p2-insta485-serverside
Deploy a Flask App to AWS EC2
This tutorial will walk you through deploying a Python/Flask web app to Amazon Web Services (AWS) Infrastructure as a Service (IaaS). Specifically, we’ll:
- Create an EC2 instance, which is a rented Linux virtual machine running in an Amazon data center
- Install and configure a server-side dynamic pages server (Gunicorn)
- Install and configure a static pages server (Nginx)
In EECS 485, each team will deploy with one team member’s account. In other words, it’s not necessary for each team member to create an AWS account.
You’ll create and configure one instance, and then reuse the same instance for each project. That means you’ll follow the create, launch and configure instructions once at the beginning of project 2, and the deploy instructions at the end of projects 2 and 3..
Limitations
If you’re here looking for advice about how to deploy a real, scalable web app, then STOP! This tutorial describes how to launch a single IaaS virtual machine and run a production server.
For a scalable production deployment using many machines, you’re probably better off with AWS’s PaaS products instead, tutorials linked below. If you arrived here from an EECS 485 project spec, skip these PaaS tutorials.
- Scaling the Database with PaaS
- Scaling the Static File Server and Uploads with PaaS
- Scaling Server-Side Dynamic Pages with PaaS (Part 1)
- Scaling Server-Side Dynamic Pages with PaaS (Part 2)
Create AWS account
Create an AWS account at https://aws.amazon.com. You should be free tier eligible, which means that you will be able to run an instance for free for the duration of the course.
You will need a credit card on the account, even if you only use free tier resources. This is how Amazon charges, in case you request more resources than provided in the free tier. Do not launch any additional instances other than the one we specify in order to avoid additional charges.
Optionally, you may redeem extra benefits as a student, including $100 in AWS credits. https://aws.amazon.com/education/awseducate/.
Start EC2 instance
EC2 is AWS’s infrastructure as a service product. An EC2 instance is a rented virtual machine running in an AWS data center.
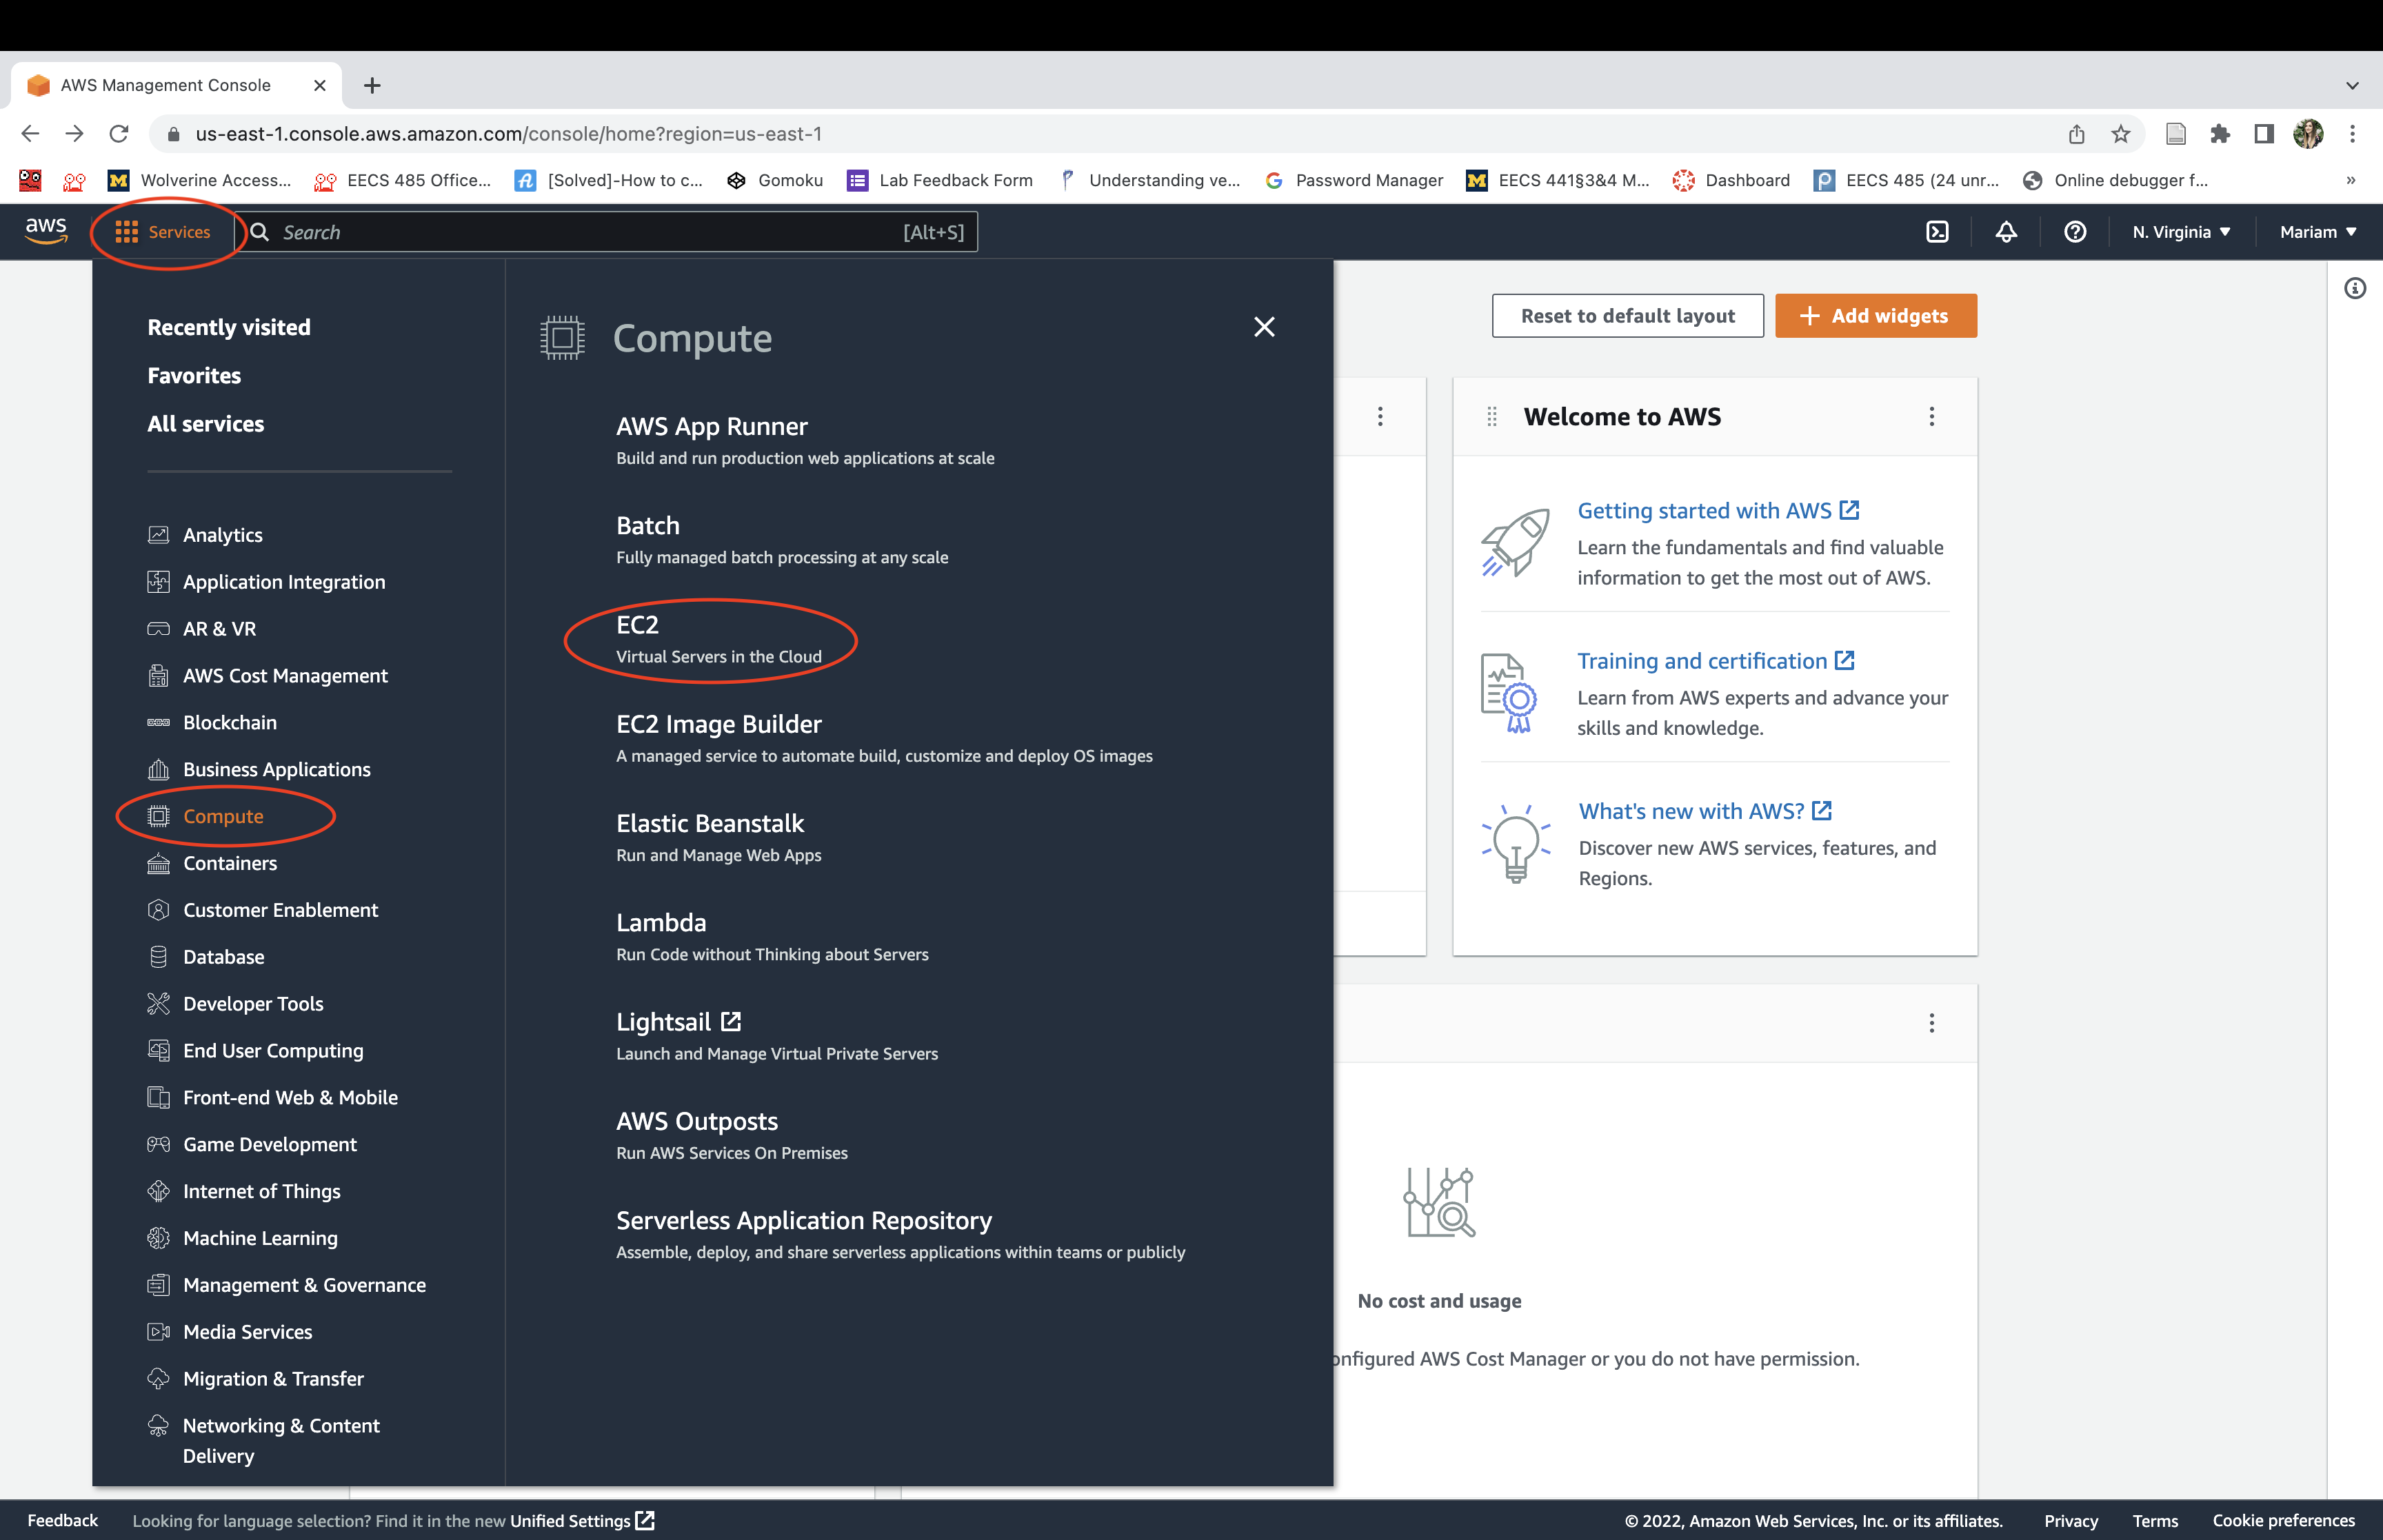
Navigate to the AWS Management Console. Select the “Services” menu, then “Compute”, then “EC2”. An EC2 “instance” is a virtual machine running on Amazon AWS hardware.
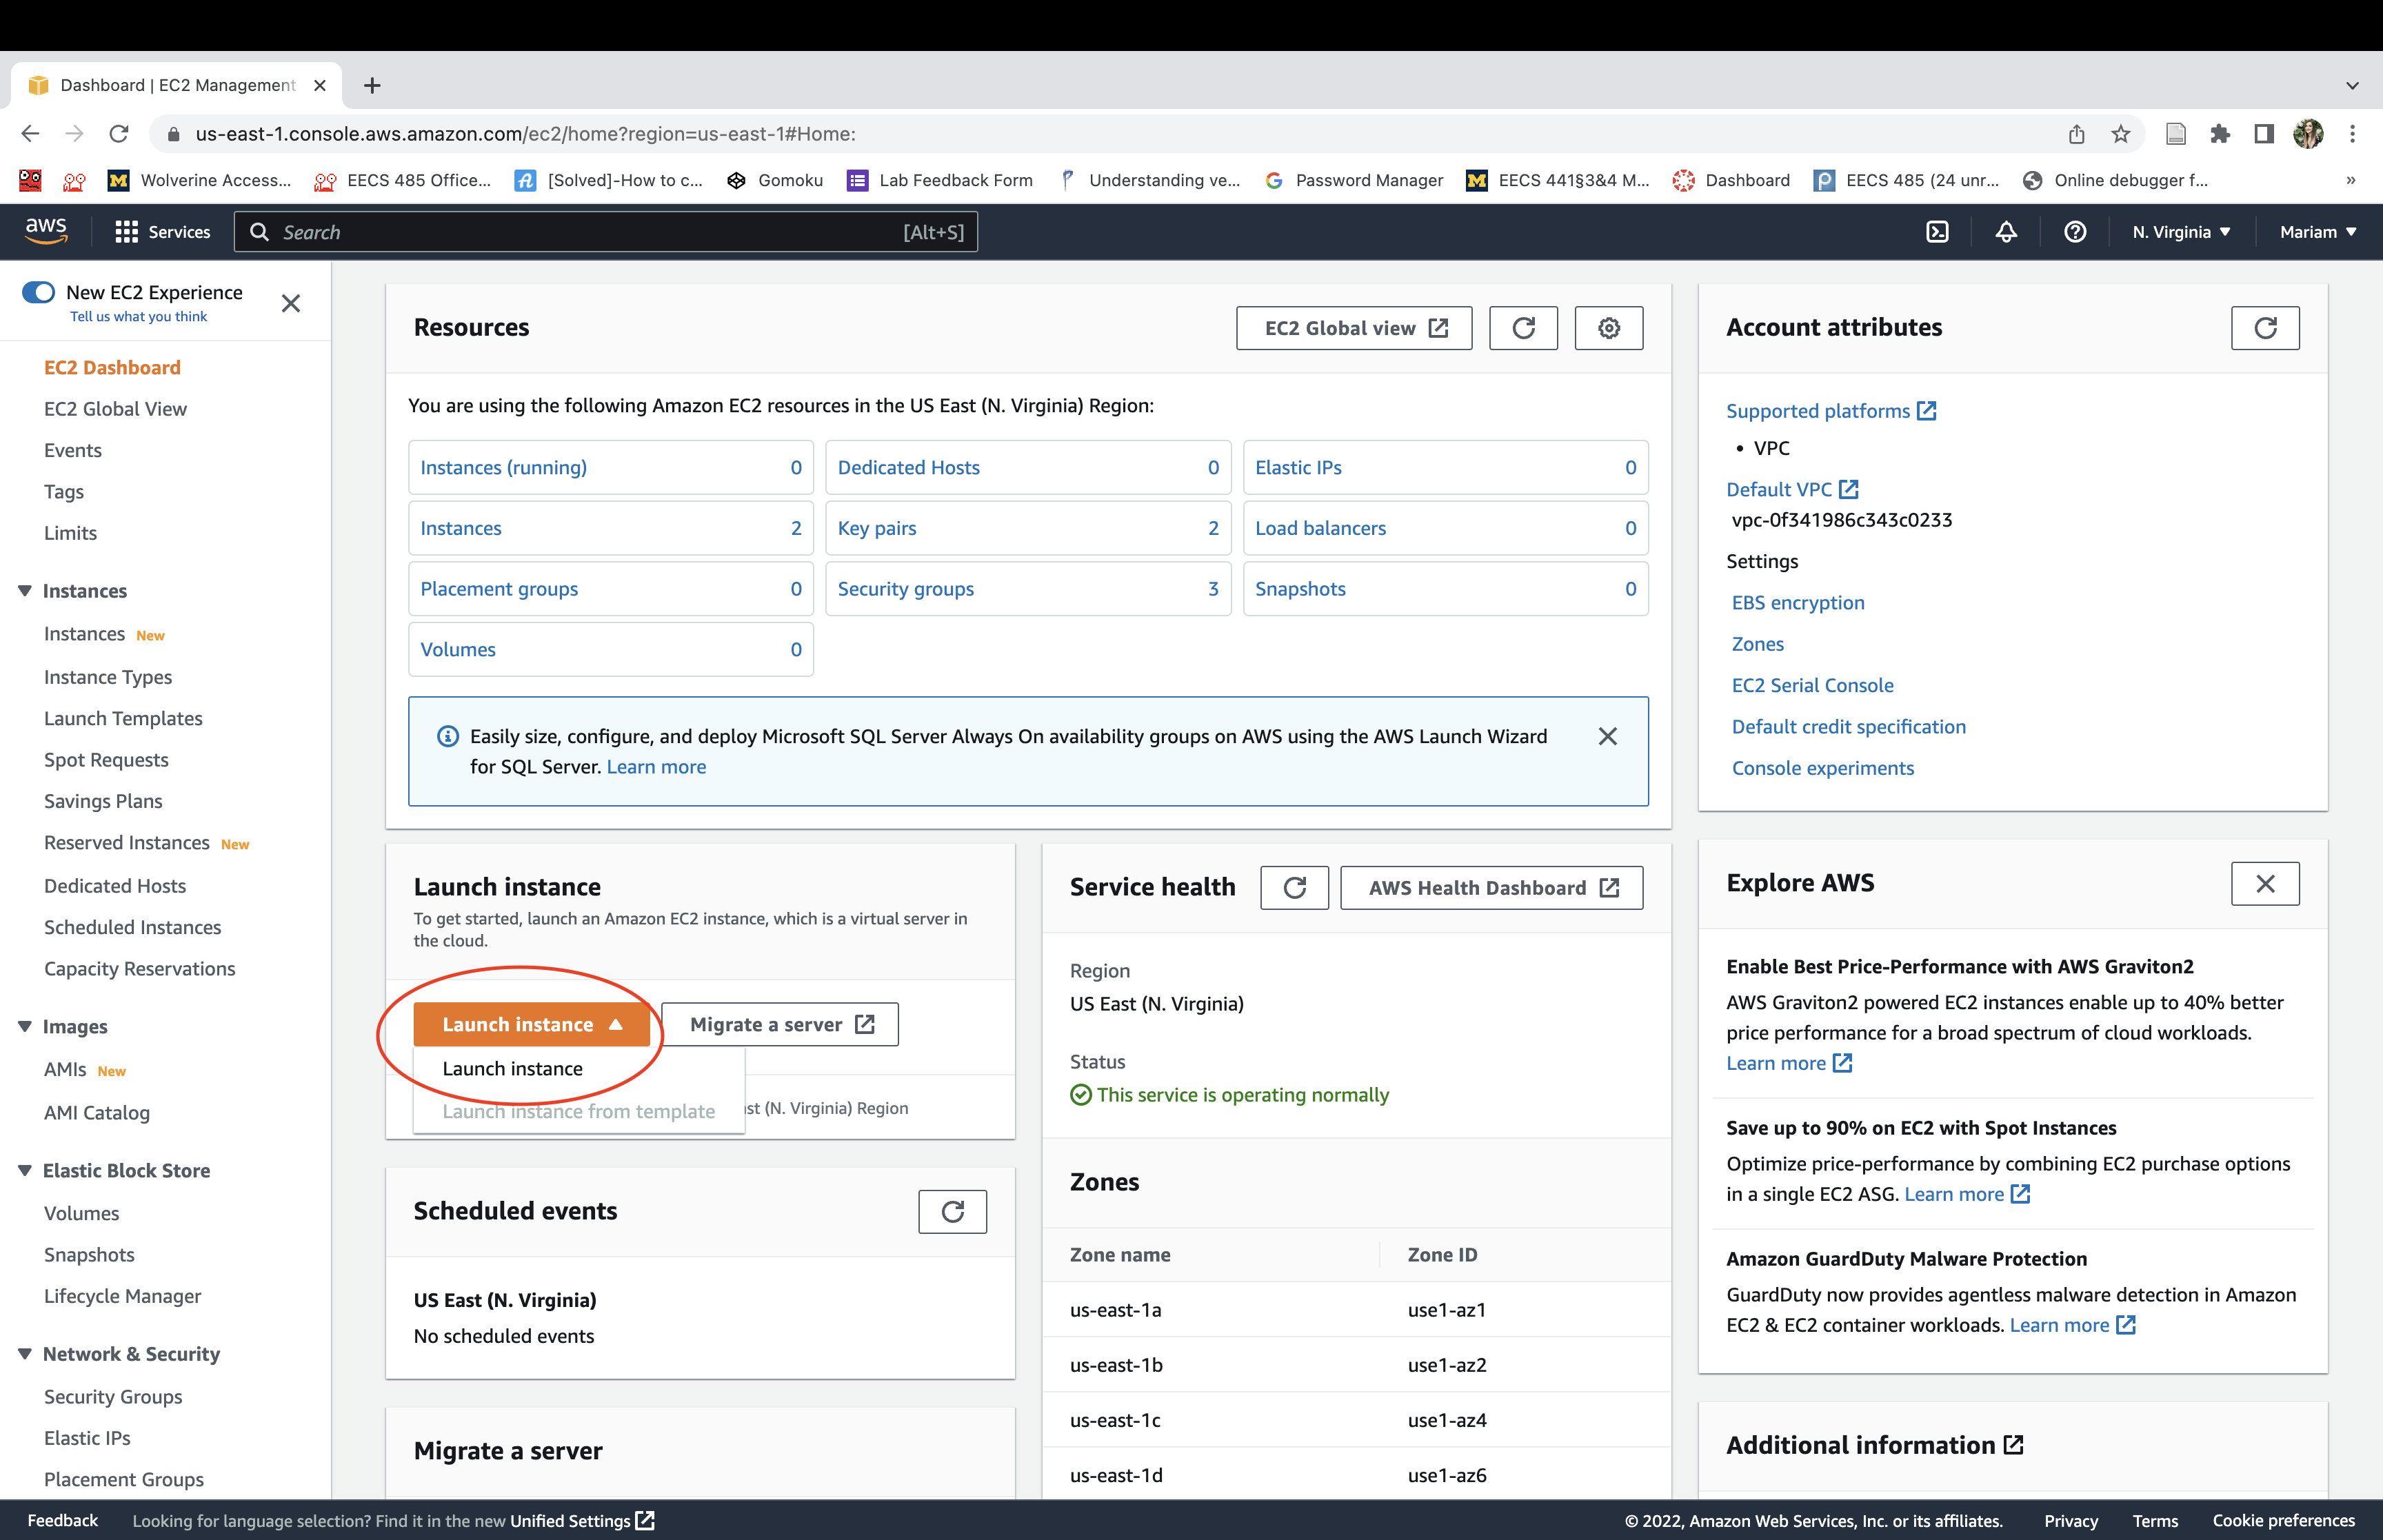
Click “Launch instance”.
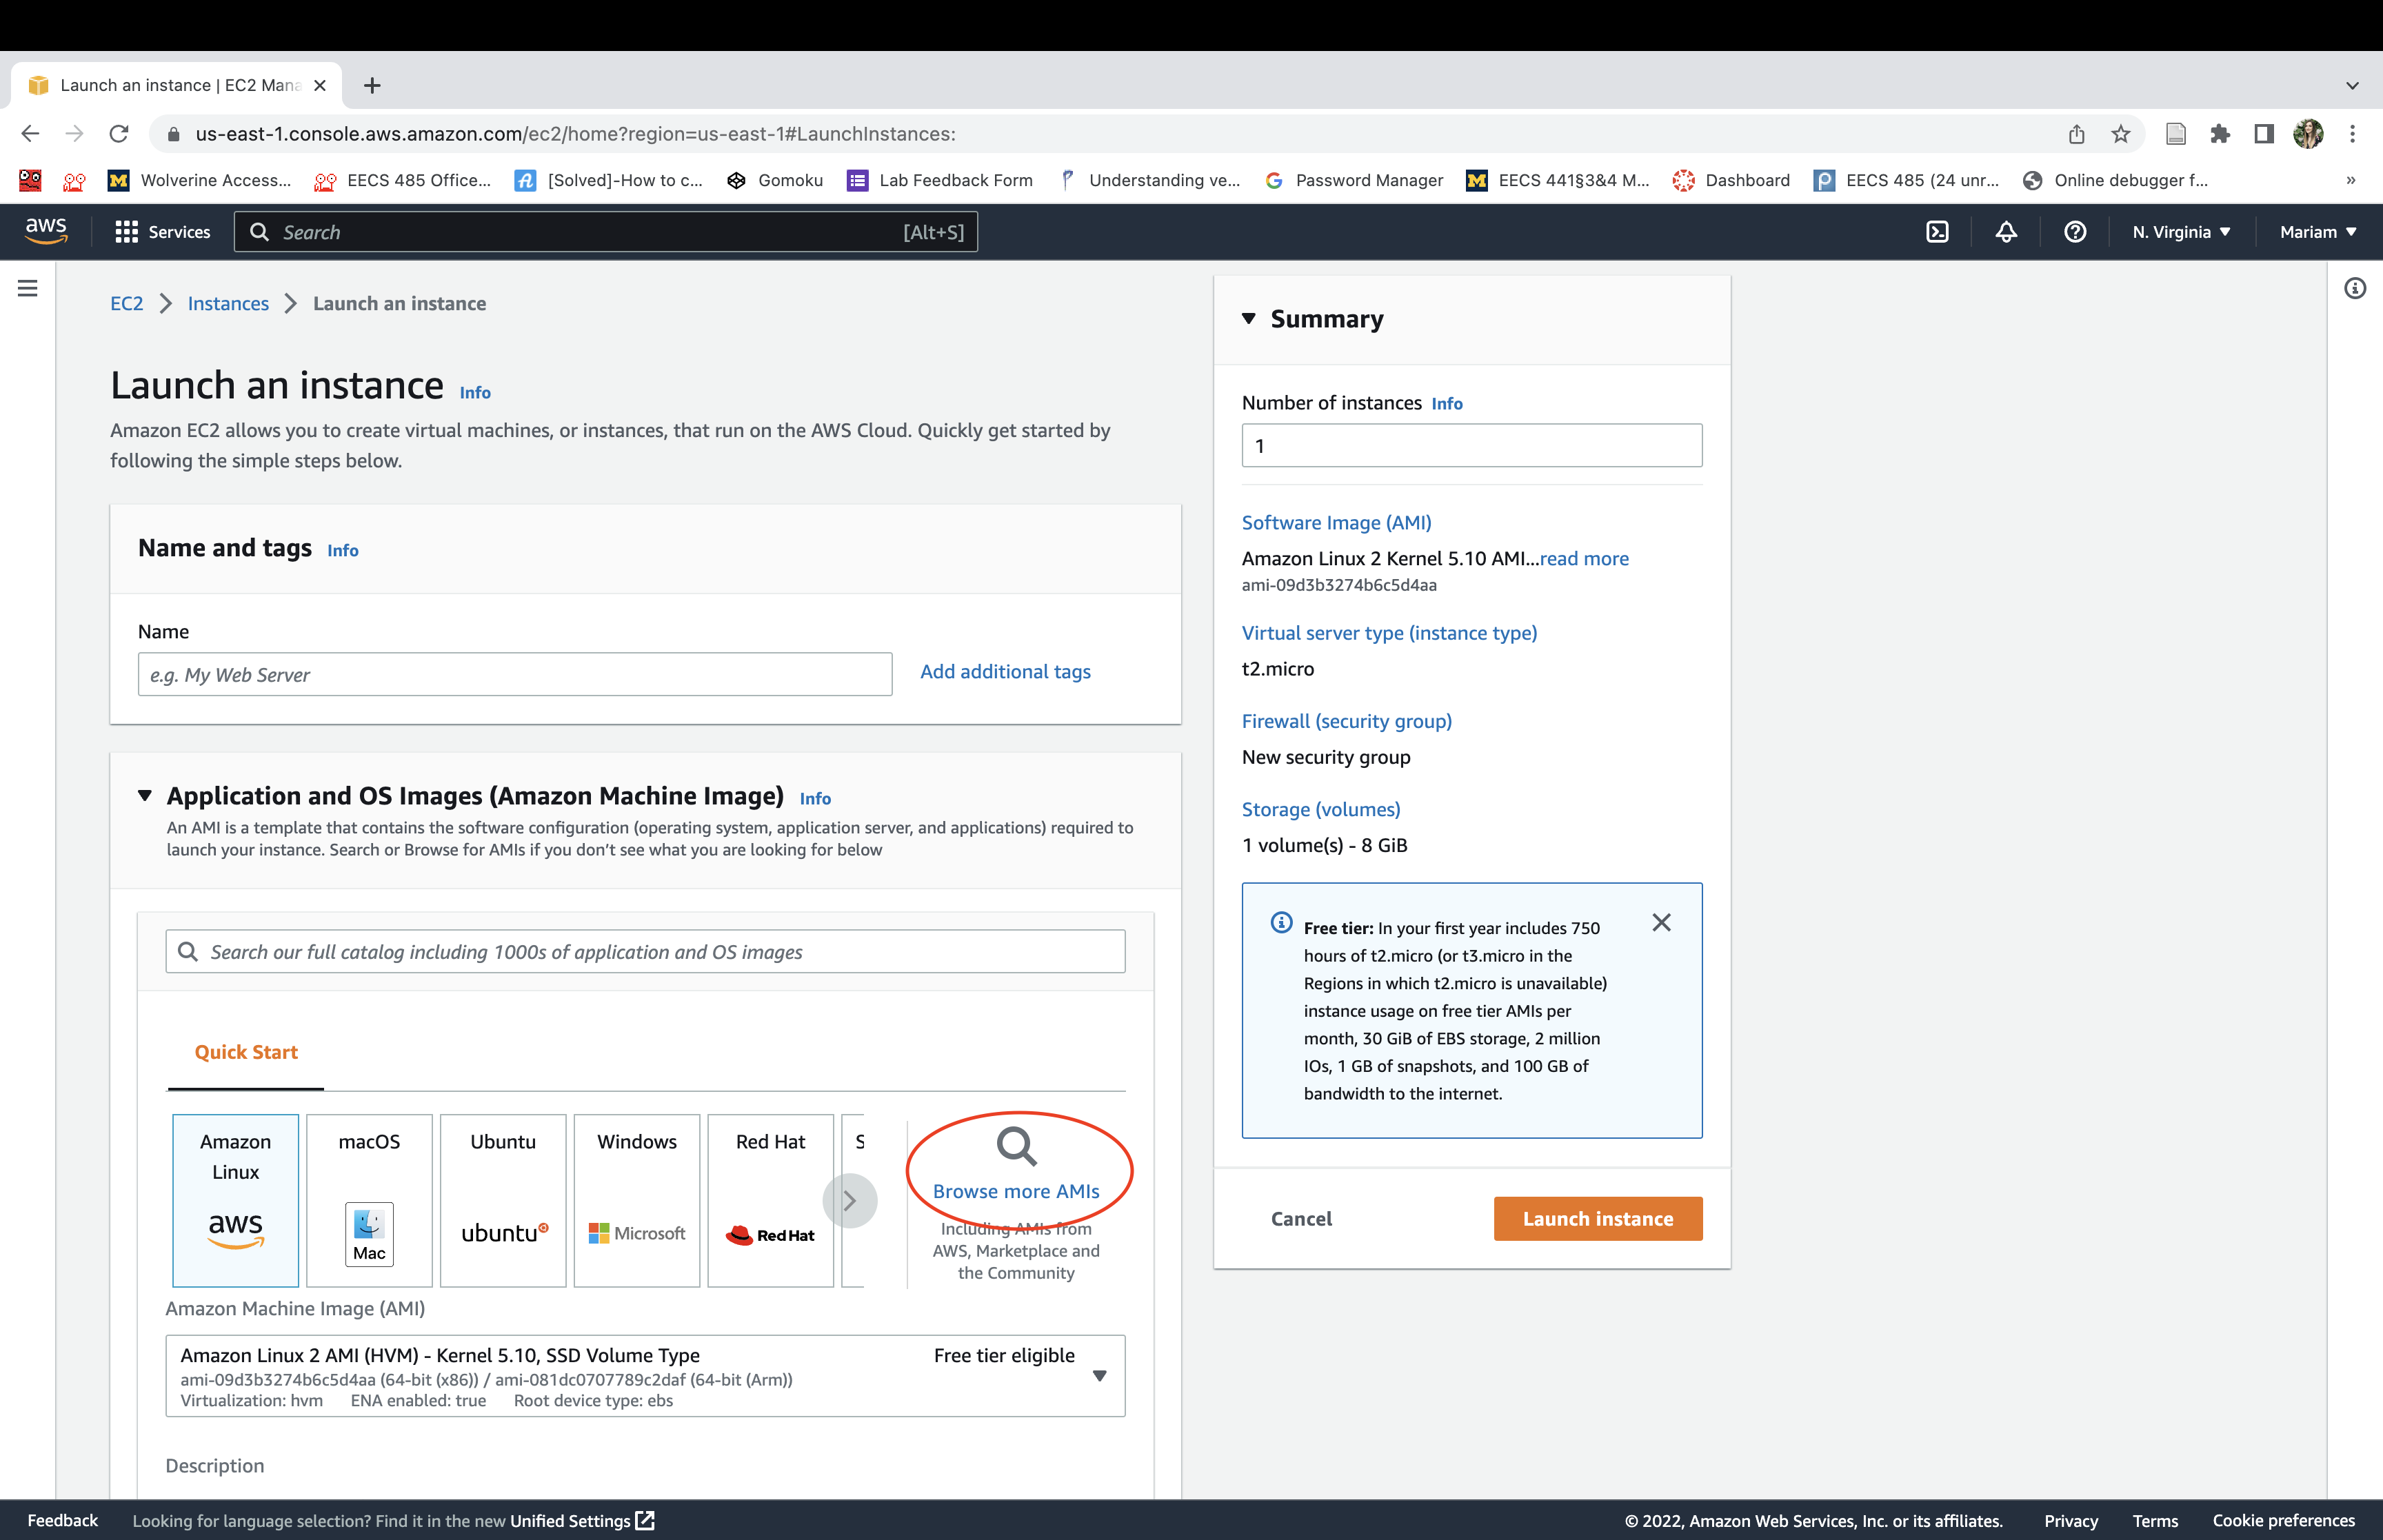
Click “Browse more AMIs”.
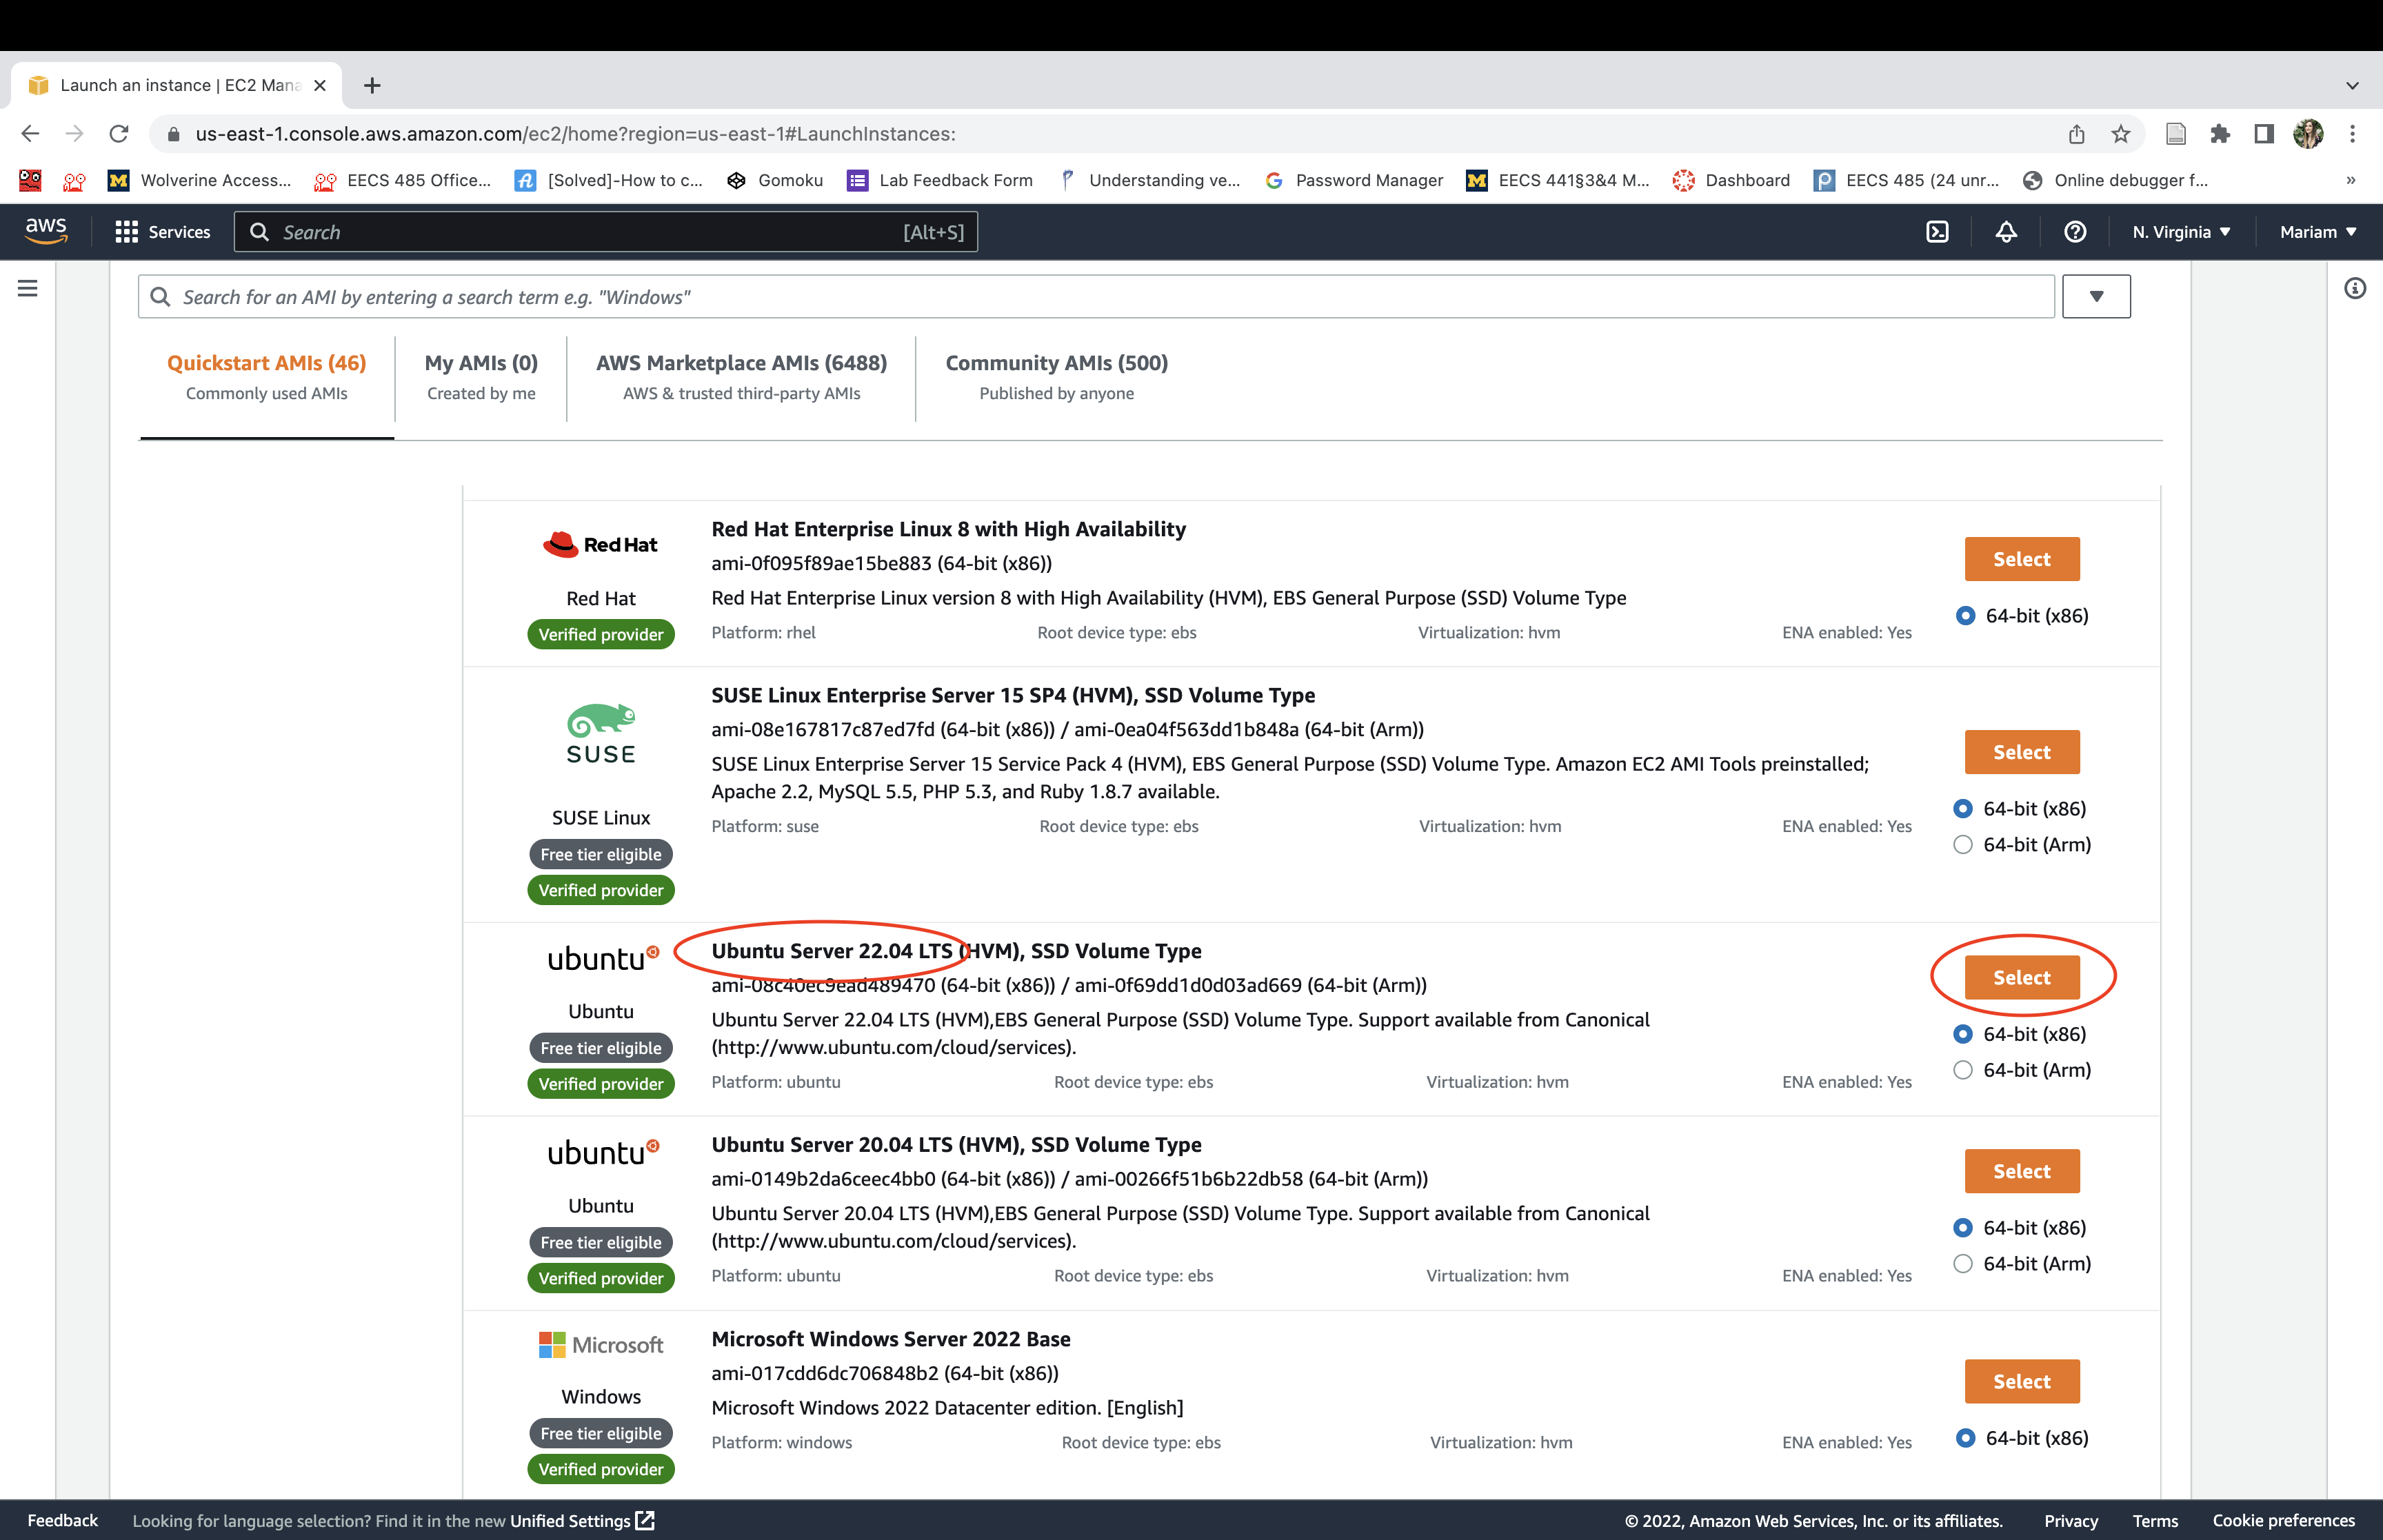
Select the same Ubuntu server version as specified in the P1 tutorial. Your version might be different from this screenshot.
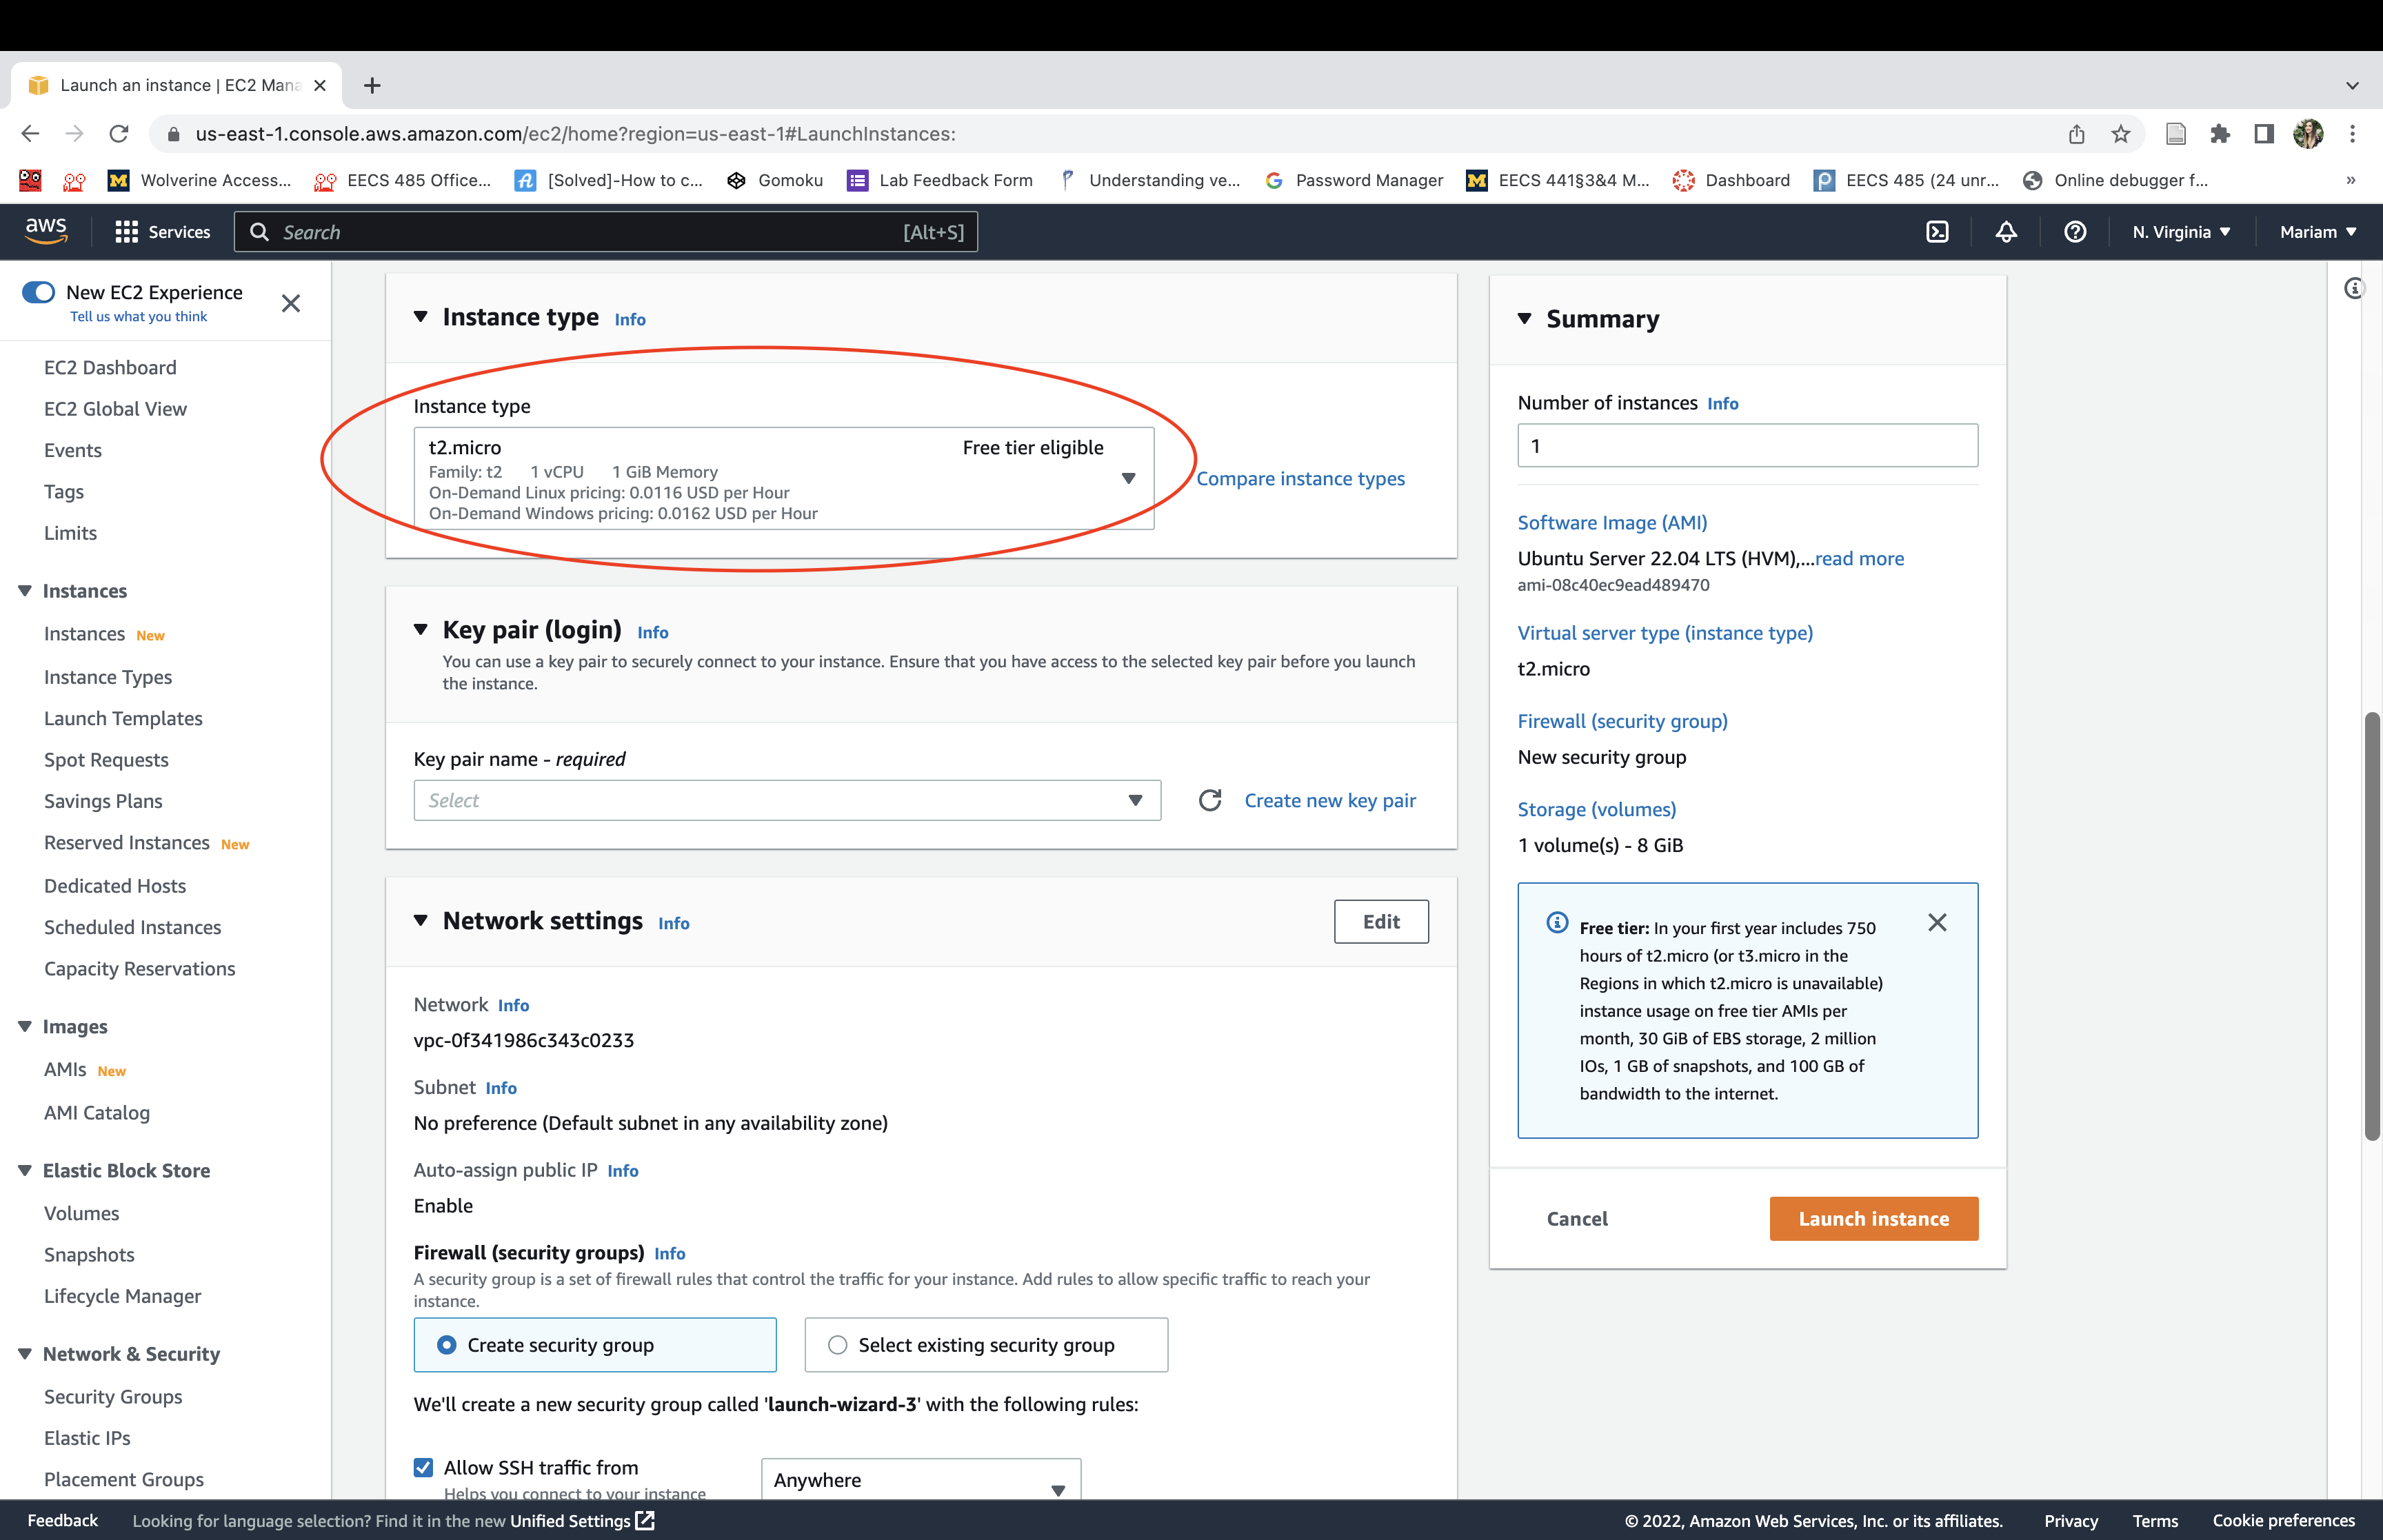
Choose the instance type labeled “Free tier eligible”—either t2.micro or t3.micro. The option available to you may vary depending on when your AWS account was created. Your version might be different from this screenshot.
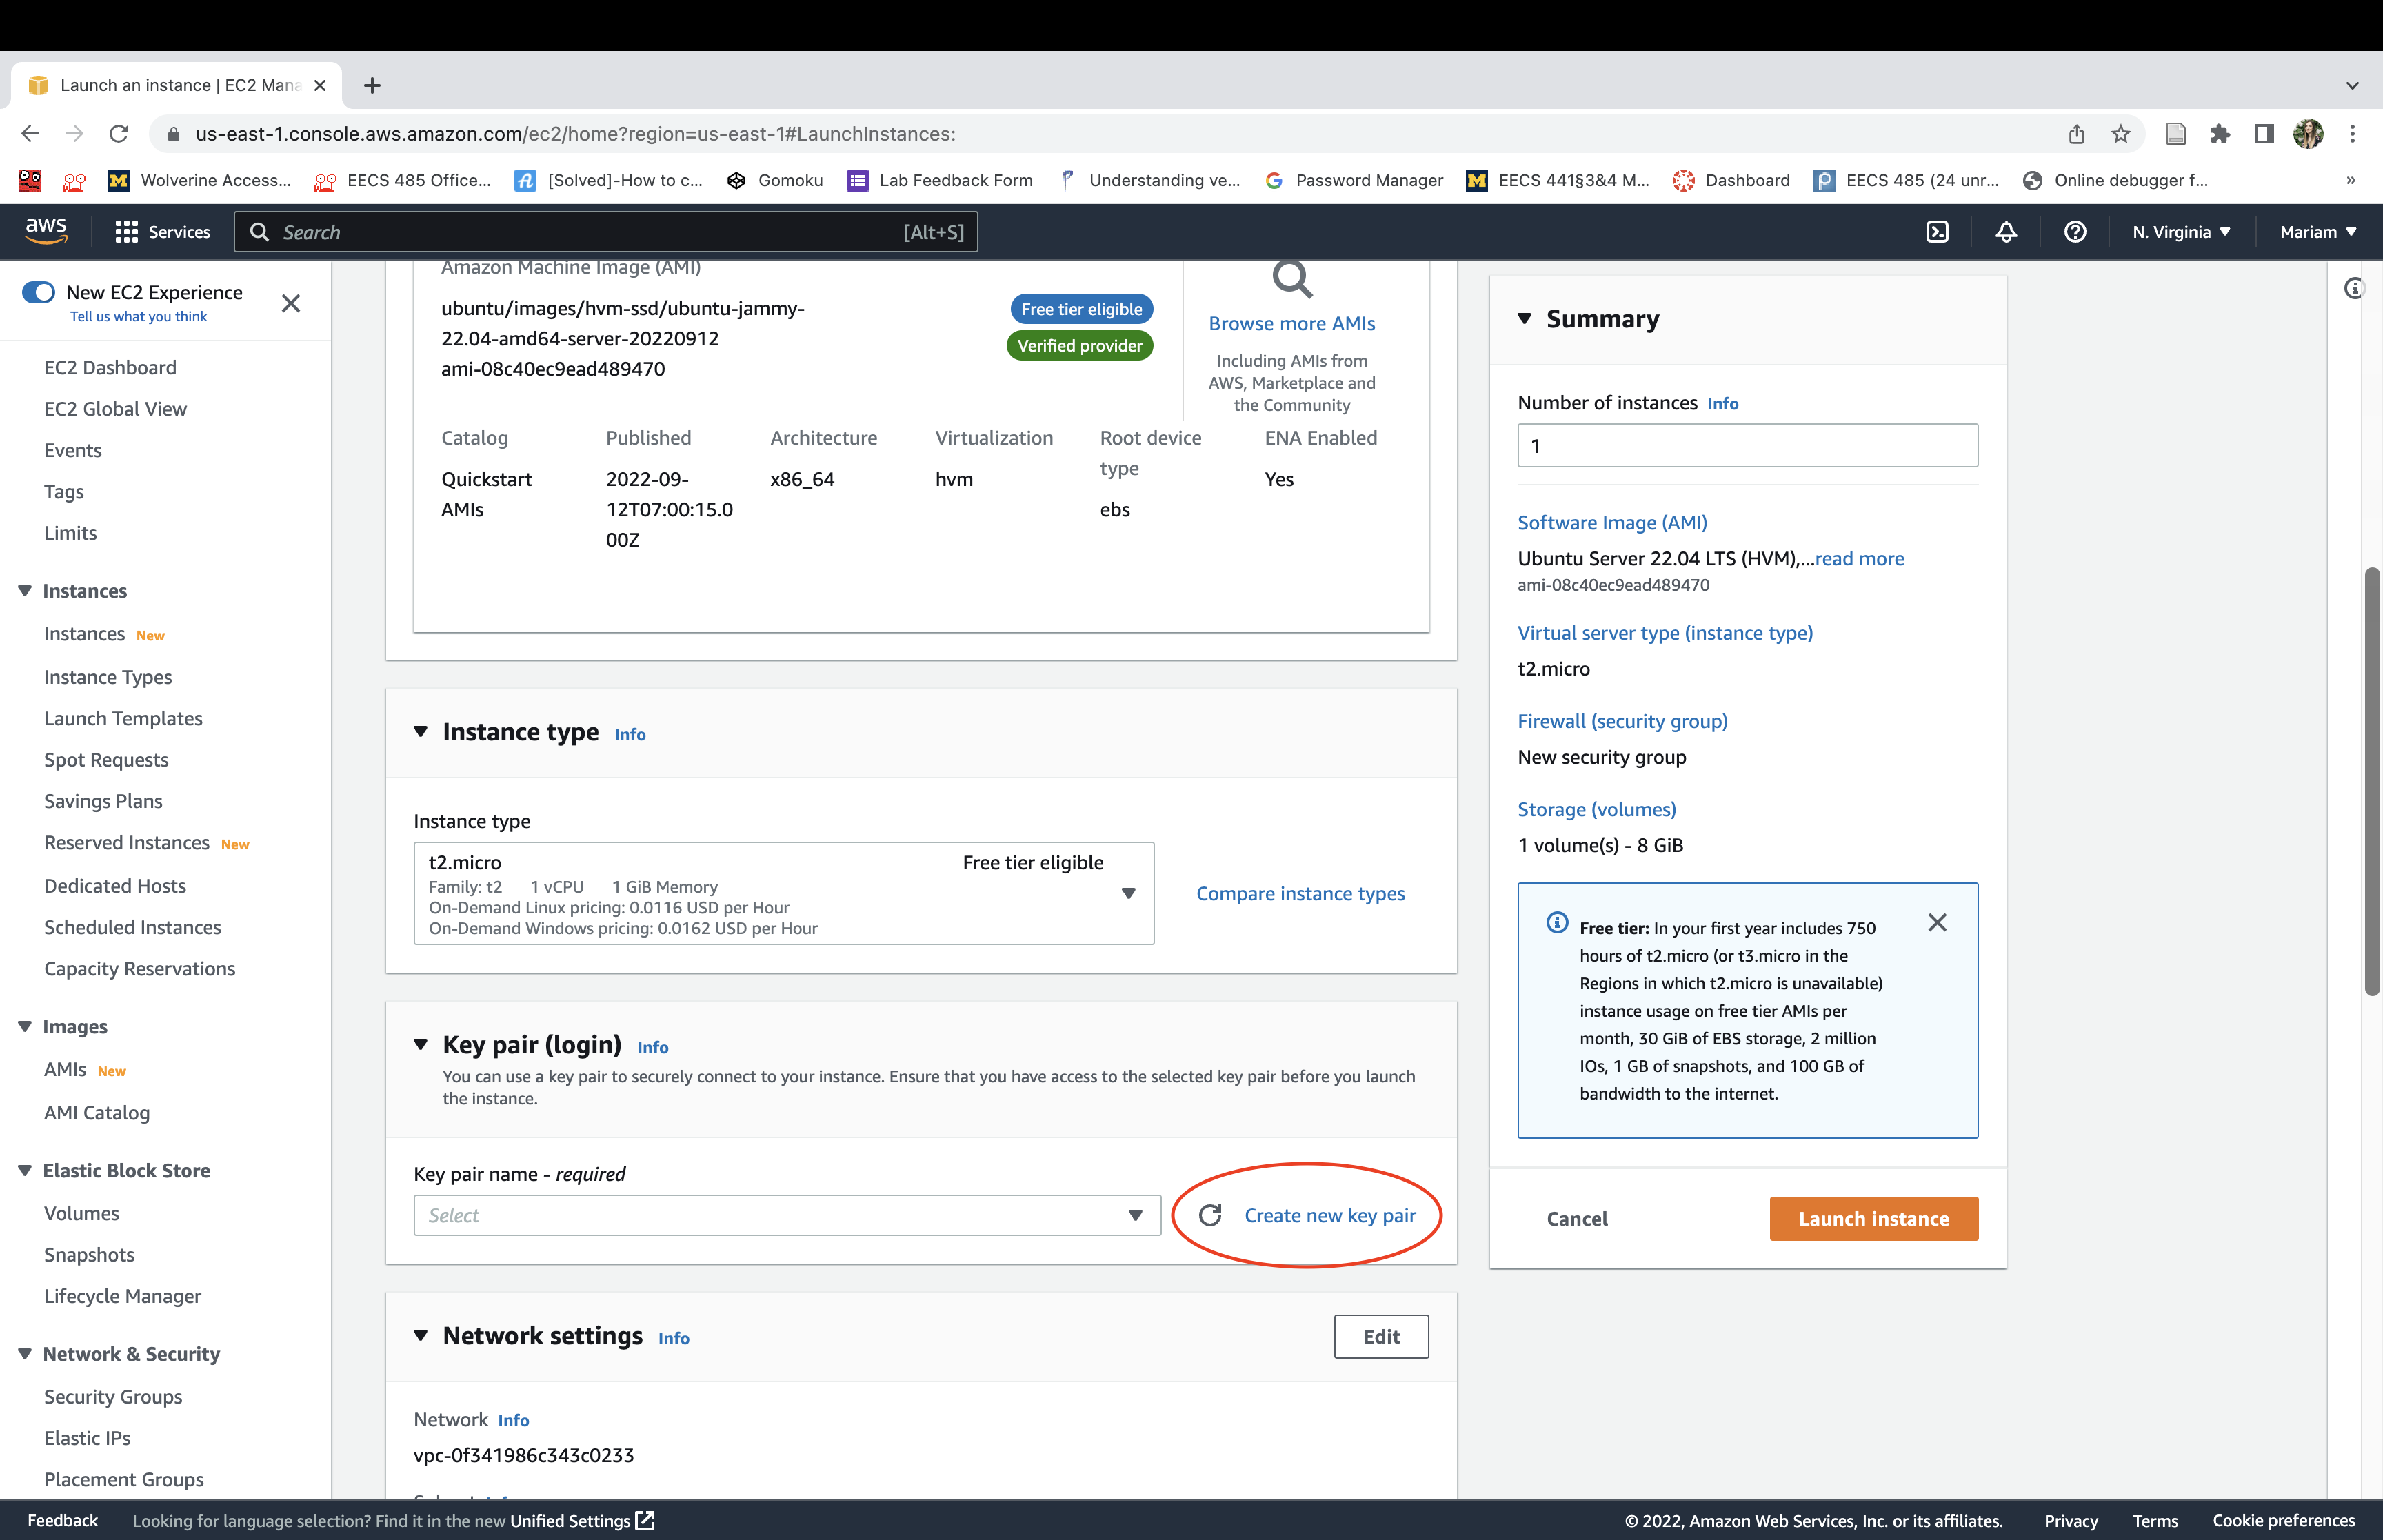
Click create a new key pair.
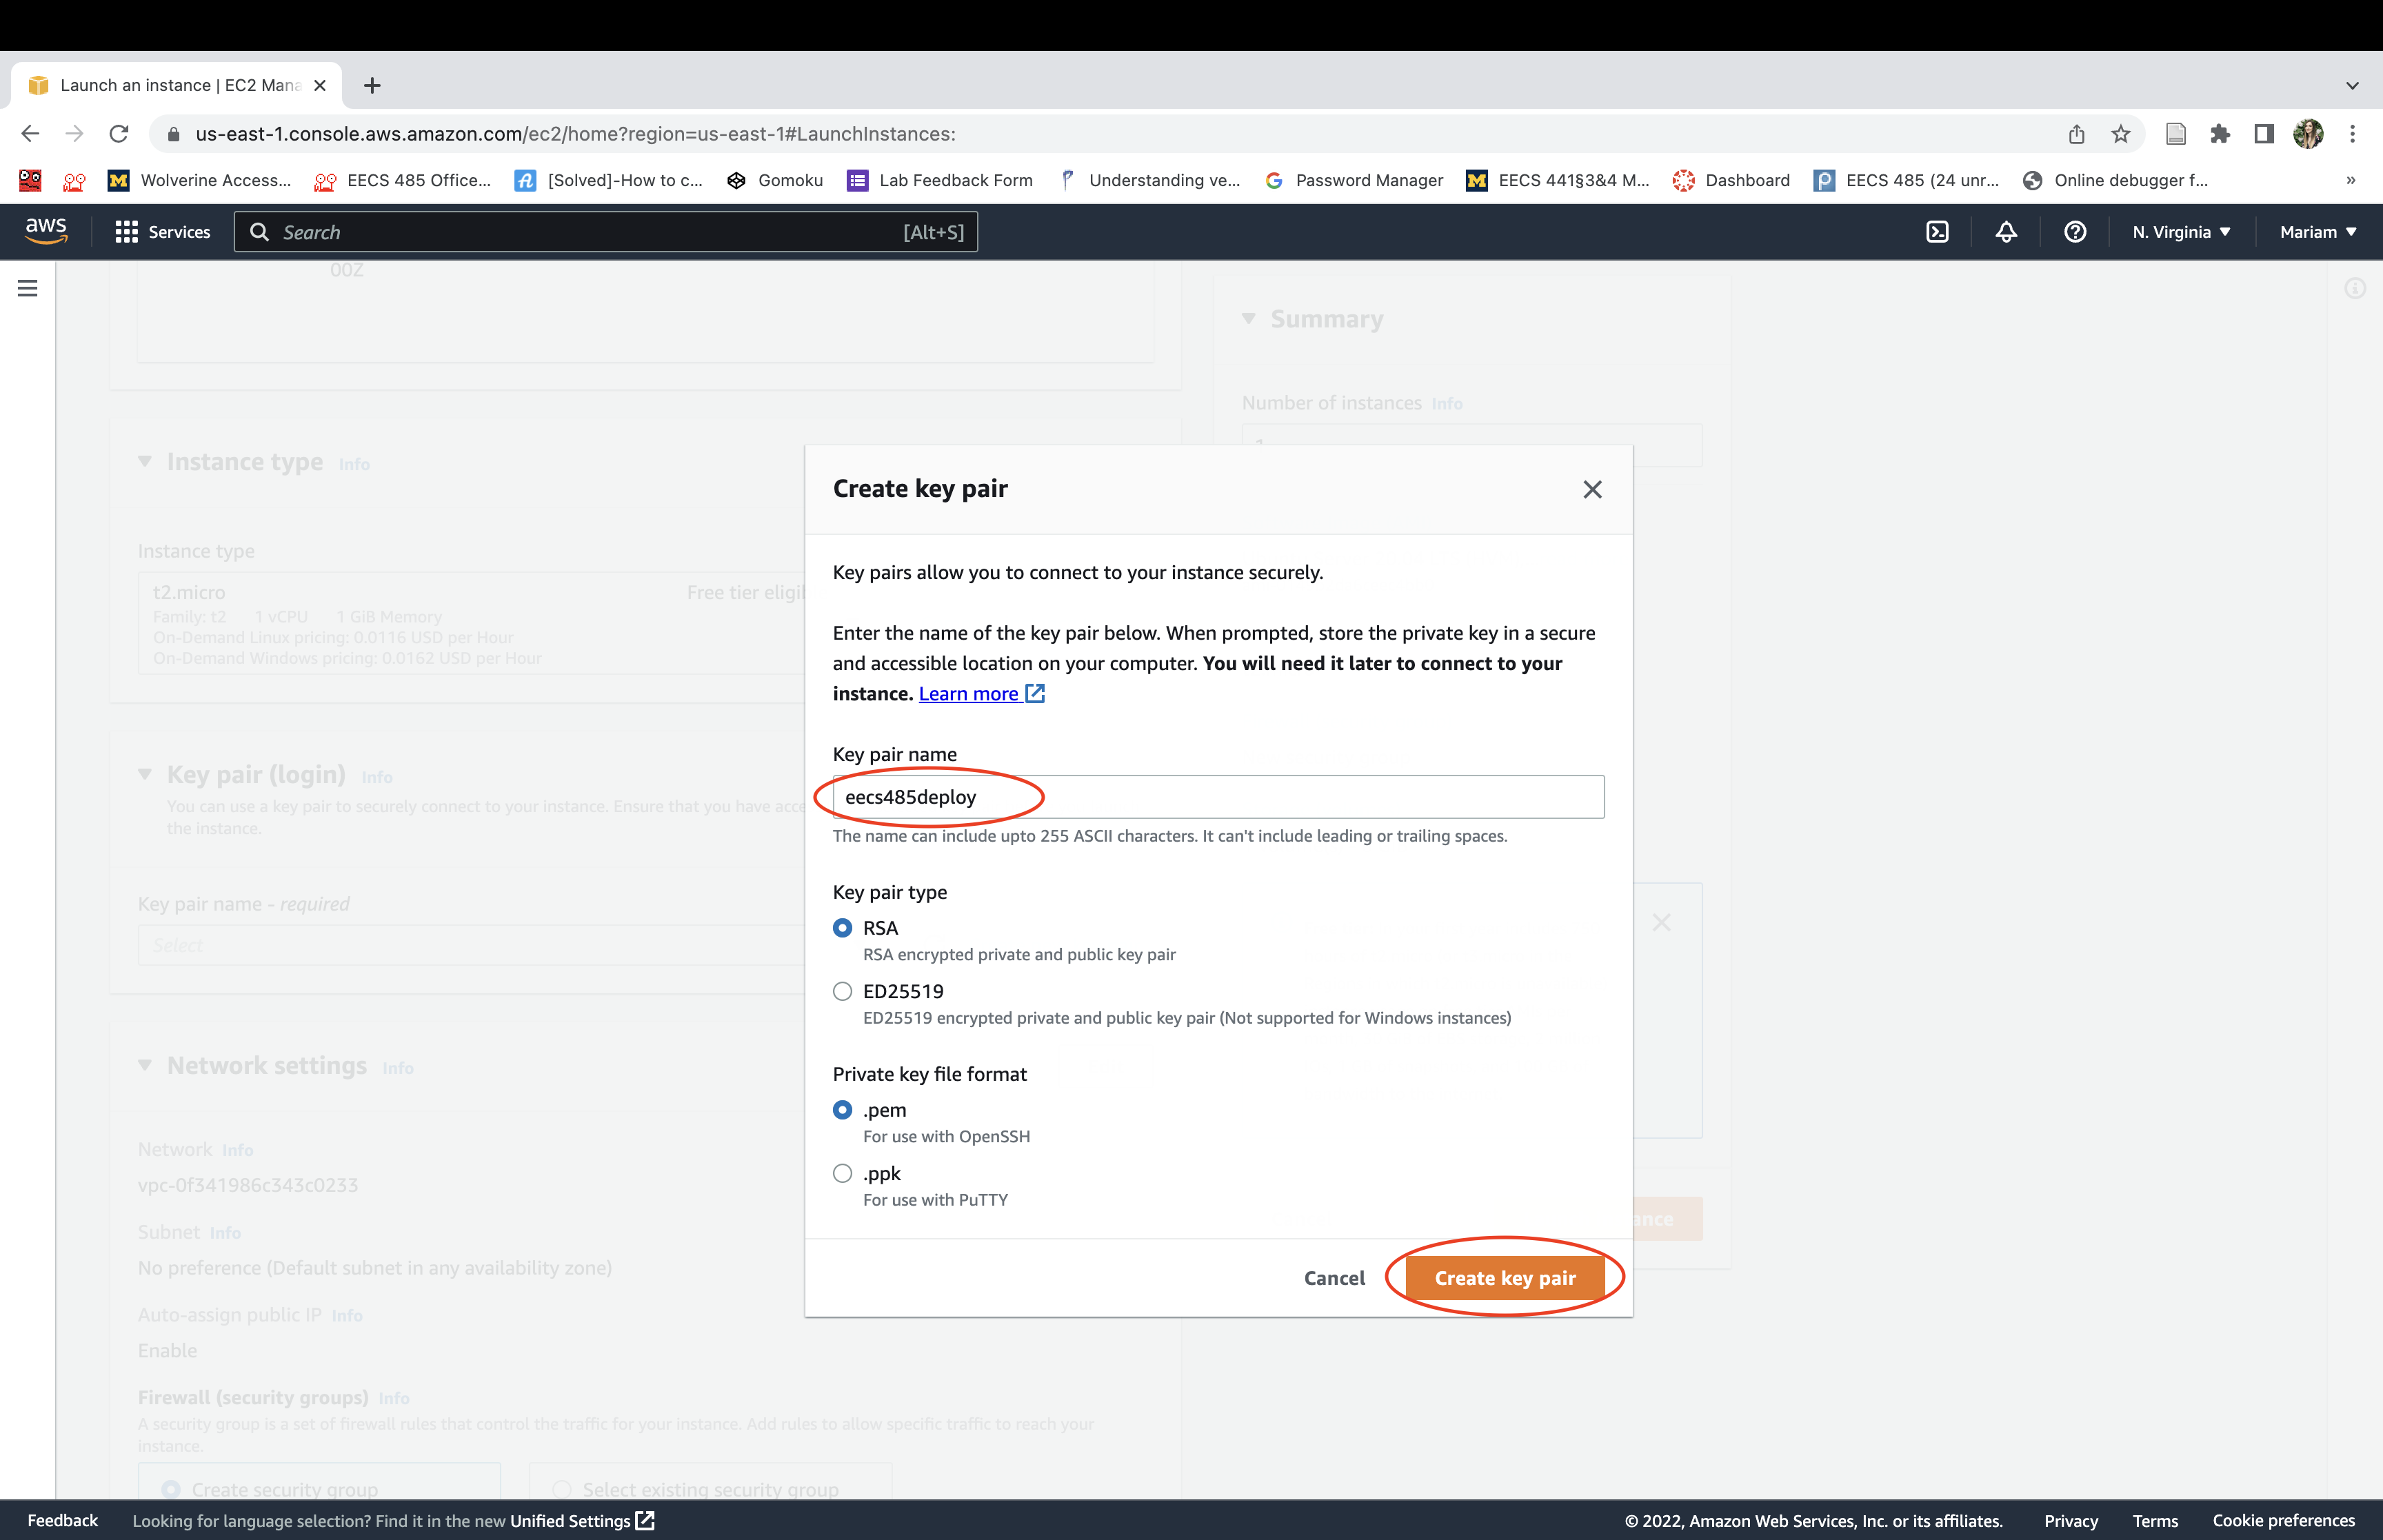
Enter a key pair name and create the key pair (it will automatically download once created). You’ll use this later to SSH into in the instance.
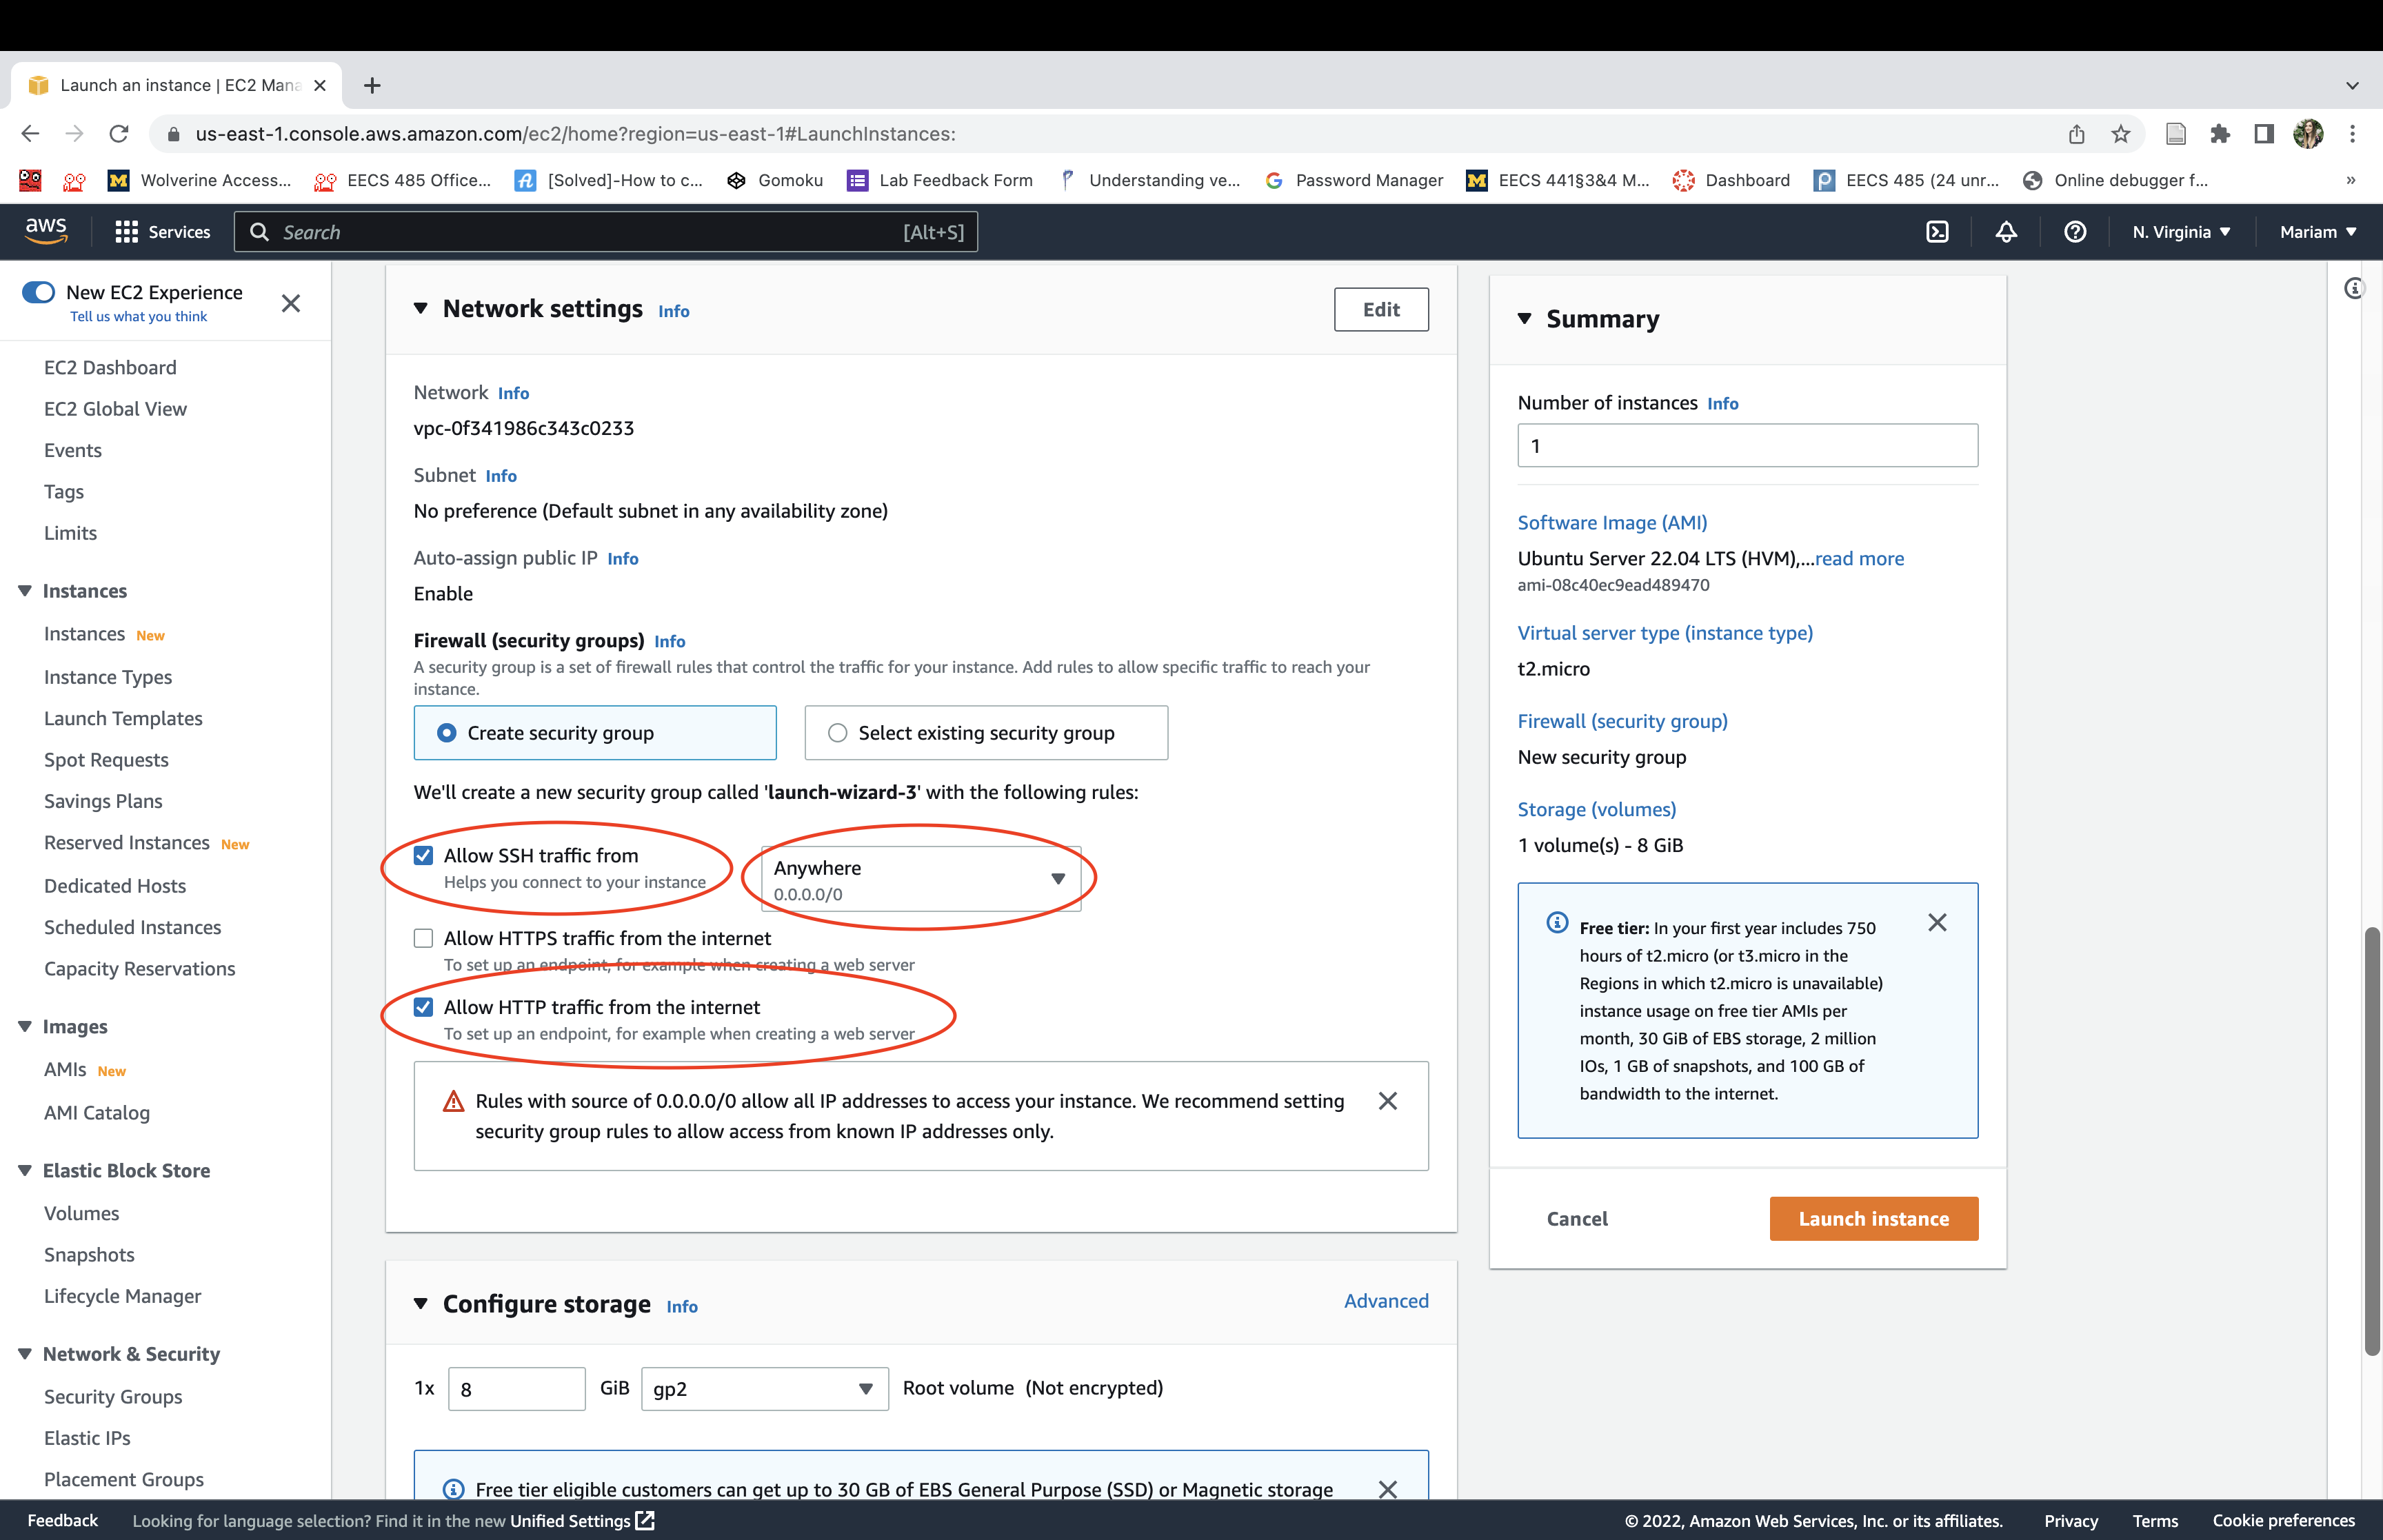
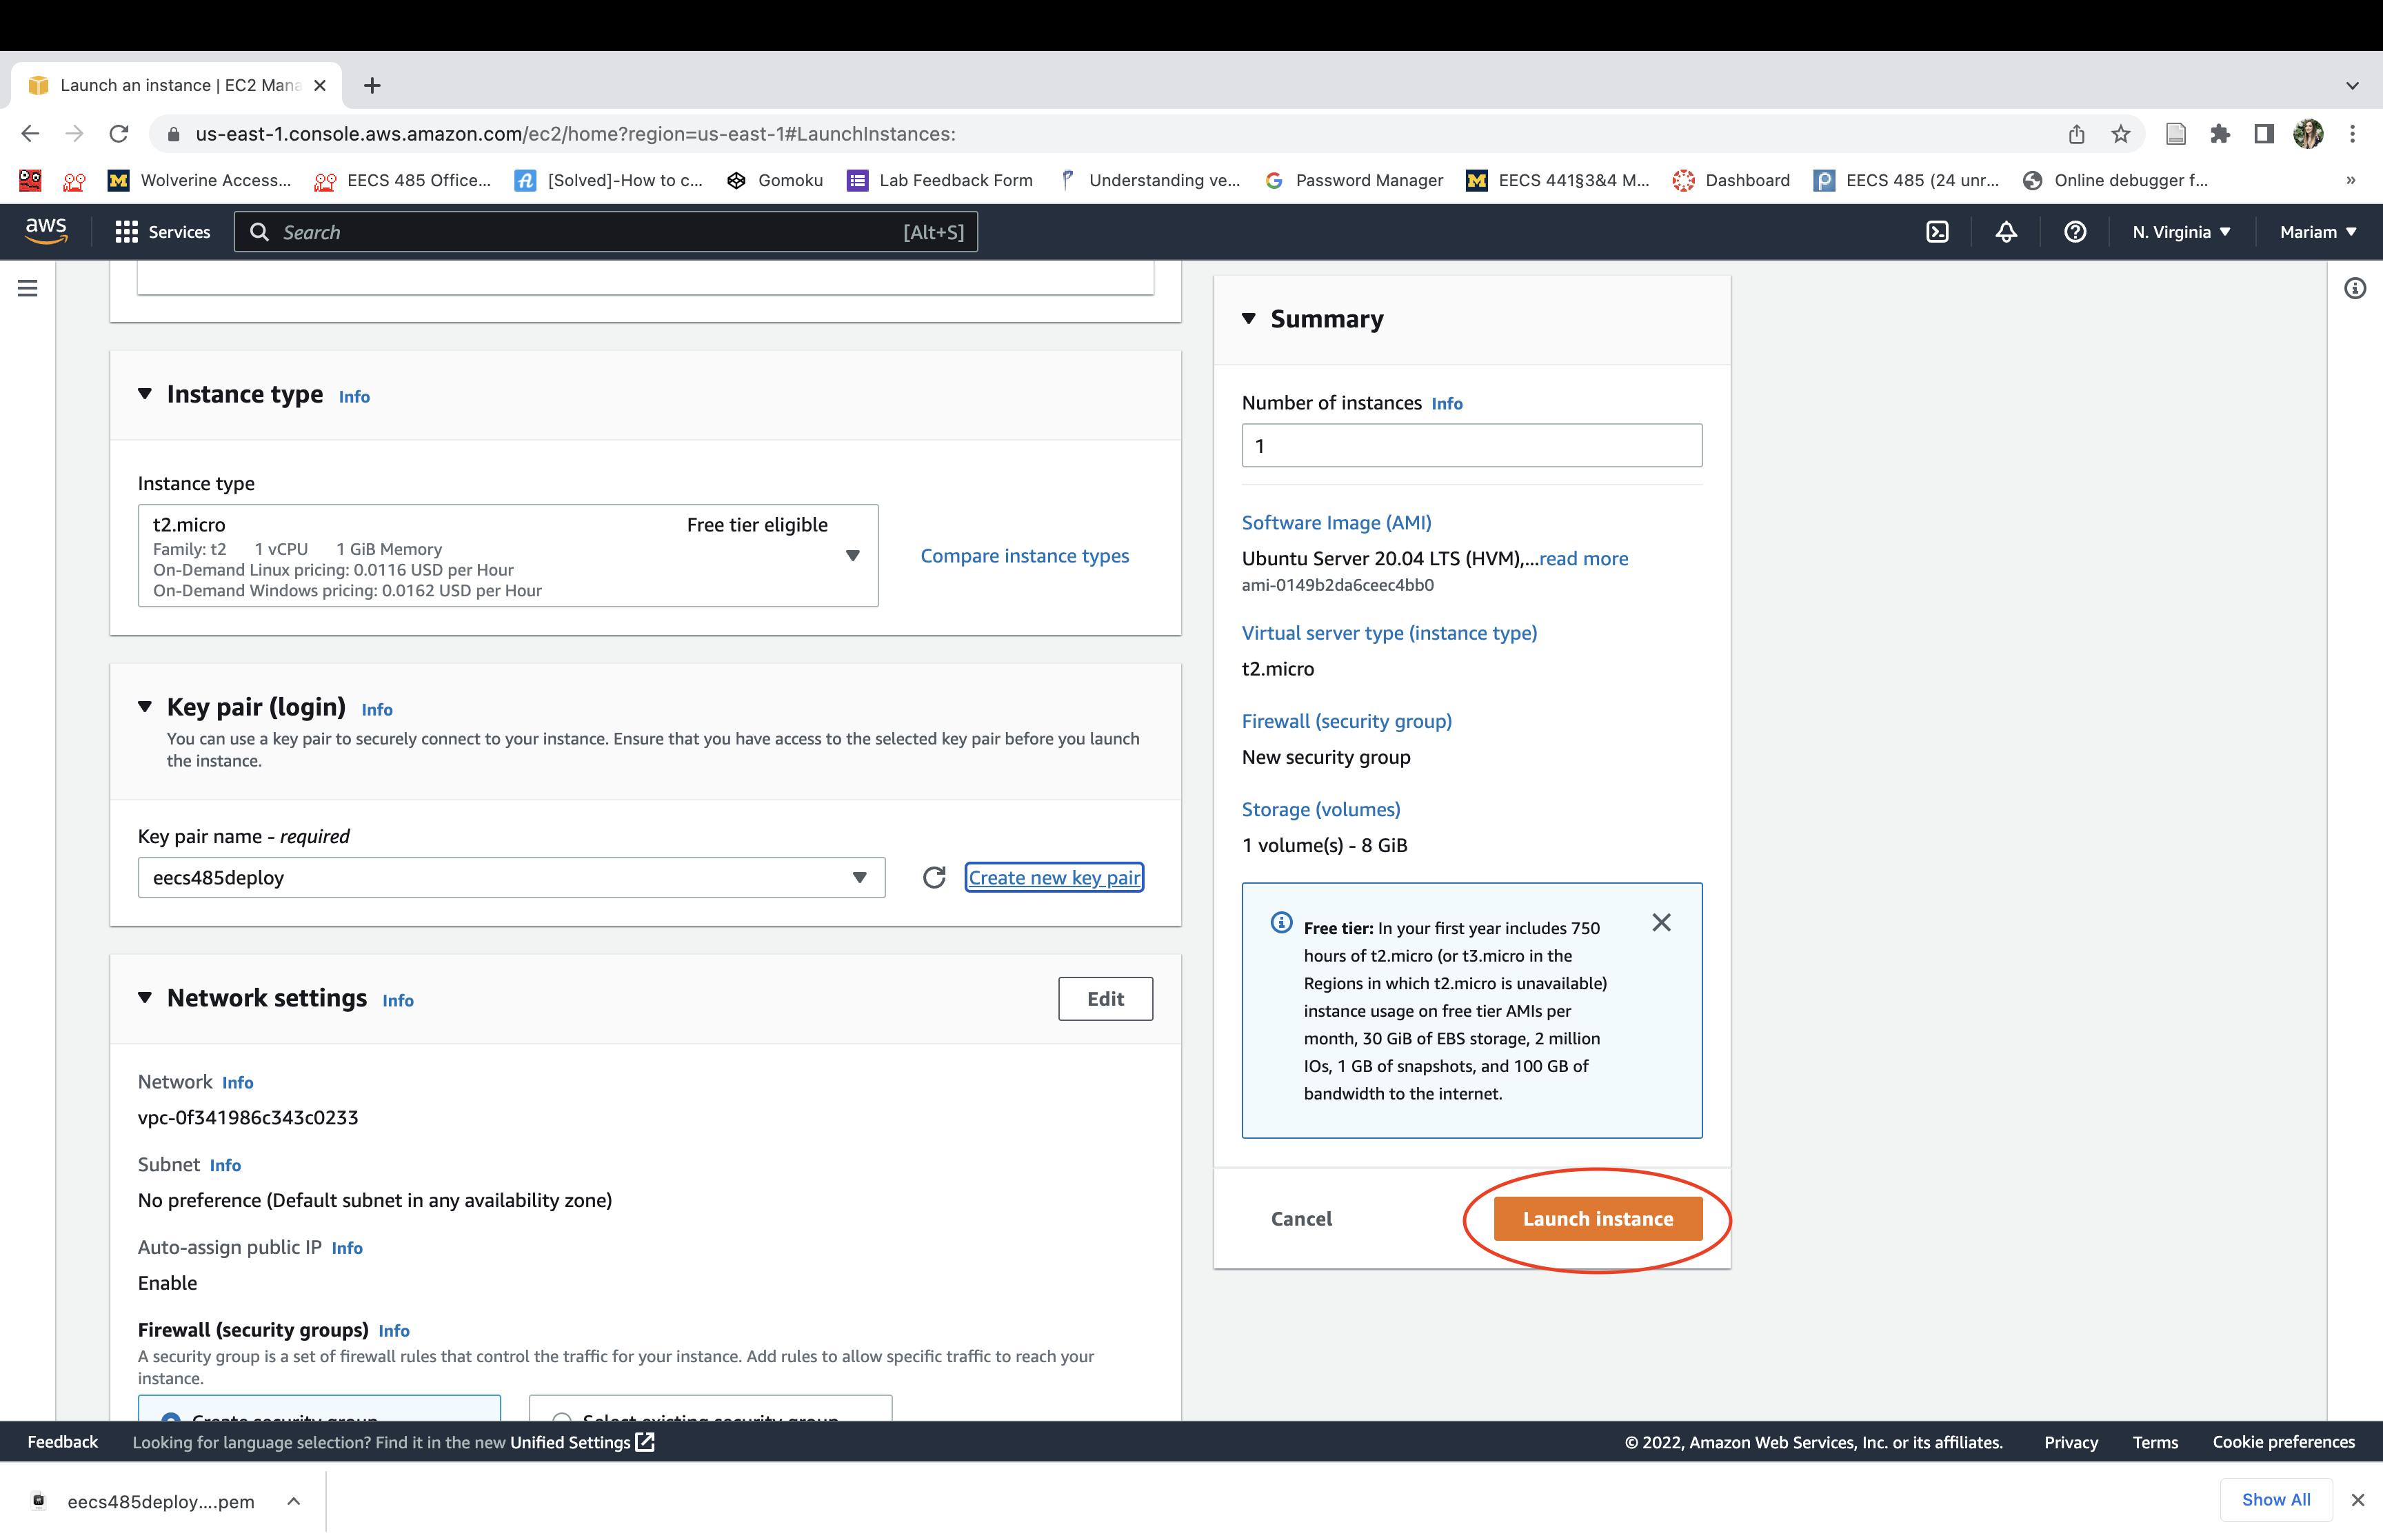
Create a new security group to allow both SSH and HTTP traffic in and out of your instance.
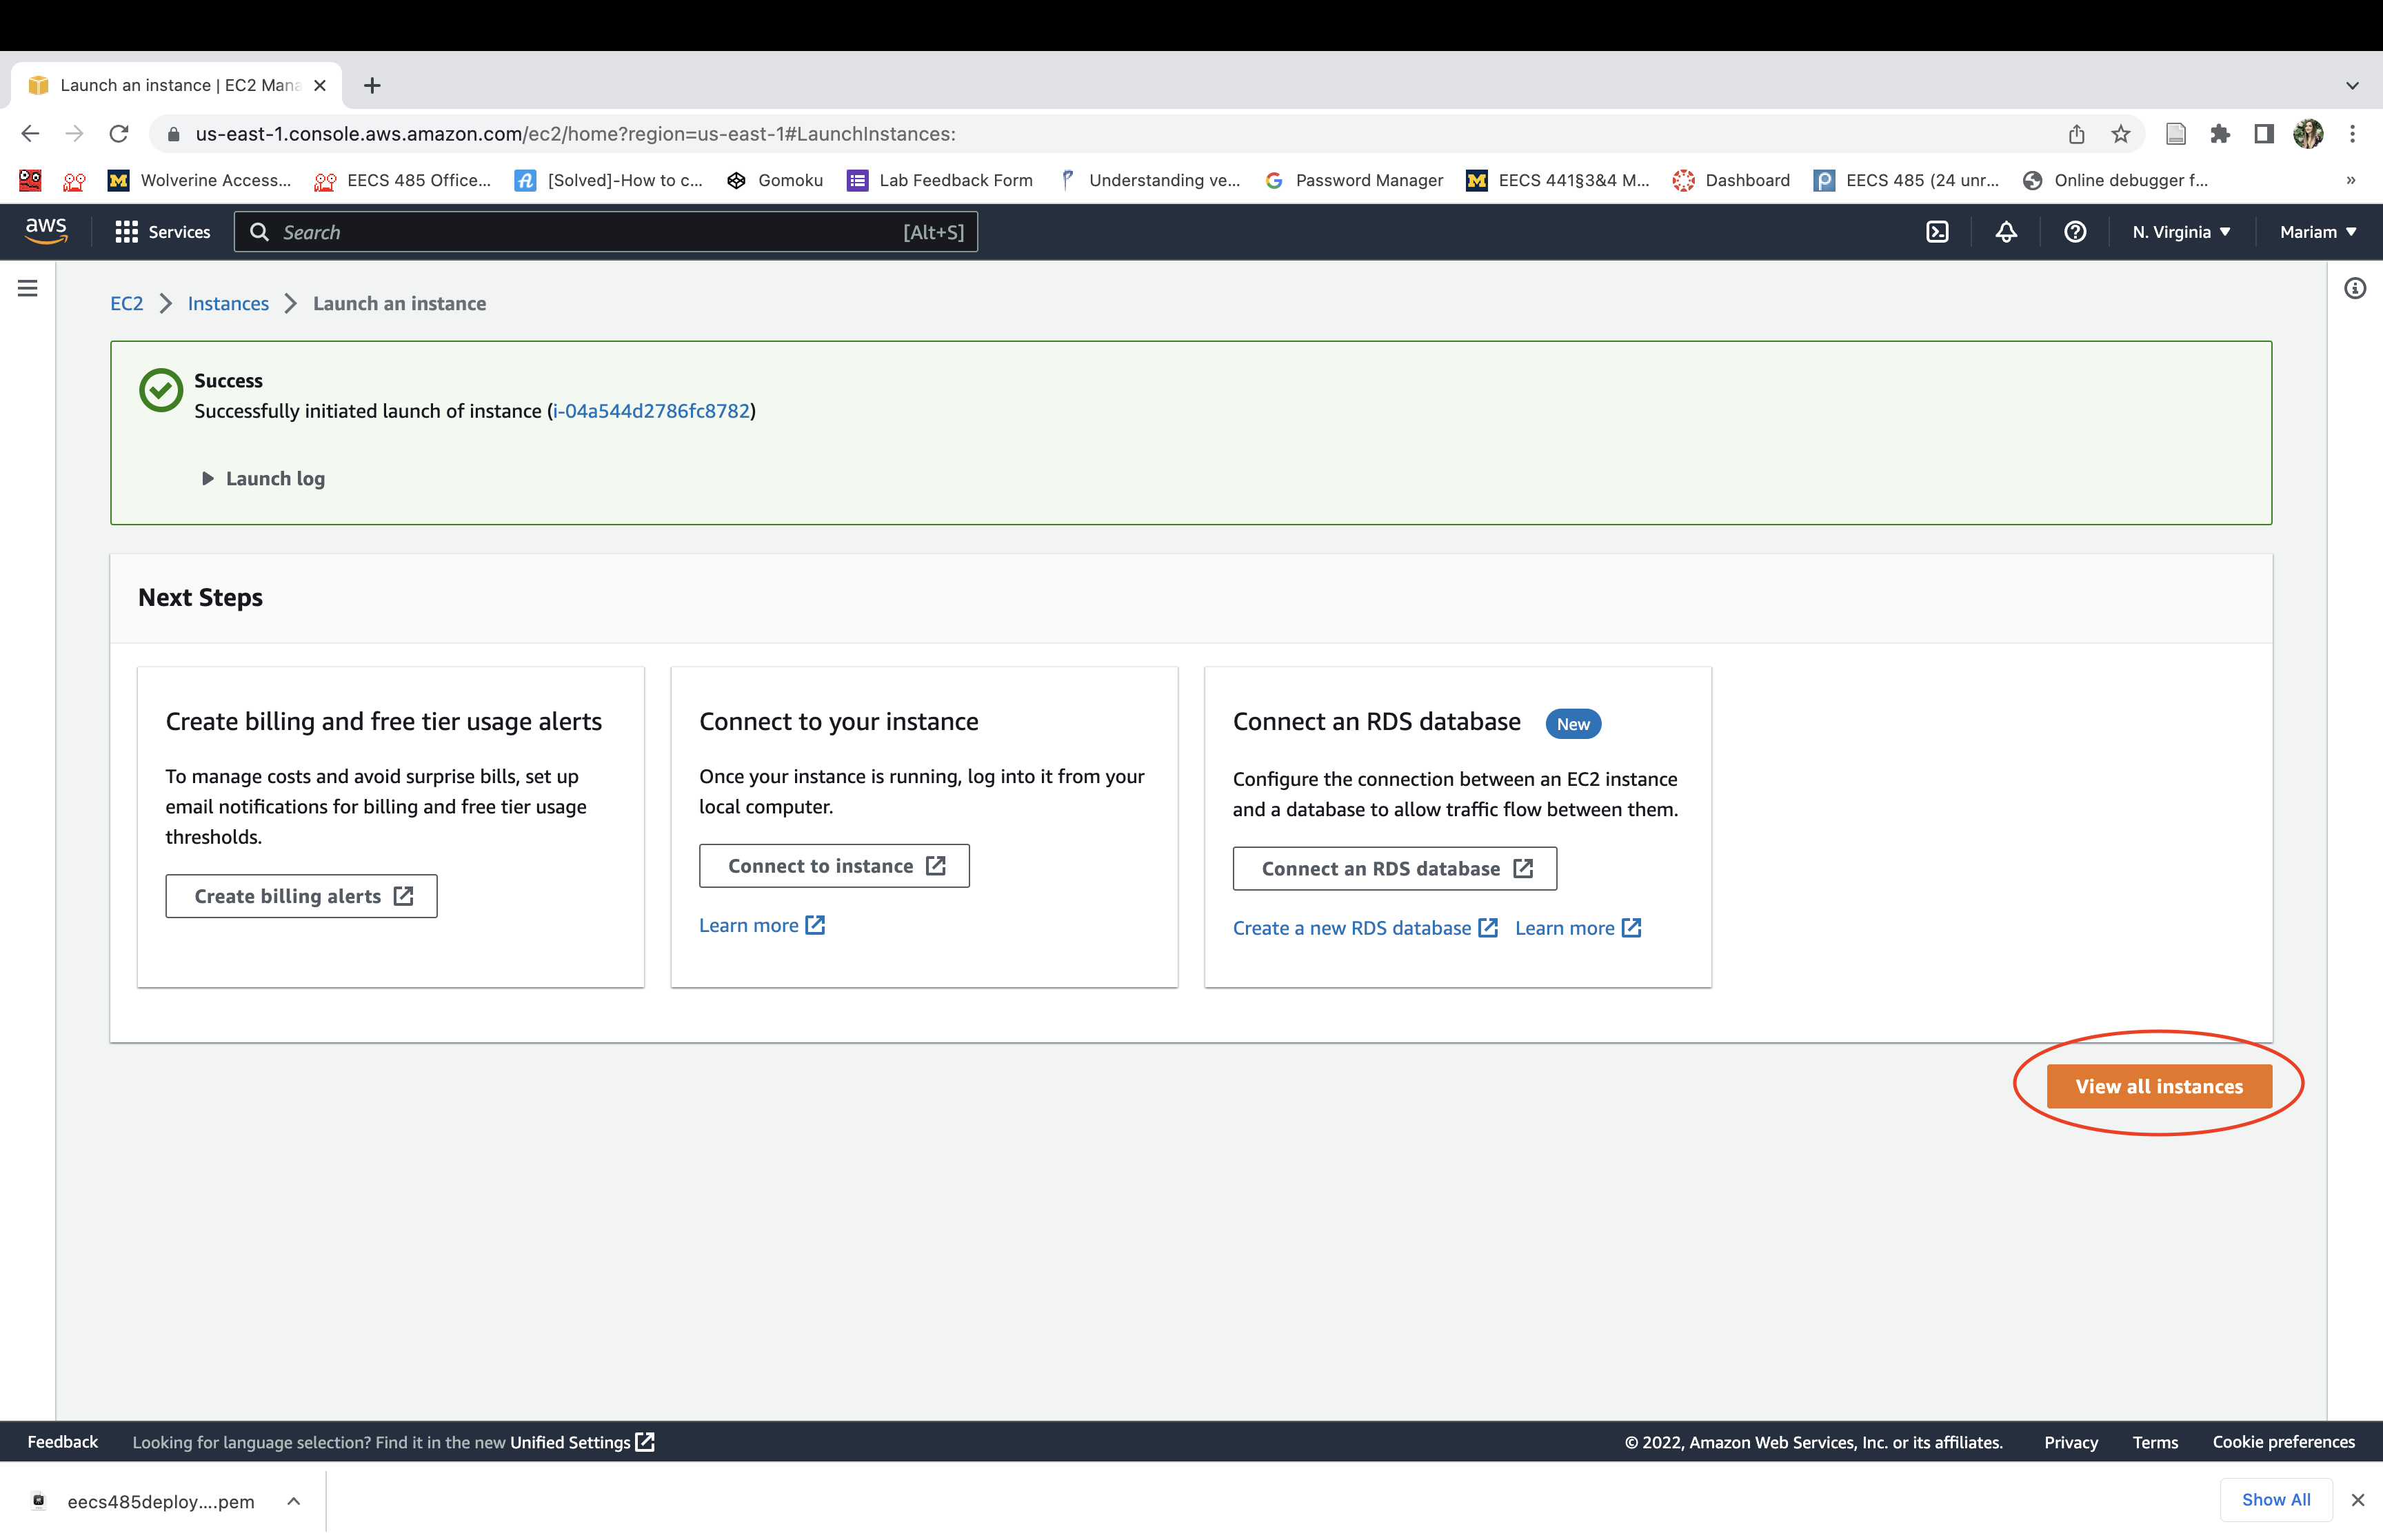
Click “Launch instance”.
Click “View all instances”.
EC2 instance status
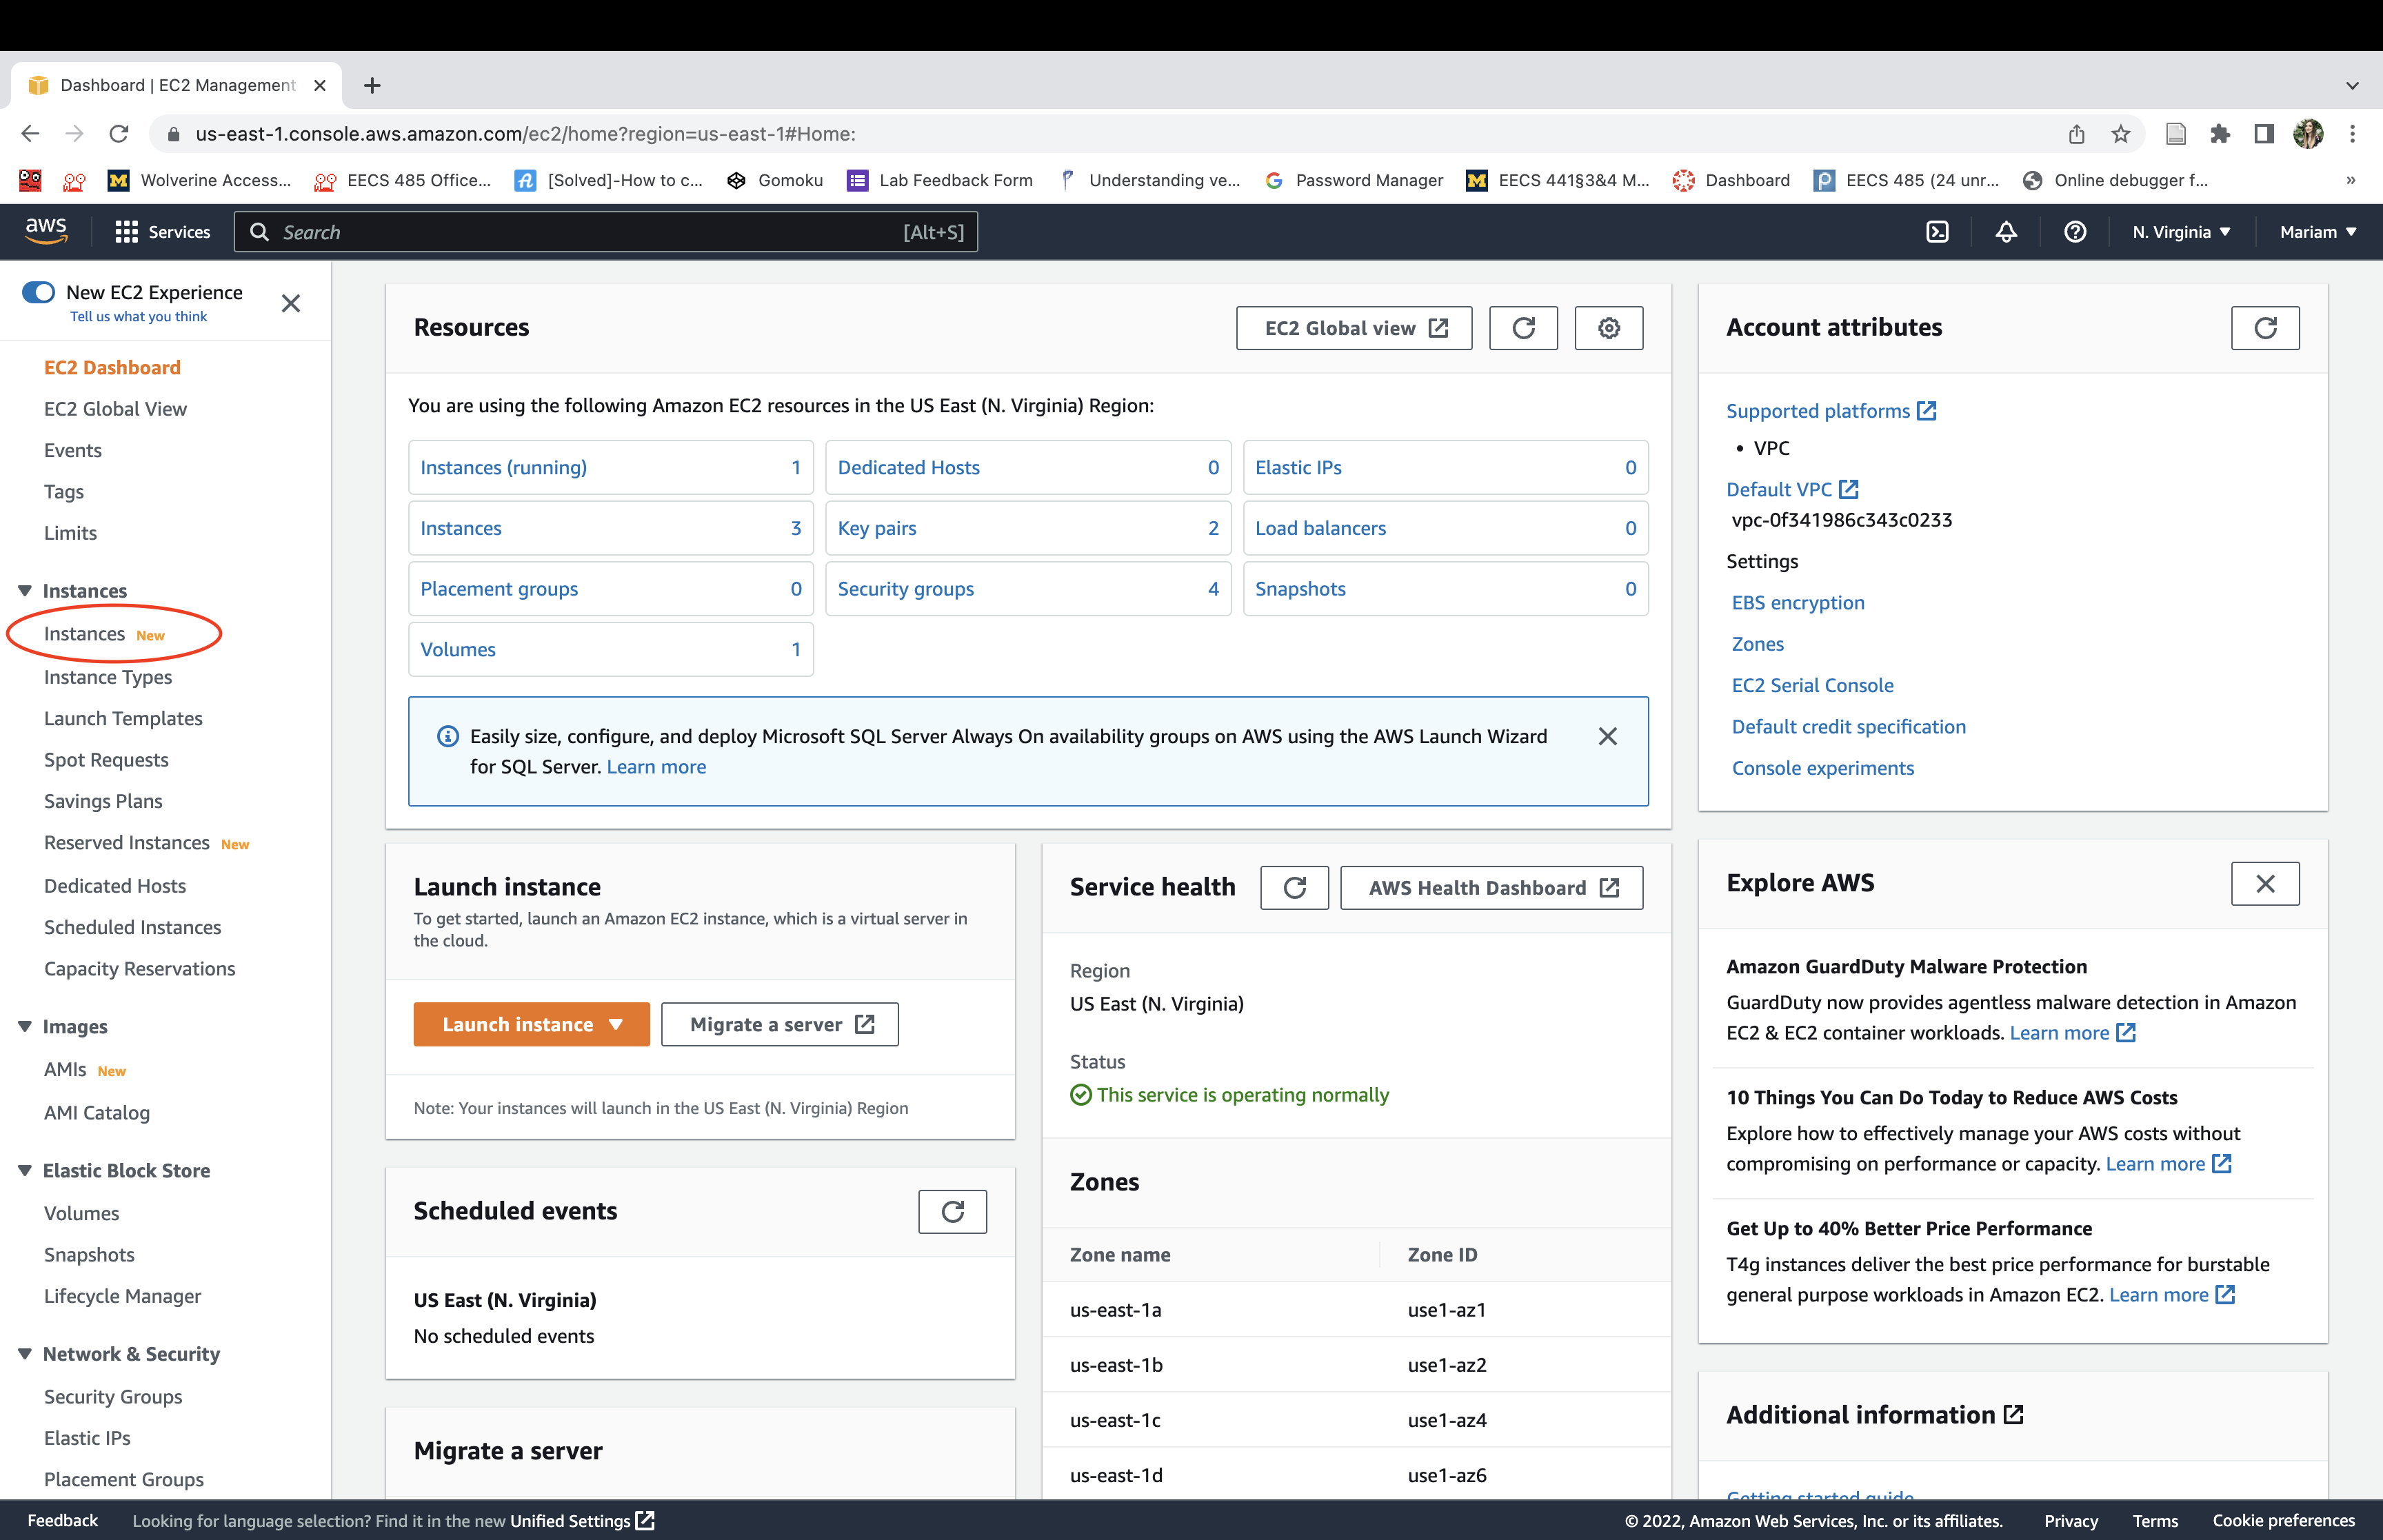
Navigate to the AWS Management Console. Select the “Services” menu, then “Compute”, then “EC2”.
Click “Instances”.
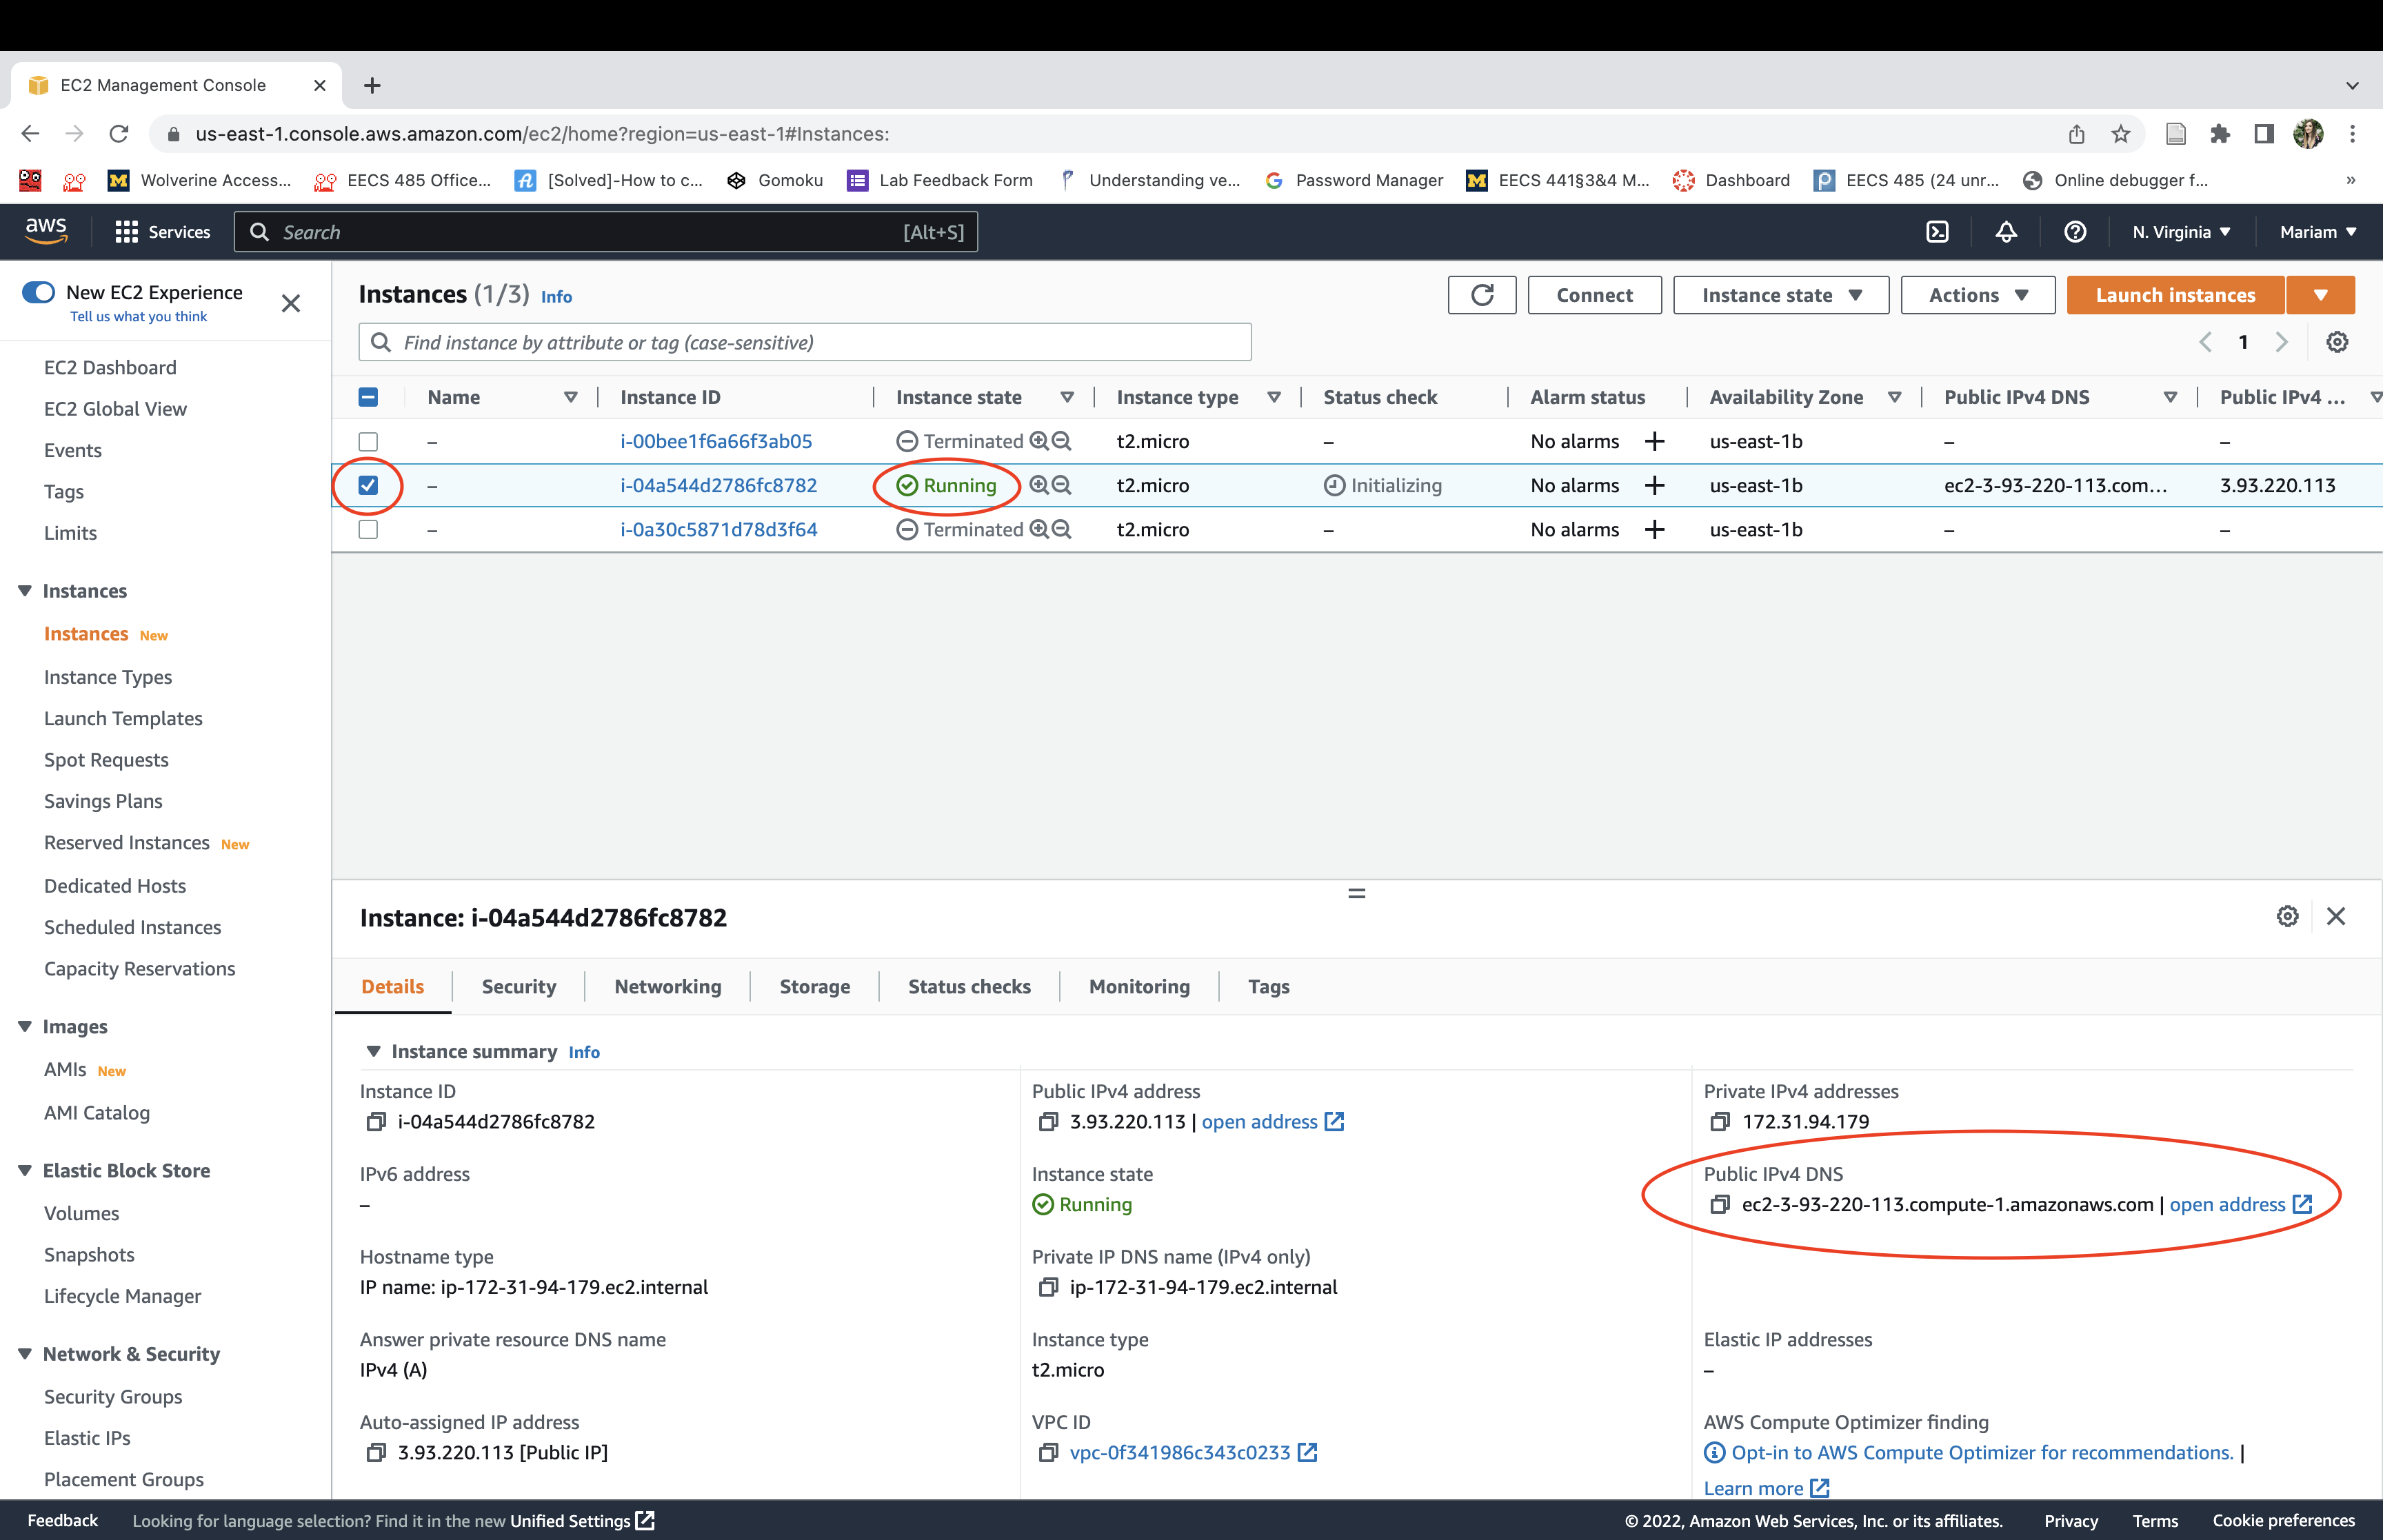
Select one of the instances and view its status and Public DNS.
SSH to EC2 instance
In this section, we’ll configure SSH access using the eecs485deploy.pem file generated in the Start instance section.
Copy or move your instance’s SSH key to your project directory and set the permissions to read-only. Notice the single r when showing the permissions with ls -l.
$ pwd
/Users/awdeorio/src/eecs485/p2-insta485-serverside
$ mv ~/Downloads/eecs485deploy.pem .
$ chmod 400 eecs485deploy.pem
$ ls -l eecs485deploy.pem
-r-------- 1 awdeorio staff 1.7K May 12 15:55 eecs485deploy.pem
SSH into your instance. Replace ec2-54-86-86-246.compute-1.amazonaws.com with your Public DNS from the Instance status section.
$ ssh -i eecs485deploy.pem ubuntu@ec2-54-86-86-246.compute-1.amazonaws.com
...
ubuntu@ip-172-31-81-21:~$
Note: When stopping and restarting your EC2 instance, your public DNS address will change. Be sure to use the newly allocated DNS address when you SSH into your instance.
Pitfall Make sure your instance is running. See Instance status.
Install Nginx
We’ll use Nginx to listen for HTTP requests and then proxy them (“pass them on”) to your Flask app Python code, which will run in a gunicorn server.
First, SSH into your instance.
Install Nginx.
$ sudo apt-get update
$ sudo apt-get install nginx
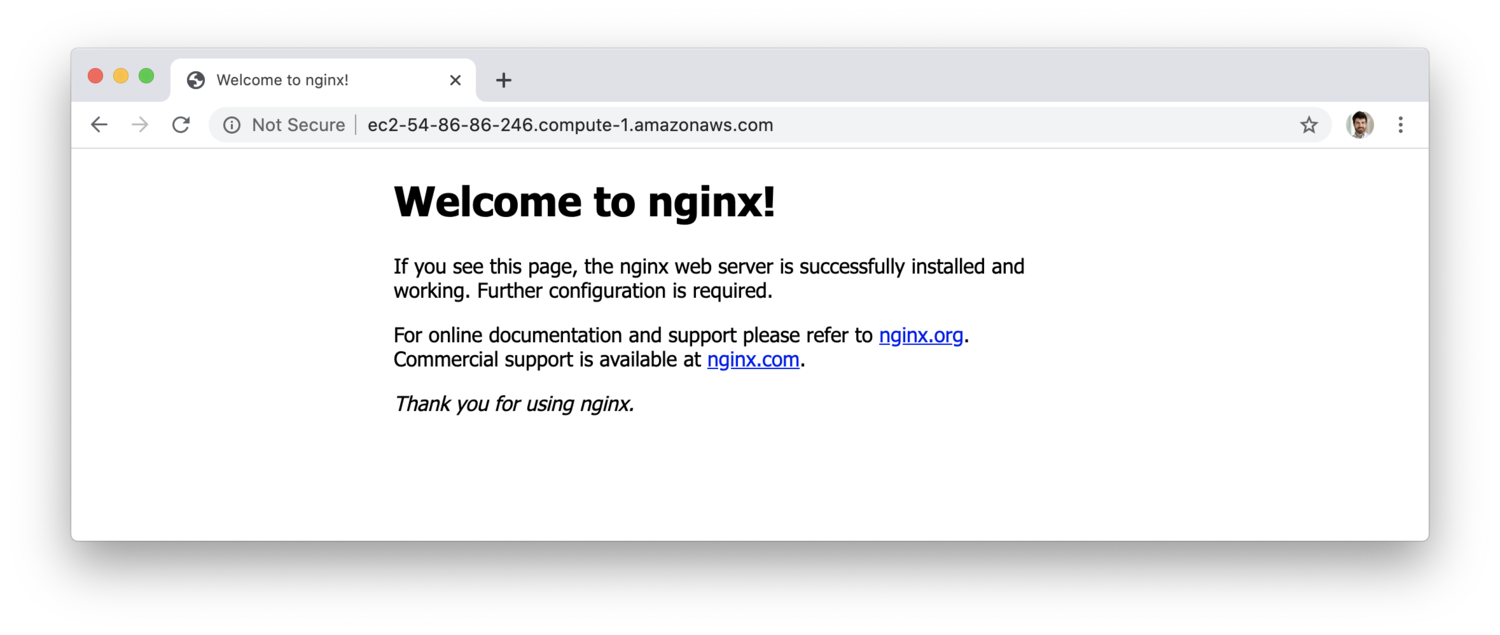
Verify that it’s working by navigating to your Public DNS in a web brower.
Configure Nginx
Optionally install your favorite editor make it the default for this login session by setting the $EDITOR environment variable. Vim should be installed already.
$ sudo apt-get install emacs-nox
$ export EDITOR=emacs
If you do not have a favorite text editor, there are a few options.
- Nano is a beginner friendly, command line text editor with a GUI. It is installed by default on most Linux distributions. This is the recommended option and its usage is described below.
- Check out the Emacs Tutorial. Emacs is a highly configurable and advanced text editor with a steep learning curve. Once learned, however, it can be very powerful.
- Run
vimtutorin your terminal for an introduction to Vim, a minimalistic but extremely extensible editor with a multitude of commands for efficiently changing text.
For the rest of this tutorial, we’ll assume you’re using Nano to edit files. First, check if nano is already installed.
$ which nano
/usr/bin/nano
If no installation path is displayed, you do not have nano installed. Install nano as follows.
$ sudo apt update
$ sudo apt install nano
$ which nano
/usr/bin/nano
Before editing any files, it may be helpful to view the available keyboard shortcuts in nano. To do so, press Ctrl + G. Here are some particularly relevant keystrokes:
- Save a file: Ctrl + O
- Search a file: Ctrl + W
- Select text: Alt + A then use arrow keys to select desired text
- Move to previous line: Ctrl + P
- Move to next line: Ctrl + N
- Move to beginning of line: Ctrl + A
- Move to end of line: Ctrl + E
- Paste text from clipboard: Ctrl + Shift + V
- Quit:Ctrl + X
Remove /etc/nginx/nginx.conf.
$ sudo rm /etc/nginx/nginx.conf
Open /etc/nginx/nginx.conf to edit the file.
$ sudo nano /etc/nginx/nginx.conf
Add the following:
# Run nginx worker processes using user www-data, which should have been created after installing Nginx.
user www-data;

# Start as many workers as there are CPU cores.
worker_processes auto;

# Configure connection processing.
events {
	# Maximum number of simultaneous connections per worker process.
	worker_connections 1000;
}

# Configure the HTTP server.
http {
	# Directly copy data between file descriptors instead of storing it in a buffer.
	sendfile on;

	# Send the response headers and the beginning of a file in a single packet.
	tcp_nopush on;

	# Map file extensions to MIME types.
	include /etc/nginx/mime.types;

	# Specify where logs should be written.
	access_log /var/log/nginx/access.log;
	error_log /var/log/nginx/error.log;

	# Compress HTML data before sending it in responses.
	gzip on;

	# Include site-specific config files.
	include /etc/nginx/conf.d/*.conf;
}
Create a file called /etc/nginx/conf.d/insta485.conf and open it.
$ sudo nano /etc/nginx/conf.d/insta485.conf
Insert the following:
# Configure a virtual server. We only need one, because this machine will only host a single website.
server {
	# Configure all requests to the path /uploads.
	location /uploads {
		# Send a subrequest to /accounts/auth/. If the response is 200, proceed; if it's 403, don't
		# serve content, and just return a 403 status.
		auth_request /accounts/auth/;

		# Serve the requested file from /var/www/uploads/<filename>.
		root /var/www;
	}

	# Configure all requests to the specific path /accounts/auth/.
	location = /accounts/auth {
		# Forward the request to the Flask app running at localhost:8000.
		proxy_pass http://localhost:8000;

		# Don't include the body of the request if any in the proxied request.
		proxy_pass_request_body off;

		# Set some headers that Nginx wants us to use for authentication subrequests.
		proxy_set_header Content-Length "";
		proxy_set_header X-Original-URI $request_uri;
	}

	# Configure all other requests to the server besides the ones that match above.
	location / {
		# Forward the request to http://localhost:8000 and return its response to the client.
		proxy_pass http://localhost:8000;

		# Make sure the proxied request's Host header is set to what the client intended.
		proxy_set_header Host $host;

		# Add a header to the proxied request indicating whether the protocol is HTTP or HTTPS.
		proxy_set_header X-Forwarded-Proto $scheme;

		# Add a header to the proxied request specifying the IP address of the original client.
		proxy_set_header X-Forwarded-For $proxy_add_x_forwarded_for;
	}
}
Restart the Nginx server.
$ sudo systemctl restart nginx
Note that we’ve configured Nginx to proxy requests to the Flask server. We’ve also configured it not to do that for requests to files in the /uploads/<filename> route. Instead, it makes sure that the user is logged in, and then serves static files directly instead of having Flask handle it like in our development environment. Nginx is optimized for sending static files fast.
After configuring Nginx, it is expected that trying to access your AWS site will lead to a 502 Bad Gateway Error. Once you complete the rest of P2 and the Install Flask app steps, this issue should be resolved.
Install Flask app
Pitfall If you are just getting started on your project, stop here and return when you are ready to run your flask app.
Use these install instructions for every project.
First, SSH into your instance.
Make sure you have Python virtual environment tools installed.
$ sudo apt-get install python3 python3-venv sqlite3
Clone your web app source code.
@ip-172-31-81-21:~$ pwd
/home/ubuntu
$ git clone https://gitlab.eecs.umich.edu/your/project/repo
$ cd p2-insta485-serverside/
Note: if your GitHub/Gitlab account has two-factor authentication enabled, you may need to create an SSH key on the AWS instance.
Install back end
Create a virtual environment. Your Python version may vary, but Python 3.12+ is required.
$ pwd
/home/ubuntu/p2-insta485-serverside
$ python3 --version
Python 3.12.5
$ python3 -m venv env
Activate the virtual environment and install python package dependencies, including your project. Also, install gunicorn, which will be used for server deployment.
$ source env/bin/activate
$ pip install --upgrade pip setuptools wheel
$ pip install -r requirements.txt
$ pip install -e .
$ pip install gunicorn
Initialize database.
$ ./bin/insta485db create
Copy var/uploads/ to /var/www. This is the web root from which Nginx will serve uploads.
$ sudo cp -r var/uploads /var/www
Give the ubuntu and www-data user permissions for the new directory. Flask runs as ubuntu and Nginx runs as www-data, so those users need permission to access files in /var/www/uploads.
$ sudo chown ubuntu:www-data /var/www/uploads
Lastly, modify your Flask app’s configuration so that it stores uploads in the new directory. Your insta485/config.py file should have a line reading UPLOAD_FOLDER = INSTA485_ROOT/'var'/'uploads'. Change it to UPLOAD_FOLDER = pathlib.Path('/var/www/uploads').
Install front end
Skip this subsection if you’re not using JavaScript.
Install node. Your Node version may vary, but should be at least the latest LTS version. See the React tutorial for instructions on installing Node.
Install JavaScript packages, including obfuscator.
$ npm ci .
$ npm install javascript-obfuscator
Compile and obfuscate JavaScript.
$ npx webpack
$ npx javascript-obfuscator insta485/static/js/bundle.js --reserved-strings '\s*'
$ mv insta485/static/js/bundle-obfuscated.js insta485/static/js/bundle.js
Note: The –reserved-strings flag sets the config for the obfuscator to “reserve” the space character in your JS code. This will prevent space character from being replaced with \x20.
Run server
Make sure that no old gunicorn processes are running.
$ pkill -f gunicorn
$ pgrep -af gunicorn
# no process should appear here!
Start gunicorn in the background (-D for daemon mode).
$ gunicorn -b localhost:8000 -w 2 -D insta485:app
$ pgrep -af gunicorn
17498 /home/ubuntu/p2-insta485-serverside/env/bin/python3 /home/ubuntu/p2-insta485-serverside/env/bin/gunicorn -b localhost:8000 -w 2 -D insta485:app
17500 /home/ubuntu/p2-insta485-serverside/env/bin/python3 /home/ubuntu/p2-insta485-serverside/env/bin/gunicorn -b localhost:8000 -w 2 -D insta485:app
17501 /home/ubuntu/p2-insta485-serverside/env/bin/python3 /home/ubuntu/p2-insta485-serverside/env/bin/gunicorn -b localhost:8000 -w 2 -D insta485:app
Pitfall If you’re having trouble, trying running Gunicorn in the foreground with debug messages enabled.
$ pkill -f gunicorn
$ gunicorn -b localhost:8000 -w 2 insta485:app --log-level debug
Browse to your Public DNS name (or refresh) and you should see your web app.
After successfully deploying, go back to the project spec and follow the deployment submission instructions. After submitting, be sure to kill your gunicorn process using pkill.
You may exit the ssh session with the exit command.
$ exit
Test app
Your web app should now work from outside AWS. Using a browser on your development machine, navigate to your app. For example, the instructor solution URL was http://ec2-54-86-86-246.compute-1.amazonaws.com. Replace ec2-54-86-86-246.compute-1.amazonaws.com with your Public DNS from the Instance status section.
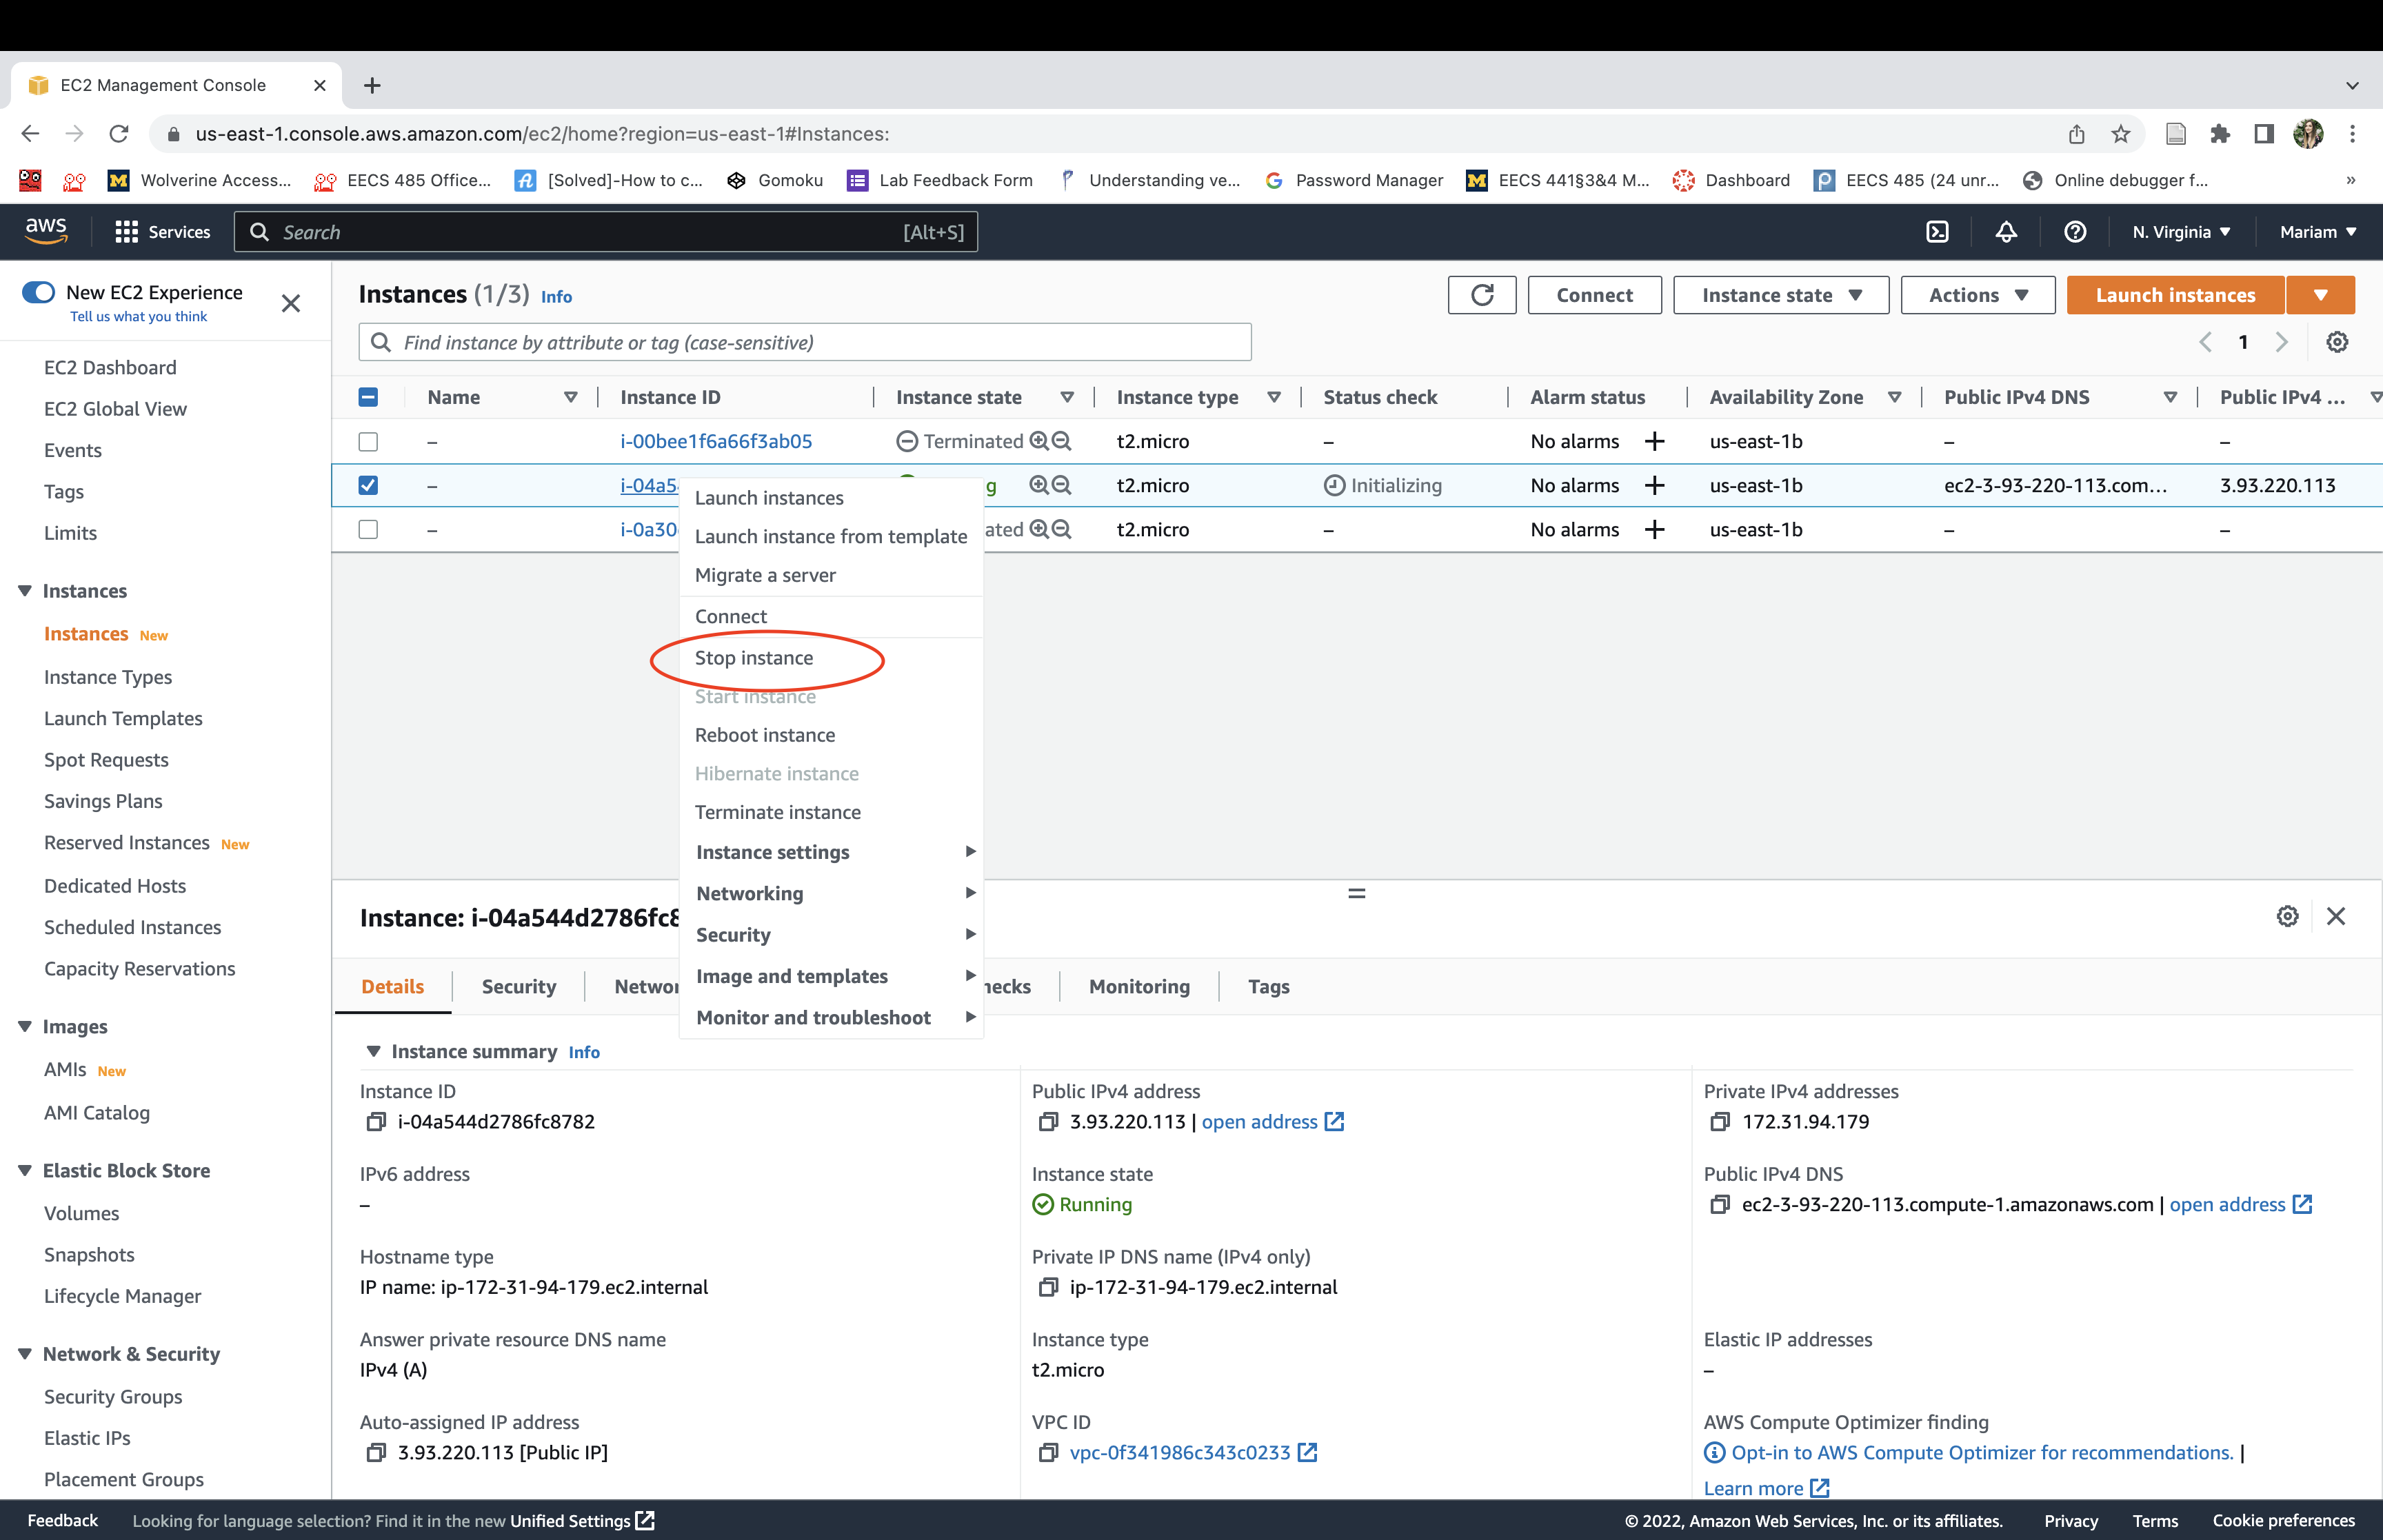
Stop EC2 instance
To avoid using your AWS credits, shut down your instance when you’re done with it.
Check the status of your instance.
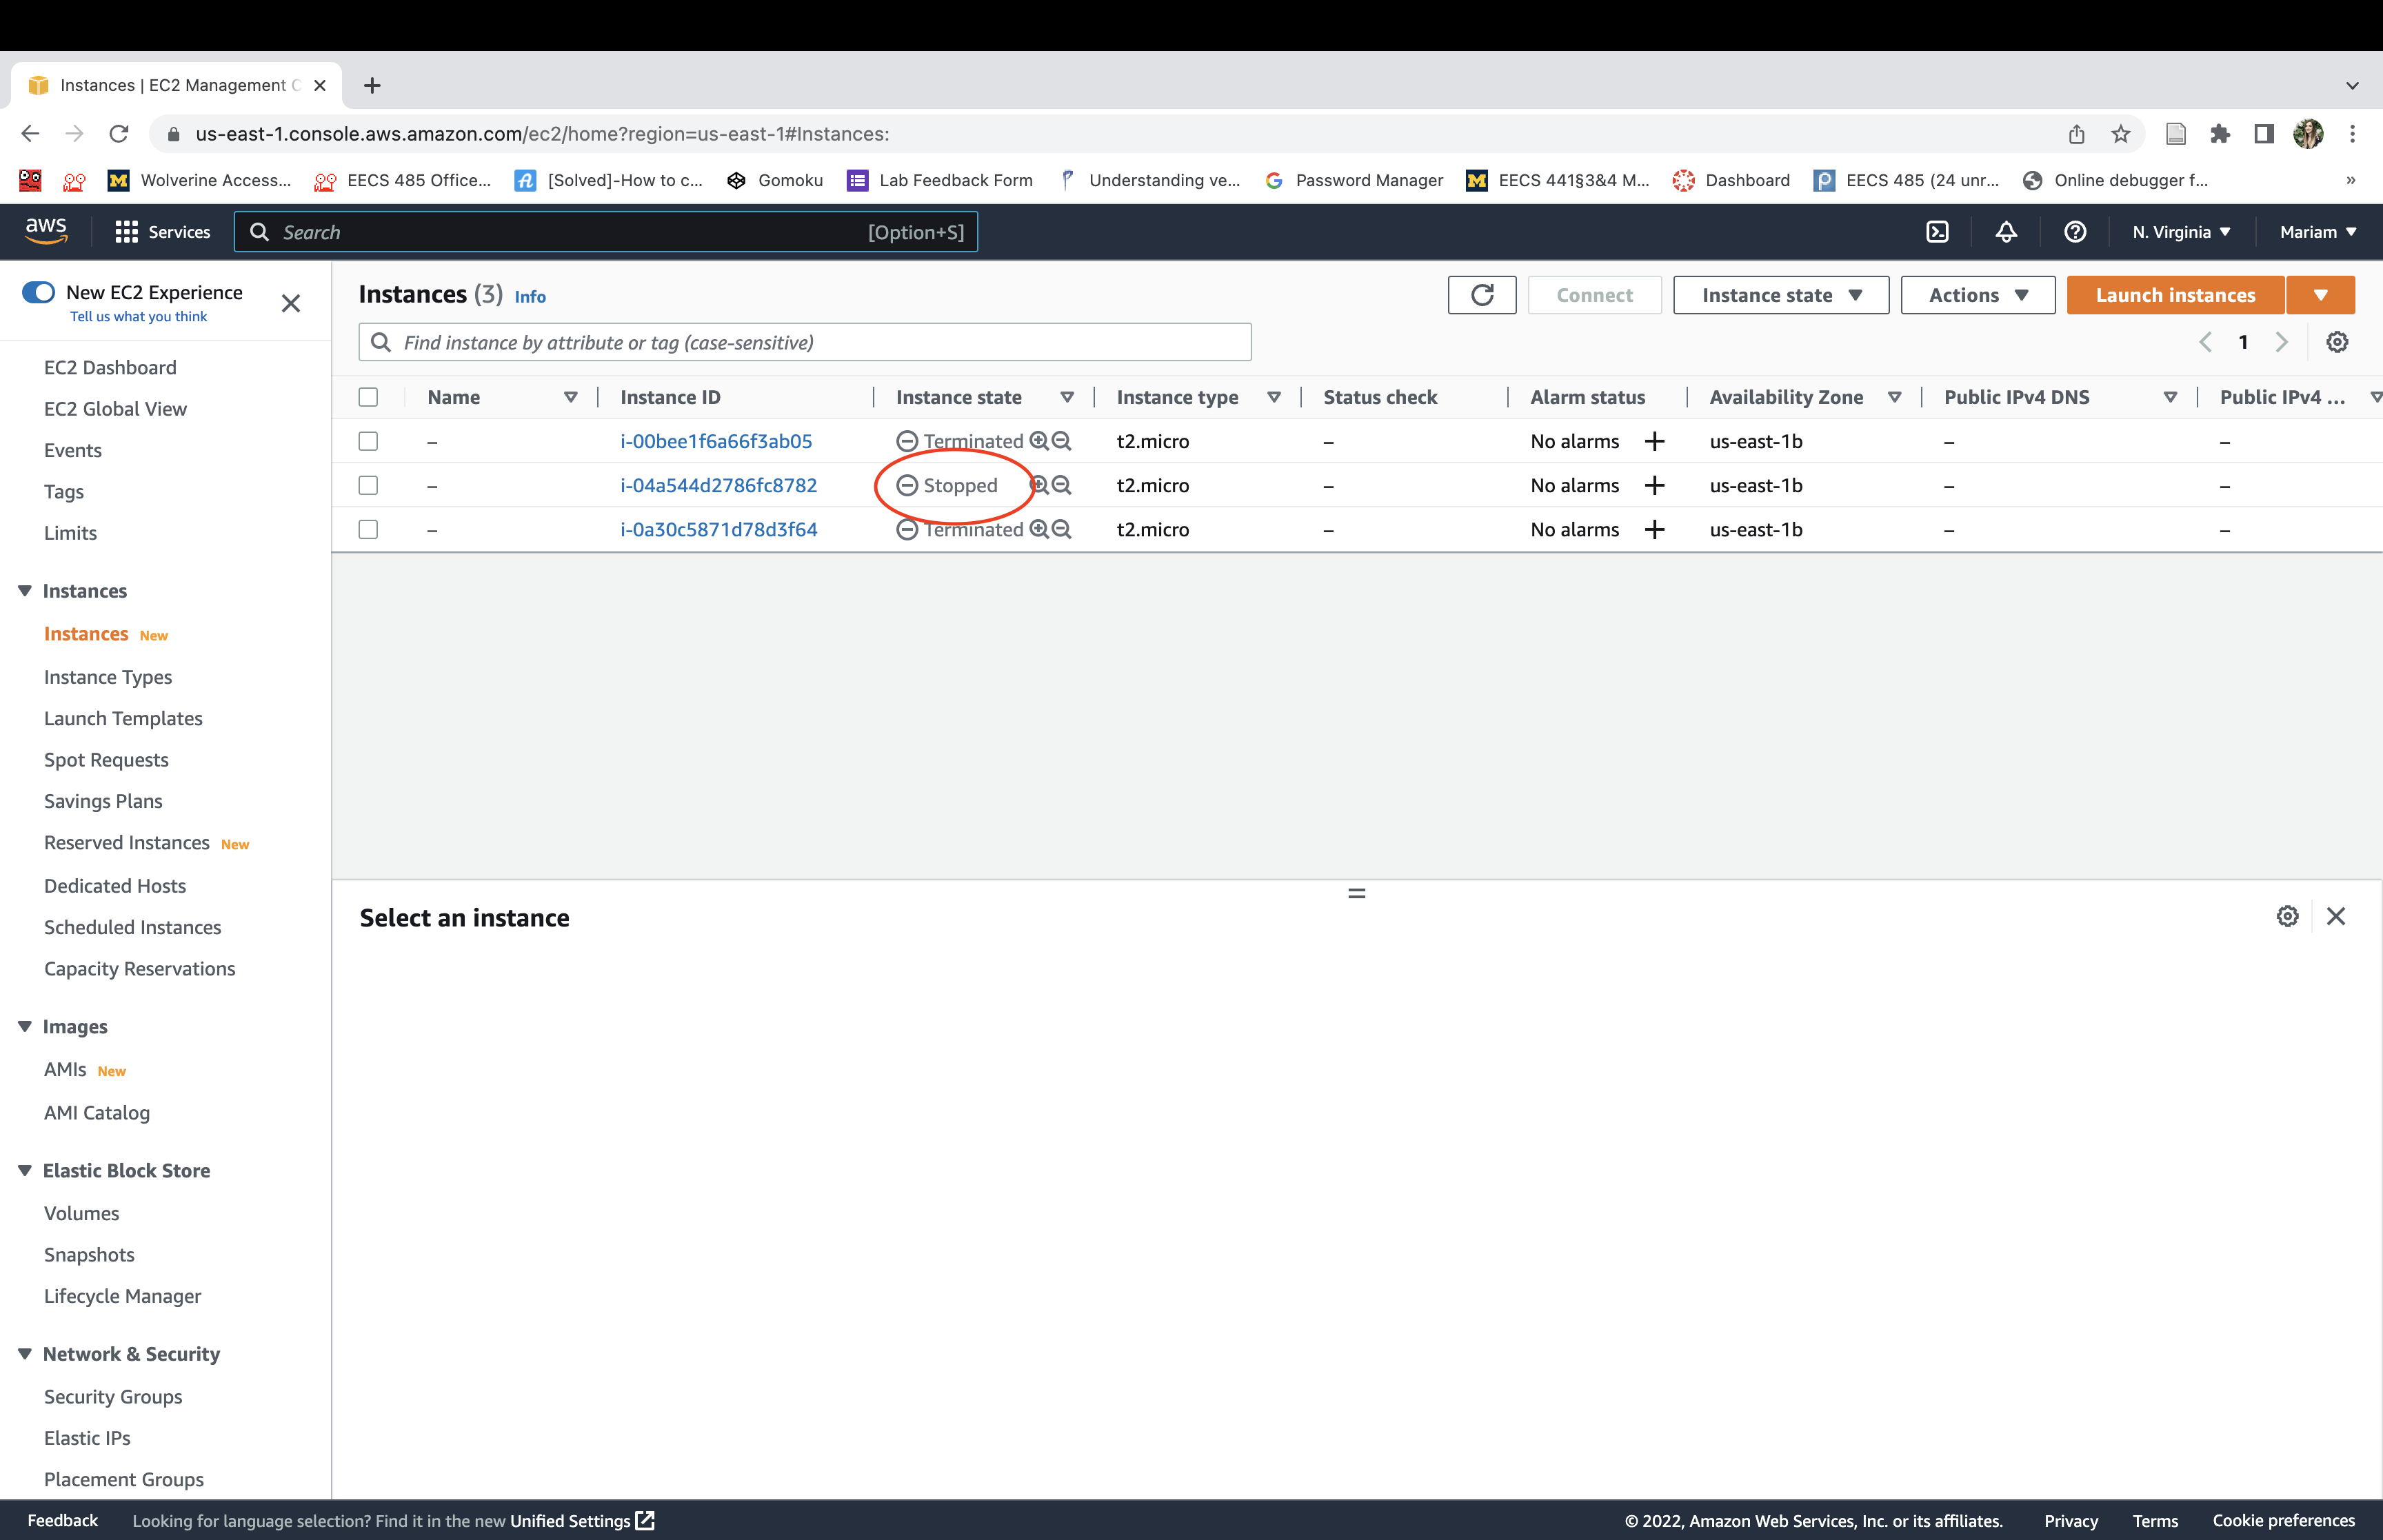
Right click on your instance -> “Stop instance”.
You should now see that your instance is stopped.
Acknowledgments
This document is licensed under a Creative Commons Attribution-NonCommercial 4.0 License. You’re free to copy and share this document, but not to sell it. You may not share source code provided with this document.