EECS 485 Lab
Lab 7: Scaling the Database with PaaS
Goals
- Learn notable differences between PostgreSQL and SQLite
- Run a PostgreSQL server on your local machine and populate it with
insta485data - Integrate local PostgreSQL database with Project 3
insta485app - Migrate local PostgreSQL database to the cloud using Amazon’s PaaS RDS
- Integrate remote PostgreSQL database with Project 3
insta485app
Glossary
PostgreSQL: An open source distributed network database.
PaaS: Platform as a Service. Rented servers with software already installed and configured.
AWS RDS: Amazon’s distributed network database platform as a service.
Prerequisites
This lab is the first in a series of labs that will convert our project 3 Insta485 site to a fully scalable site using AWS! Start with your project 3 repository. It should be clean, without any modifications.
$ pwd
/Users/awdeorio/src/eecs485/p3-insta485-clientside
$ git status
On branch main
Your branch is up to date with 'origin/main'.

nothing to commit, working tree clean
Create a new branch with your uniqname.
$ git checkout -b aws-<FIXME UNIQNAME>
$ git branch
* aws-awdeorio
  main
PostgreSQL vs. SQLite
In project 2 and 3, we used SQLite to create a database for our Insta485 application. SQLite uses a single file on a single computer. It doesn’t support network connections and can’t scale up by adding more servers.
PostgreSQL is an RDBMS distributed network database that scales well.
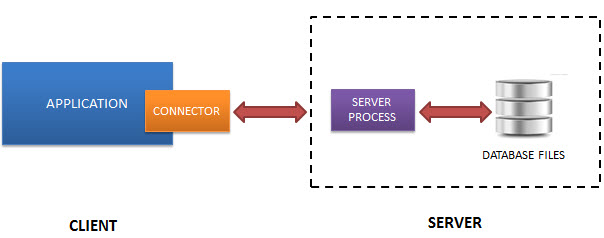
SQLite
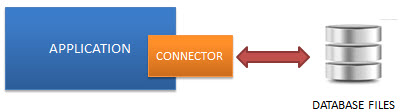
PostgreSQL
Installation
Before we start using PostgreSQL, let’s first make sure that we have it installed on our machine.
MacOS
$ brew install postgresql
Linux/Windows
$ sudo apt-get install postgresql
Sanity Check
Your version may be different.
$ psql --version
psql (PostgreSQL) 10.12
Configuration (Linux/WSL only)
Complete this section only if you are working on a Windows machine in WSL. There are a few issues with the default configurations in the PostgreSQL client we just installed.
First, edit the PostgreSQL configuration file. You might need to change the version number.
$ sudoedit /etc/postgresql/12/main/pg_hba.conf
Change the first uncommented line to look this, then save and exit.
local all postgres trust
Restart the PostgreSQL server.
$ sudo service postgresql restart
Login to psql and set a password for the postgres superuser.
$ psql -U postgres
Password for user postgres:
psql (10.12 (Ubuntu 10.12-0ubuntu0.18.04.1))
Type "help" for help.

postgres=# ALTER USER postgres with password 'password';
ALTER USER
postgres=# \q
Edit the PostgreSQL configuration file again. You might need to change the version number.
$ sudoedit /etc/postgresql/10/main/pg_hba.conf
Change the line that looks like this, replacing trust with md5.
local all postgres md5
Change the line under the comment # IPv4 local connections to:
host all all 127.0.0.1/32 trust
Restart the server again.
$ sudo service postgresql restart
Create a role that shares the same username as your WSL account.
$ psql -U postgres
Password for user postgres:
psql (10.12 (Ubuntu 10.12-0ubuntu0.18.04.1))
Type "help" for help.

postgres=# CREATE ROLE awdeorio CREATEDB LOGIN;
CREATE ROLE
postgres=# \du
                                List of roles
Role name |                         Attributes                         | Member of
-----------+------------------------------------------------------------+-----------
awdeorio    | Create DB                                                  | {}
postgres  | Superuser, Create role, Create DB, Replication, Bypass RLS | {}

postgres=# \q
Local PostgreSQL Database
Before we can host a PostgreSQL database locally, we need to make a few changes to our existing Project 3 code.
First, we need to start up a PostgreSQL server on our local machine.
MacOS
$ brew services start postgresql
Linux/Windows
$ sudo service postgresql start
We need to convert our SQL statements to PostgreSQL syntax. Edit sql/schema.sql, and make these changes:
- Replace timestamp declarations with
created TIMESTAMP DEFAULT CURRENT_TIMESTAMP - Change filename declarations to
filename VARCHAR(128) NOT NULL. - Remove the line
PRAGMA foreign_keys = ON; - Change type of the
postidandcommentidcolumns in thepostsandcommentstables to beSERIALinstead ofINTEGER
We now need to update our bin/insta485db script to run psql commands. Copy and paste the following code.
#!/bin/bash
# insta485db
#
# Andrew DeOrio <awdeorio@umich.edu>

# Path to database file
UPLOAD_FOLDER=var/uploads

# Stop on errors
set -Eeuxo pipefail

# Sanity check command line options
usage() {
echo "Usage: $0 (create|destroy|reset|dump)"
}

if [ $# -ne 1 ]; then
usage
exit 1
fi

# Parse command line options
case $1 in
"empty")
    if psql -lqt | grep insta485; then
    echo "Error: database already exists"
    exit 1
    fi
    createdb --echo insta485
    psql --echo-errors -d insta485 -f sql/schema.sql
    mkdir -p ${UPLOAD_FOLDER}
    ;;

"create")
    $0 empty
    psql --echo-errors -d insta485 -f sql/data.sql
    cp sql/uploads/* ${UPLOAD_FOLDER}/
    ;;

"destroy")
    dropdb --echo insta485
    rm -rf ${UPLOAD_FOLDER}
    ;;

"reset")
    $0 destroy
    $0 create
    ;;

"dump")
    TABLES=`psql -d insta485 -c '\x' -c '\dt' | grep Name | awk '{print $3}'`
    for TABLE in ${TABLES}; do
    psql -d insta485 -c "\x" -c "SELECT * FROM ${TABLE}"
    echo
    done
    ;;

"random")
    SHUF=shuf
    # If shuf is not on this machine, try to use gshuf instead
    if ! type shuf 2> /dev/null; then
    SHUF=gshuf
    fi
    DB_FILENAME=var/insta485.sqlite3
    FILENAMES="122a7d27ca1d7420a1072f695d9290fad4501a41.jpg
            ad7790405c539894d25ab8dcf0b79eed3341e109.jpg
            9887e06812ef434d291e4936417d125cd594b38a.jpg
            2ec7cf8ae158b3b1f40065abfb33e81143707842.jpg"
    for i in `seq 1 100`; do
    # echo $FILENAMES      print string
    # shuf -n1             select one random line from multiline input
    # awk '{$1=$1;print}'  trim leading and trailing whitespace

    # Use '${SHUF}' instead of 'shuf'
    FILENAME=`echo "$FILENAMES" | ${SHUF} -n1 | awk '{$1=$1;print}'`
    OWNER="awdeorio"
    psql -d insta485 -c "INSERT INTO posts(filename, owner) VALUES('${FILENAME}','${OWNER}');"
    done
    ;;

*)
    usage
    exit 1
    ;;
esac
Then for bin/insta485run, alter the check to see if the database exists to:
if ! psql -lqt | grep -q insta485; then
  ./bin/insta485db create
fi
Change all ? in your Python code to %s.
Add the following library to your project 3 setup.py:
psycopg2-binary
Update your virtual enviorment with the new required library by running this on the console:
pip install -e .
Note You may also need to manually install the psycopg2-binary libray to your virtual environment through pip by running this on the command prompt:
pip install psycopg2-binary
Replace the imports, get_db() function, and close_db() function in model.py with:
import flask
import psycopg2
import psycopg2.extras
import insta485

def get_db():
    """Open a new database connection.
    Flask docs:
    https://flask.palletsprojects.com/en/1.0.x/appcontext/#storing-data
    """
    if "db_con" not in flask.g:
        flask.g.db_con = psycopg2.connect(
            host=insta485.app.config['POSTGRESQL_DATABASE_HOST'],
            port=insta485.app.config['POSTGRESQL_DATABASE_PORT'],
            user=insta485.app.config['POSTGRESQL_DATABASE_USER'],
            password=insta485.app.config['POSTGRESQL_DATABASE_PASSWORD'],
            database=insta485.app.config['POSTGRESQL_DATABASE_DB'],
        )
        flask.g.db_cur = flask.g.db_con.cursor(
            cursor_factory=psycopg2.extras.RealDictCursor
        )
    return flask.g.db_cur


@insta485.app.teardown_appcontext
def close_db(error):
    """Close the database at the end of a request.
    Flask docs:
    https://flask.palletsprojects.com/en/1.0.x/appcontext/#storing-data
    """
    assert error or not error  # Needed to avoid superfluous style error
    db_cur = flask.g.pop('db_cur', None)
    db_con = flask.g.pop('db_con', None)
    if db_con is not None:
        db_con.commit()
        db_cur.close()
        db_con.close()
Fix get_db() calls throughout your code. get_db() will now be returning a connection that you can directly execute statements from and get a cursor. So instead of running
connection = get_db()
cur = connection.execute("SELECT COUNT(*) FROM likes")
likes = cur.fetchall()
you can run
cur = get_db()
cur.execute("SELECT COUNT(*) FROM likes") # cur now points to the result set of the executed statement
likes = cur.fetchall()
Append the following at the end of the insta485/config.py:
POSTGRESQL_DATABASE_HOST = "localhost"
POSTGRESQL_DATABASE_PORT = 5432
POSTGRESQL_DATABASE_USER = "awdeorio" # OS or WSL username
POSTGRESQL_DATABASE_PASSWORD = None
POSTGRESQL_DATABASE_DB = "insta485"
Now we should be able to run our database locally! Run ./bin/insta485run.
Note: Issues may arise that are implementation specific. For example, psycopg2 has issues running the SQL function last_insert_rowid().
Create AWS RDS PostgreSQL Database
Platform as a service (PaaS) is a category of cloud computing services that provides a platform for customers to develop, run, and manage applications without the need to build and maintain an infrastructure. Amazon Relational Database Service (RDS) is a PaaS that makes it easy to set up, operate, and scale a relational database in the cloud.
To begin scaling our database, navigate to the Amazon RDS Console.
- On the navigation bar on the left hand side, click Databases.

- Then click Create Database.

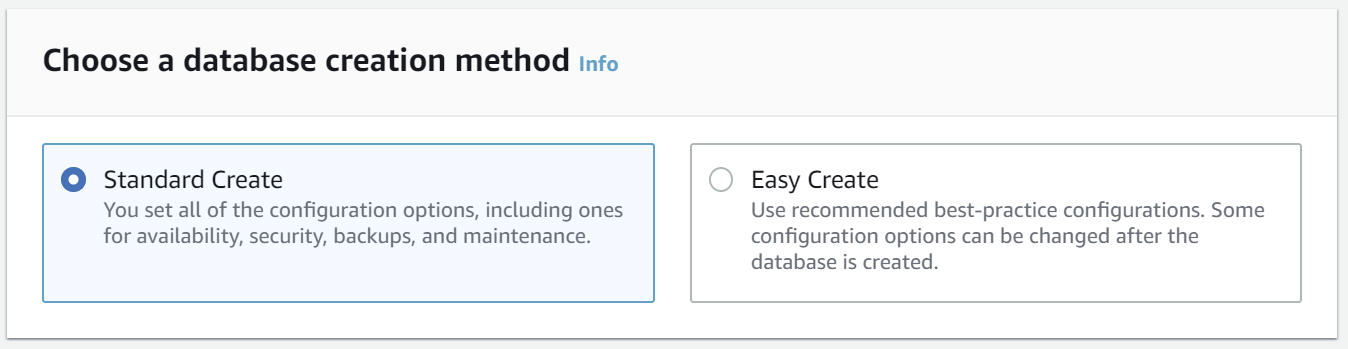
- Under Choose a database creation method, choose Standard Create.
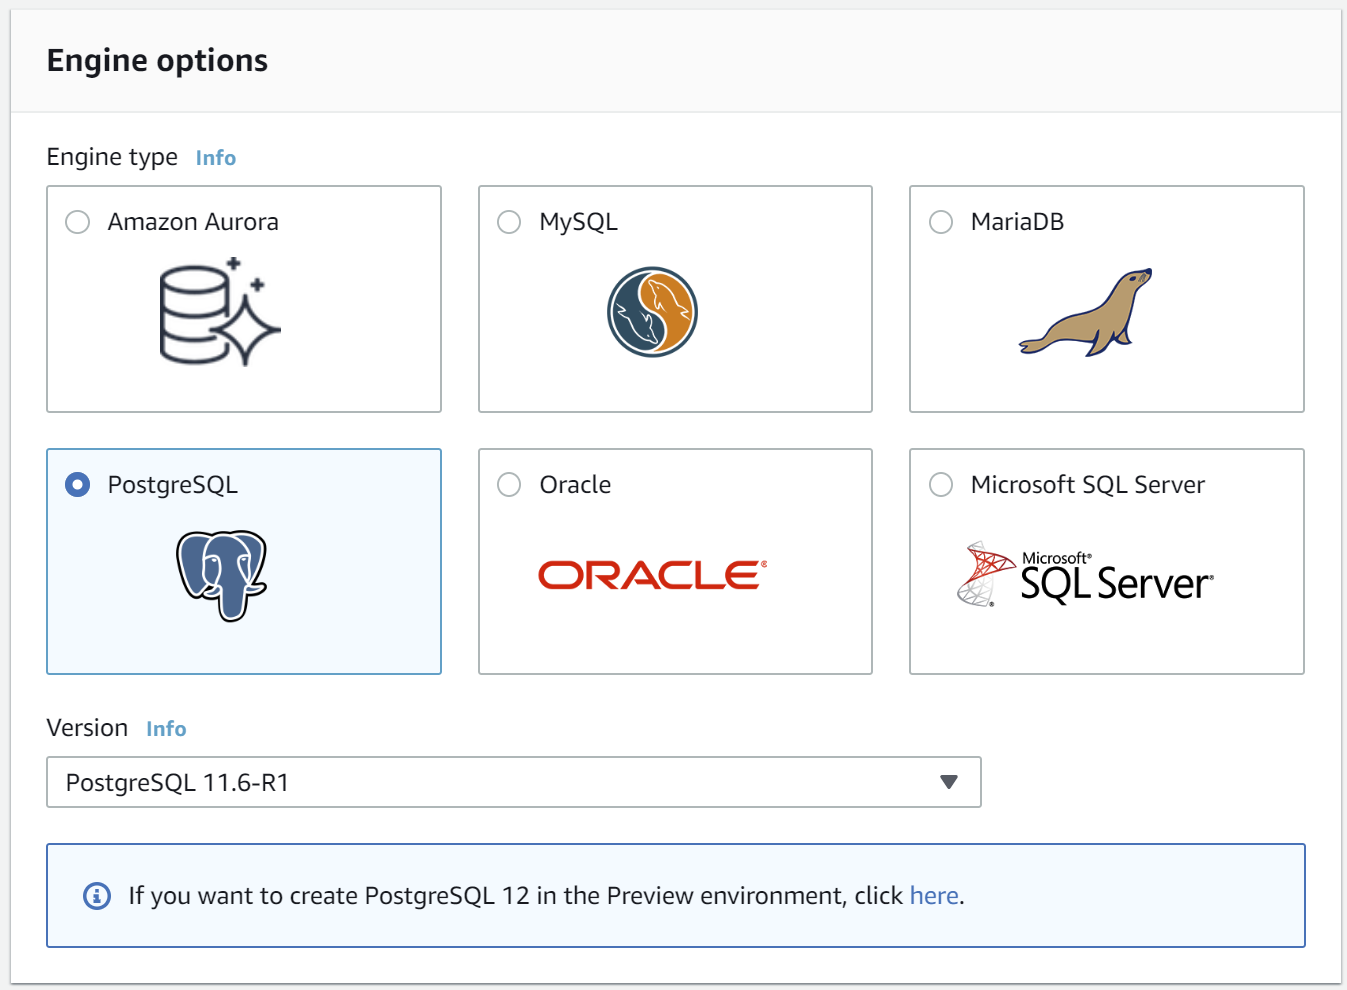
- Under Engine options, choose PostgreSQL.
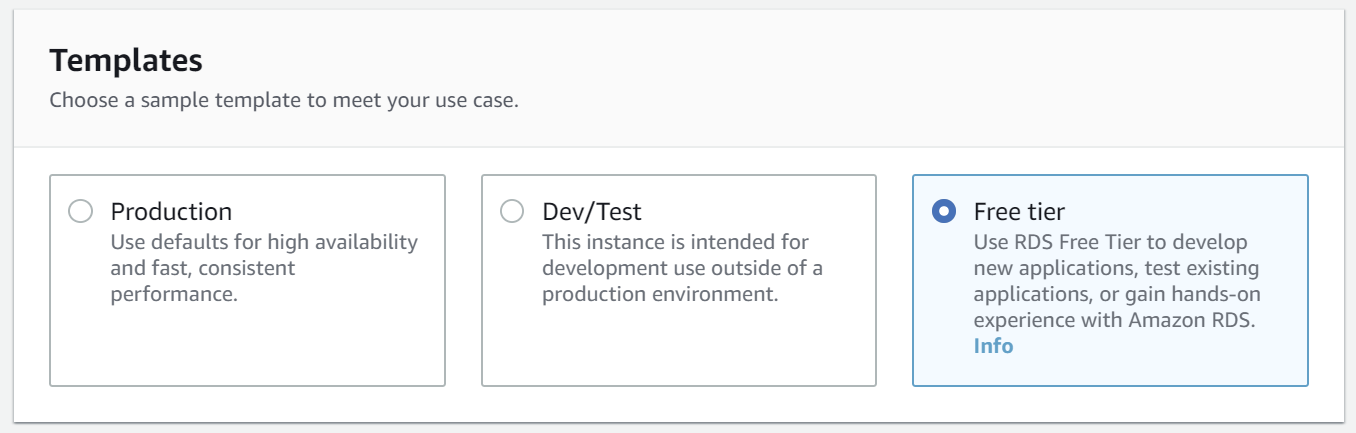
- Under Templates, select Free tier.
- Under Settings, set the DB instance identifier to be
insta485and Master username to bepostgres. Check the box Auto generate a password. Be sure to retrieve and save this password after you create the database.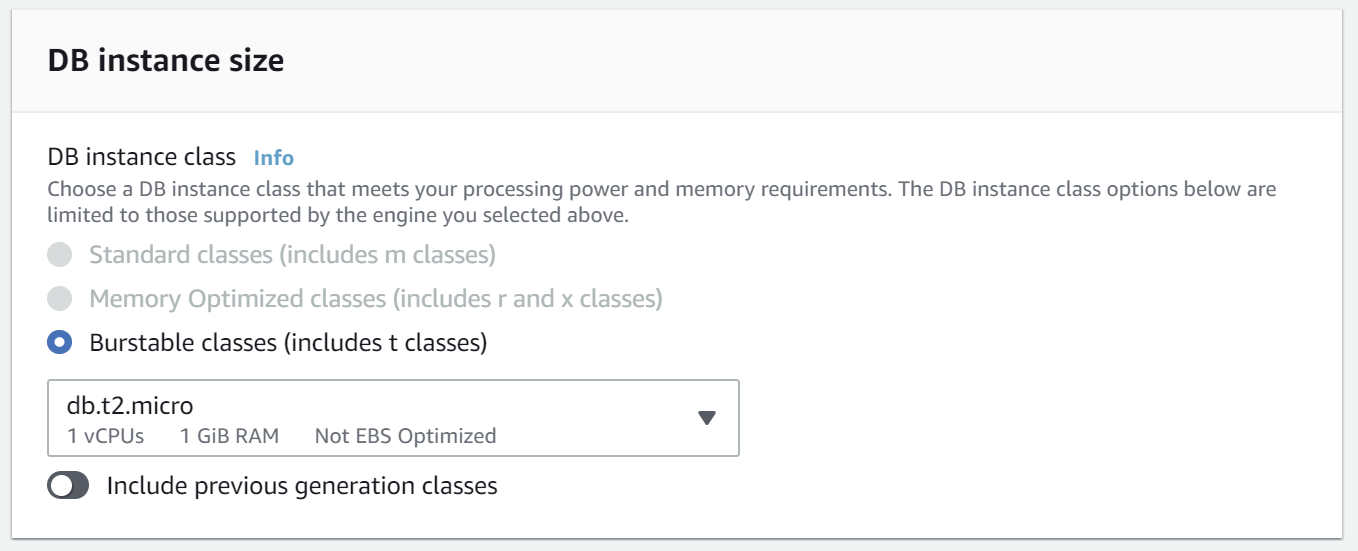
-
Under DB instance size, Burstable classes (includes t classes) and db.t2.micro should already be selected for you. This database configuration is the only one available for RDS Free Tier.
- Keep Availability & durability, Connectivity, Database authentication, and Additional configurations as the default settings. Then click Create database at the bottom.
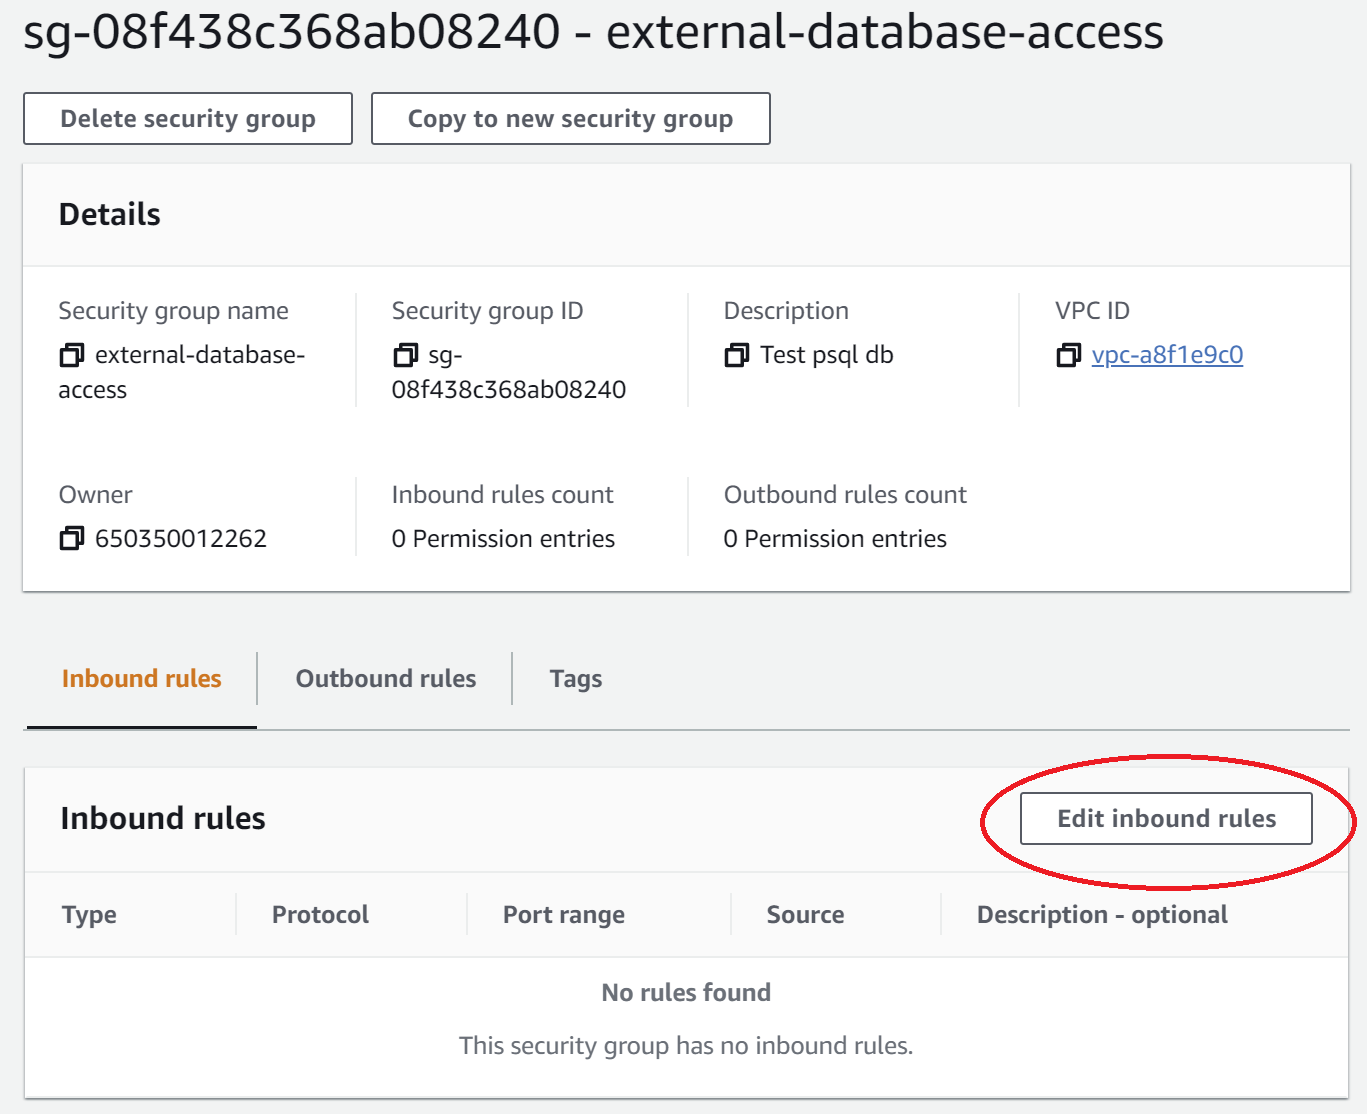
To provide access to your DB instance, we need add rules to the default Amazon Virtual Private Cloud (VPC) security group attached to our DB instance. VPC security groups control both inbound and outbound traffic for your DB instance.
-
Sign in to your Amazon VPC console.
- On navigation bar on the left, select Security Groups.

- Then click Create security groups.
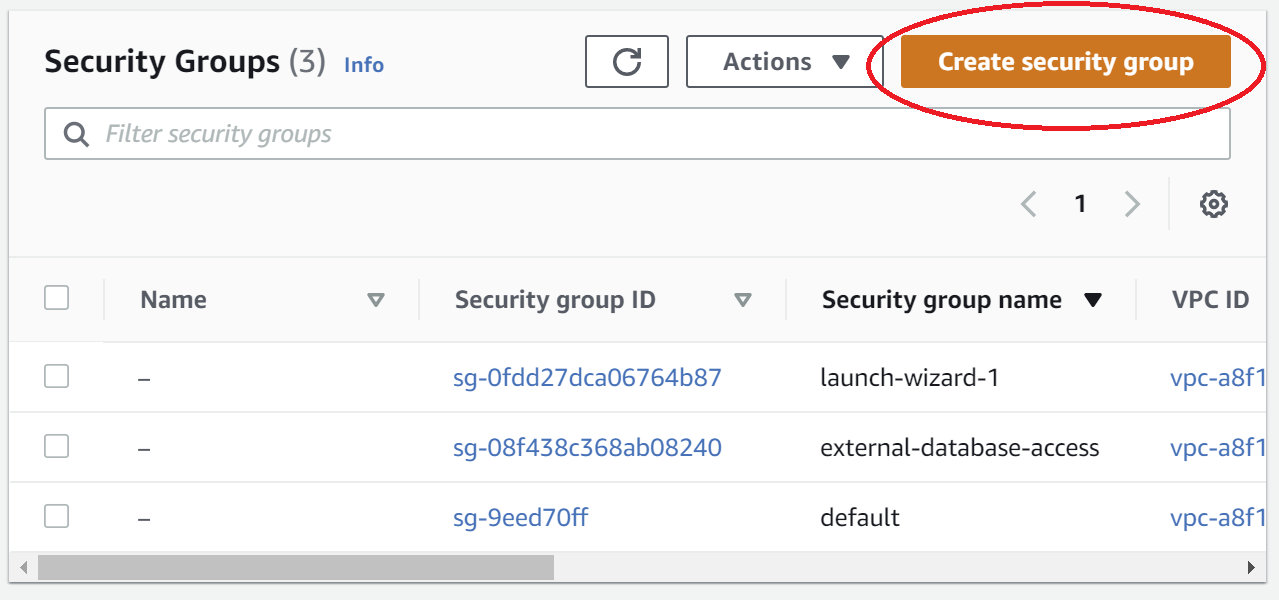
- Fill out the Security group name and VPC (should be the default one connected to your database instance) fields. Then create the security group.
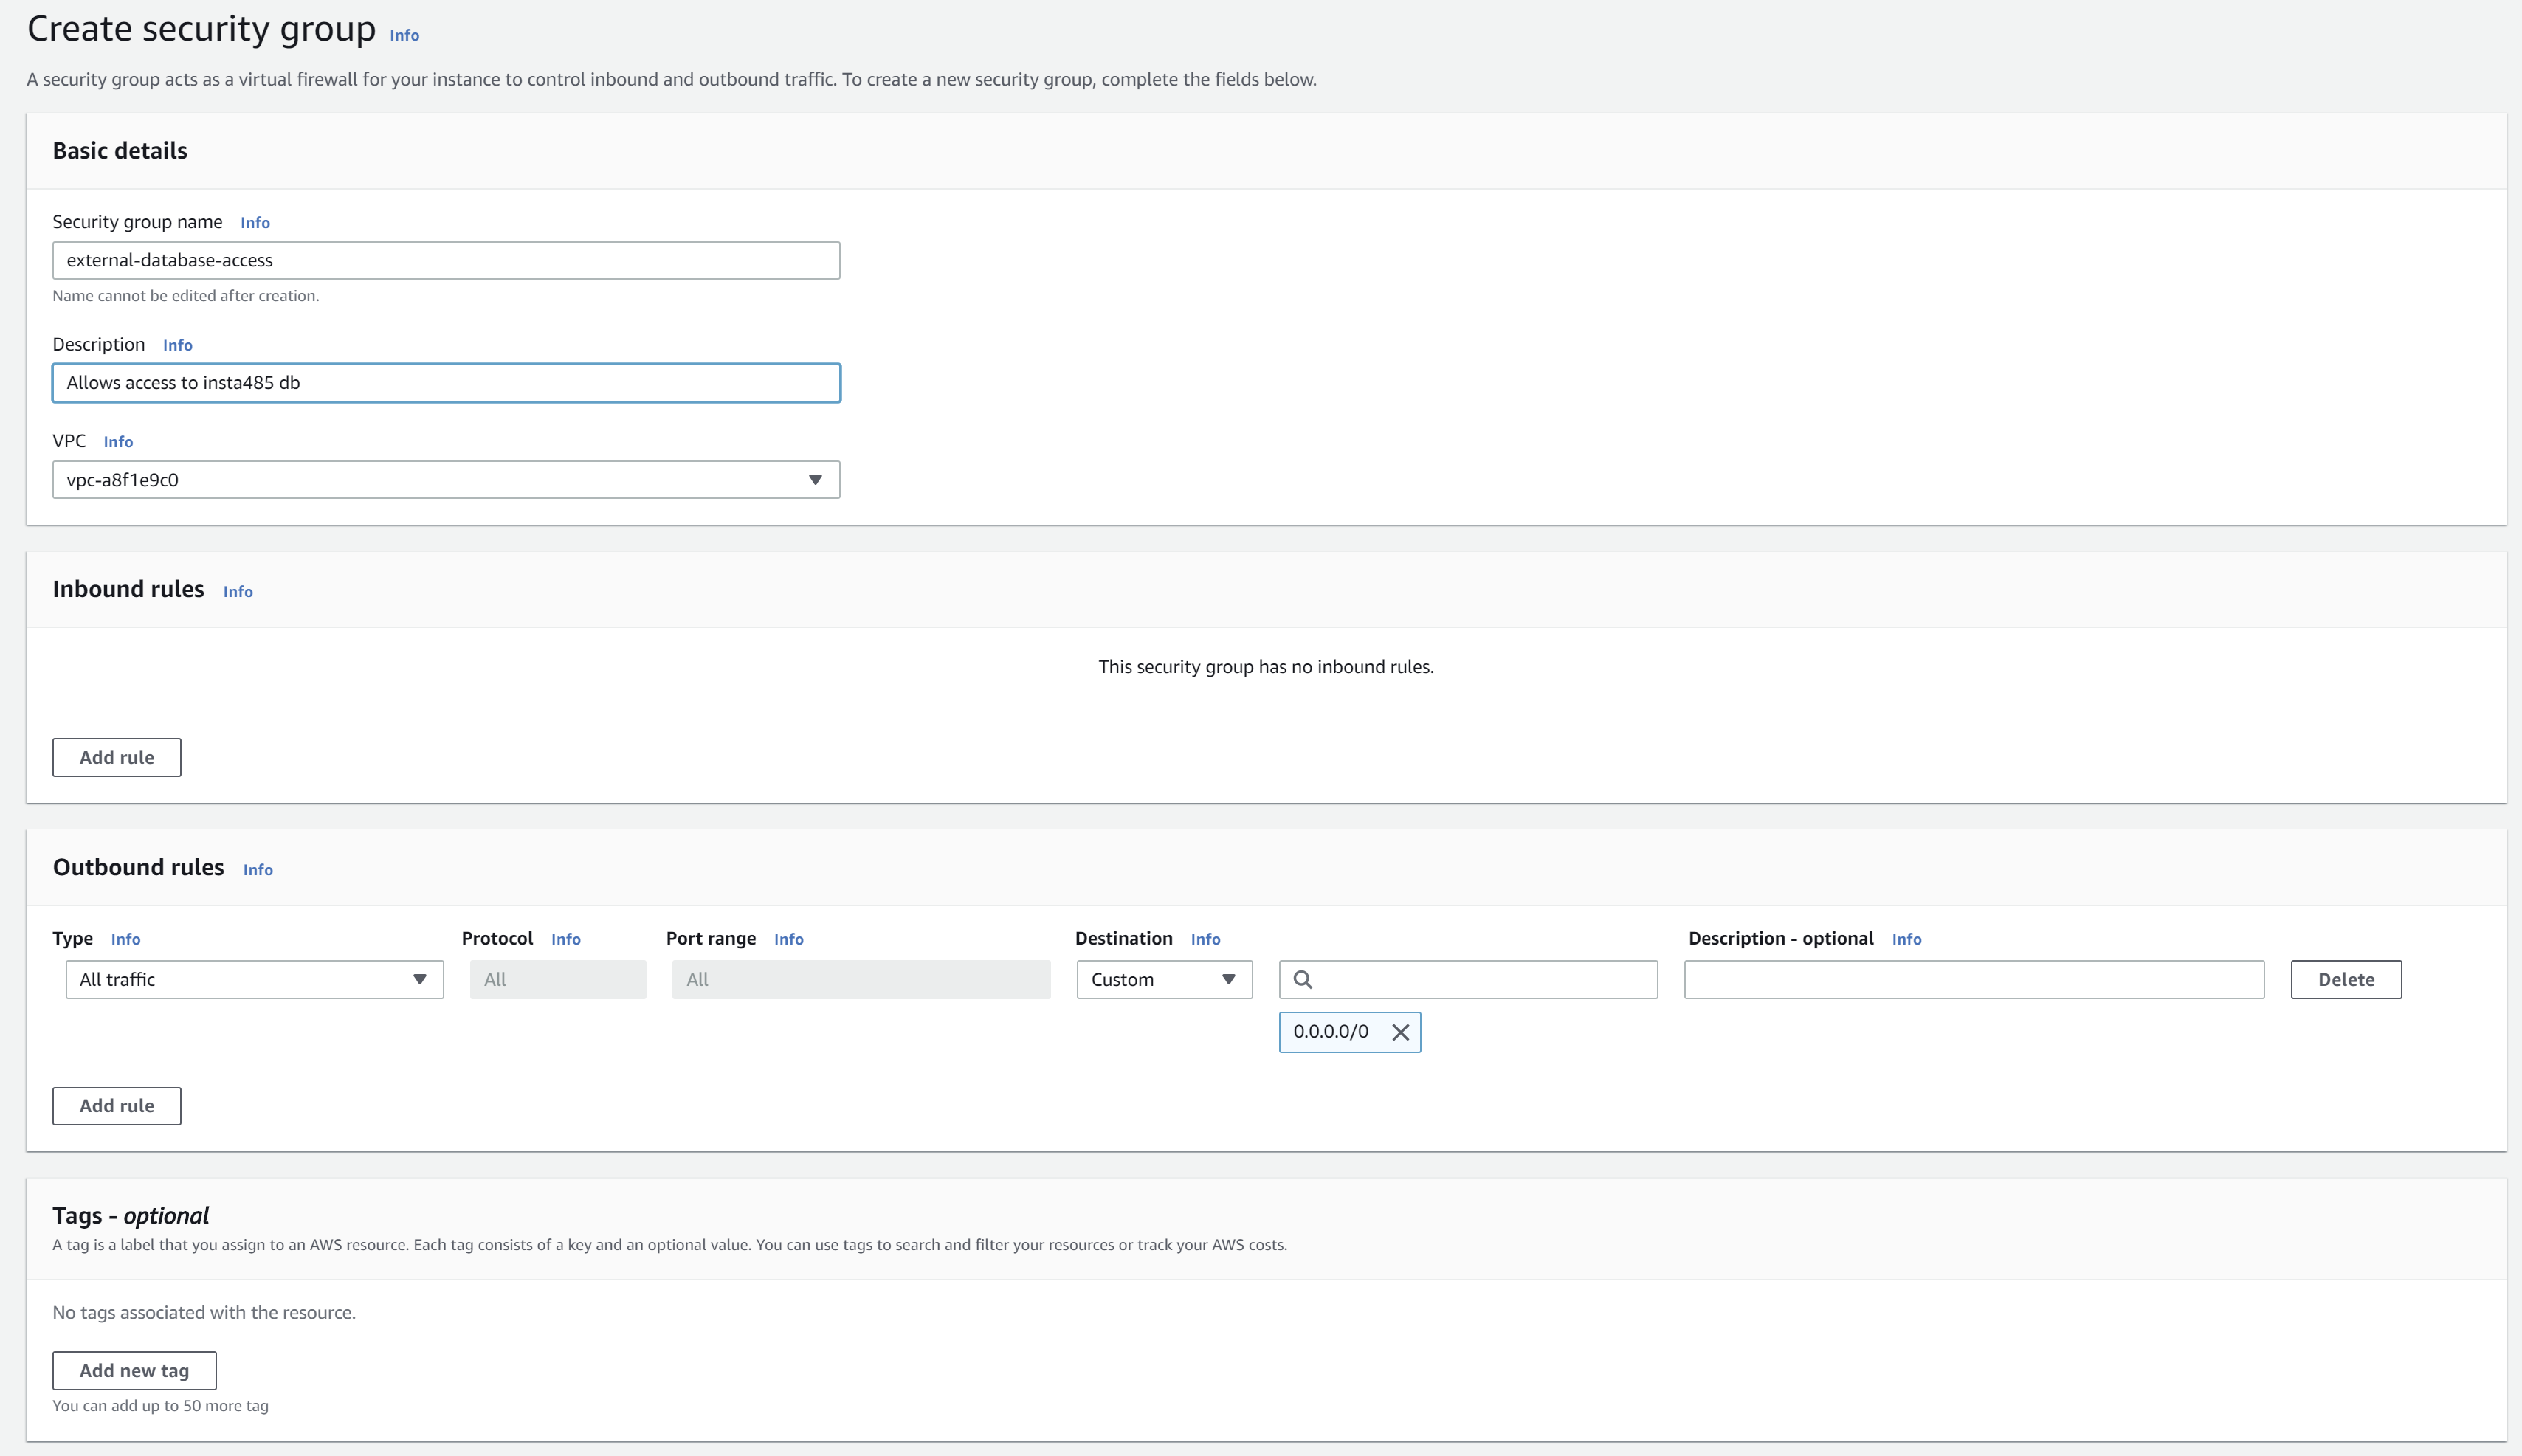
- The security group should still be selected. Click Edit inbound rules.
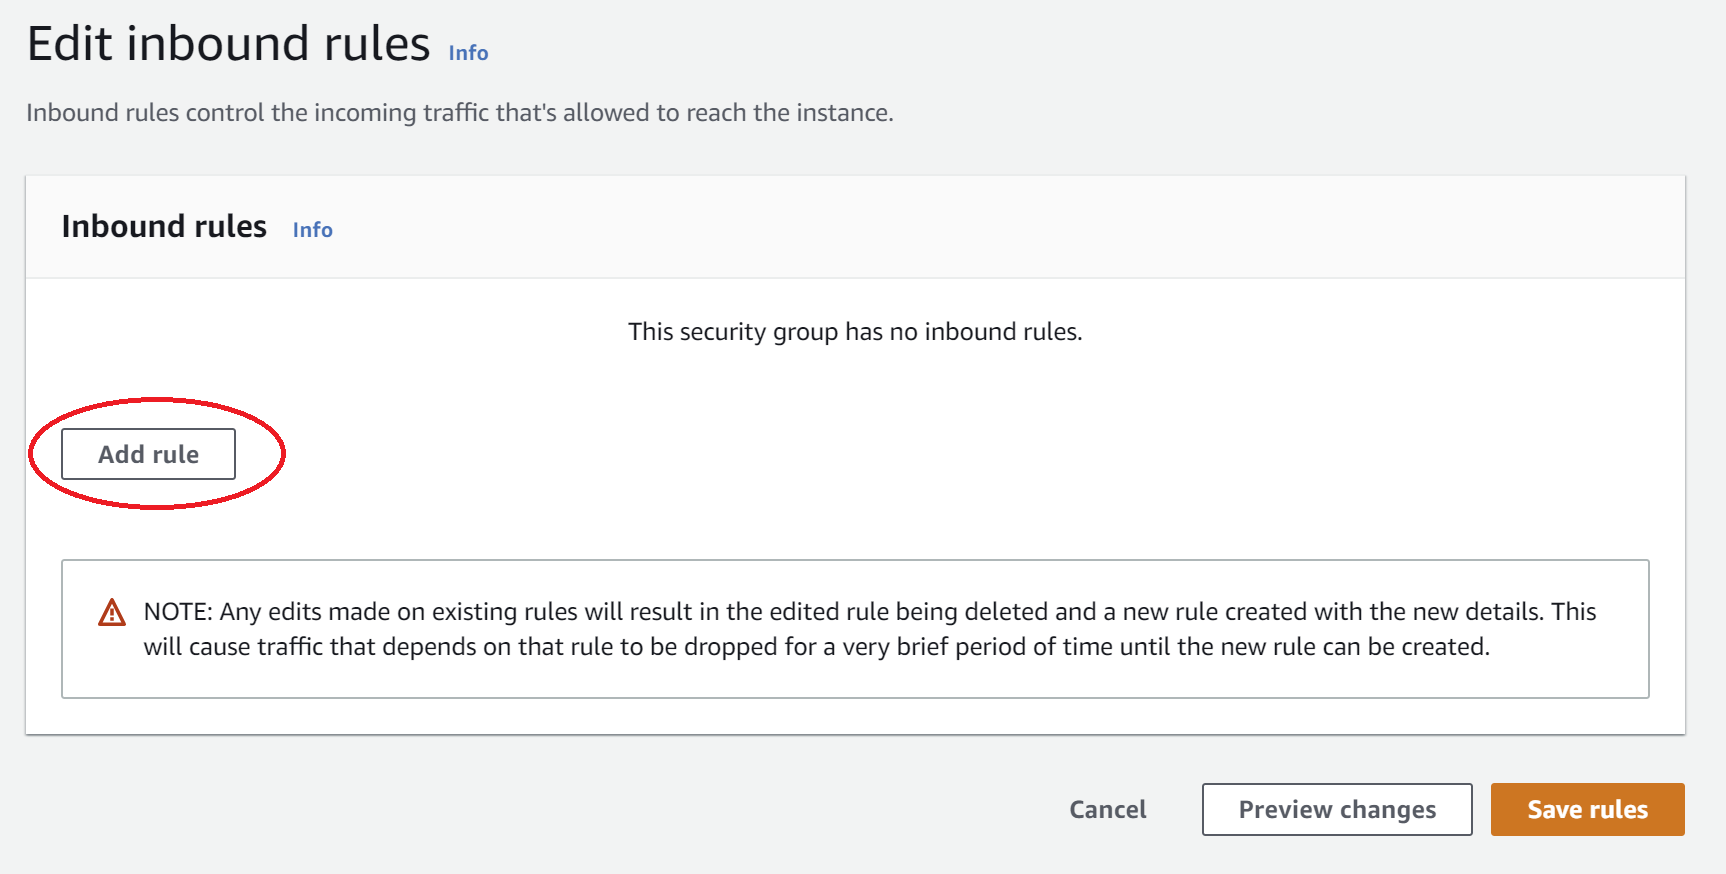
- Click Add rule.
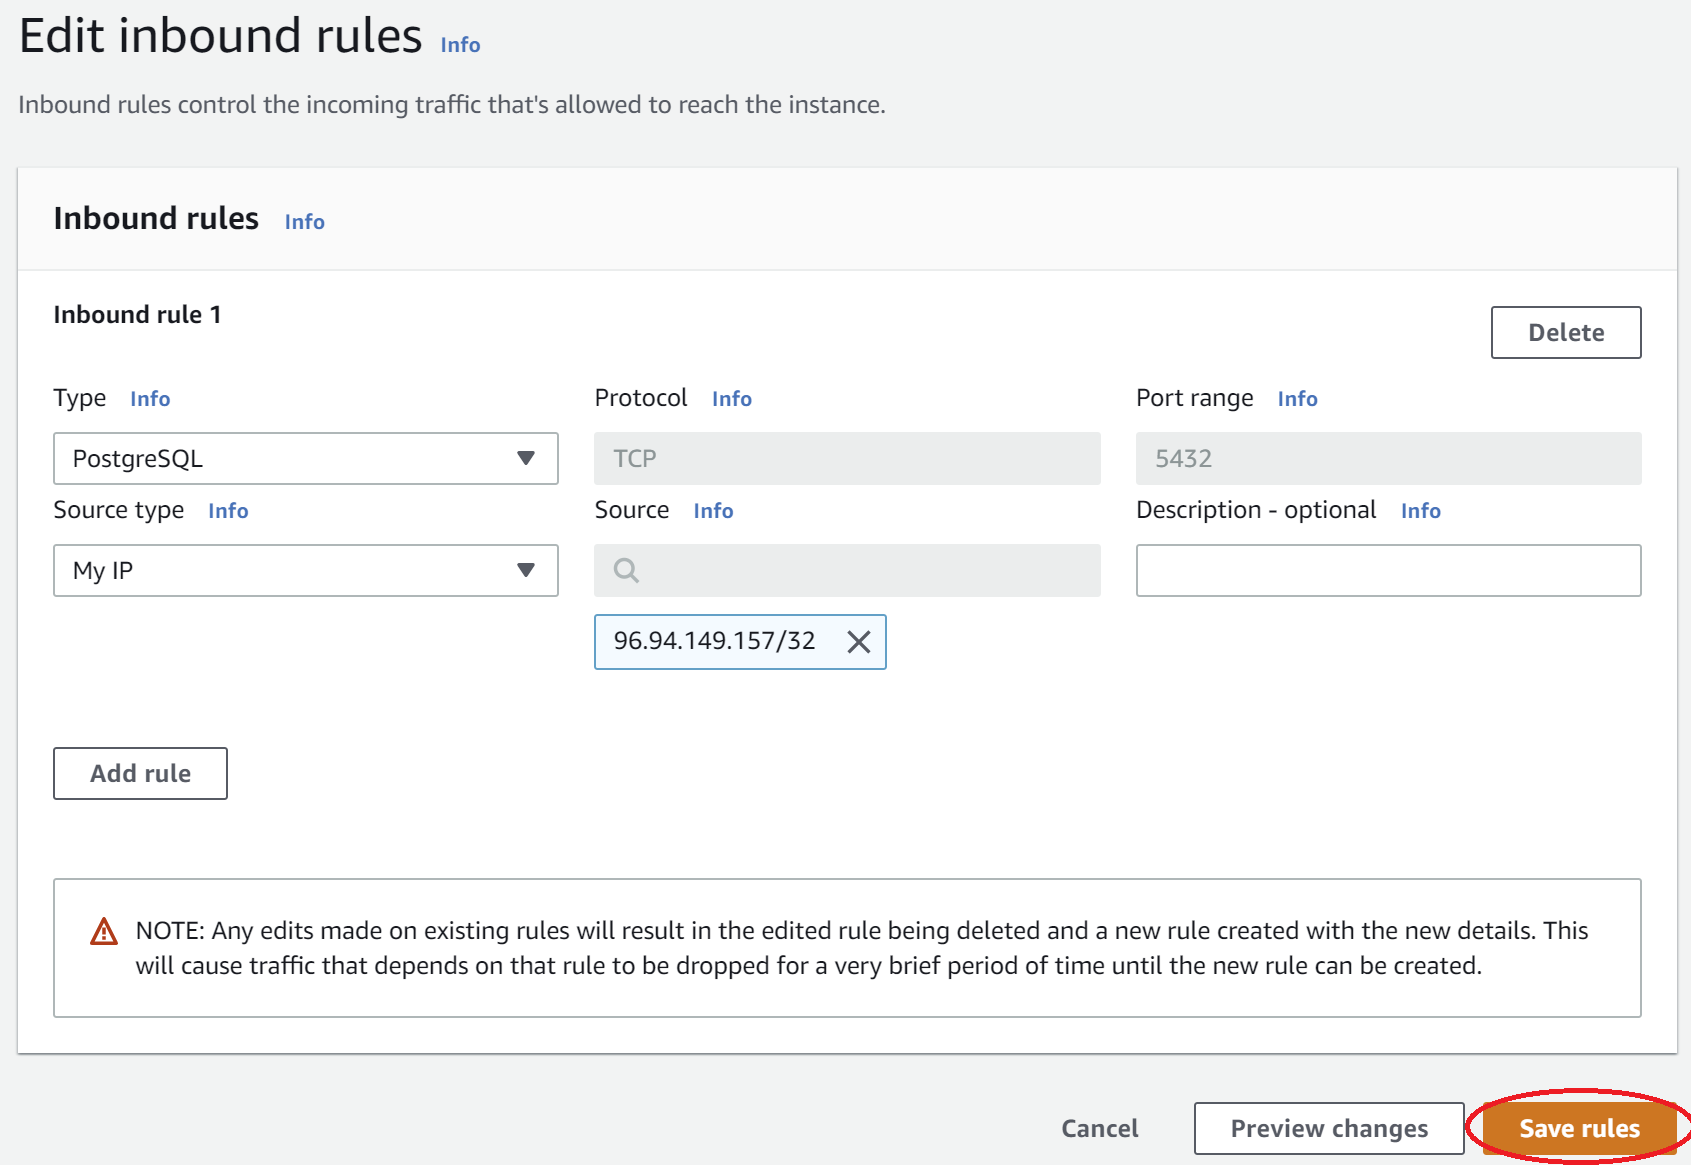
- Then fill out the fields as in the image and click Save rules.
Now that we have created this security group, we need to add it to our database. Navigate back to your insta485 database instance and select Modify.
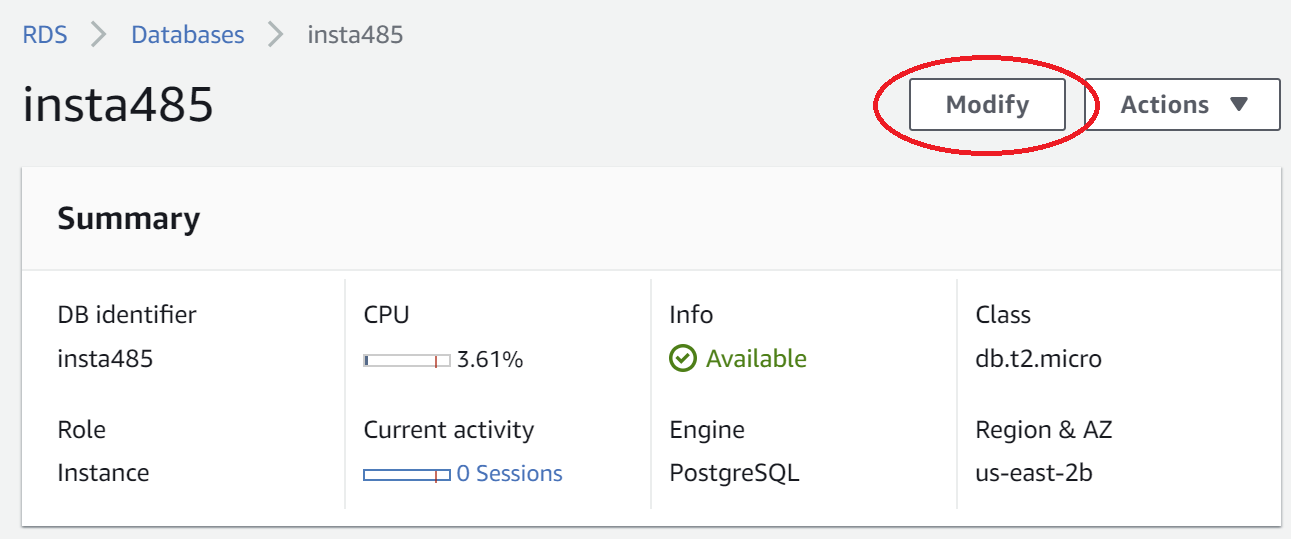
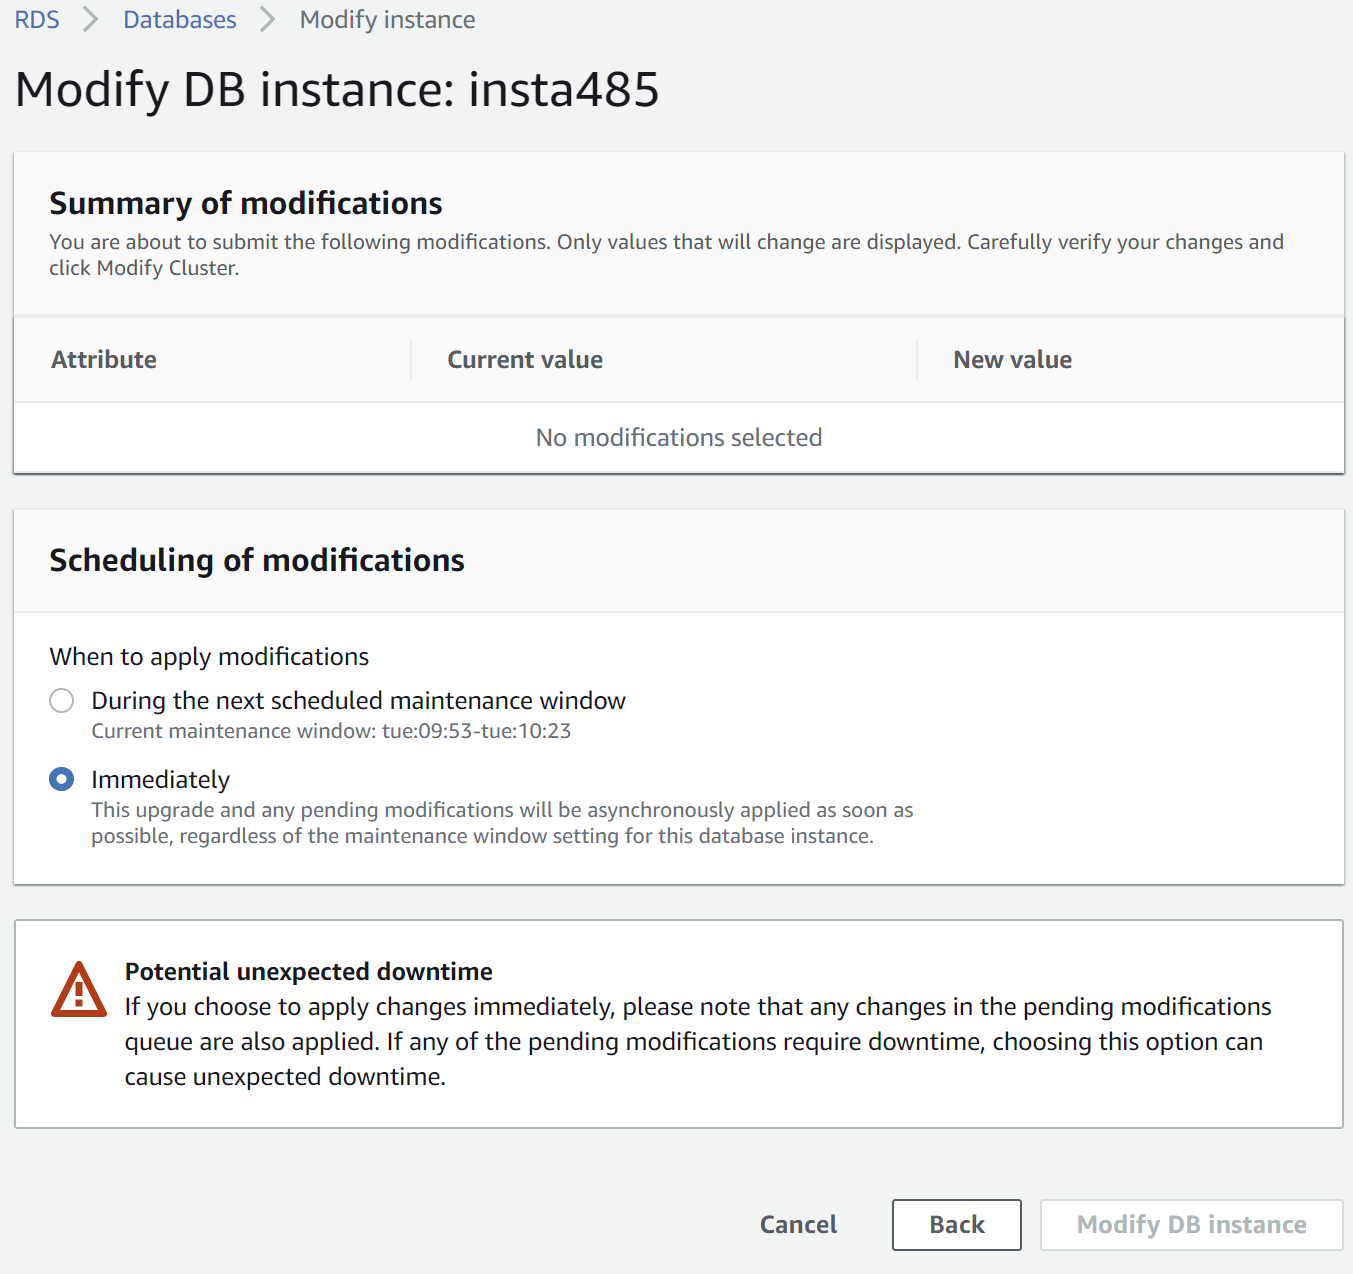
Under Connectivity, make your instance Publicly accessible and add your security group under Security group. Then click Continue.
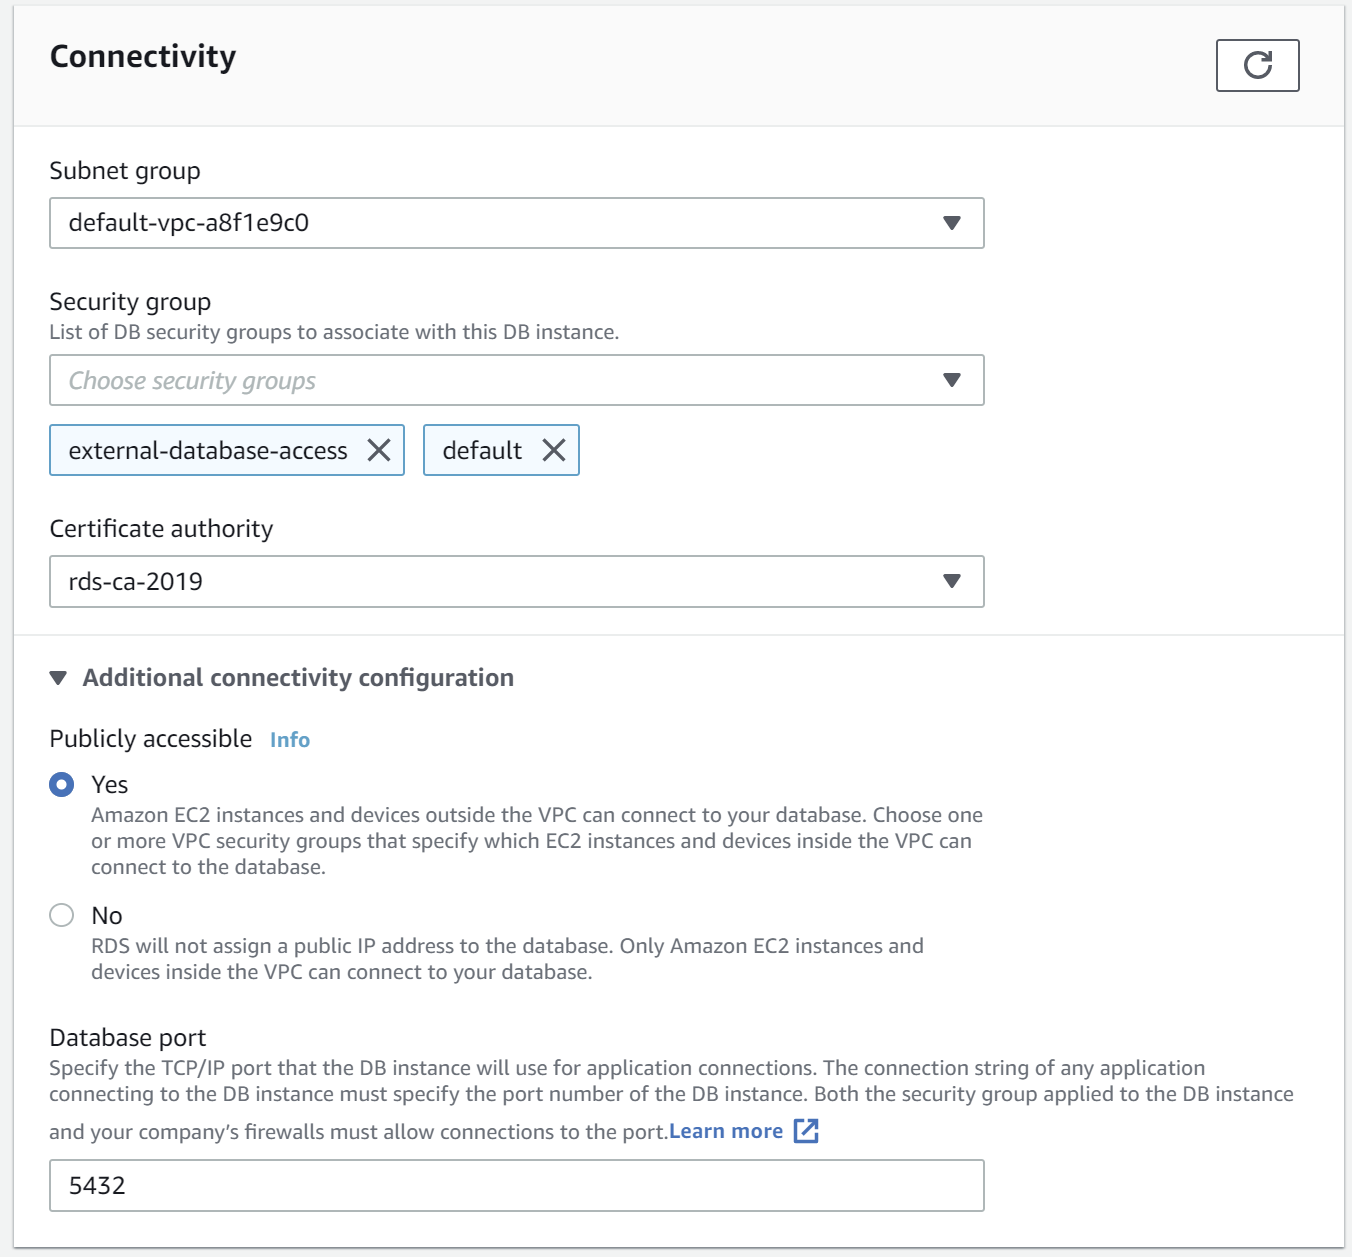
Apply these modifications Immediately and then click Modify DB Instance.
Take note of your database instance endpoint. You will need this url when connecting through your Flask app.
Test AWS RDS Database
Now navigate to your p3 directory. Check DNS resolves and port is open. Your RDSHOST (i.e. database instance endpoint) will be different.
$ export RDSHOST=insta485.chu7njfuys16.us-east-2.rds.amazonaws.com
$ export PGPASSWORD=YOUR_PASSWORD_HERE
$ nslookup $RDSHOST
...
Address: 3.23.251.198
$ nc -v -z $RDSHOST 5432
Connection to insta485.chu7njfuys16.us-east-2.rds.amazonaws.com port 5432 [tcp/postgresql] succeeded!
Check psql client connection.
$ psql -U postgres -h $RDSHOST -d template1 -c 'SELECT usename FROM pg_user'
Password for user postgres:
 usename
----------
 postgres
 rdsadmin
(2 rows)
Make sure you have these env vars set.
$ echo $PGPASSWORD
...
$ echo $RDSHOST
insta485.chu7njfuys16.us-east-2.rds.amazonaws.com
Create the insta485 database
$ psql -U postgres -h $RDSHOST -d template1 -c 'CREATE DATABASE insta485'
Create a database user. The postgres user created earlier is a super user. Avoid connecting as super user when possible.
$ psql -U postgres -h $RDSHOST -d template1
psql (12.3, server 11.6)
SSL connection (protocol: TLSv1.2, cipher: ECDHE-RSA-AES256-GCM-SHA384, bits: 256, compression: off)
Type "help" for help.

template1=> CREATE USER insta485 WITH PASSWORD 'YOUR_PASSWORD_HERE';
template1=> GRANT ALL PRIVILEGES ON DATABASE insta485 TO insta485;
template1=> \q
Initialize schema
$ export PGPASSWORD=INSTA485_USER_PASSWORD
$ psql -U insta485 -h $RDSHOST -d insta485 -a -v ON_ERROR_STOP=1 -f sql/schema.sql
$ psql -U postgres -h $RDSHOST -d insta485 -c '\dt'
           List of relations
 Schema |   Name    | Type  |  Owner
--------+-----------+-------+----------
 public | comments  | table | postgres
 public | following | table | postgres
 public | likes     | table | postgres
 public | posts     | table | postgres
 public | users     | table | postgres
(5 rows)
Optionally initialize data. WARNING the default data contains user logins with bad passwords!
$ psql -U insta485 -h $RDSHOST -d insta485 -a -v ON_ERROR_STOP=1 -f sql/data.sql
$ psql -U insta485 -h $RDSHOST -d insta485 -c 'SELECT username FROM users'
 username
----------
 awdeorio
 jflinn
 michjc
 jag
(4 rows)
Run a local dev server with a remote PostgreSQL database hosted by AWS.
Change the database configuration in insta485/config.py to use your AWS connection info.
POSTGRESQL_DATABASE_HOST = "insta485.chu7njfuys16.us-east-2.rds.amazonaws.com"
POSTGRESQL_DATABASE_PORT = 5432
POSTGRESQL_DATABASE_USER = "insta485"
POSTGRESQL_DATABASE_PASSWORD = FIXME_PASSWORD_HERE
POSTGRESQL_DATABASE_DB = "insta485"
Run the dev server.
$ ./bin/insta485run
Navigate to http://localhost:8000. Now your Flask application is pulling from an AWS RDS instance in the cloud!
Commit and Push Code Changes
If everything has worked for you up until this point, then go ahead and commit and push your changes.
$ git status
On branch aws-awdeorio
Your branch is up to date with 'origin/aws-awdeorio.
Changes not staged for commit:
  (use "git add <file>..." to update what will be committed)
  (use "git checkout -- <file>..." to discard changes in working directory)
    ...
$ git add .
$ git commit -m "Update SQLite3 database to PostgreSQL hosted on AWS RDS"
$ git push
Clean up
Perform this clean up step so that you incur no charges on your AWS account. In this lab, we set up a free tier database, which provides a lot of capabilities for free (view here). You MUST delete your database instance or you’ll run out of free credits!
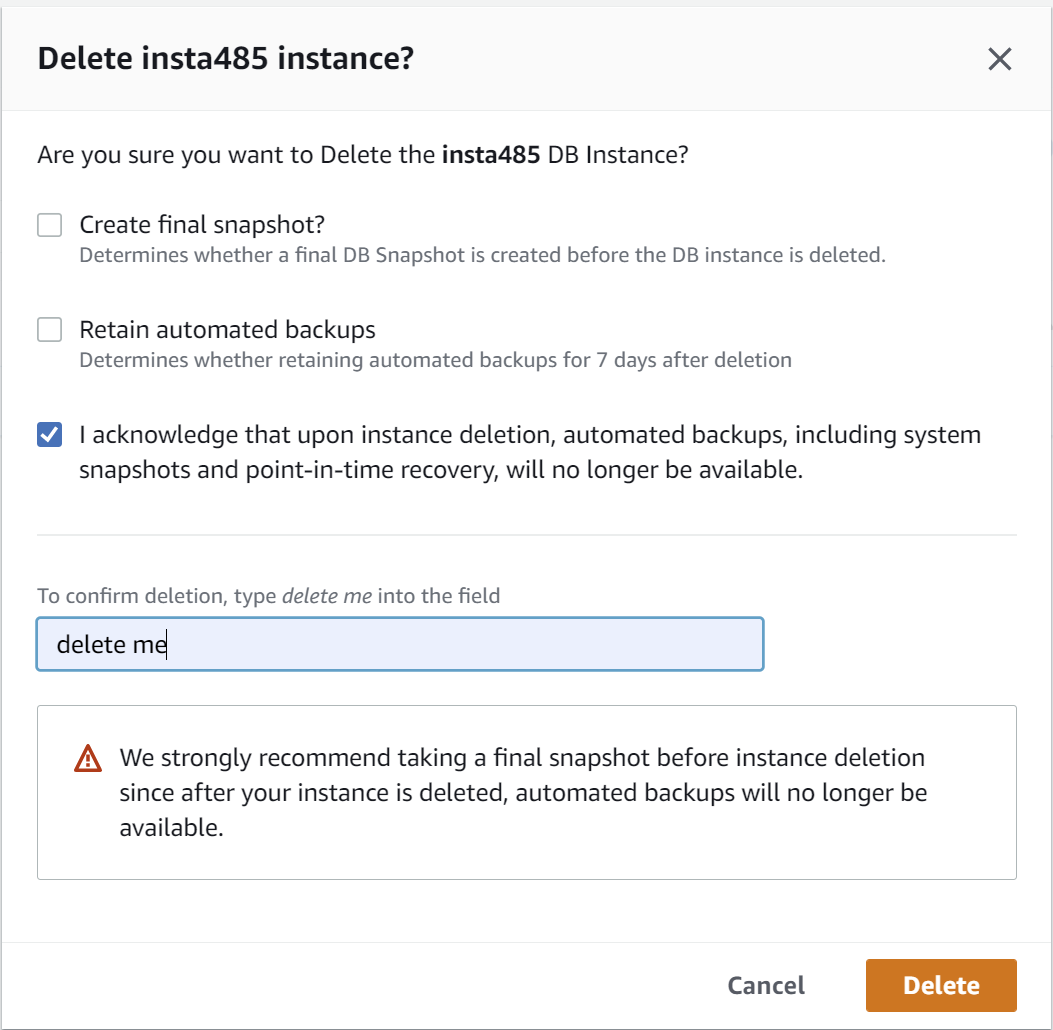
Navigate to your databases in the RDS console. Select the insta485 database and under Actions, click Delete.
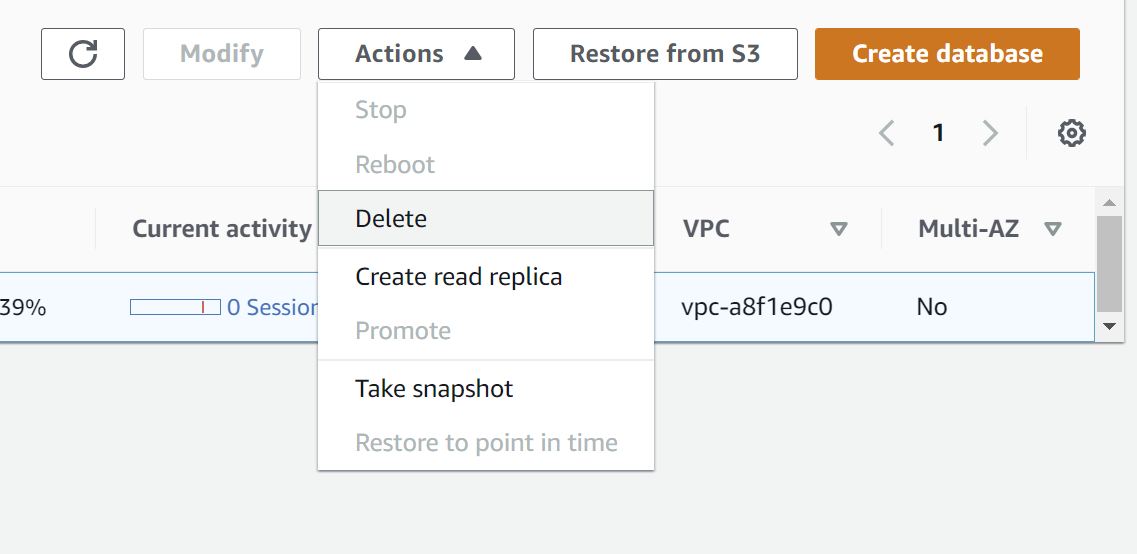
Do not save a snapshot or backup the database. Click Delete.
We want to revert the changes to insta485/config.py so they are back to:
POSTGRESQL_DATABASE_HOST = "localhost"
POSTGRESQL_DATABASE_PORT = 5432
POSTGRESQL_DATABASE_USER = "awdeorio" # OS or WSL username
POSTGRESQL_DATABASE_PASSWORD = None
POSTGRESQL_DATABASE_DB = "insta485"
Completion Criteria
- Be able to explain PostgreSQL and AWS RDS
- Have local PostgreSQL
insta485database with the table create and populatedCheck
$ sudo service postgresql start * Starting PostgreSQL 10 database server $ ./bin/insta485db create $ psql -d insta485 -c '\d' List of relations Schema | Name | Type | Owner --------+-----------+-------+---------- public | comments | table | postgres public | following | table | postgres public | likes | table | postgres public | posts | table | postgres public | users | table | postgres (5 rows) $ ./bin/insta485db dump # should return all of the starting data ... -
Be able to pull from database through
insta485app. There are no formal test cases for this right now, so just test by navigating through your application. - Have a remote PostgreSQL database hosted on AWS RDS. Your
RDSHOSTwill be different.Check
$ export RDSHOST=insta485.chu7njfuys16.us-east-2.rds.amazonaws.com $ export PGPASSWORD=INSTA485_USER_PASSWORD $ psql -U insta485 -h $RDSHOST -d insta485 -a -v ON_ERROR_STOP=1 -f sql/schema.sql $ psql -U postgres -h $RDSHOST -d insta485 -c '\dt' List of relations Schema | Name | Type | Owner --------+-----------+-------+---------- public | comments | table | postgres public | following | table | postgres public | likes | table | postgres public | posts | table | postgres public | users | table | postgres (5 rows) $ psql -U insta485 -h $RDSHOST -d insta485 -a -v ON_ERROR_STOP=1 -f sql/data.sql $ psql -U insta485 -h $RDSHOST -d insta485 -c 'SELECT username FROM users' username ---------- awdeorio jflinn michjc jag (4 rows) - Deleted your Amazon RDS instance.
Lab Quiz
Complete the lab quiz by the due date.