EECS 485 Lab
Lab 9: Scaling Static Pages and Uploads with PaaS
Goals
- Learn how to setup IAM roles and the AWS CLI (command line interface)
- Convert P3 static file server to use AWS S3 and CDN
- Convert P3 file uploads to use AWS S3
Restarting this Tutorial
- To delete IAM user, go to IAM console, click on Users –> Check box next to user –> Delete (and accept every warning)
- To delete IAM group, click on groups, click on the checkbox next to group, click on group actions, and press delete
- To revert code changes use
git reset$ pwd /Users/awdeorio/src/eecs485/p3-insta485-clientside/ $ git checkout aws-uniqname M ... Already on 'aws-uniqname' Your branch is up to date with 'origin/aws-uniqname'. $ git branch # Verify that you are on the aws-uniqname branch * aws-uniqname main $ git reset --hard # Reverts all code changes back to your previous commit HEAD is now at ... [previous commit message] - To remove all S3 changes use
aws s3 rb$ aws s3 ls 2020-08-24 20:50:46 uniqname.static.insta485.com 2020-08-24 19:16:53 uniqname.uploads.insta485.com 2020-08-24 15:03:57 logs.uniqname.com $ aws s3 rb s3://uniqname.static.insta485.com --force $ aws s3 rb s3://uniqname.uploads.insta485.com --force $ aws s3 rb s3://log.uniqname.com --force $ aws s3 ls # Verify that those buckets do not exist anymore - To delete and disable your CDN distribution, navigate to the CloudFront console, click on your CDN distribution, and click on disable. Once it is disabled, you will be able to delete it as well.
Setup AWS
Follow the steps in the AWS tutorial to create an AWS Educate account.
Create IAM User
-
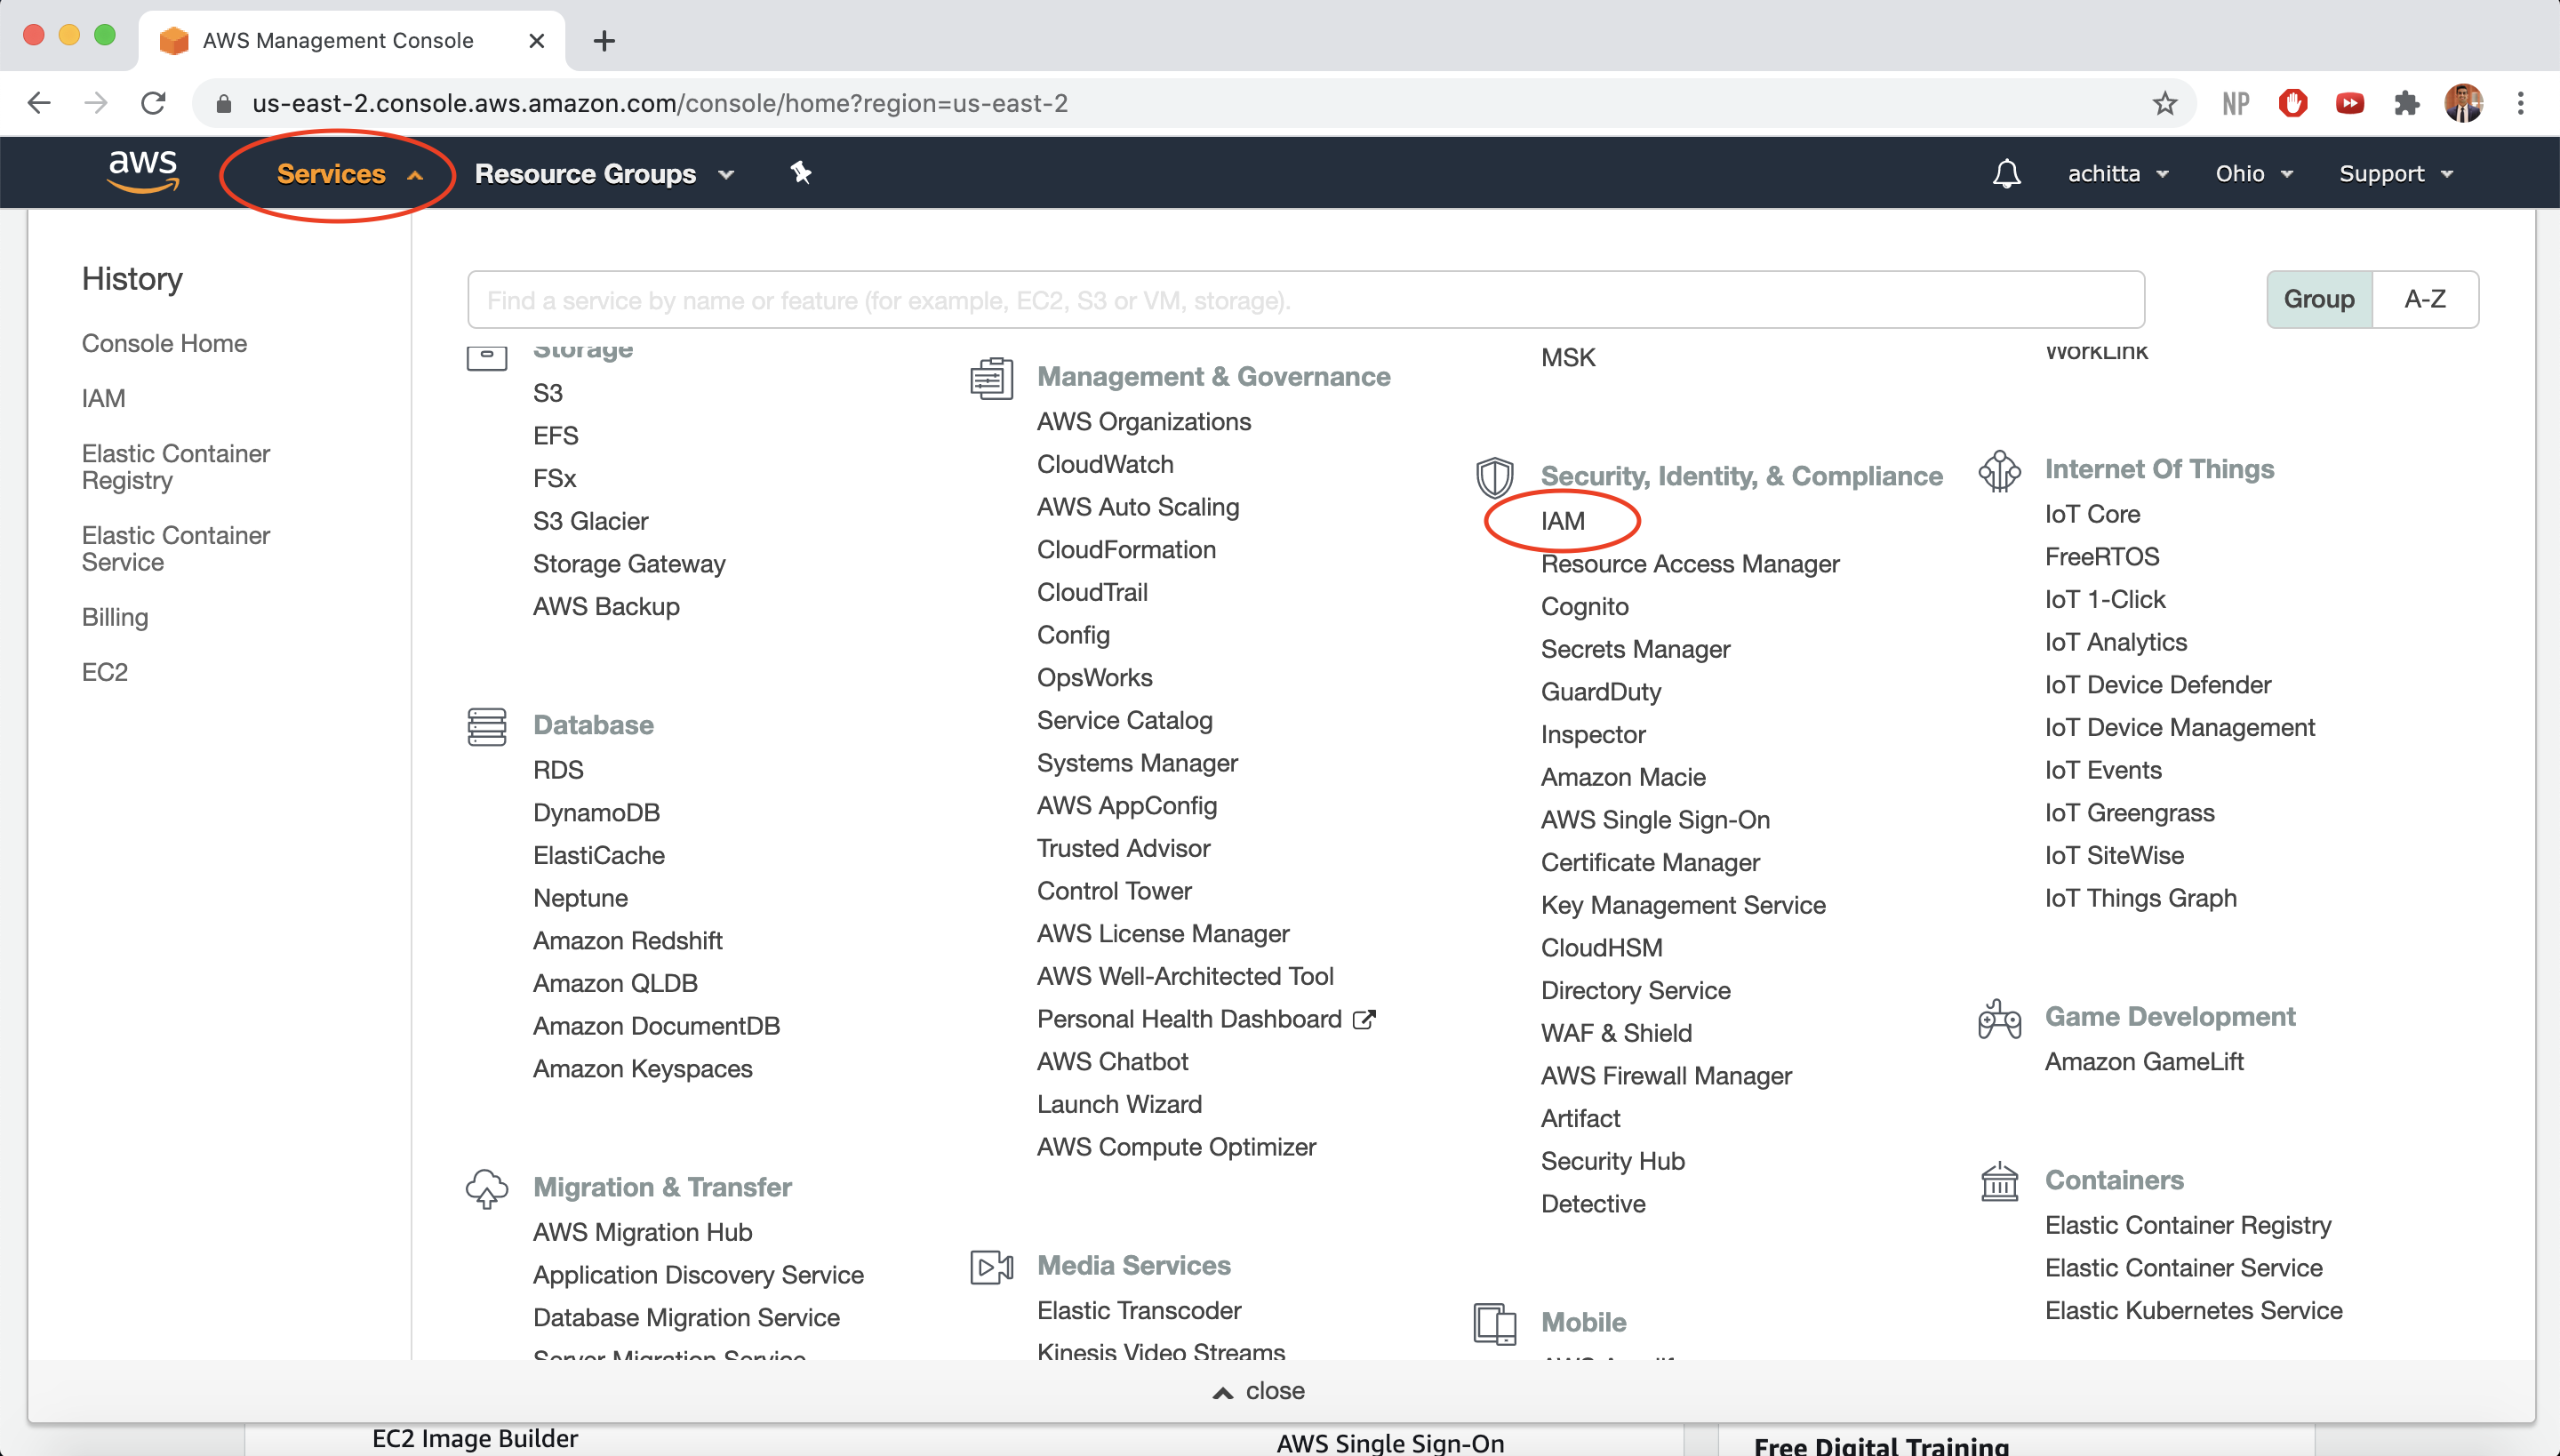
Navigate to the AWS Management Console. Select the “Services” dropdown menu, then “IAM”. AWS Identity and Access Management (IAM) allows you to securely control who is authenticated (signed in) and authorized (has permissions) to use your AWS resources.
-
Click on Users on the side panel and select Add User.

-
Make sure you select Programmatic access and AWS Management Console access so that we can access AWS from our local command line. Also select Custom password for the console password, enter a password of your choosing, and select Require password reset. Then, click on Next: Permissions.

-
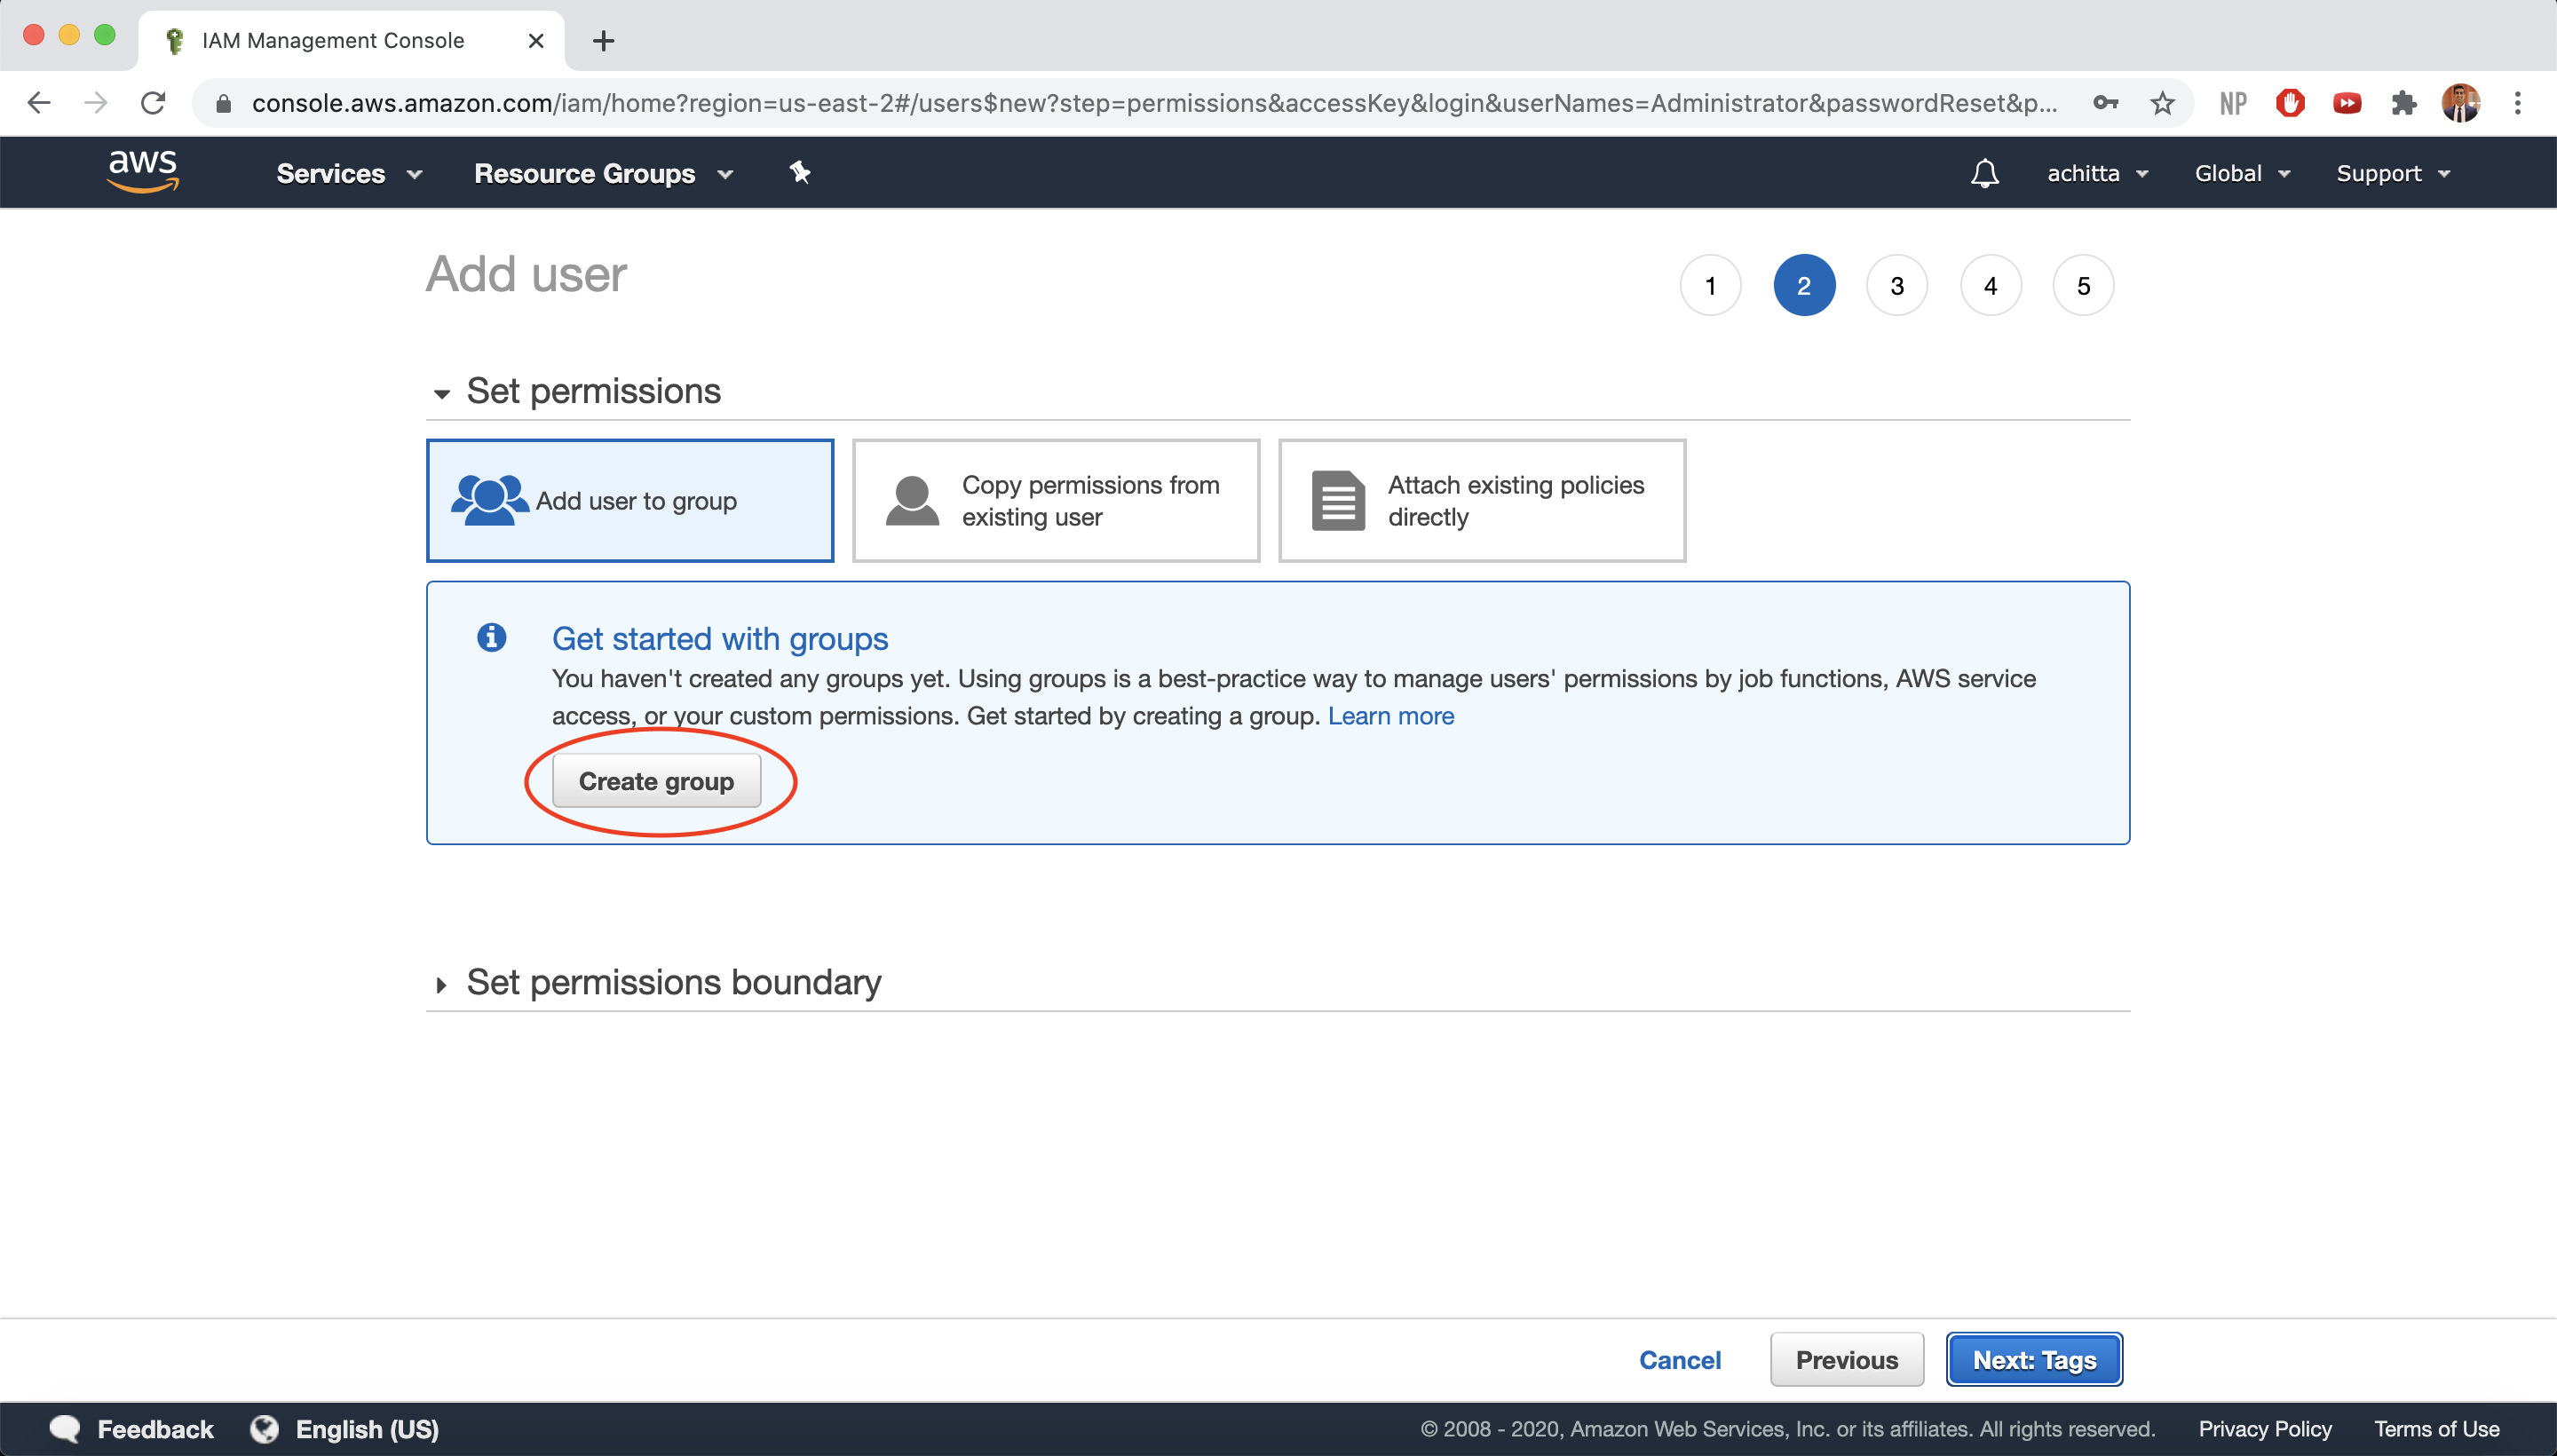
Select Add user to group and then Create group.
-
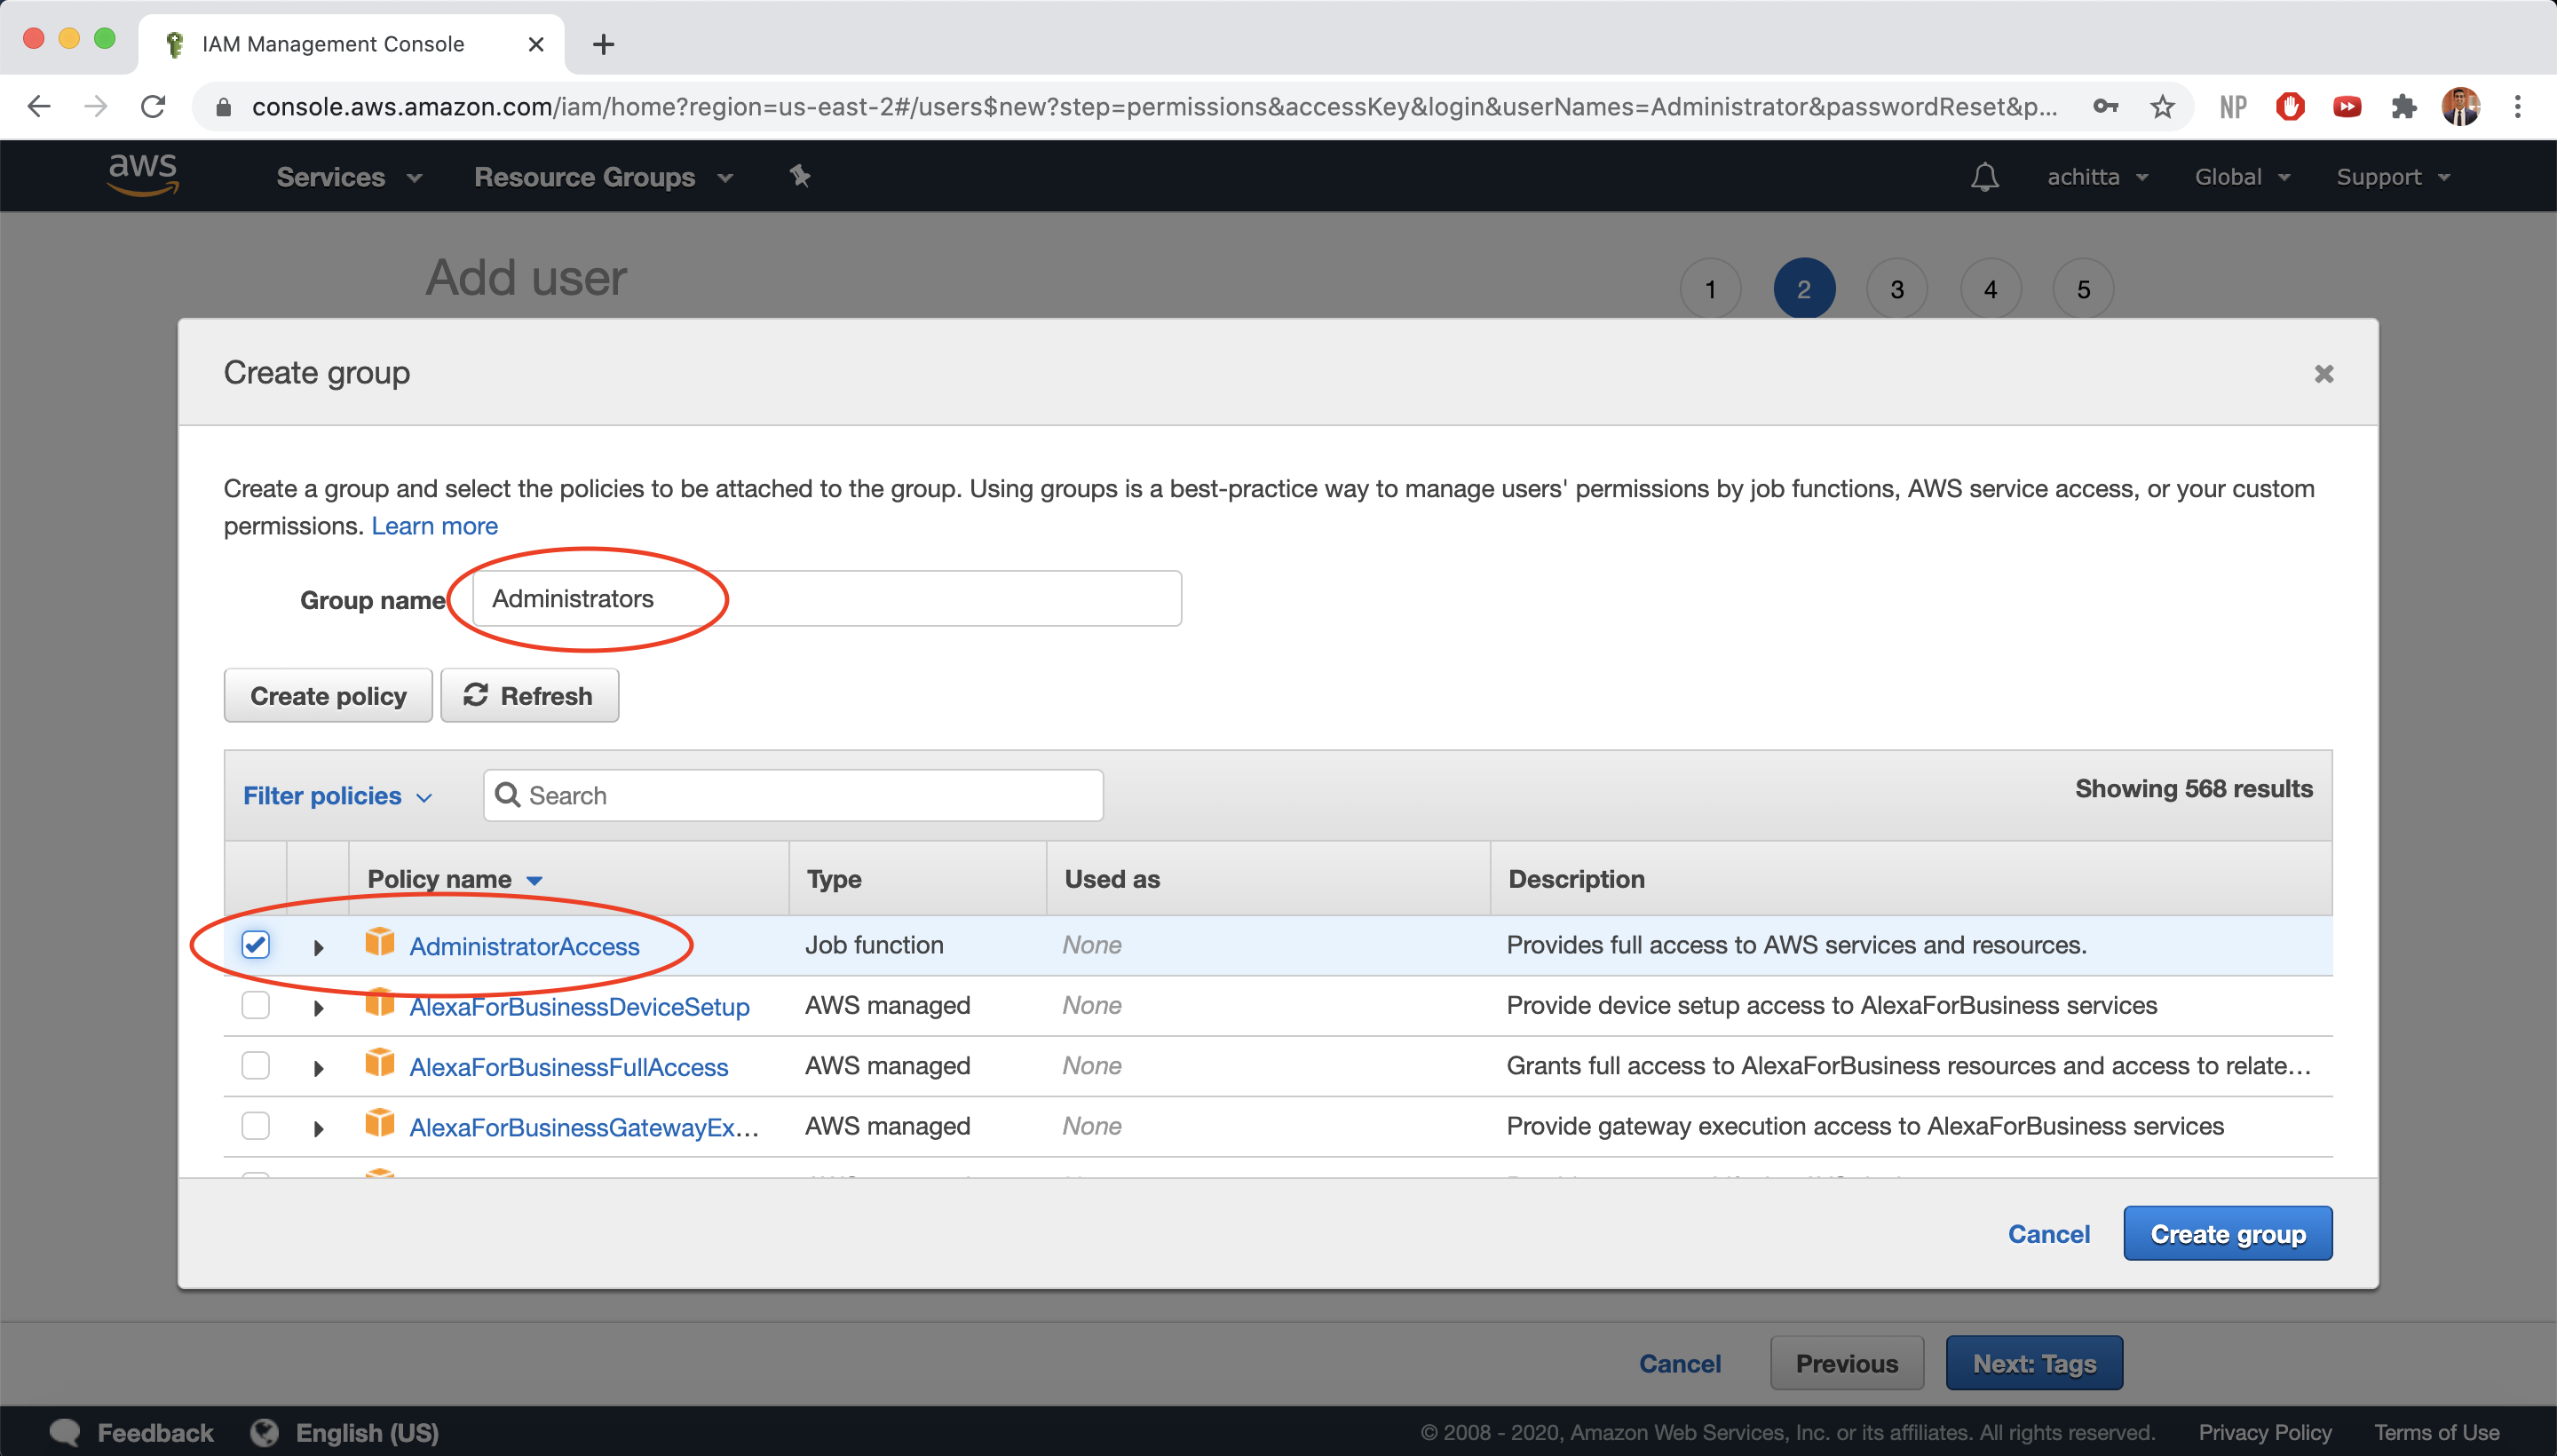
For Group Name, enter “Administrators” and select the AdministratorAccess policy (gives members of this group full access to AWS resources). Then, click on Create group.
-
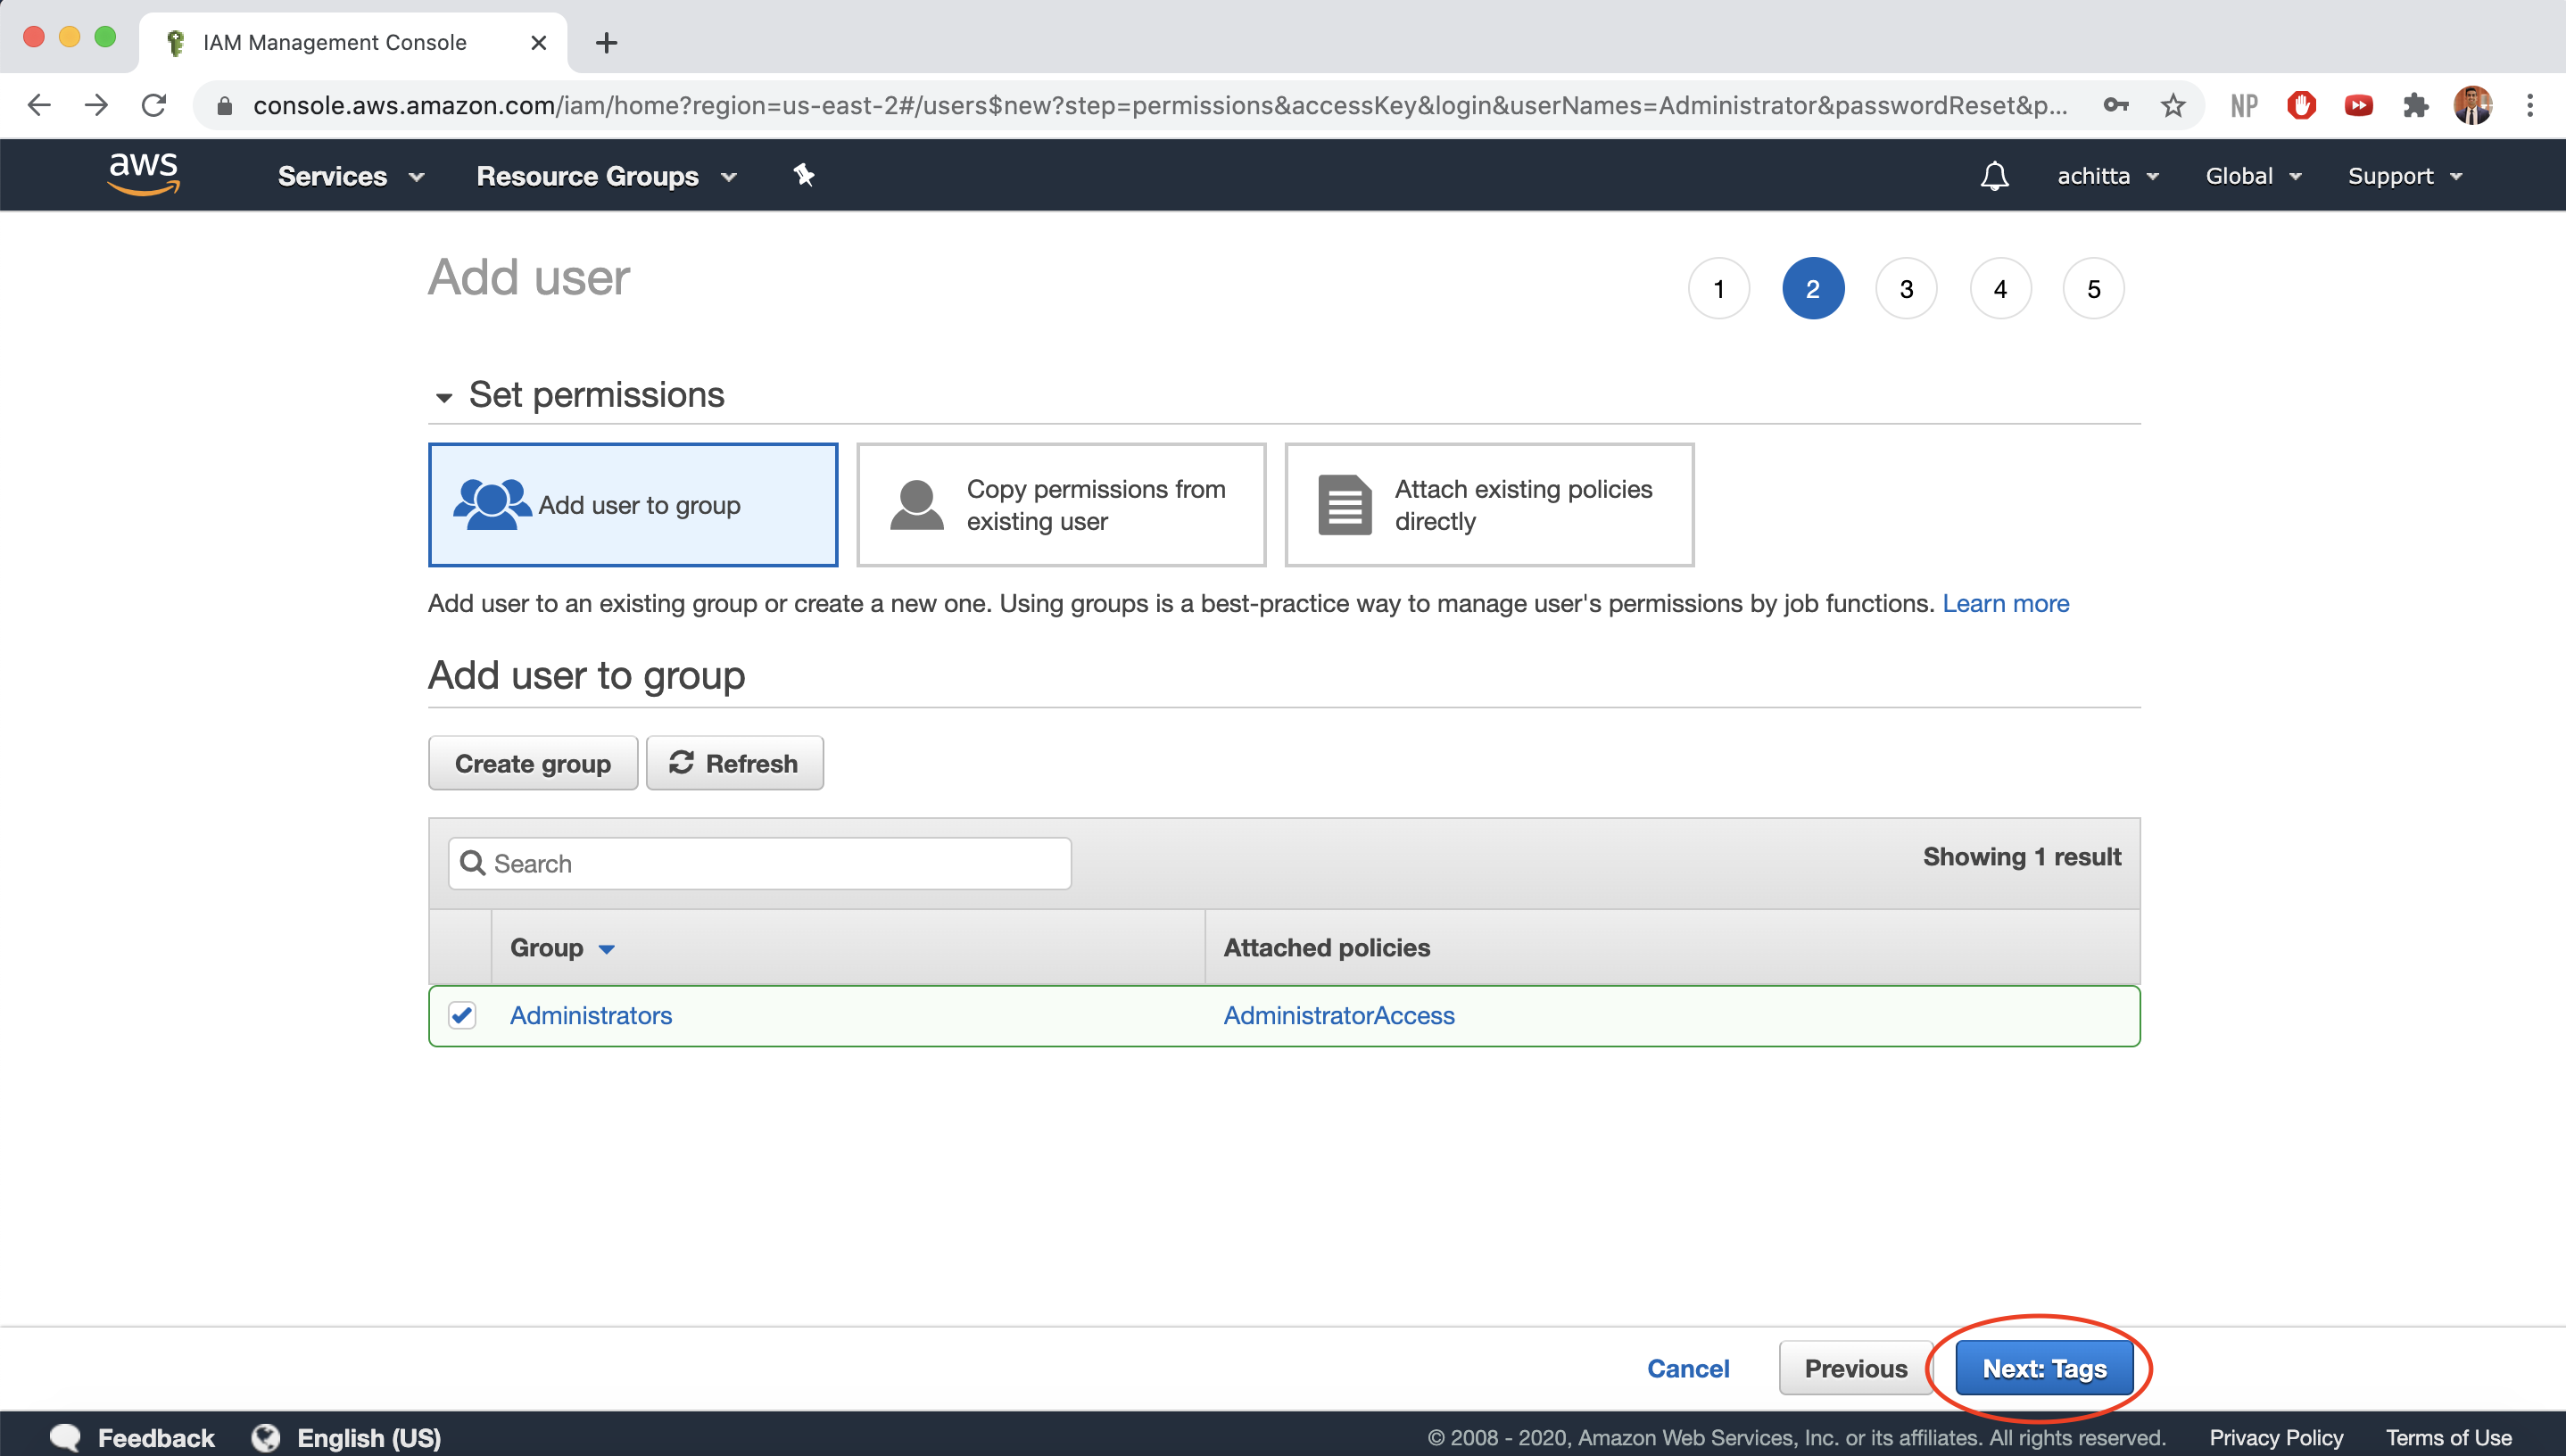
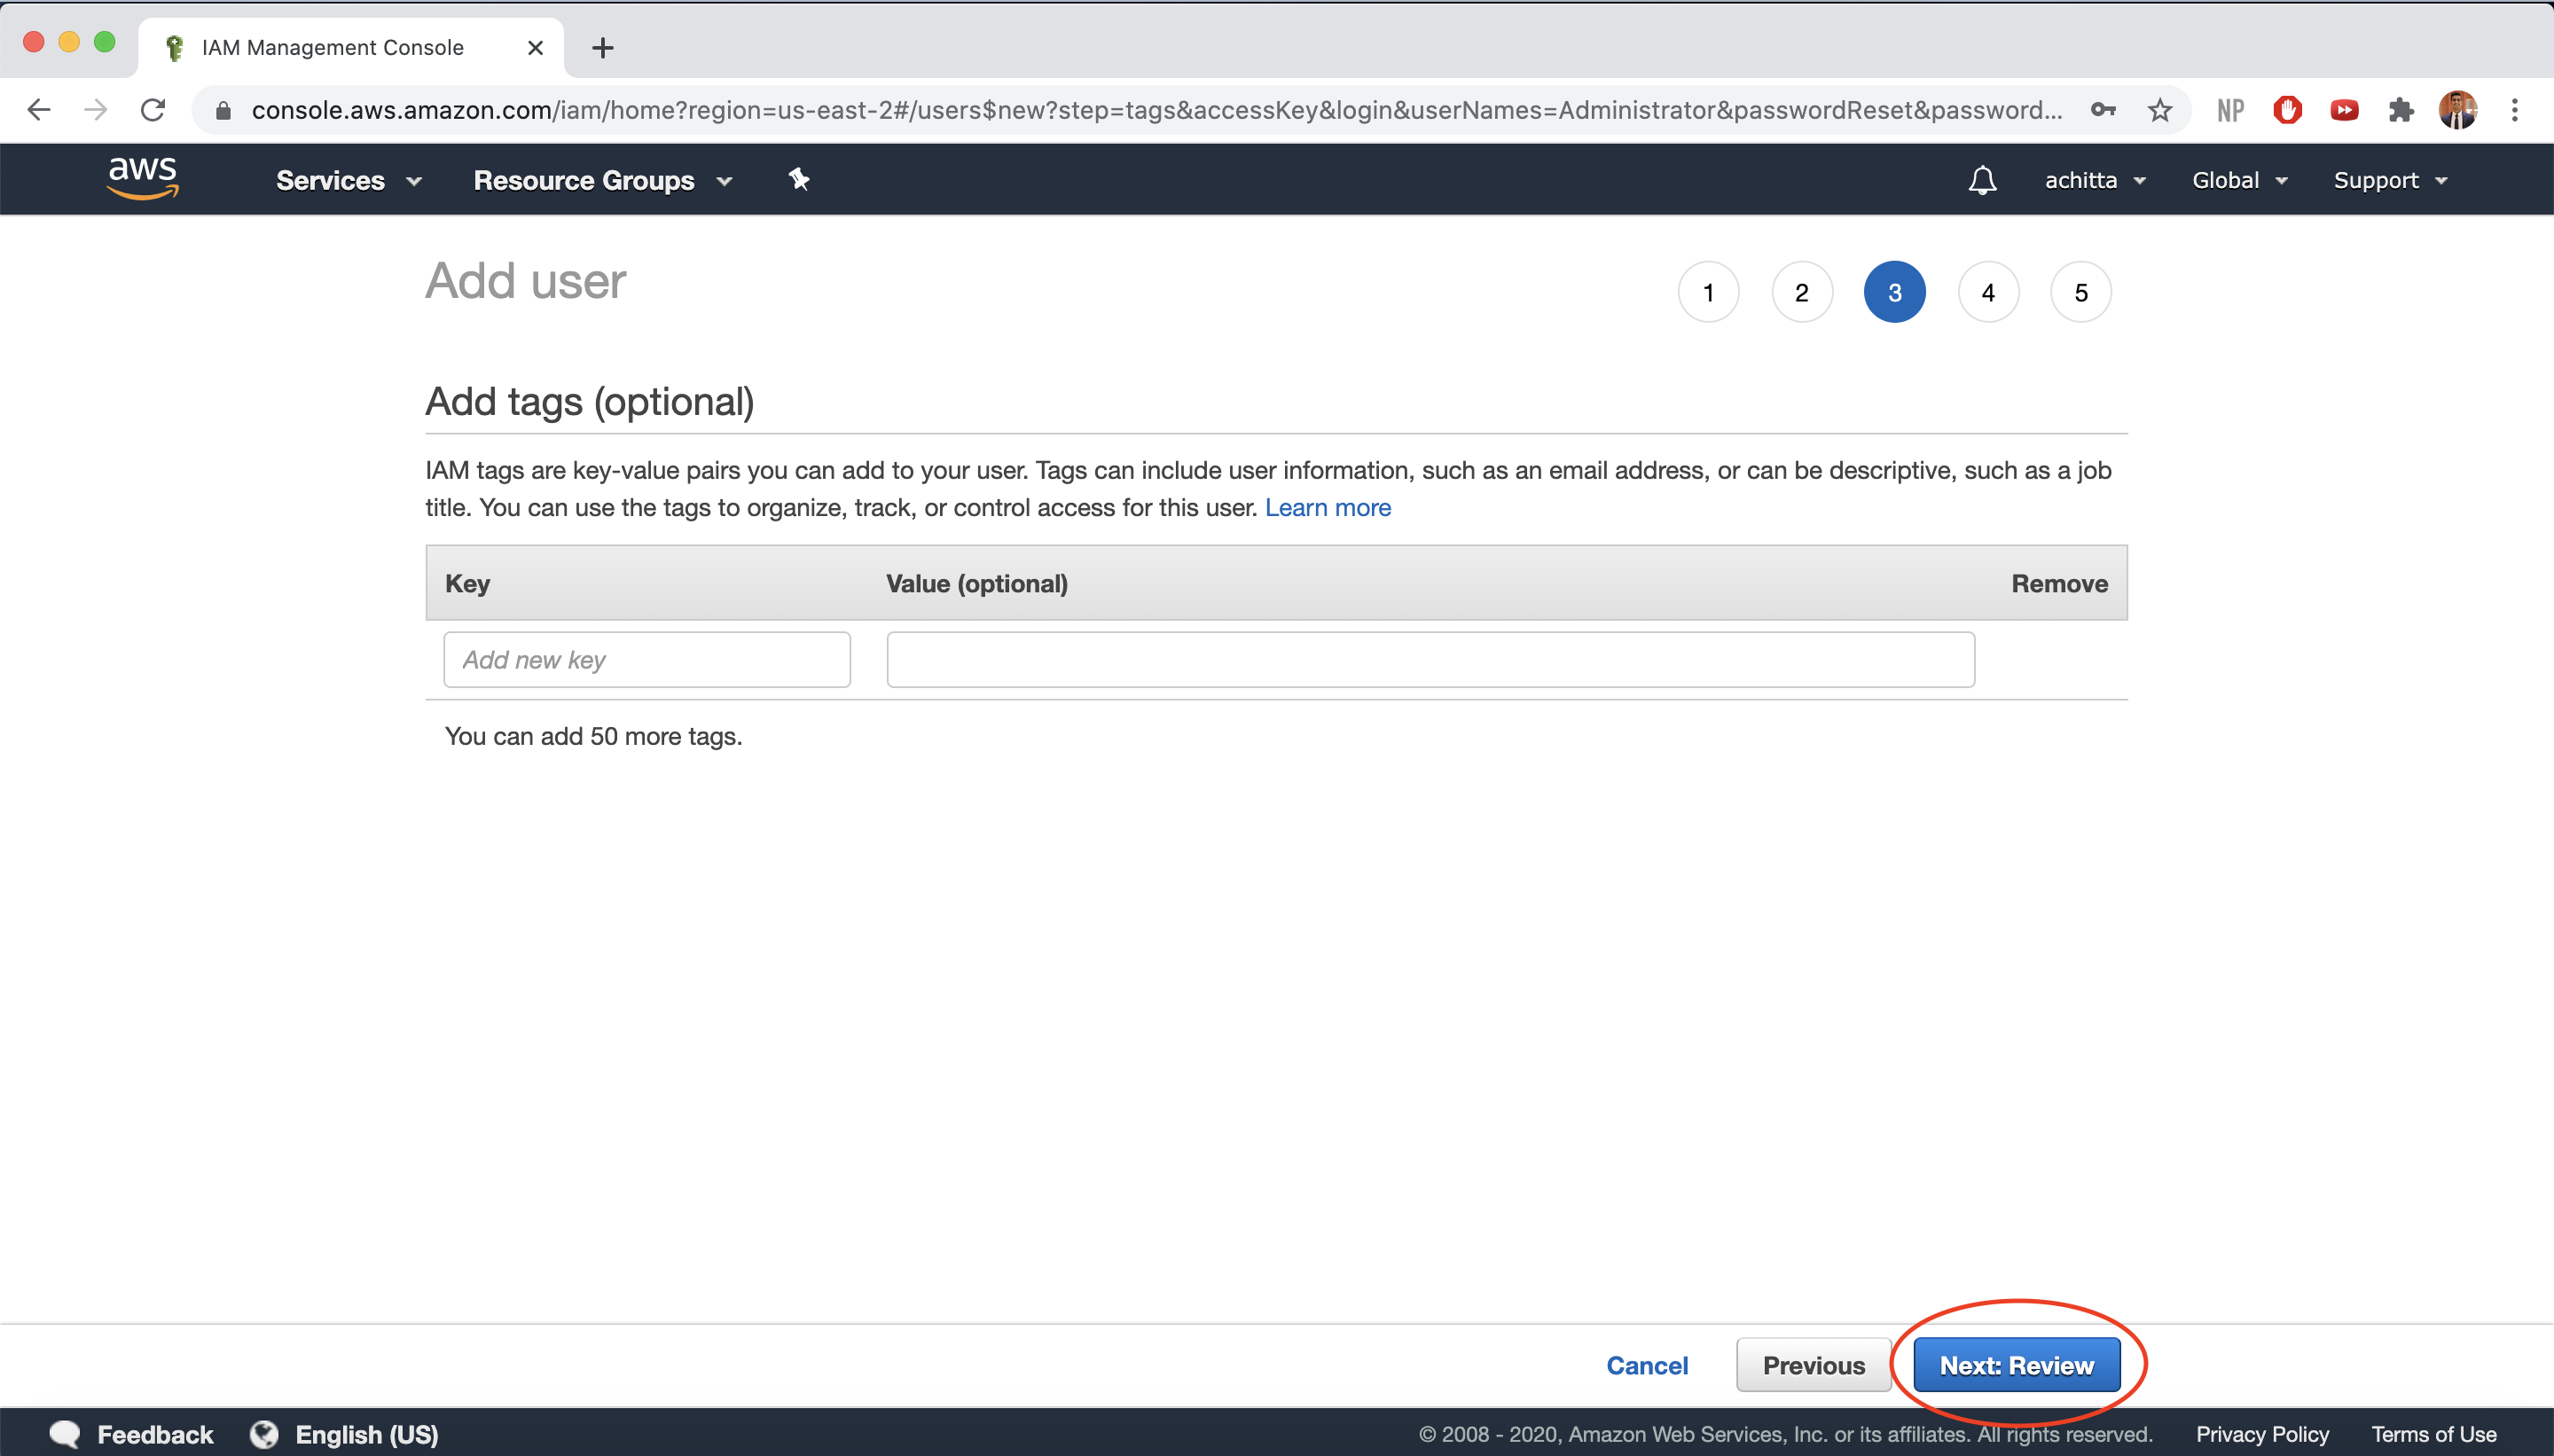
Click on Next: Tags.
-
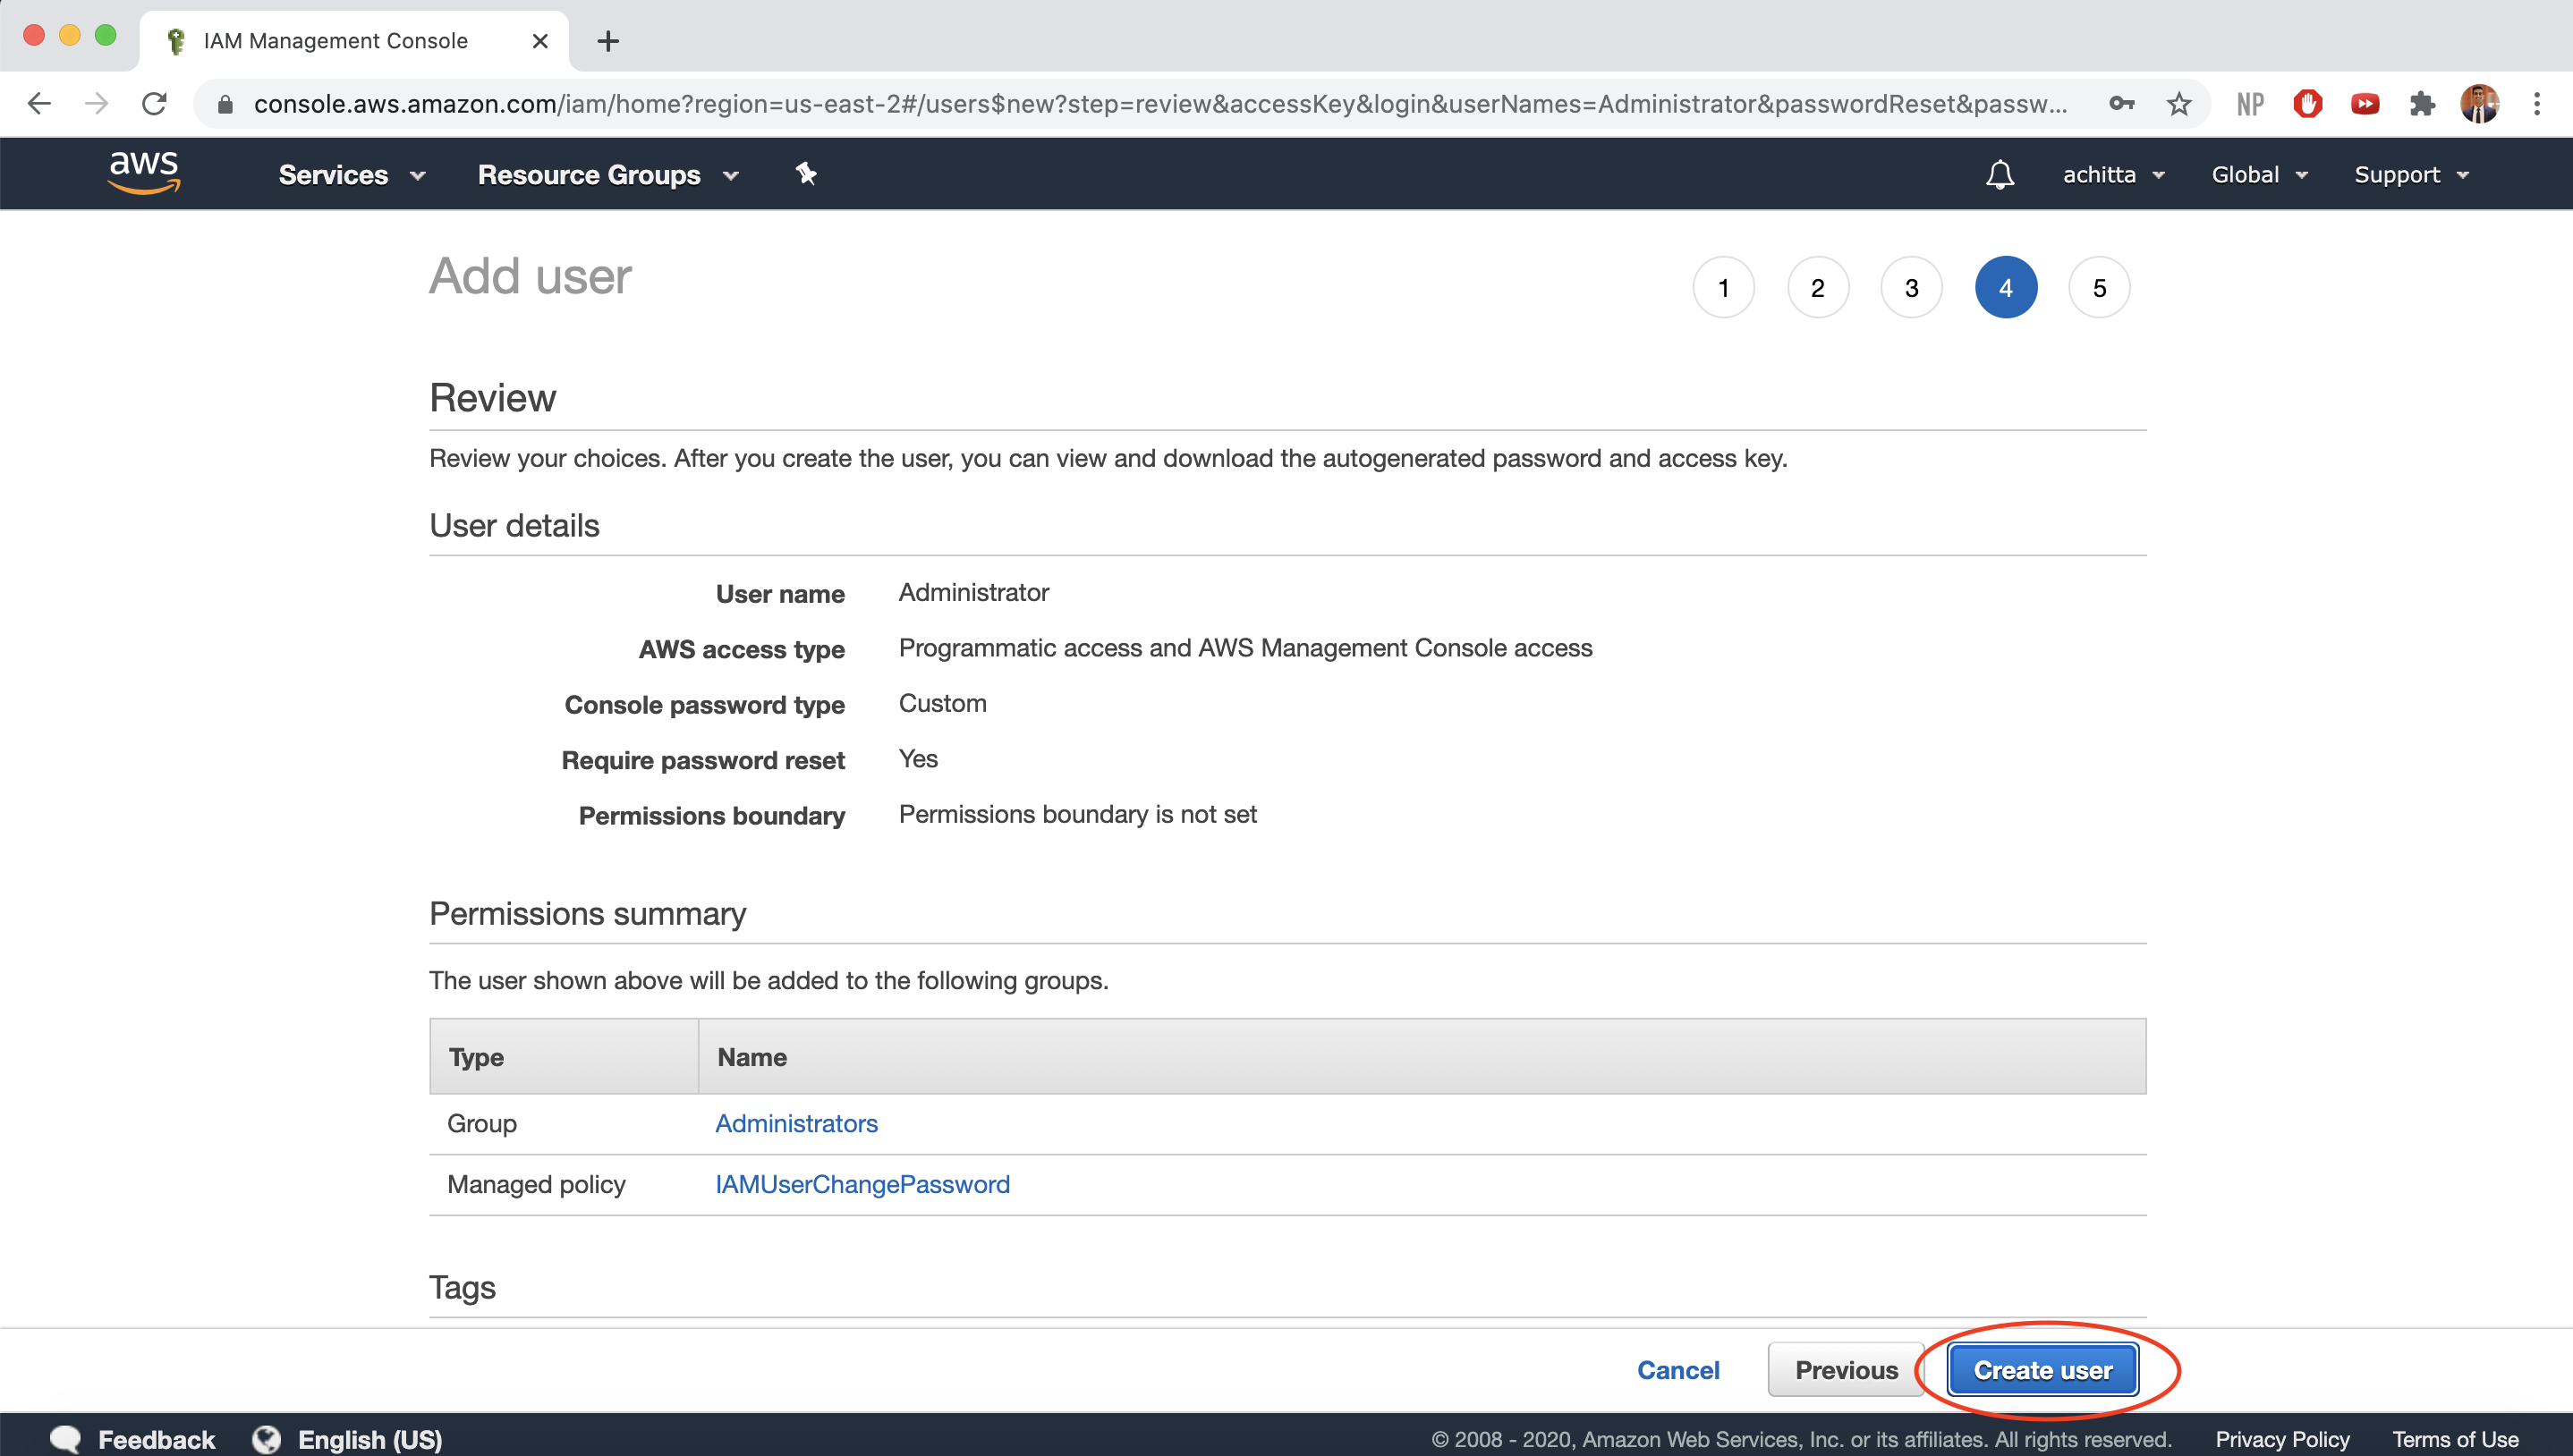
Click on Next: Review.
-
Click on Create user.
-
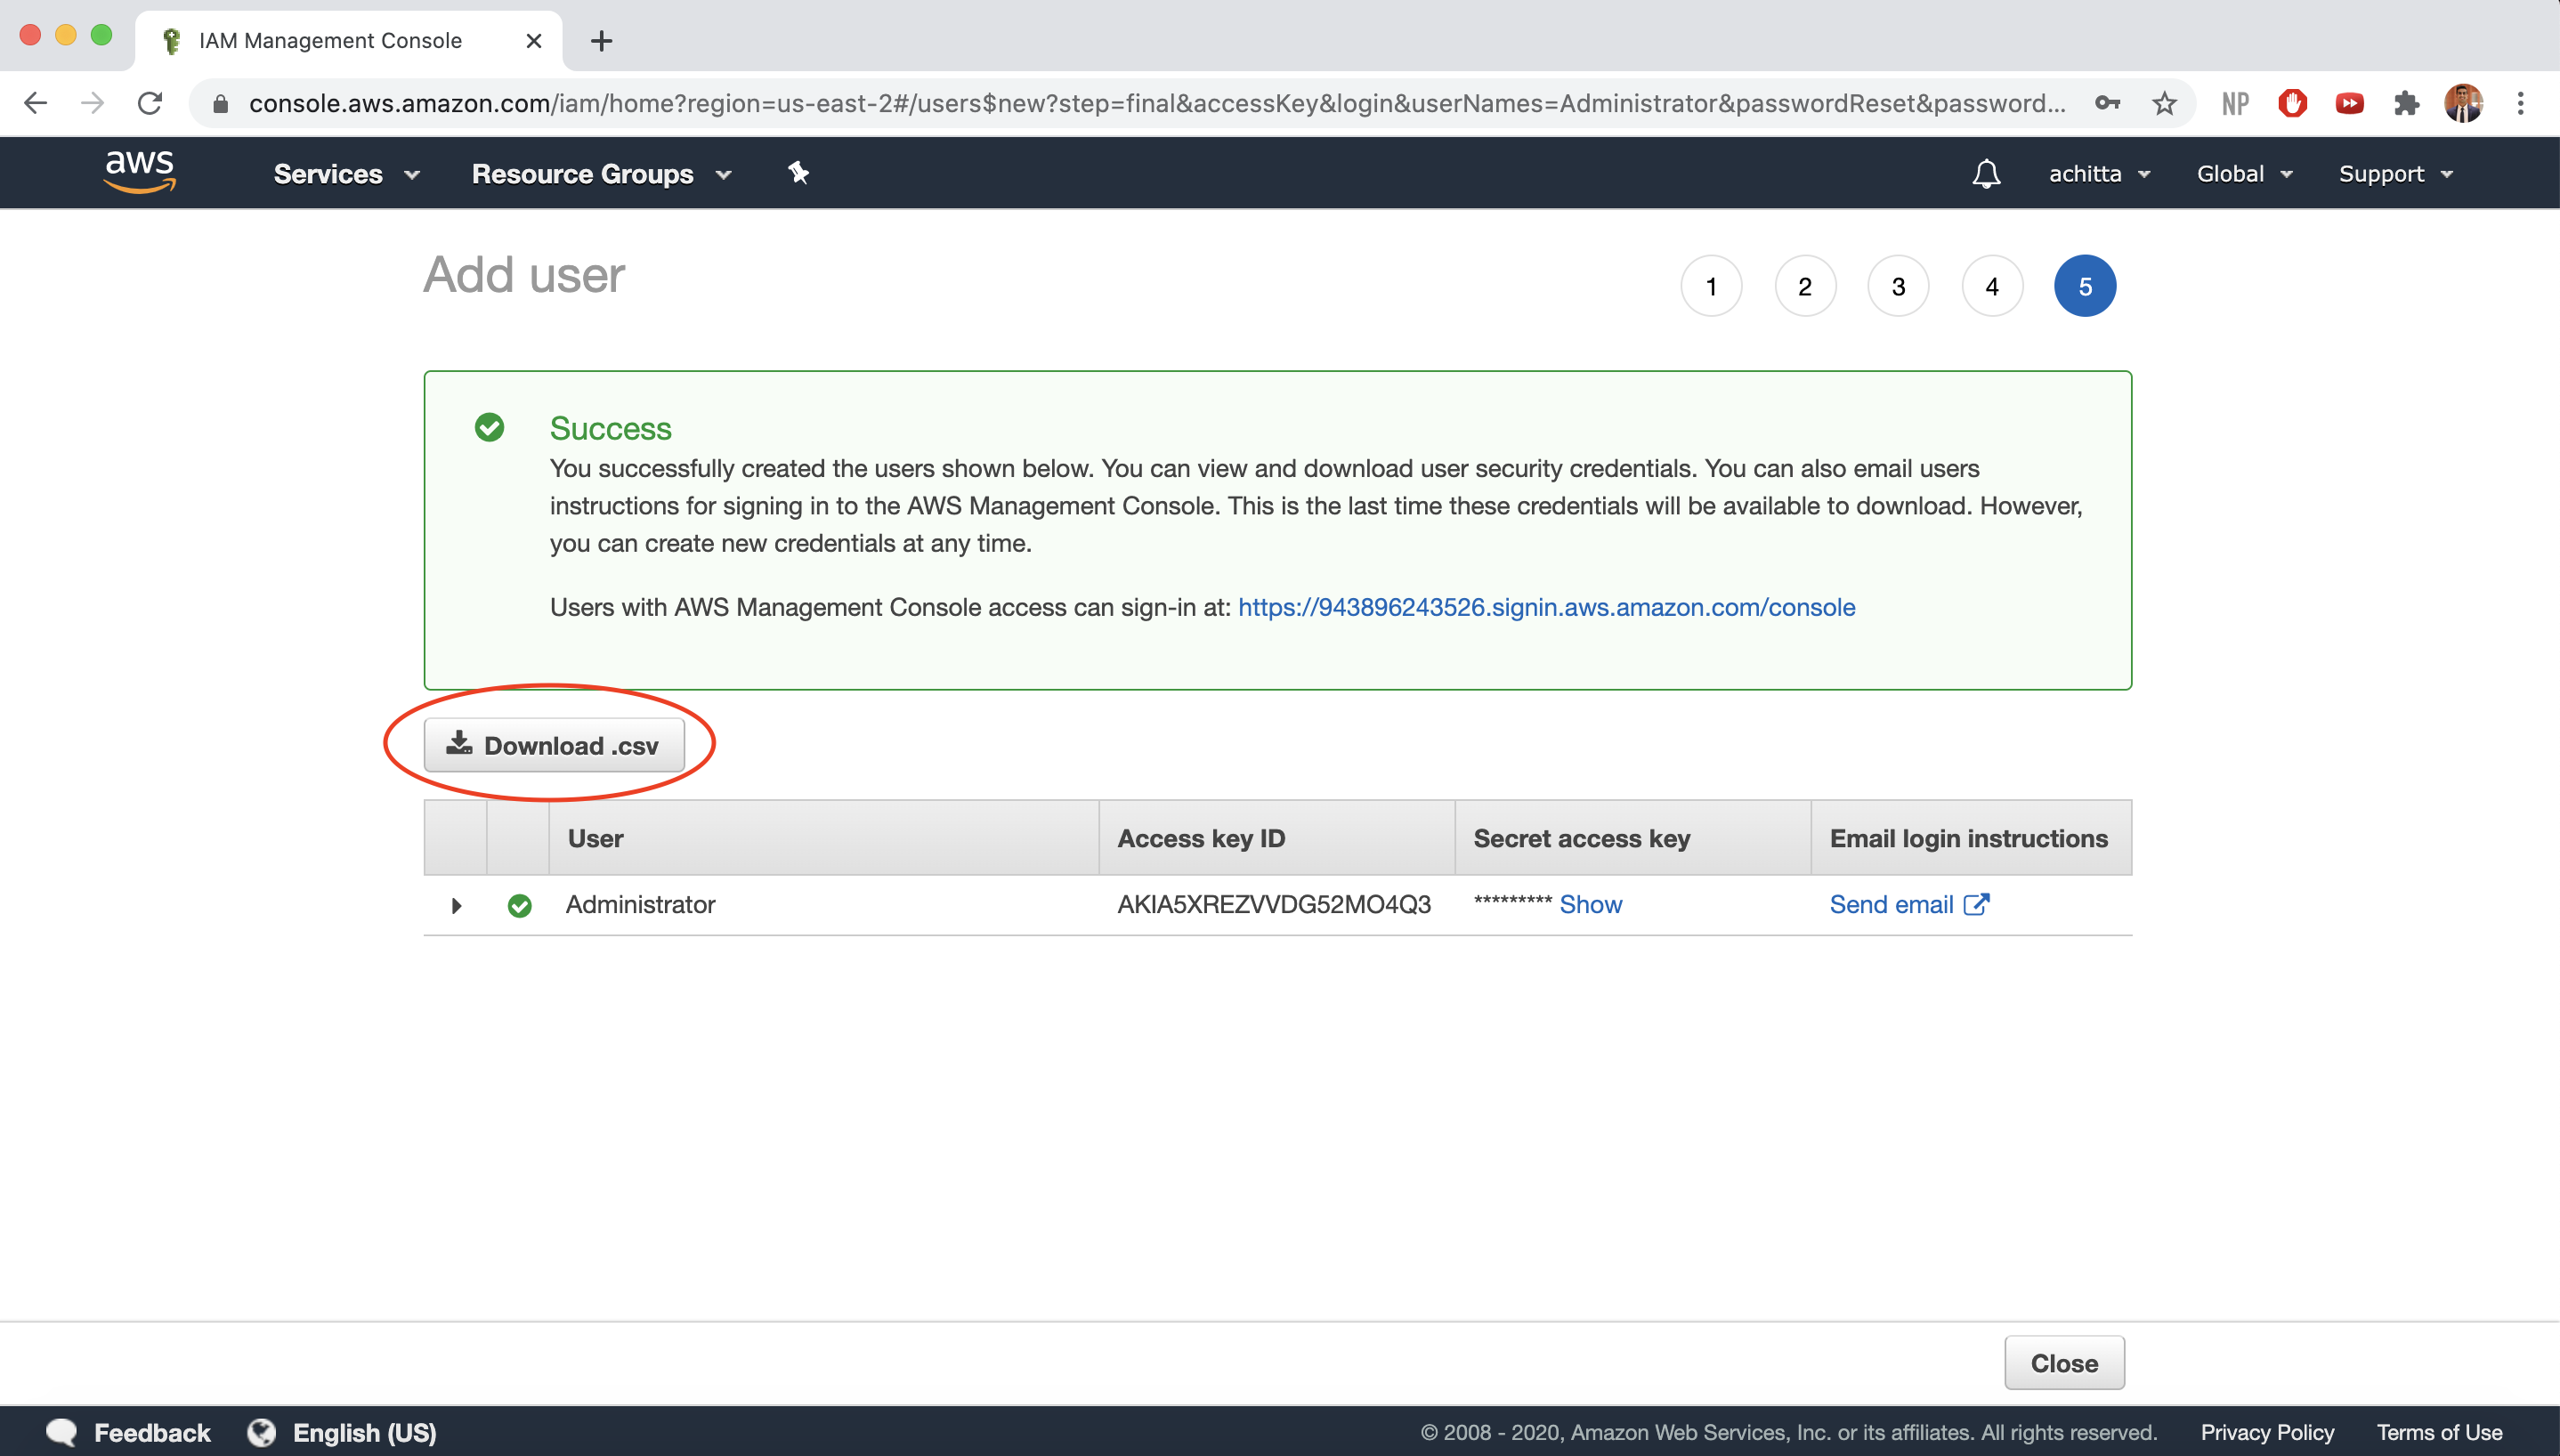
NOTE: Before you leave the page after successfully creating the IAM User, make sure to either download the .csv, which will contain the Access Key ID and Secret access key, or store them in a different way. You will not have access to the secret access key again after this page closes.
-
You should now see your IAM User and Group on the IAM console dashboard.
AWS CLI Setup
Next, we are going to install and setup the AWS Command Line Interface (CLI).
Install AWS CLI
For Linux/WSL:
$ sudo apt-get update
$ sudo apt-get install awscli
For MacOS:
$ brew install awscli
Verify that the installation was successful:
$ aws --version
aws-cli/2.0.38 Python/3.7.4 Darwin/19.6.0 exe/x86_64
Configure AWS CLI
Now we need to connect our AWS CLI with the IAM User and permissions to access the appropriate AWS resources.
AWS Access Key ID: Enter you AWS Access Key ID that you got from the IAM setup (in new_user_credentials.csv)
AWS Secret Access Key: Enter you AWS Secret Access Key that you got from the IAM setup (in new_user_credentials.csv)
Default region name: Enter us-east-2
Default output format: Enter json
$ aws configure
AWS Access Key ID [None]: AKIAIOSFODNN7EXAMPLE
AWS Secret Access Key [None]: wJalrXUtnFEMI/K7MDENG/bPxRfiCYEXAMPLEKEY
Default region name [None]: us-east-2
Default output format [None]: json
This configurations gets saved by default to ~/.aws/config and your credentials get saved by default to ~/.aws/credentials. Verify that your CLI is configured correctly.
$ aws configure list
      Name                    Value             Type    Location
      ----                    -----             ----    --------
   profile                <not set>             None    None
access_key     ****************MPLE shared-credentials-file
secret_key     ****************EKEY shared-credentials-file
    region                us-east-2      config-file    ~/.aws/config
$ cat ~/.aws/config
[default]
region = us-east-2
output = json
$ cat ~/.aws/credentials
[default]
aws_access_key_id = AKIAIOSFODNN7EXAMPLE
aws_secret_access_key = wJalrXUtnFEMI/K7MDENG/bPxRfiCYEXAMPLEKEY
Now that your AWS CLI is set up, you should be all set to work with your AWS resources directly from your command line!
Check Account Balance
If you have AWS Credits from the AWS Educate account, click your account username in the top right –> My Account –> Credits to view the remaining credits on your account.
Convert P3 Static file server to AWS S3 with CDN
In this lab, we will be converting our P3 static file server to upload files to AWS S3 and serve those files using AWS S3 and CloudFront (the AWS CDN offering). The reason we do this is so that some of the work of serving static files (which are constant for everyone) is offloaded from our own server to the AWS servers to reduce the latency of our applications. Essentially, we are letting our own server focus on the flask computations and letting AWS deal with the static files.
At a high level, we will:
- Set up an S3 bucket
- Set up the bucket to host our website
- Write new upload API routes to upload files to S3
- Refactor the accounts and user views to use the new upload API routes
- Add a CDN
Create bucket
First, we need to create an AWS S3 bucket to host our website’s static resources.
Before we create the S3 bucket for our static resources, we need to create one to host our server logs. Feel free to name it whatever you want or logs.uniqname.com. You can accept all the default settings here.
Follow the Lab 2 Deploying Static Pages tutorial to host your project 3 website. Feel free to name your root bucket whatever you want or you can use uniqname.static.insta485.com. Skip the step where you create and upload your own index.html file and all the steps dealing with the subdomain bucket. Be sure to enable static website hosting, public access, and logging for your root bucket (using the log bucket to host the logs) and attach the bucket policy below with the name of your root domain bucket name.
{
    "Version": "2012-10-17",
    "Statement": [
        {
            "Sid": "PublicReadGetObject",
            "Effect": "Allow",
            "Principal": "*",
            "Action": [
                "s3:GetObject"
            ],
            "Resource": [
                "arn:aws:s3:::uniqname.static.insta485.com/*"
            ]
        }
    ]
}
At this point, you should be able to see your bucket from the CLI:
$ aws s3 ls
...
2020-08-24 22:37:13 uniqname.static.insta485.com
2020-08-24 14:50:55 logs.uniqname.com
...
Flask and S3 Configuration
Now that we have our AWS S3 bucket set up, we need to set up our project 3 flask configuration to serve all your Flask application’s static assets from Amazon S3, without having to modify your templates. To do this, we will use the flask_s3 library.
Add this to the install_requires array in your project 3 setup.py:
'Flask-S3==0.3.3'
Then, in your insta485/__init__.py, import flask_s3 and add the following:
# Set up flask-s3, which serves static files from AWS S3 in production
s3 = flask_s3.FlaskS3(app)
Add the following to your project 3 config.py:
# AWS S3 static files
# https://flask-s3.readthedocs.io/en/latest/
FLASKS3_DEBUG = True # Enables Flask-S3's debug mode
FLASKS3_ACTIVE = True # This setting allows you to toggle whether Flask-S3 is active or not
FLASKS3_BUCKET_NAME = "uniqname.static.insta485.com" # Add your own root bucket name here, replacing uniqname with your uniqname
FLASKS3_REGION = "us-east-2" # Sets up the AWS region to host your static assets in
FLASKS3_FORCE_MIMETYPE = True # Always set the Content-Type header on the S3 files irrespective of gzipping
FLASKS3_USE_HTTPS = False # We will only be using HTTP for now
Upload files
Next, we need to actually upload our static files to S3 for them to be served.
First run npx webpack in your p3 directory to generate the bundled JS file. Then, upload the files in insta485/static/ to your S3 bucket using the below Python code. Note that the flask_s3 uses boto3 under the hood, which in turn uses the AWS credentials stored by the aws CLI utility.
$ pwd
/Users/awdeorio/src/eecs485/p3-insta485-clientside
$ source env/bin/activate # Activate your python virtual environment
$ npx webpack
$ pip install flask_s3
$ python3
>>> import flask_s3
>>> import insta485
>>> flask_s3.create_all(insta485.app)
Verify that the files were uploaded. You should also be able to see them in the AWS S3 management console.
$ aws s3 ls uniqname.static.insta485.com
                           PRE static/
$ aws s3 ls uniqname.static.insta485.com/static/
                           PRE css/
                           PRE images/
                           PRE js/
$ aws s3 ls uniqname.static.insta485.com/static/css/
2020-06-23 22:28:32       3611 style.css
Verify that you can download a static file. Don’t forget to change the bucket name in this example.
$ curl -L http://uniqname.static.insta485.com.s3.amazonaws.com/static/js/bundle.js
Verify that the Content-Type header is being set correctly. Check the last set of headers (not the redirect). If you see Content-Type: binary/octet-stream, then make sure you set FLASKS3_FORCE_MIMETYPE = True before uploading files.
$ curl -LI http://uniqname.static.insta485.com.s3.amazonaws.com/static/js/bundle.js | less
HTTP/1.1 307 Temporary Redirect
... ignore this one

HTTP/1.1 200 OK
...
Content-Type: application/javascript
...
Test
Now that we have uploaded the static files to S3, static files should be sourced from AWS S3, because of our Flask-S3 configuration.
$ ./bin/insta485run
Browse to the index page http://localhost:8000 . View source and look for static files, e.g., bundle.js. It should be sourced from S3, e.g.:
<script type="text/javascript" src="http://uniqname.static.insta485.com.s3.amazonaws.com/static/js/bundle.js"></script>
Add a CDN
Amazon CloudFront is a content delivery network (CDN) offered by AWS. CDNs provide a network of globally distributed cached content (generally static content) that is geographically closer to users, which reduces the latency for the download of the content.
-
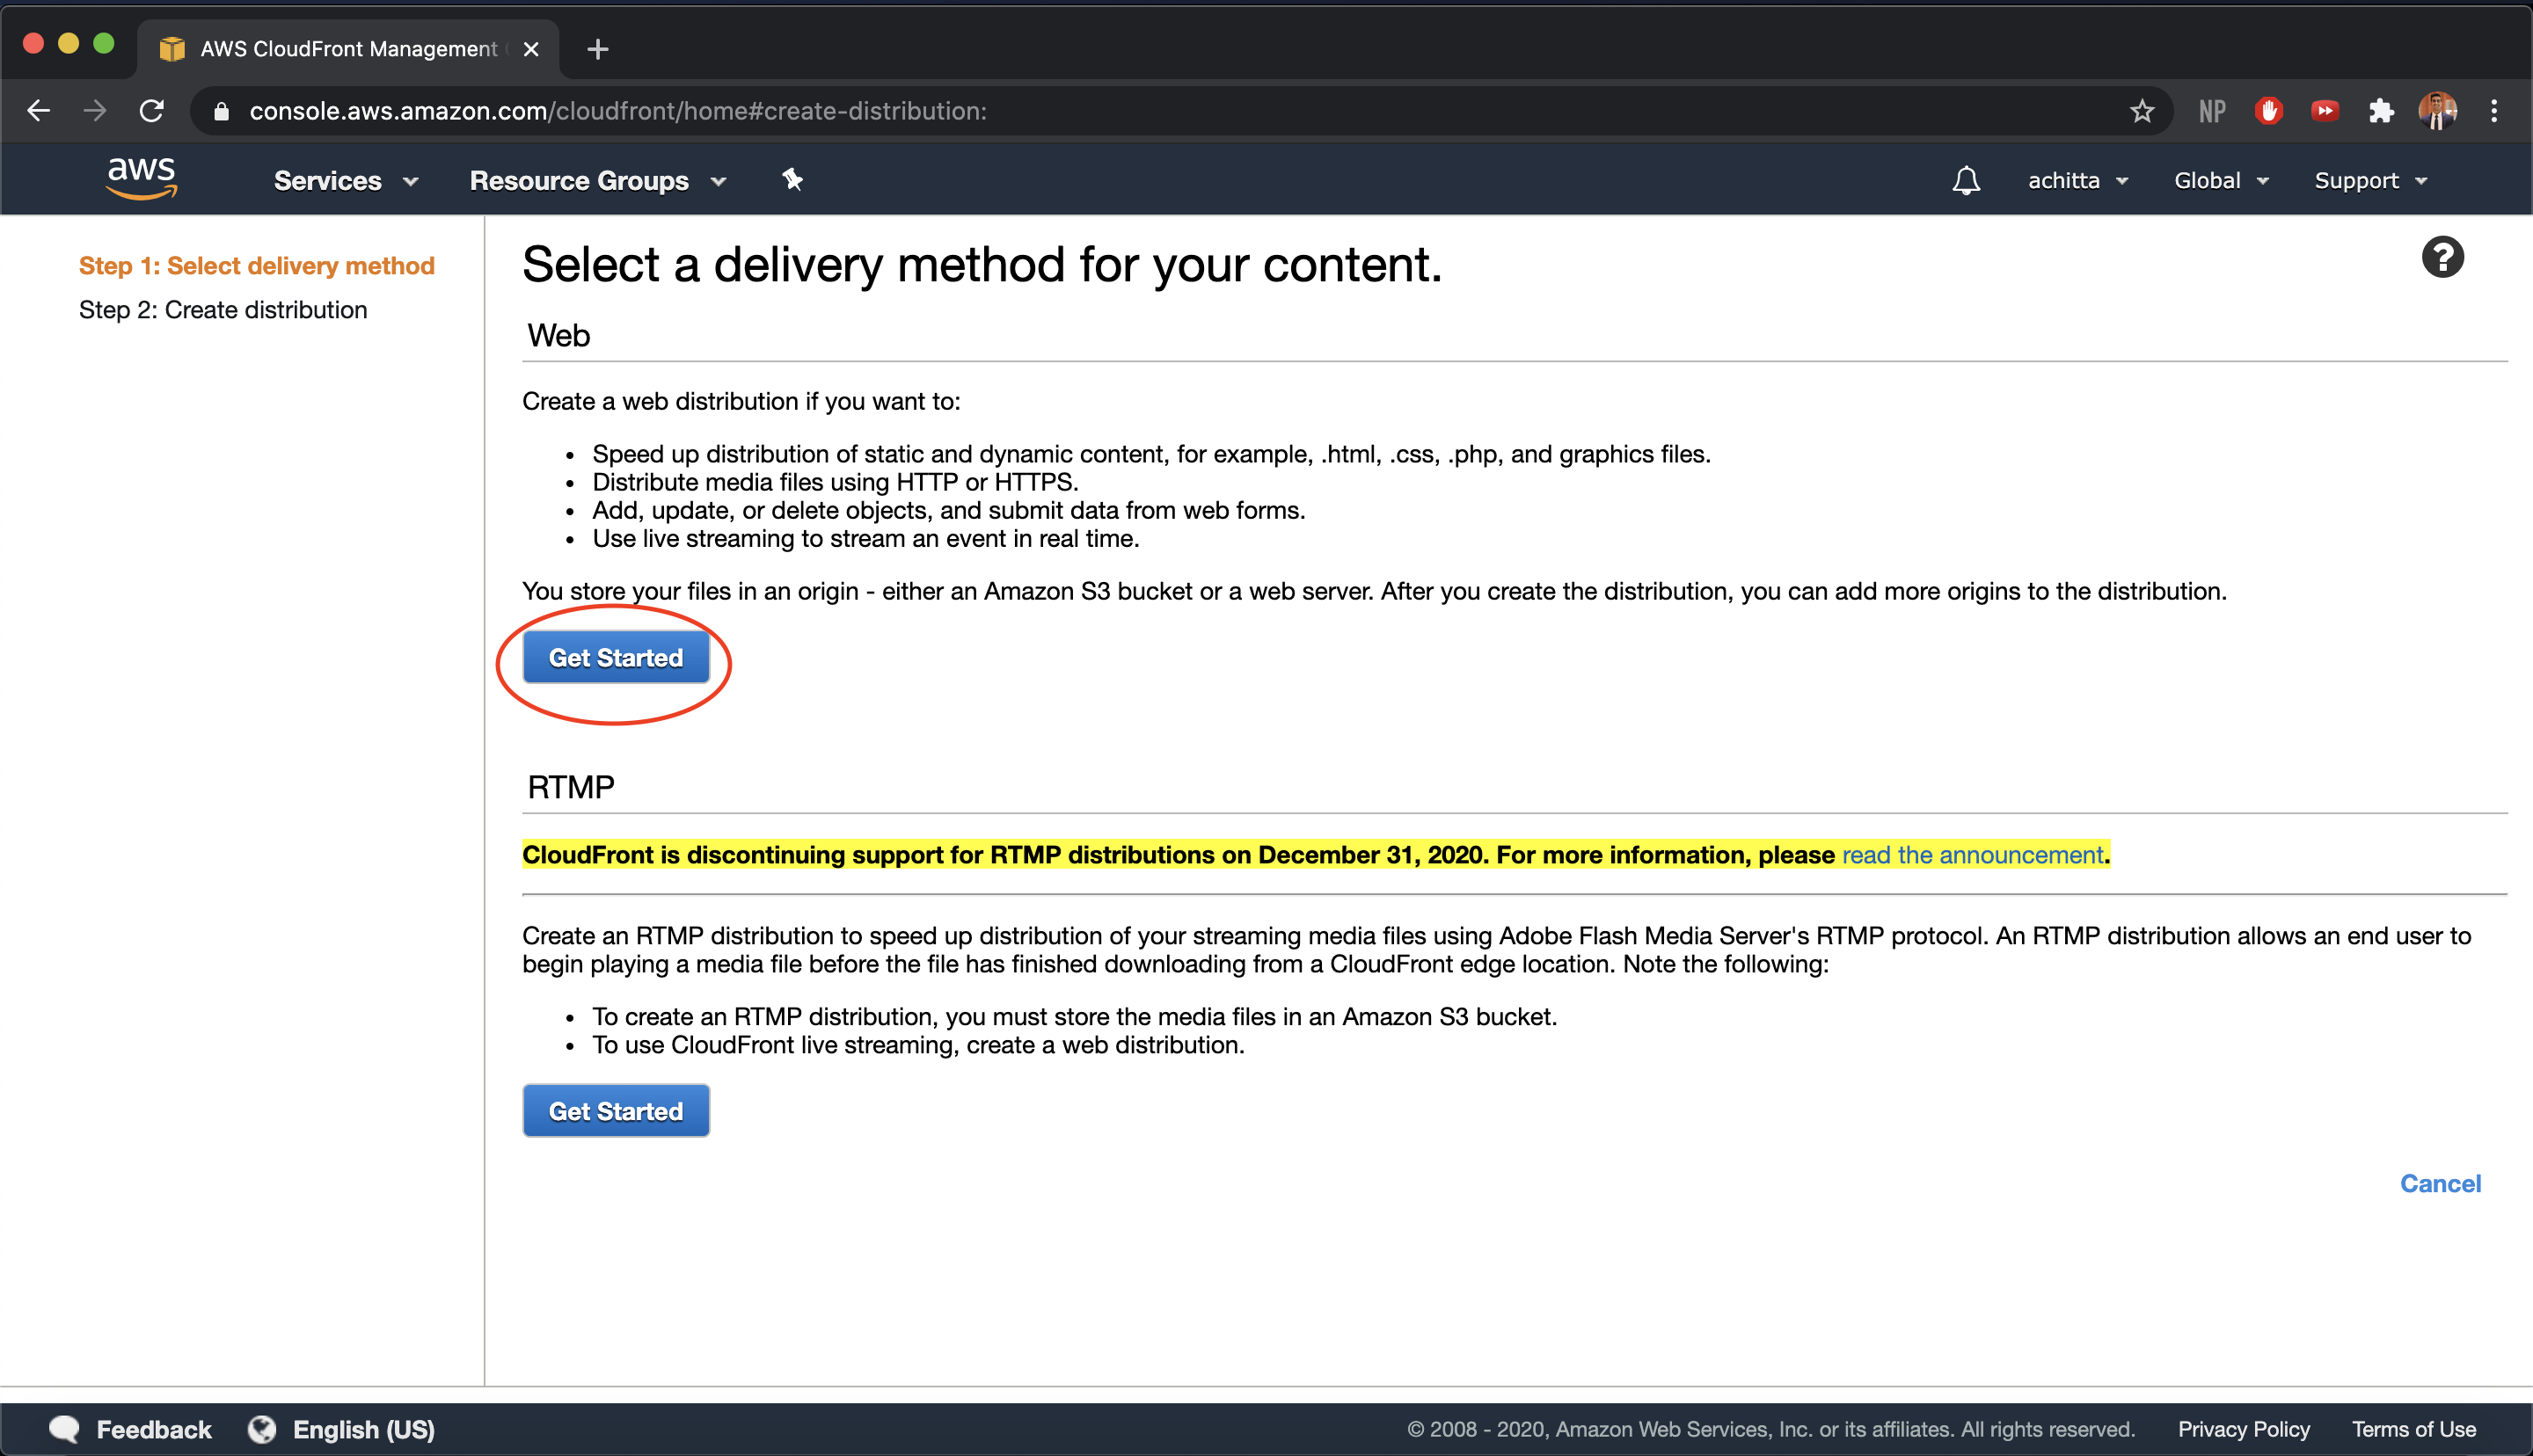
Navigate to the AWS CloudFront console https://console.aws.amazon.com/cloudfront/ and choose Create Distribution.
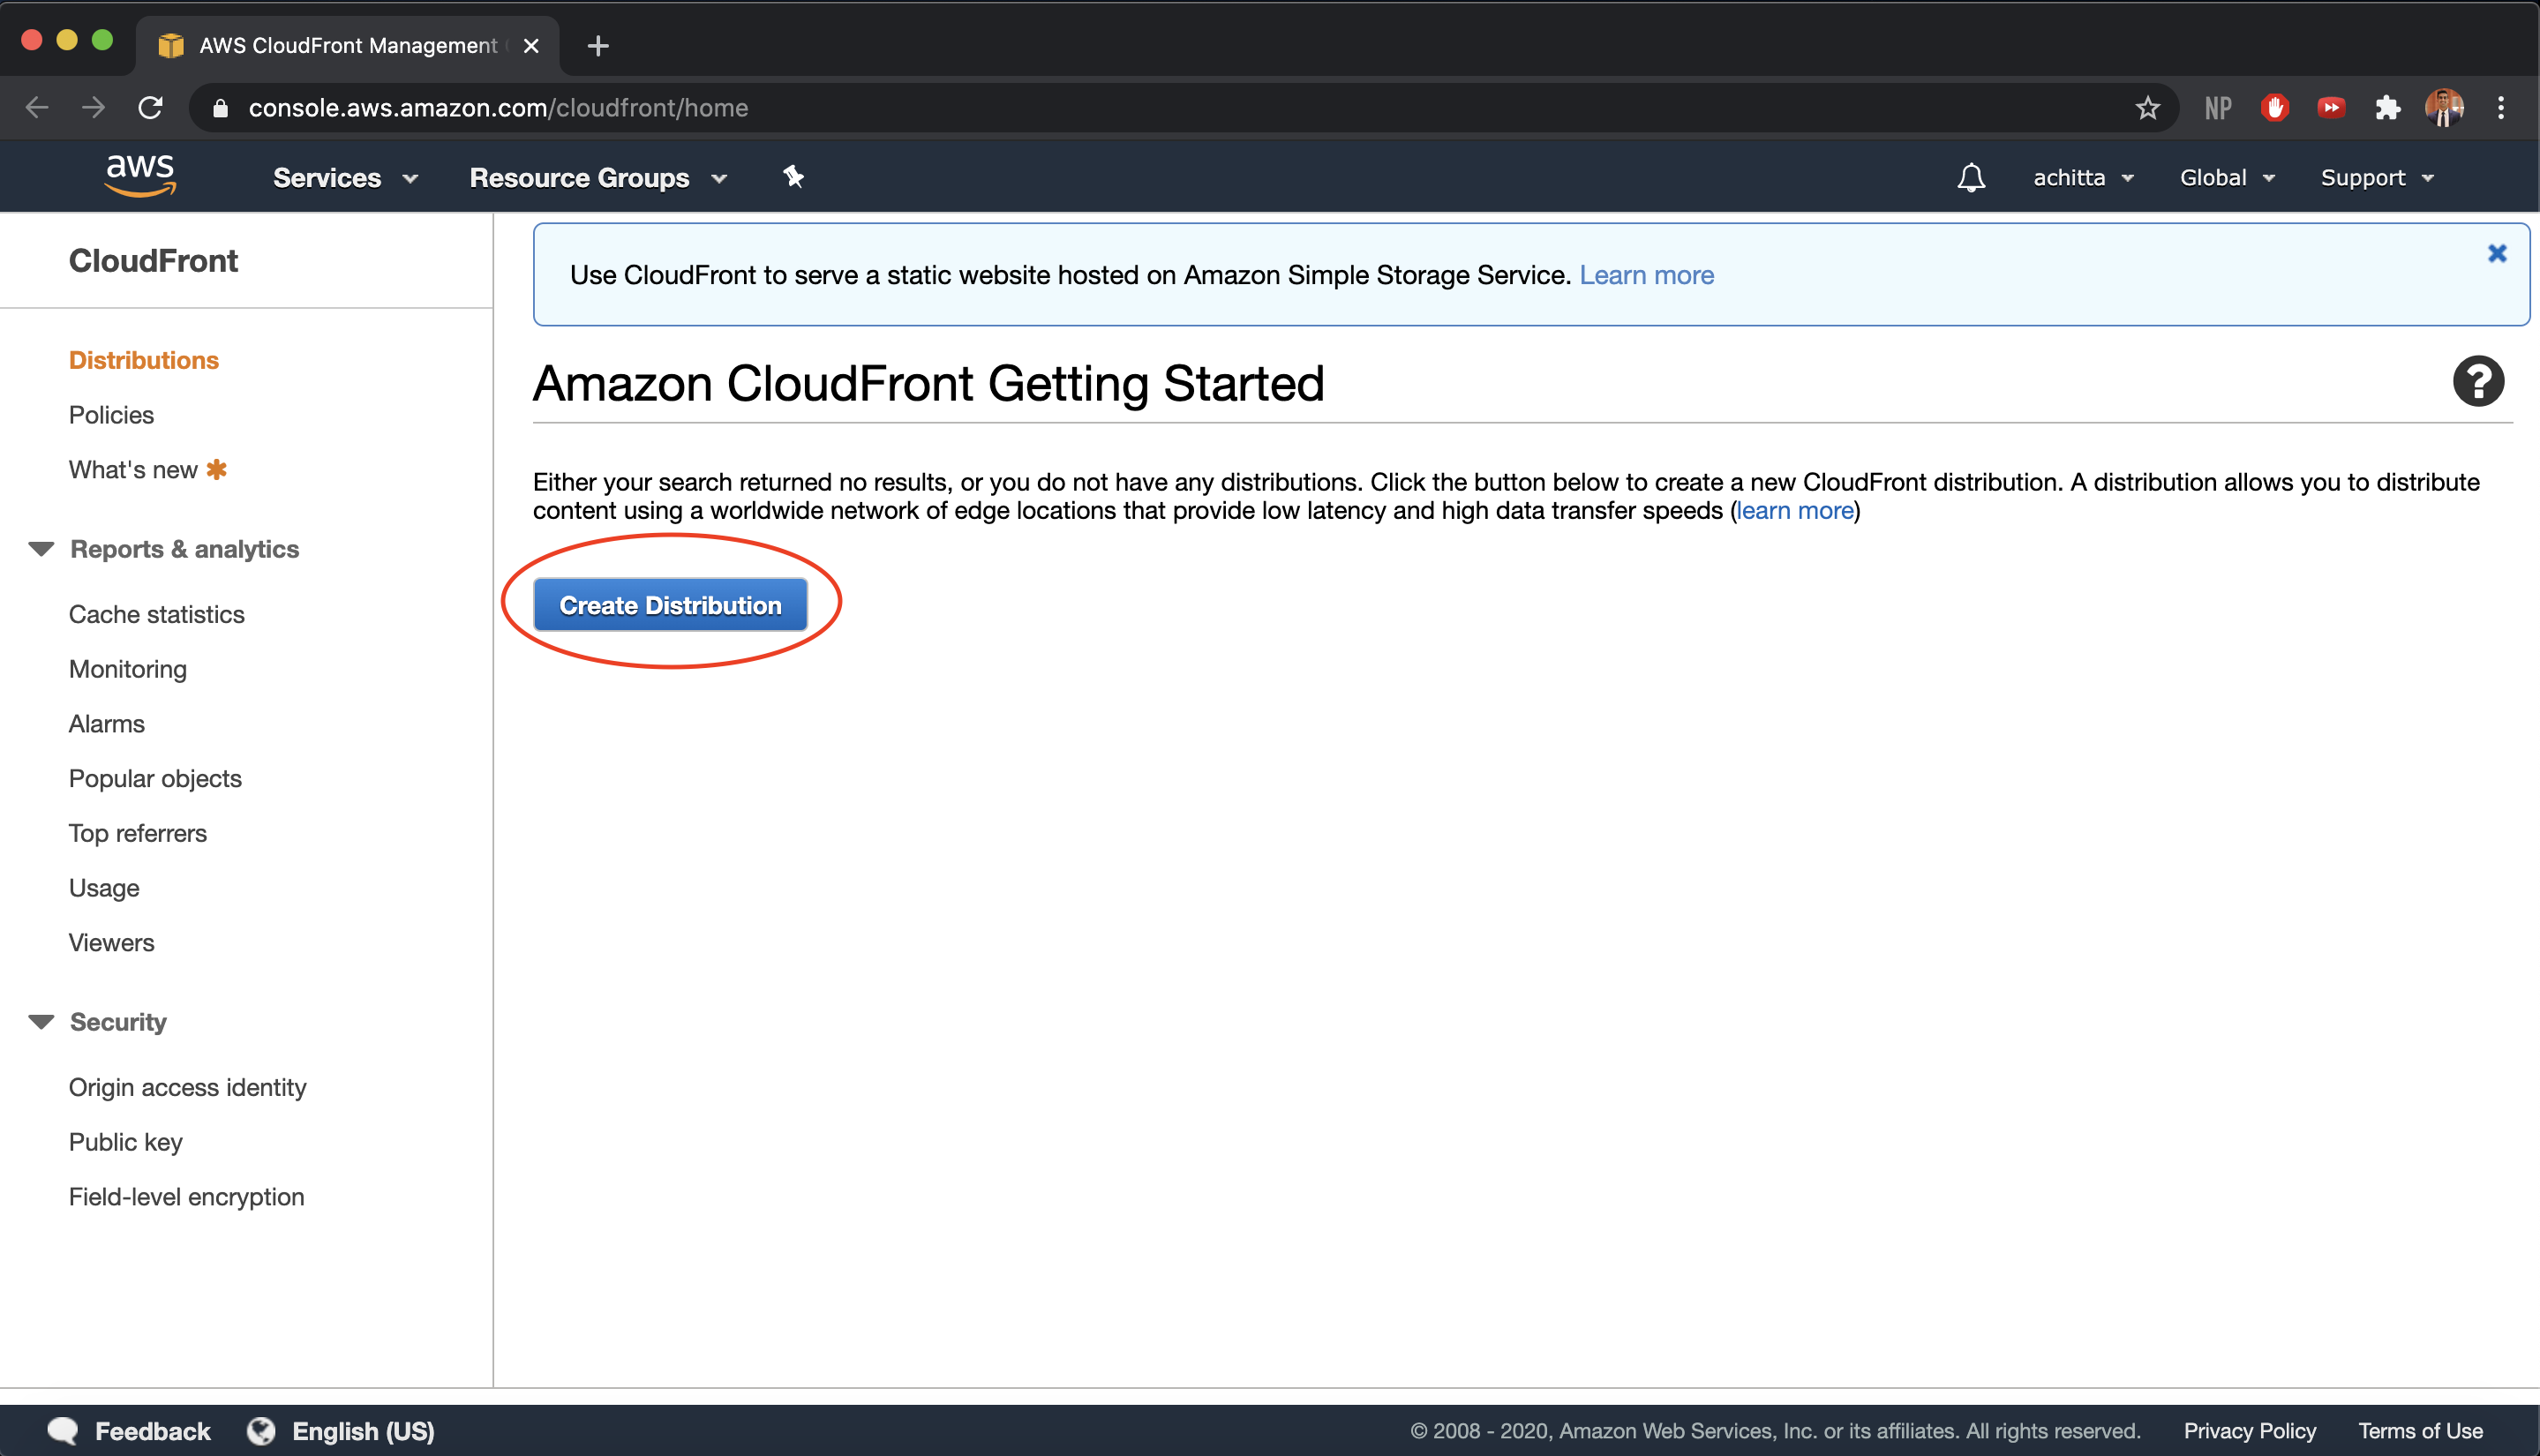
-
Since we want to speed up distribution of static and dynamic content and distribute media files using HTTP, we want to use CloudFront to create a web distribution. Click on Get Started under the web section.
-
We want to create our distribution so that it caches the static assets from our static file server that we created earlier with S3. First, in the Origin Settings section, for Origin Domain Name, enter your root domain S3 website endpoint, which generally follows the format domainName.s3-website.us-west-2.amazonaws.com (should be suggested via the dropdown menu). CloudFront will fill in the Origin ID and other Origin Settings for you.
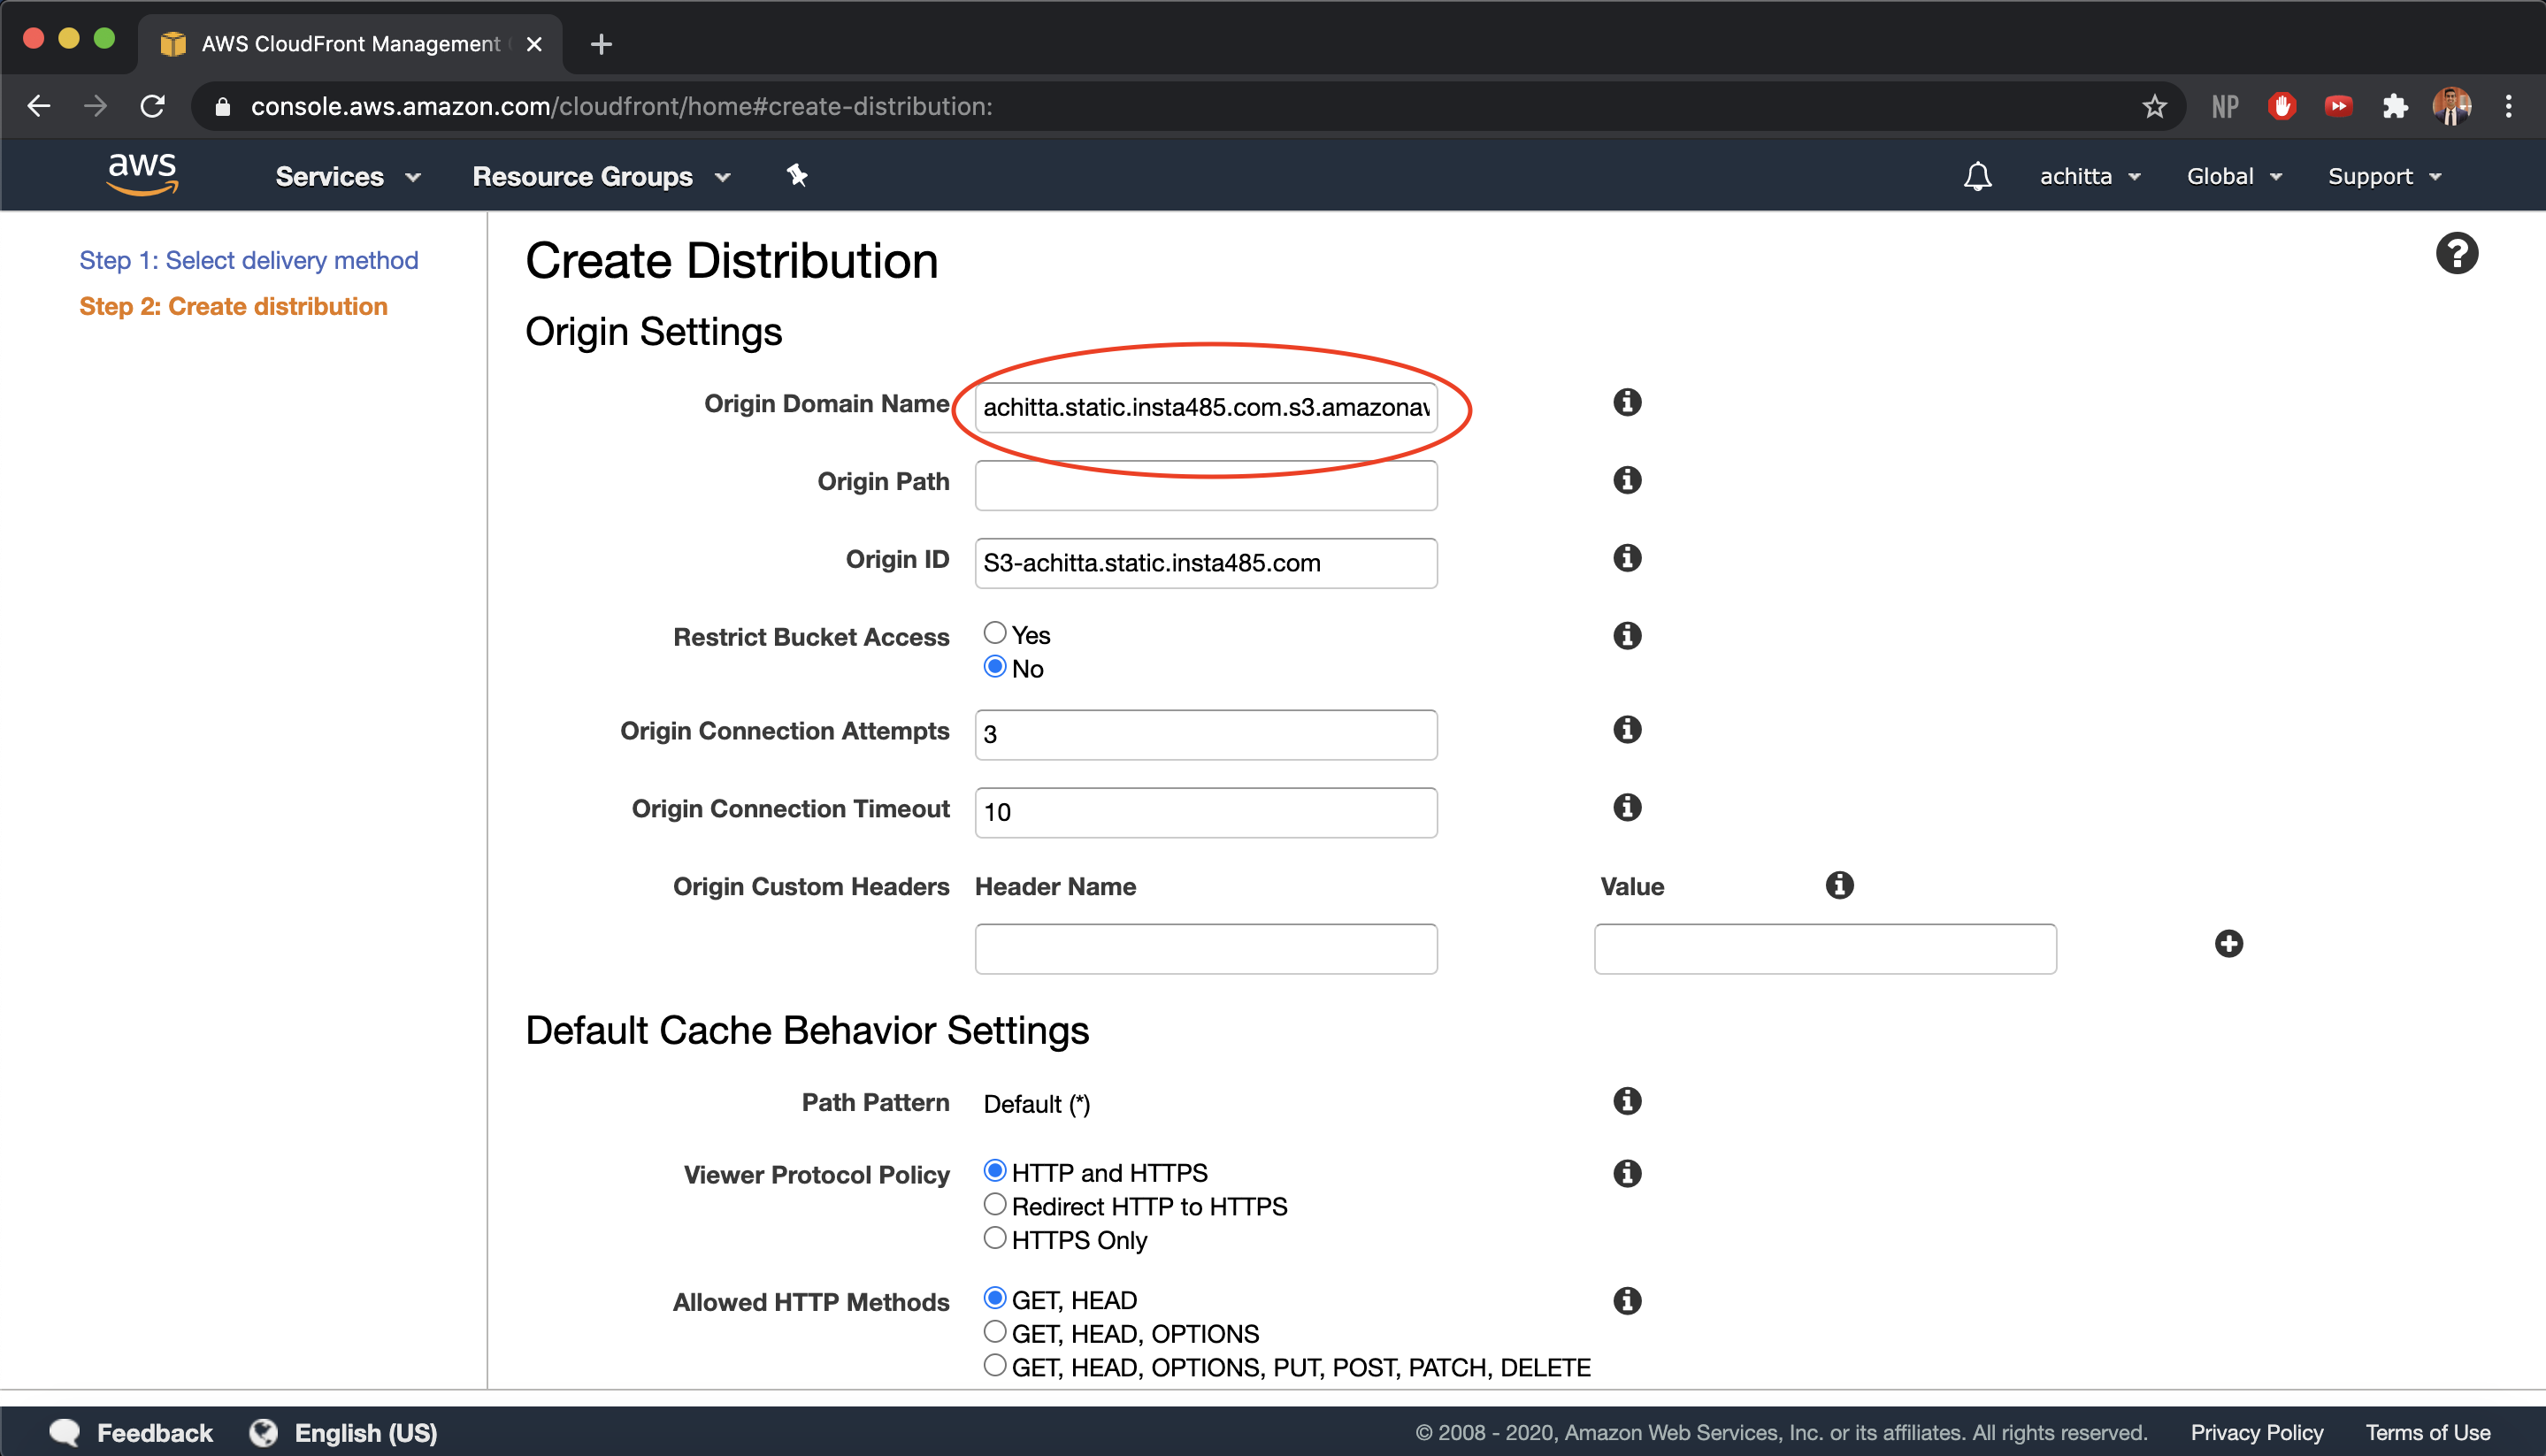
-
Do not change any of the Default Cache Behavior Settings as they are already optimized for our usage
-
When a user requests your root website endpoint, we want CloudFront to return our
index.htmlpage. In the Distribution Settings section, enterindex.htmlfor the Default Root Object and enable logging, enter your logging S3 bucket that was created earlier (should be suggested via the dropdown menu), and enterlogs/for Log Prefix so that the logs are more organized. Then, click Create Distribution.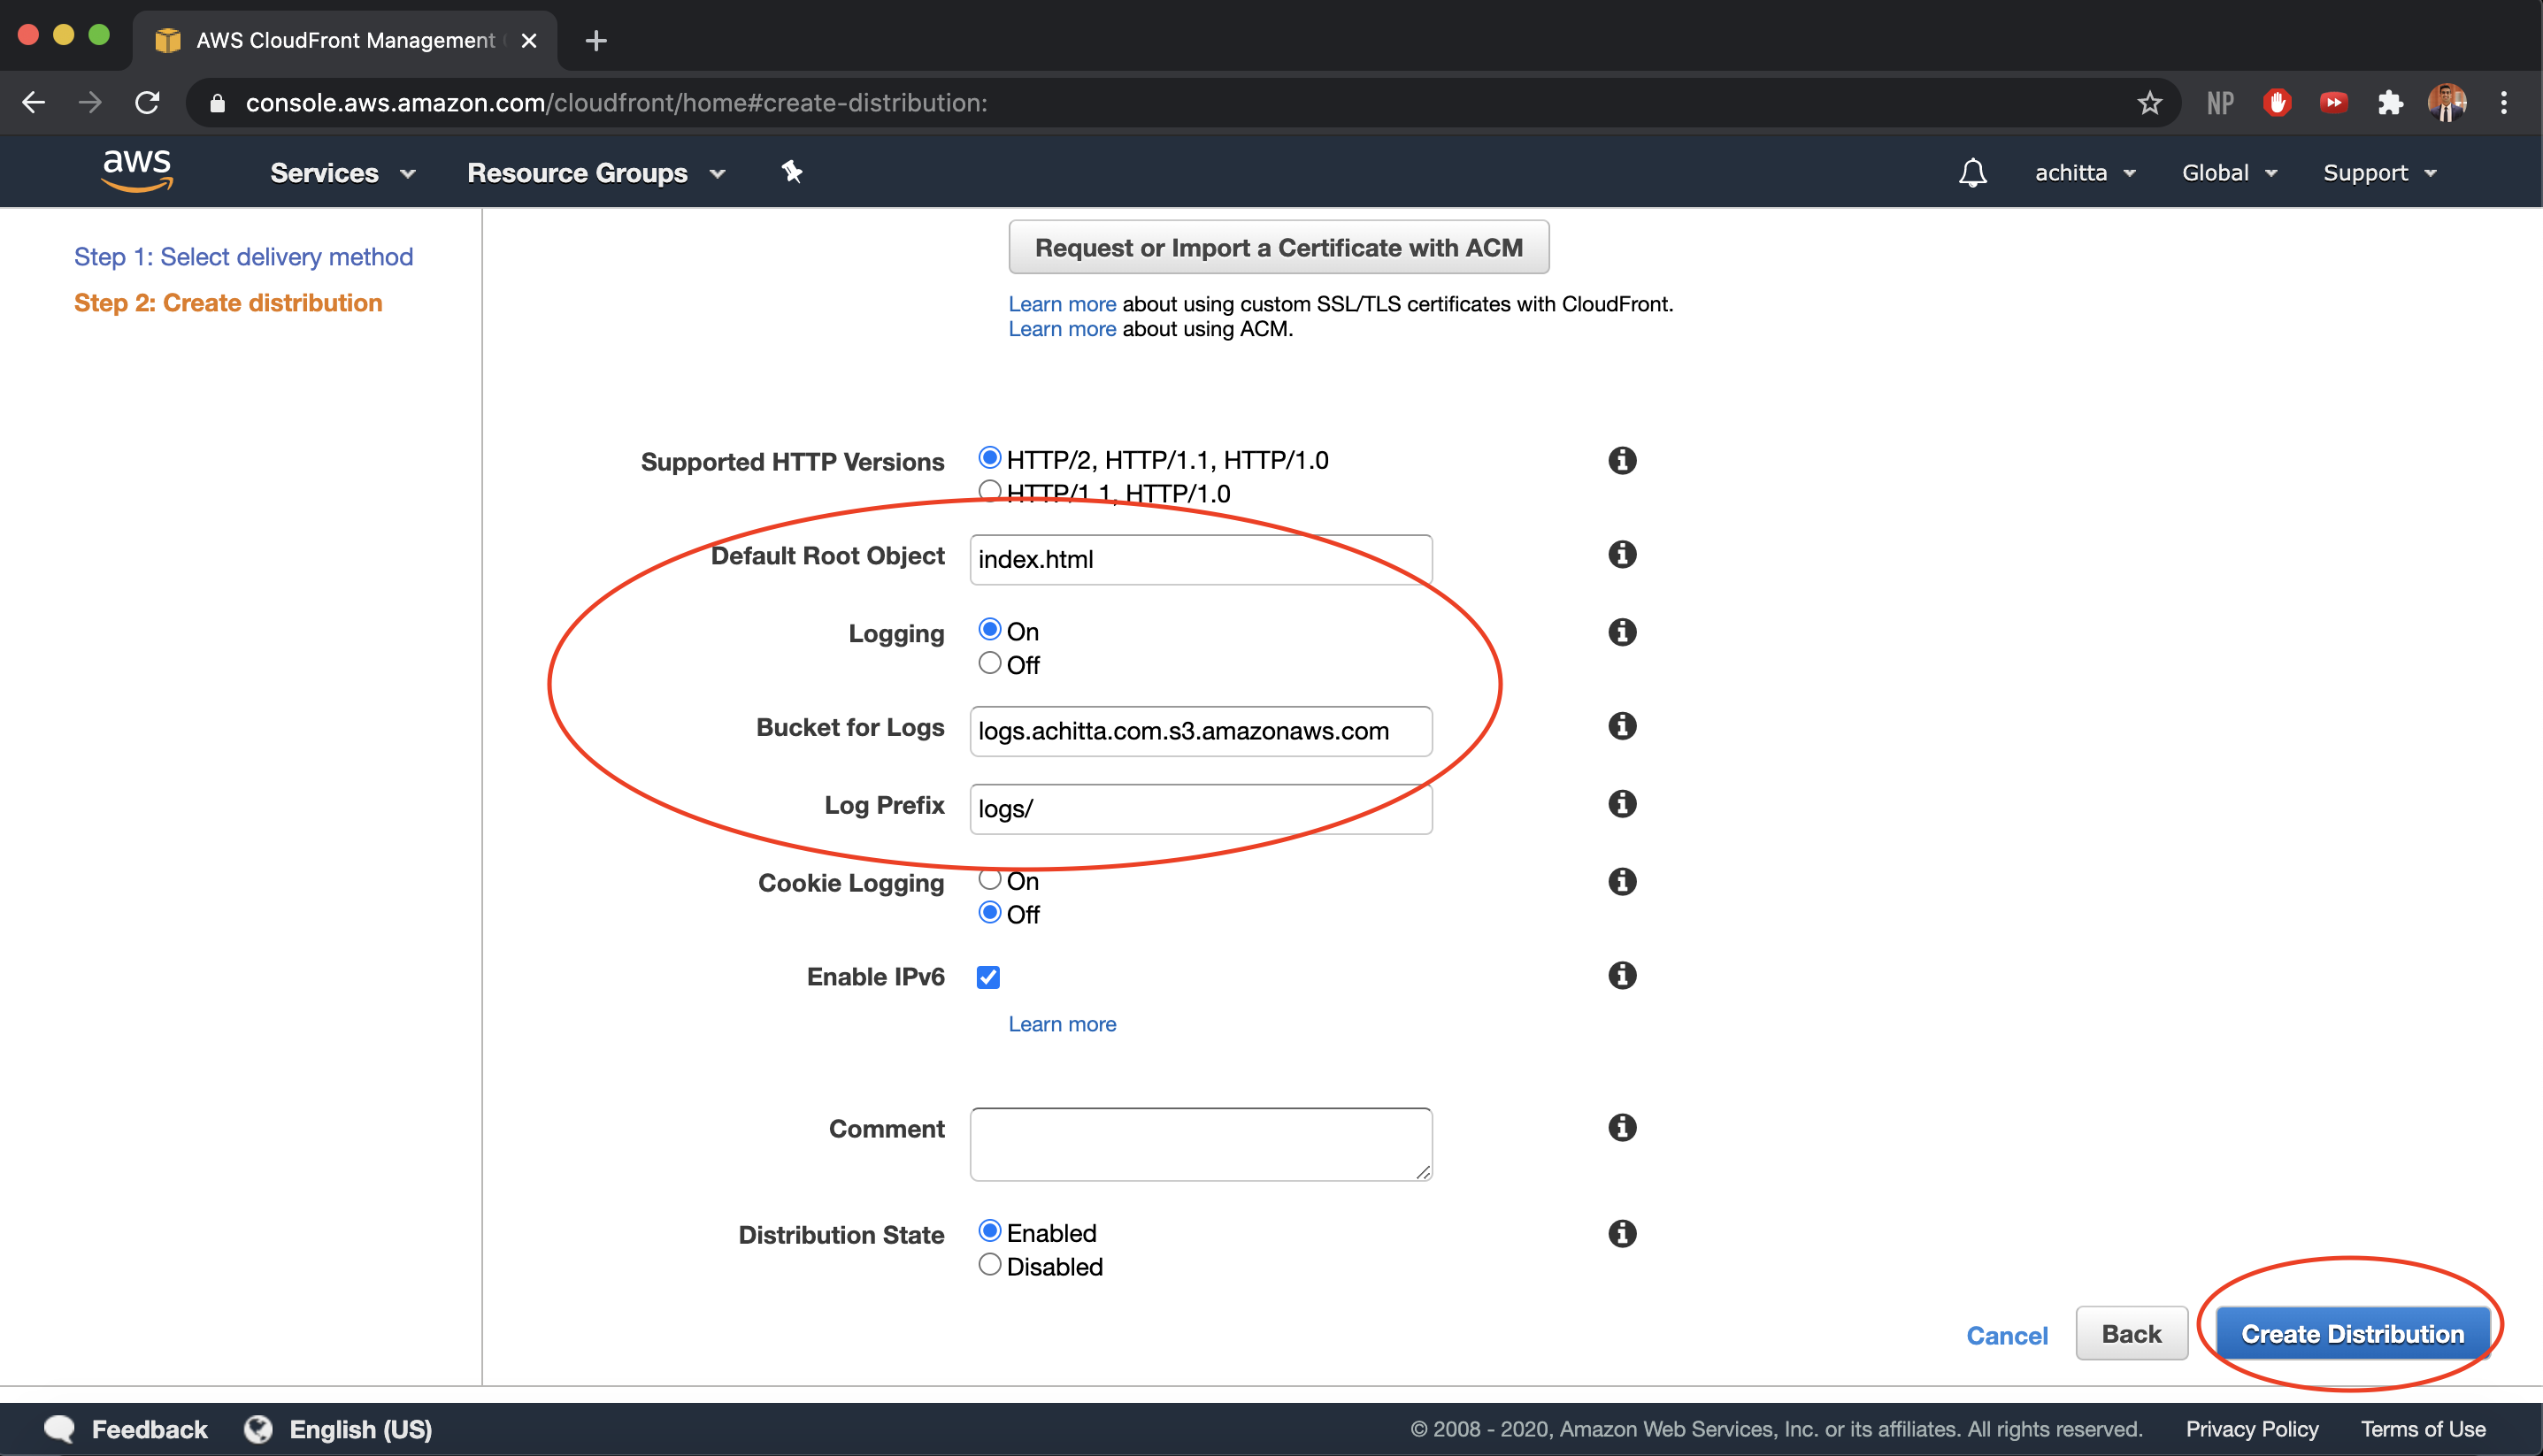
-
You should now see your CloudFront distribution in the console. Wait for the status to change to
Deployedand then get your CDN domain name. It may take up to 15 minutes or so for the CDN to be deployed. Verify that it has been deployed successfully by browsing to your CDN domain. You should see “This XML file does not appear to have any style information associated with it. The document tree is shown below.”. If you see “This site can’t be reached”, then something went wrong.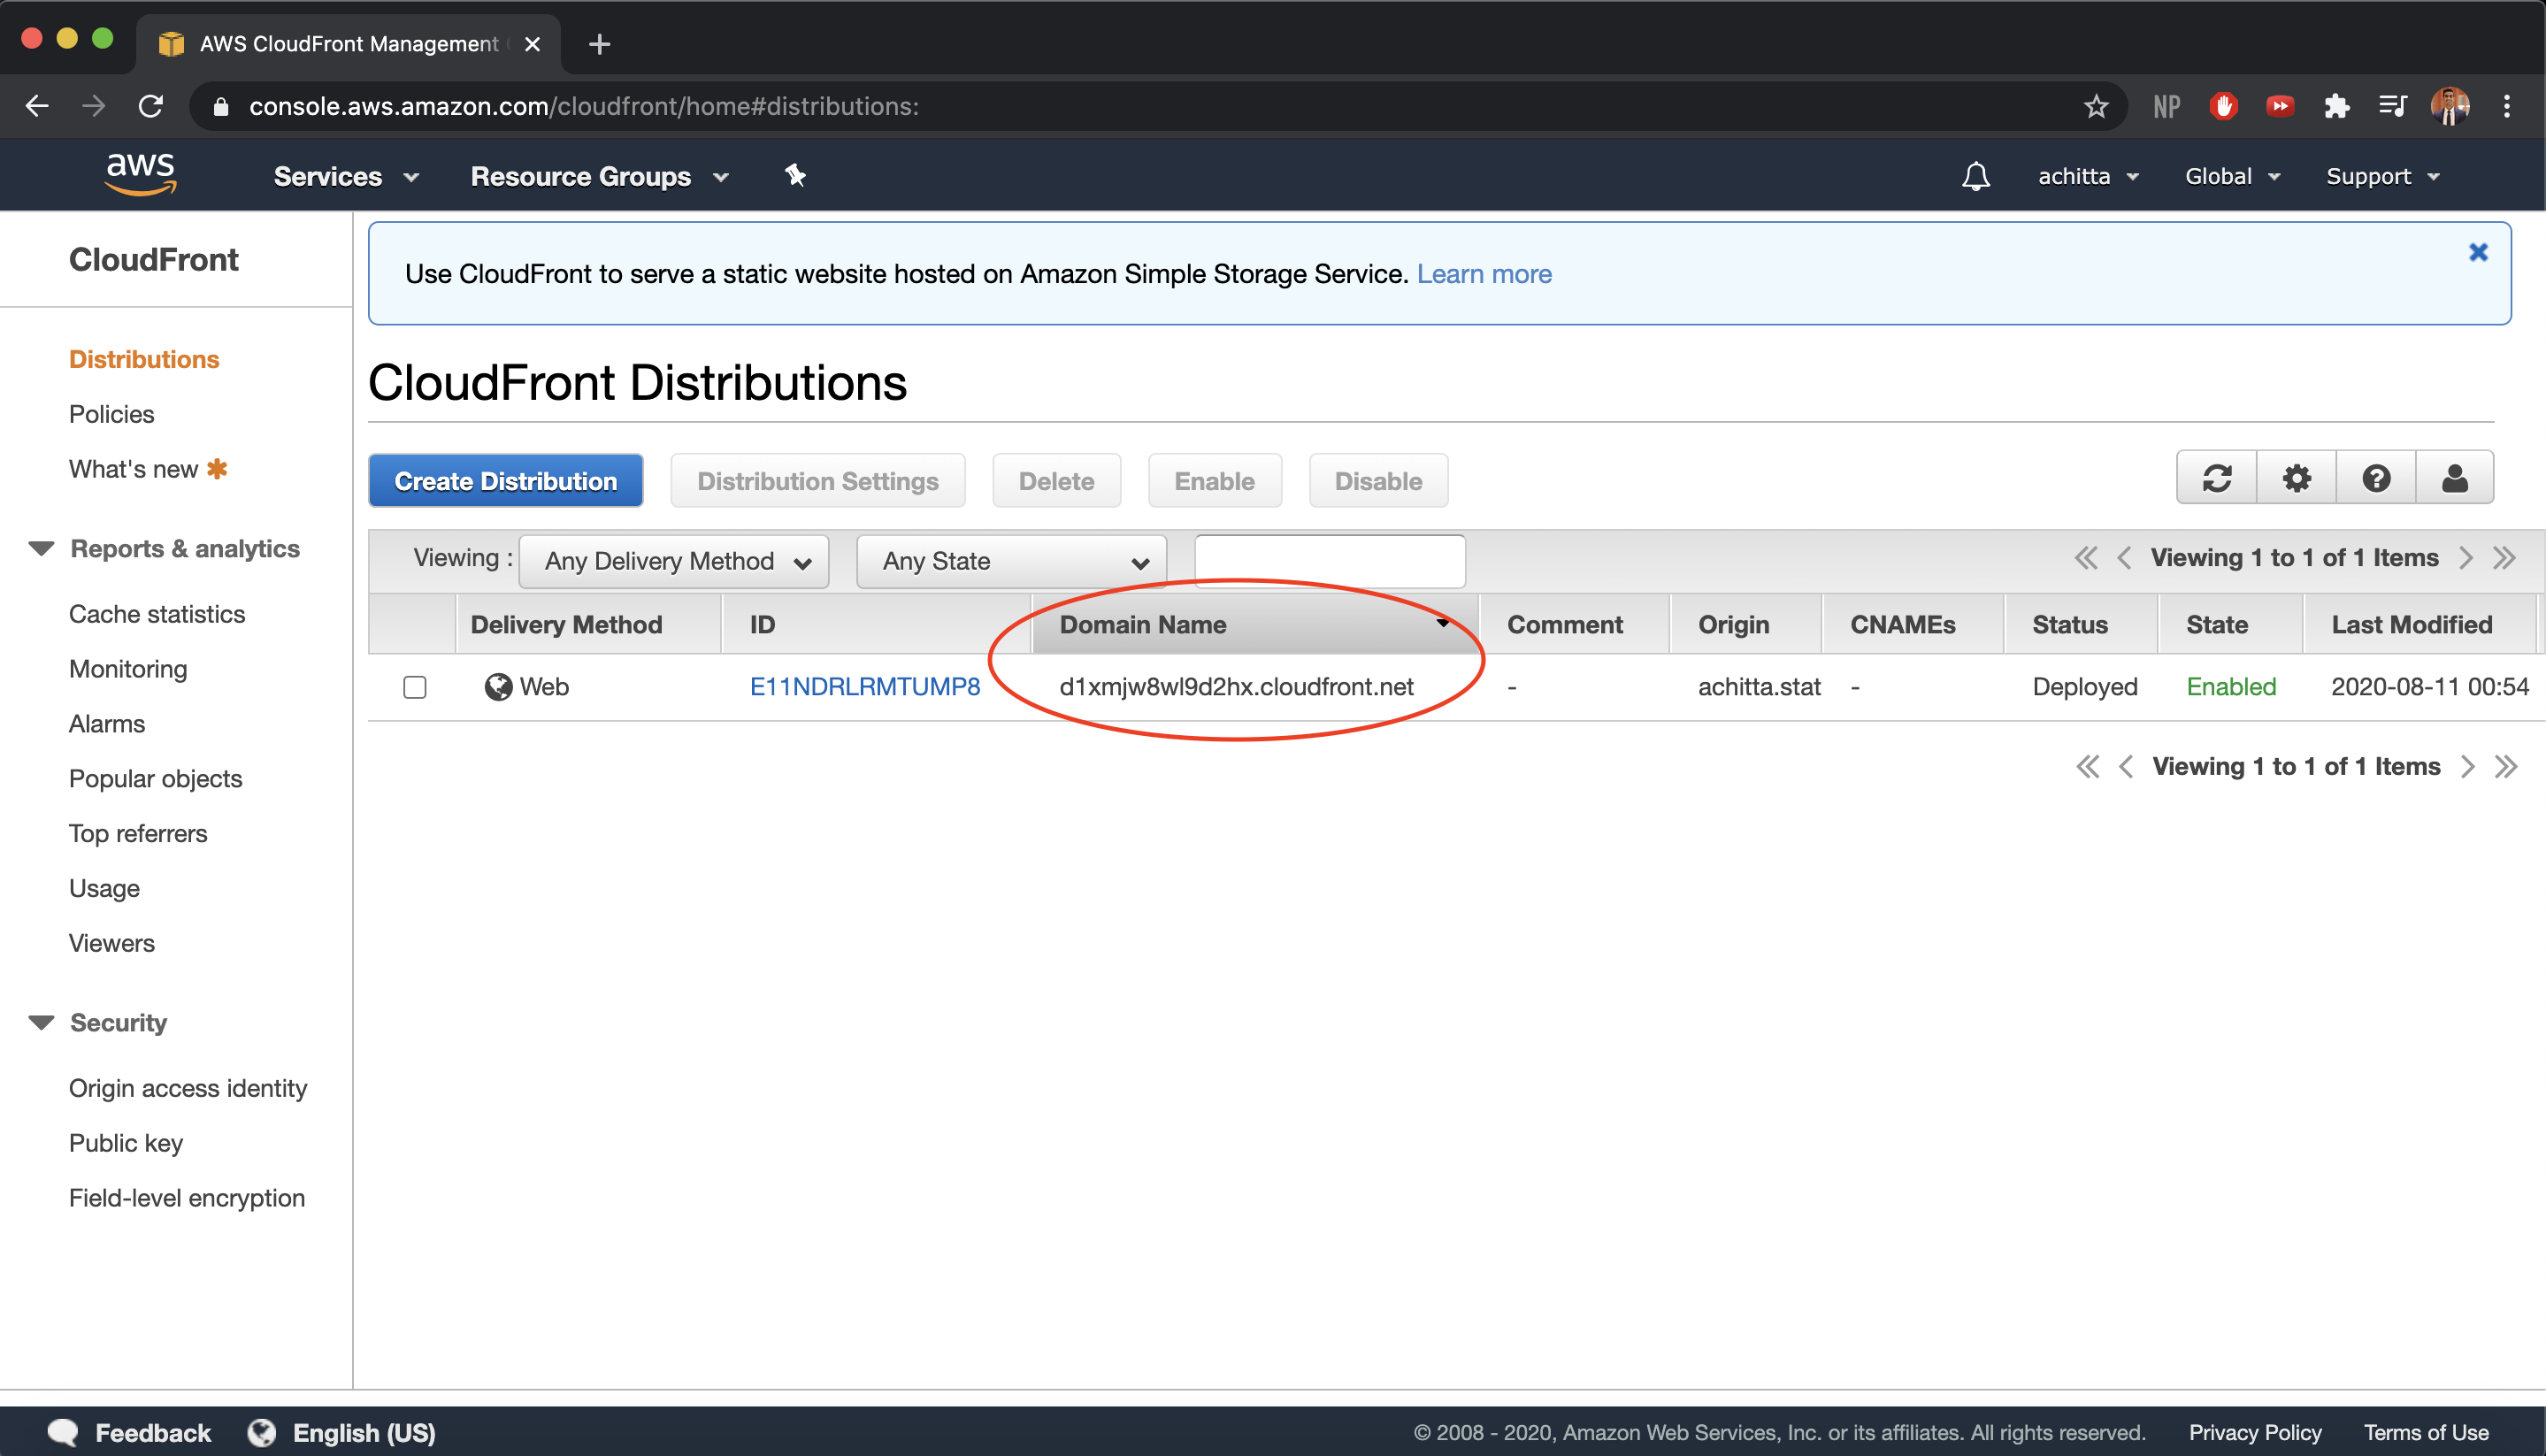
See the different IPs when accessing the static file server directly vs. through the CDN.
$ curl -vI http://uniqname.static.insta485.com.s3-website.us-east-2.amazonaws.com/static/js/bundle.js
*   Trying 52.219.84.28...
* TCP_NODELAY set
* Connected to uniqname.static.insta485.com.s3-website.us-east-2.amazonaws.com (52.219.84.28) port 80 (#0)
...
$ curl -vI
$ curl -vI http://d1xmjw8wl9d2hx.cloudfront.net
*   Trying 99.84.248.133...
* TCP_NODELAY set
* Connected to d1xmjw8wl9d2hx.cloudfront.net (99.84.248.133) port 80 (#0)
...
Configure web server setting to use the CDN
Similar to before, we can use Flask-S3 to work with the CDN we just deployed.
Add FLASKS3_CDN_DOMAIN to the settings in config.py. All flask-s3 setting look this this now:
FLASKS3_DEBUG = True # Enables Flask-S3's debug mode
FLASKS3_ACTIVE = True # This setting allows you to toggle whether Flask-S3 is active or not
FLASKS3_BUCKET_NAME = "uniqname.static.insta485.com" # Add your own root bucket name here
FLASKS3_REGION = "us-east-2" # Sets up the AWS region to host your static assets in
FLASKS3_FORCE_MIMETYPE = True # Always set the Content-Type header on the S3 files irrespective of gzipping
FLASKS3_USE_HTTPS = False # We will only be using HTTP for now
FLASKS3_CDN_DOMAIN = "d1xmjw8wl9d2hx.cloudfront.net" # Add your own CDN Domain Name here
Browse to the index page http://localhost:8000 . View source and look for static files, e.g., bundle.js. It should be sourced from CloudFront, e.g.:
<script type="text/javascript" src="http://d1xmjw8wl9d2hx.cloudfront.net/static/js/bundle.js"></script>
Then, disable your CDN using the management console. This will take a few minutes.
Convert P3 Uploads to AWS S3
In addition to our static assets, we want the images that are posted to Insta485 to be available to users globally. Locally, we are storing the image files in the var/uploads folder; however, this is not a very scalable solution. For example, if we want to create multiple front-end servers for Insta485 to distribute the computation, each server cannot have its own copy of uploads. Instead, we can once again leverage an AWS S3 bucket to store all of the uploads and our front-end web servers can read and write to that S3 bucket.
Add S3 Support
-
First, we need to create an S3 bucket for our uploads. Create an S3 bucket in us-east-2 (Ohio) named
uniqname.uploads.insta485.comwith your uniqname and click “Create” (accept all the default settings). Inside that bucket, create a folder nameduploads/- you can do this by clicking theCreate folderbutton inside the S3 bucket on the console. You do not need to make it a public bucket or attach any permissions.You should now be able to see your buckets.
$ aws s3 ls ... 2020-08-24 14:58:25 achitta.static.insta485.com 2020-08-24 15:10:48 achitta.uploads.insta485.com 2020-08-24 15:03:57 logs.achitta.com ... $ aws s3 ls uniqname.uploads.insta485.com PRE uploads/ - Now we need to copy all of your local database assets to your S3 bucket. Make sure to use your own uniqname.
$ aws s3 cp var/uploads/ s3://uniqname.uploads.insta485.com/uploads --recursive upload: var/uploads/e1a7c5c32973862ee15173b0259e3efdb6a391af.jpg to s3://achitta.uploads.insta485.com/uploads/e1a7c5c32973862ee15173b0259e3efdb6a391af.jpg ... -
Add the following to the the
insta485/config.pyfile.# AWS S3 file upload AWS_S3_UPLOAD_BUCKET = "uniqname.uploads.insta485.com" # or your bucket name AWS_S3_UPLOAD_REGION = "us-east-2" AWS_S3_UPLOAD_FOLDER = "uploads" -
Add the following imports to your
insta485/model.pyfile before theinsta485import:from pathlib import Path import uuid import tempfile import botocore import boto3 -
Add this to the
install_requiresarray insetup.py:'boto3==1.14.9',
Functions for API Routes
The following functions will be written in the model.py folder. Let’s first write the API route for getting uploads from S3.
@insta485.app.route("/uploads/<filename>")
def get_upload(filename):
    """Serve one file from the uploads directory."""
    # In production, download the image from S3 to a temp file and serve it
    if "AWS_S3_UPLOAD_BUCKET" in insta485.app.config:
        s3_client = boto3.client("s3")
        bucket = insta485.app.config["AWS_S3_UPLOAD_BUCKET"]
        key = "{folder}/{filename}".format(
            folder=insta485.app.config.get("AWS_S3_UPLOAD_FOLDER"),
            filename=filename,
        )

        # Download the image to a temporary in-memory file
        # https://docs.python.org/3/library/tempfile.html#tempfile.SpooledTemporaryFile
        # https://boto3.amazonaws.com/v1/documentation/api/latest/reference/services/s3.html#S3.Client.download_fileobj
        tmpfileobj = tempfile.SpooledTemporaryFile()
        try:
            s3_client.download_fileobj(bucket, key, tmpfileobj)
        except botocore.exceptions.ClientError as error:
            LOGGER.error(error)
            flask.abort(400)

        # Serve the file to the user
        # https://flask.palletsprojects.com/en/1.1.x/api/#flask.send_file
        tmpfileobj.seek(0)
        return flask.send_file(tmpfileobj, attachment_filename=filename)

    # In development, send the file directly from the file system
    return flask.send_from_directory(
        insta485.app.config['UPLOAD_FOLDER'],
        filename
    )
Next, let’s write a helper function for if a filename has an allowed extension.
def allowed_file(filename):
    """Return true if filename has allowed extension."""
    extension = Path(filename).suffix
    extension = extension.replace(".", "").lower()
    return extension in insta485.app.config["ALLOWED_EXTENSIONS"]
Now, let’s write the function to save an upload to S3.
def save_upload_to_s3(fileobj, filename):
    """Upload file object to S3.
    This function is used in production for media uploads.
    Docs
    https://boto3.amazonaws.com/v1/documentation/api/latest/guide/s3-uploading-files.html
    https://boto3.amazonaws.com/v1/documentation/api/latest/guide/configuration.html
    """
    s3_client = boto3.client("s3")
    bucket = insta485.app.config["AWS_S3_UPLOAD_BUCKET"]
    key = "{folder}/{filename}".format(
        folder=insta485.app.config.get("AWS_S3_UPLOAD_FOLDER"),
        filename=filename,
    )
    try:
        s3_client.upload_fileobj(fileobj, bucket, key)
    except botocore.exceptions.ClientError as error:
        LOGGER.error(error)
        flask.abort(400)
    LOGGER.info("Saved upload to S3 %s/%s", bucket, key)
And we need to write a function to delete a file from S3.
def delete_upload_from_s3(filename):
    """Delete file object from S3.
    This function is used in production for media uploads.
    Docs
    https://boto3.amazonaws.com/v1/documentation/api/latest/guide/s3-uploading-files.html
    https://boto3.amazonaws.com/v1/documentation/api/latest/guide/configuration.html
    """
    s3_client = boto3.client("s3")
    bucket = insta485.app.config["AWS_S3_UPLOAD_BUCKET"]
    key = "{folder}/{filename}".format(
        folder=insta485.app.config.get("AWS_S3_UPLOAD_FOLDER"),
        filename=filename,
    )
    try:
        s3_client.delete_object(Bucket=bucket, Key=key)
    except botocore.exceptions.ClientError as error:
        LOGGER.error(error)
        flask.abort(400)
    LOGGER.info("Deleted upload from S3 %s/%s", bucket, key)
In local development, we don’t want to interact with S3 - so let’s write two functions to save and delete uploads using local storage.
def save_upload_to_disk(fileobj, filename):
    """Save file object to on-disk uploads folder.
    This function is used in development for media uplods.
    """
    path = insta485.app.config["UPLOAD_FOLDER"]/filename
    fileobj.save(path)
    LOGGER.info("Saved upload to disk %s", path)


def delete_upload_from_disk(filename):
    """Delete file from on-disk uploads folder.
    This function is used in development for media uplods.
    """
    path = insta485.app.config["UPLOAD_FOLDER"]/filename
    path.unlink()
Finally, let’s use the functions we wrote to create and remove uploads.
def create_upload():
    """Handle one upload POST request.  Return filename of saved file."""
    # User is not logged in
    if "logname" not in flask.session:
        flask.abort(403)

    # Post request has no file part
    if "file" not in flask.request.files:
        flask.abort(400)
    file = flask.request.files["file"]

    # User did not select file
    if file.filename == "":
        flask.abort(400)

    # Disallowed file extension
    if not allowed_file(file.filename):
        flask.abort(400)

    # New filename is a unique ID
    uuid_filename = "{stem}{suffix}".format(
        stem=uuid.uuid4().hex,
        suffix=Path(file.filename).suffix
    )

    # Upload to S3 if the configuration provides AWS_S3_UPLOAD_BUCKET.
    # Typically, this would be set in production.
    if "AWS_S3_UPLOAD_BUCKET" in insta485.app.config:
        save_upload_to_s3(file, uuid_filename)
    else:
        save_upload_to_disk(file, uuid_filename)

    # Return hash_basename for adding to database
    return uuid_filename


def remove_upload(filename):
    """Handle one request to delete a media upload."""
    # Upload to S3 if the configuration provides AWS_S3_UPLOAD_BUCKET.
    # Typically, this would be set in production.
    if "AWS_S3_UPLOAD_BUCKET" in insta485.app.config:
        delete_upload_from_s3(filename)
    else:
        delete_upload_from_disk(filename)
- By the end of this section, you should have all of the helper functions in your
model.pyfile.
Refactoring views to use new API routes
Now that we’ve written new create_upload() and remove_upload() functions in the model module of insta485, we’ll need to refactor the uses in views/accounts.py and views/user.py.
Everyone will have slightly different code for this. Here’s what you’ll need to do:
- Recall that you had to computed filenames and saved the files using this code given to you in the project 2 spec
  # Save POST request's file object to a temp file
  dummy, temp_filename = tempfile.mkstemp()
  file = flask.request.files["file"]
  file.save(temp_filename)

  # Compute filename
  hash_txt = sha256sum(temp_filename)
  dummy, suffix = os.path.splitext(file.filename)
  hash_basename = hash_txt + suffix
  hash_filename = insta485.app.config["UPLOAD_FOLDER"]/hash_basename

  # Move temp file to permanent location
  shutil.move(temp_filename, hash_filename)
Most likely, you either added a helper function for this code block or copy-pasted this logic whenever you had to upload a file/image. If you went the helper function route, replace all of the calls to that helper fuction with
insta485.model.create_upload(). If you went the copy-paste route, replace every occurrence of the file upload logic withinsta485.model.create_upload(). -
Remove the Flask route
@insta485.app.route('/uploads/<filename>', methods=['GET'])and Python function associated with that flask route. We do not need it anymore. - Replace all your code regarding actually deleting a file (delete post, update profile picture, etc.) to now call
insta485.model.remove_upload(old_filename)
Run and validate
View bucket contents with AWS CLI.
List buckets and bucket contents
$ aws s3 ls
...
2020-06-22 11:27:33 uniqname.uploads.insta485.com
$ aws s3 ls uniqname.uploads.insta485.com
                           PRE uploads/
Make sure you have the AWS Python module installed.
$ pip install boto3
Run a dev server.
$ ./bin/insta485run
Log in to the web interface and navigate to a user page, e.g., http://localhost:8000/u/awdeorio/ . Upload an image, creating a new post. You should it the image appear. Check the server logs, you should see:
[2020-06-23 21:52:25,411] INFO in model: Saved upload to S3 uniqname.uploads.insta485.com/uploads/aaaf3b2c2597410ba72fa4a337bc9185.jpg
- By the end of this section, you should see server logs that uploads are being saved to S3.
Cleanup
Note: We are NOT deleting any of the AWS resources that we provisioned.
-
Disable your CDN by navigating to the CloudFront console, clicking on the checkbox for your distribution, and then clicking on
disable. -
Block public access to your static S3 file server by navigating to the S3 console, clicking into your static files S3 bucket (i.e.
uniqname.static.insta485.com), then clicking onproperties -> Static Website Hosting, and then clicking onDisable website hostingandsave. -
Comment out the line
AWS_S3_UPLOAD_BUCKET = "uniqname.uploads.insta485.com"in yourinsta485/config.pyto use local image uploads instead of S3. -
Set
FLASKS3_ACTIVEtofalsein yourinsta485/config.pyto serve static files locally instead of from your CDN and S3.
You should now be able to run ./bin/insta485run and everything should still work. Additionally, verify that your the script source on your index.html page is /static/js/bundle.js
Completion Criteria
- Connect your P3 code to AWS S3 to serve static file assets from S3
- Use a CDN to work on top of your S3 bucket to serve content from the S3 bucket
- Connect your P3 code to write new uploads to an S3 bucket and serve uploads from the S3 bucket
Lab Quiz
Complete the lab quiz by the due date.