EECS 485 Lab
Lab 12: Scaling Server-Side Dynamic Pages with PaaS (Part 2)
Goals
By the end of this lab, you will:
- Provision AWS infrastructure to deploy your application
- Push a Docker container with your server-side code to Amazon ECR
- Deploy Docker container to AWS Fargate and ECS
- Finish scaling your client-side dynamic web page
Prerequisites
Restarting this tutorial
To restart this tutorial, you will need to revert your code changes, delete your ECS cluster, delete your CloudFormation Stack, delete your Elastic Load Balancer, and any other AWS resources you enabled.
Reverting Code Changes
$ pwd
/Users/awdeorio/src/eecs485/p3-insta485-clientside/
$ git checkout aws-uniqname
M       ...
Already on 'aws-uniqname'
Your branch is up to date with 'origin/aws-uniqname'.
$ git branch # Verify that you are on the aws-uniqname branch
* aws-uniqname
main
$ git reset --hard # Reverts all code changes back to your previous commit
HEAD is now at ... [previous commit message]
Remove Local Created Docker Images
The only local images that we created are your local insta485, python, and your AWS insta485. We will remove these with the docker rmi command
$ docker images
REPOSITORY                                              TAG                 IMAGE ID            CREATED             SIZE
943896243526.dkr.ecr.us-east-2.amazonaws.com/insta485   latest              213bd50edc70        17 hours ago        364MB
insta485                                                latest              213bd50edc70        17 hours ago        364MB
python                                                  3.8.1-slim-buster   b99890b7a7dc        6 months ago        193MB
hello-world                                             latest              bf756fb1ae65        7 months ago        13.3kB
$ docker rmi -f 943896243526.dkr.ecr.us-east-2.amazonaws.com/insta485 insta485 python
Untagged: 943896243526.dkr.ecr.us-east-2.amazonaws.com/insta485:latest
Untagged: insta485:latest
Untagged: python:3.8.1-slim-buster
Delete All AWS Resources
To clean up all the AWS resources you may have created and/or re-enabled, follow this tutorial
Re-Enabling All AWS Resources
In labs 7 and 9, we previously disabled an Amazon RDS instance, disabled a CloudFront distribution, and blocked public acess to our S3 static file server.
Re-Enable Amazon RDS Instance
- To redeploy your RDS instance, you need complete the Create AWS RDS PostgreSQL Database and Test AWS RDS Database sections. You should already have the VPC security group created and the correct code implementation. Your new database instance will have a different endpoint so make sure to change the
RDSHOSTenvironment variable andPOSTGRESQL_DATABASE_HOSTPython Flask variable to the updated url.
Re-Enable CDN and S3 Buckets
-
Enable your CDN by navigating to the CloudFront console, clicking on the checkbox for your distribution, and then clicking on
enable. Add in theFLASKS3_CDN_DOMAIN = "d1xmjw8wl9d2hx.cloudfront.net" # Add your own CDN Domain Name hereback into yourconfig.py. -
Unblock public access to your static S3 file server by navigating to the S3 console, clicking into your static files S3 bucket (i.e.
uniqname.static.insta485.com), then clicking onproperties -> Static Website Hosting, and then clicking onUse this bucket to host a websiteandsave. -
If not already done so, add
AWS_S3_UPLOAD_BUCKET = "uniqname.uploads.insta485.com"with your uniqname to your production config (this should have been added before so double check!) -
If not already done so, set
FLASKS3_ACTIVEtotruein your production config file (this should have been added before so double check!)
Updating configs and run scripts
Note: Replace the FIXMEs for FIXME_AWS_RDS_HOSTNAME, FIXME_S3_STATIC_BUCKET_NAME, FIXME_CDN_DOMAIN_NAME, FIXME_S3_UPLOADS_BUCKET_NAME) in your config_prod.py with the correct information
Also replace the FIXMEs in the insta485run_prod script: FIXME_FLASK_SECRET_KEY, FIXME_RDS_PASSWORD. Upon properly updating these values, running the script should bring up a working version of the site on localhost.
Docker & Amazon ECR
Docker
Docker is an open source containerization technology. Containers allow us to run our server-side dynamic pages code on AWS servers.
Installing Docker
MacOS
# Docker Server on macOS
brew cask install docker                # Install
open /Applications/Docker.app           # Start VM
docker version                          # Verify connection
Sanity check
$ docker run hello-world
...
Hello from Docker!
...
Pitfall If you see the following message
$ docker run hello-world
docker: Error response from daemon: dial unix docker.raw.sock: connect: connection refused.
See 'docker run --help'.
it means that Docker Desktop is not running and you can verify by checking the icon in your toolbar. If this is the case, then open up the Docker Desktop icon, wait for it to initialize, and then try again.
Linux/WSL
To use Docker on WSL, we first need to download Docker Desktop. Navigate to the link and select Download for Windows (stable).

Once the Open the installer and accept the default configurations by clicking Ok. Launch the Docker Desktop application. If you get an error about your WSL 2 kernel being out of date, navigate here and download the latest WSL2 Linux kernel.
If the dashboard does not appear, navigate to it, by right-clicking the Docker icon in the pop-up menu on your Windows desktop and clicking dashboard.


In the dashboard, click the settings icon. Then check Expose daemon on tcp://localhost:2375 without TLS and click Apply and Restart.
Now, open a terminal and run the following:
$ sudo apt update
$ sudo apt install apt-transport-https ca-certificates curl software-properties-common
$ curl -fsSL https://download.docker.com/linux/ubuntu/gpg | sudo apt-key add -
$ sudo add-apt-repository "deb [arch=amd64] https://download.docker.com/linux/ubuntu bionic stable"
$ sudo apt update
$ sudo apt install docker-ce
$ sudo groupadd docker
$ sudo usermod -aG docker ${USER}
$ exit
# After opening a new terminal window
$ echo "export DOCKER_HOST=tcp://localhost:2375" >> ~/.bashrc && source ~/.bashrc
Verify you’re in the docker group.
$ groups
... docker
Sanity check.
$ docker run hello-world
Hello from Docker!
This message shows that your installation appears to be working correctly...
Writing a Manifest file
Your setup.py file describes the metadata about your project and how it can be easily installed by others including the dependencies. This file is used to package your python projects for distribution. However, when you distribute this project, you want to make sure that it is as lightweight as possible, so you should exclude all files that are not essential for actual distribution. In the context of project 3, your python package is your server-side code so you do not need to include the JavaScript files as they are static files (that can be served with AWS services like S3/CloudFront like you did in Lab 10) or dev/binary files as those will be generated when end users run the python code. To define what files will be added/removed to the source distribution, you will need to create a MANIFEST.in file in your p3 root directory and add the following code.
graft insta485

# Avoid JS files in insta485
global-exclude *.js
global-exclude *.jsx

# Avoid dev and and binary files
global-exclude *.pyc
global-exclude __pycache__
To learn more about the MANIFEST.in file and packaging in python, click here.
Writing a Dockerfile
A Dockerfile is a text document that contains all the commands a user would call on the command line to assemble an image. Using docker build users can create an automated build that executes several command-line instructions in succession. Think of these similar to the bash scripts we used in previous projects. They both run several commands to set up either an application or an image. We’ll be writing a Dockerfile for project 3 as well.
Create a new file in your project root folder named Dockerfile and add the following code:
# Configuration for insta485 web server Docker image
#
# Andrew DeOrio <awdeorio@umich.edu>

# Use a minimal Python image as a parent image
FROM python:3.8.1-slim-buster

# Copy list of production requirements into Docker container
COPY requirements-prod.txt /tmp

# Install Python package requirements
RUN pip install -r /tmp/requirements-prod.txt

# Copy application into image
COPY dist/insta485-0.1.0.tar.gz /tmp

# Install Insta485 web app
RUN pip install /tmp/insta485-0.1.0.tar.gz

# Run the web server in the container
CMD gunicorn \
  --workers 4 \
  --bind 0.0.0.0:8000 \
  insta485:app
Python requirements
You’re going to also need a requirements-prod.txt. Create this file in your p3-insta485-clientside (root) folder and add the following code
arrow==0.15.7
click==7.1.2
Flask==1.1.2
gunicorn==20.0.4
itsdangerous==1.1.0
Jinja2==2.11.2
MarkupSafe==1.1.1
python-dateutil==2.8.1
six==1.15.0
Werkzeug==1.0.1
Building a Docker image
With your virtual environment activated, run the following commands in your p3-insta485-clientside (root) folder:
$ pwd
/Users/awdeorio/src/eecs485/p3-insta485-clientside/
$ python3 setup.py sdist # Create a source distribution
$ ls dist/insta485-0.1.0.tar.gz
dist/insta485-0.1.0.tar.gz
$ docker build --tag insta485:latest .
...
Successfully built d11400c99e16
Successfully tagged insta485:latest
Pitfall: If you can not successfully build the image, double check that your Manifest file, Dockerfile and requirements-prod.txt files are all in the p3-insta485-clientside (root) folder; not in the insta485 folder.
Sanity check: Check that your insta485 image exists in the list of images
$ docker images | grep insta485
REPOSITORY          TAG                 IMAGE ID            CREATED             SIZE
insta485            latest              9f8303305987        9 seconds ago       206MB
Running a Docker image
Now that we’ve created a Docker image, let’s run it.
$ pwd
/Users/awdeorio/src/eecs485/p3-insta485-clientside/
$ docker run --publish 8000:8000 --env FLASK_SECRET_KEY=0123456789abcdef --env POSTGRESQL_DATABASE_PASSWORD=FIXME insta485:latest
[2020-08-03 22:09:21 +0000] [6] [INFO] Starting gunicorn 20.0.4
[2020-08-03 22:09:21 +0000] [6] [INFO] Listening at: http://0.0.0.0:8000 (6)
[2020-08-03 22:09:21 +0000] [6] [INFO] Using worker: sync
[2020-08-03 22:09:21 +0000] [8] [INFO] Booting worker with pid: 8
[2020-08-03 22:09:21 +0000] [9] [INFO] Booting worker with pid: 9
[2020-08-03 22:09:21 +0000] [10] [INFO] Booting worker with pid: 10
[2020-08-03 22:09:21 +0000] [11] [INFO] Booting worker with pid: 11
Sanity check: Open up another terminal window and verify the image is running by entering this command:
$ docker ps
CONTAINER ID        IMAGE               COMMAND                  CREATED              STATUS              PORTS                    NAMES
c113cbbaf59e        insta485:latest     "/bin/sh -c 'gunicor…"   About a minute ago   Up About a minute   0.0.0.0:8000->8000/tcp   magical_greider
$ curl -L localhost:8000
<!DOCTYPE html>
<html lang="en">
  <head>
    <title>Insta485</title>
...
Killing a Docker image
Now that we’ve built and run a Docker image, let’s kill our currently running image. In your second terminal, run the following command where container_id is the id associated with the insta485 image you got from docker ps:
$ docker kill <container_id> # ex: docker kill c113cbbaf59e
c113cbbaf59e
$ docker ps # should not have anything running!
CONTAINER ID        IMAGE               COMMAND             CREATED             STATUS              PORTS               NAMES
Commit and Push Code Changes
If everything has worked for you up until this point, then go ahead and commit and push your changes.
$ git status
On branch aws-uniqname
Your branch is up to date with 'origin/aws-uniqname'.
Changes not staged for commit:
  (use "git add <file>..." to update what will be committed)
  (use "git checkout -- <file>..." to discard changes in working directory)
    ...
$ git add .
$ git commit -m "Add Docker support"
$ git push
Amazon ECR
Amazon Elastic Container Registry, or ECR, is a container registry that helps developers store and manage Docker container images. We will be using Amazon ECR to store our newly created Docker image.
Create an IAM user
If you have not done so already, create an IAM user and group using this IAM tutorial
AWS CLI
If you have not done so already, install and configure your AWS CLI using this AWS CLI tutorial
Deploying to ECR
During the project, we deployed our application directly to an EC2 instance. However, we had to individually clone our code repo, create a virtual environment, install all the dependencies and other tools, create our database, and run the application. If we want to scale this application, it would be quite tedious to replicate this process on multiple provisioned EC2 instances. Instead, by deploying a Docker image that specifies these instructions already to AWS, we can easily scale our application and the scaling process can even be automated by AWS in a fast and reliable way.
Authenticate Docker to AWS ECR. Run the following command, but use use your own AWS account ID (ours is 403881461553), which you find by going from console -> username -> My Account -> Account Id
$ aws ecr get-login-password --region us-east-2 | docker login --username AWS --password-stdin 403881461553.dkr.ecr.us-east-2.amazonaws.com
WARNING! Your password will be stored unencrypted in /Users/awdeorio/.docker/config.json.
Configure a credential helper to remove this warning. See
https://docs.docker.com/engine/reference/commandline/login/#credentials-store

Login Succeeded
Create repository in AWS ECR
$ aws ecr create-repository \
    --repository-name insta485 \
    --image-scanning-configuration scanOnPush=true \
    --region us-east-2

THIS IS OUTPUT
{
    "repository": {
        "repositoryArn": "arn:aws:ecr:us-east-2:403881461553:repository/insta485",
        "registryId": "403881461553",
        "repositoryName": "insta485",
        "repositoryUri": "403881461553.dkr.ecr.us-east-2.amazonaws.com/insta485",
        "createdAt": "2020-06-24T19:40:49-04:00",
        "imageTagMutability": "MUTABLE",
        "imageScanningConfiguration": {
            "scanOnPush": true
        }
    }
}
Add a tag to the image with AWS info. Make sure to use your own account number. This tag helps AWS identify which images from your local repository should be pushed at a later point.
$ docker tag insta485:latest 403881461553.dkr.ecr.us-east-2.amazonaws.com/insta485:latest
Publish to ECR. Make sure to use your own account ID.
$ docker push 403881461553.dkr.ecr.us-east-2.amazonaws.com/insta485:latest
You should be able to now view your image on AWS
$ aws ecr describe-images --repository-name insta485
{
    "imageDetails": [
        {
            "registryId": "403881461553",
            "repositoryName": "insta485",
            ...
            "imageTags": [
                "latest"
            ],
            ...
You should also be able to see the repository in the AWS ECR Console.
Update Image on ECR
NOTE: You only need to worry about this section if you make a mistake with the initial Docker image you pushed to ECR.
First, make any necessary local changes.
Rebuild the docker image.
$ docker images
REPOSITORY                                              TAG                 IMAGE ID            CREATED             SIZE
943896243526.dkr.ecr.us-east-2.amazonaws.com/insta485   latest              154c64009ca9        31 minutes ago      364MB
insta485                                                latest              154c64009ca9        31 minutes ago      364MB
...
$ python3 setup.py sdist
$ ls dist/insta485-0.1.0.tar.gz
dist/insta485-0.1.0.tar.gz
$ docker build --tag insta485:latest .
$ docker images # Notice that the image IDs are now different
REPOSITORY                                              TAG                 IMAGE ID            CREATED             SIZE
insta485                                                latest              213bd50edc70        9 seconds ago       364MB
943896243526.dkr.ecr.us-east-2.amazonaws.com/insta485   latest              154c64009ca9        33 minutes ago      364MB
...
Authenticate with AWS ECR. Don’t forget to change your account number.
$ aws ecr get-login-password --region us-east-2 | docker login --username AWS --password-stdin 943896243526.dkr.ecr.us-east-2.amazonaws.com
WARNING! Your password will be stored unencrypted in /Users/awdeorio/.docker/config.json.
Configure a credential helper to remove this warning. See
https://docs.docker.com/engine/reference/commandline/login/#credentials-store

Login Succeeded
Add a tag to the image with AWS info. Don’t forget to change your account number.
$ docker tag insta485:latest 943896243526.dkr.ecr.us-east-2.amazonaws.com/insta485:latest
$ docker images # Notice that the latest AWS repository and insta485 repository have same Image ID
REPOSITORY                                              TAG                 IMAGE ID            CREATED             SIZE
943896243526.dkr.ecr.us-east-2.amazonaws.com/insta485   latest              213bd50edc70        5 minutes ago       364MB
insta485                                                latest              213bd50edc70        5 minutes ago       364MB
943896243526.dkr.ecr.us-east-2.amazonaws.com/insta485   <none>              154c64009ca9        38 minutes ago      364MB
...
Publish to ECR. Make sure to use your own account ID. Notice there are two images: one with an imageTag and one without
$ docker push 943896243526.dkr.ecr.us-east-2.amazonaws.com/insta485:latest
If you navigate to the ECR console and go into your insta485 repository, you should see 2 images: one with an image tag latest and one with image tag <untagged>. We will eventually remove the untagged image. You can also verify this with the CLI:
$ aws ecr list-images --repository-name insta485
{
    "imageIds": [
        {
            "imageDigest": "sha256:0bee367b4a6704dbdd78be0054cc3463e368ce6deb5ff02af09c1972516eb162"
        },
        {
            "imageDigest": "sha256:f2bd92fc77dc3f8dcfe1b9a196ac5e12cedb4e7a17e2c9a1c65c5052c8362740",
            "imageTag": "latest"
        }
    ]
}
Remove old image locally using the docker rmi command. Make sure to use the image ID of the image that does not have a tag.
$ docker images
REPOSITORY                                              TAG                 IMAGE ID            CREATED             SIZE
943896243526.dkr.ecr.us-east-2.amazonaws.com/insta485   latest              213bd50edc70        5 minutes ago       364MB
insta485                                                latest              213bd50edc70        5 minutes ago       364MB
943896243526.dkr.ecr.us-east-2.amazonaws.com/insta485   <none>              154c64009ca9        38 minutes ago      364MB
...
$ docker rmi -f 154c64009ca9
Untagged: 943896243526.dkr.ecr.us-east-2.amazonaws.com/insta485@sha256:0bee367b4a6704dbdd78be0054cc3463e368ce6deb5ff02af09c1972516eb162
Deleted: sha256:154c64009ca92cb9544ad8d17e279fb1883f17e7f5c06cd9d94756828e90f43a
Deleted: sha256:773dceb52980b9af6988008a8915585d9eae0164674e1fee9f0667221930b484
...
$ docker images
REPOSITORY                                              TAG                 IMAGE ID            CREATED             SIZE
943896243526.dkr.ecr.us-east-2.amazonaws.com/insta485   latest              213bd50edc70        5 minutes ago       364MB
insta485                                                latest              213bd50edc70        5 minutes ago       364MB
...
Remove old image from AWS ECR repository. You can either do this through the AWS ECR console by selecting the untagged images, clicking on delete, and typing in delete to confirm or through the CLI by using the batch-delete-image command. If you use the CLI to remove the image, make sure you use the imageDigest associated with the untagged image.
You should now only be able to see the one image in your insta485 repository in the AWS ECR console.
$ aws ecr list-images --repository-name insta485
{
    "imageIds": [
        {
            "imageDigest": "sha256:0bee367b4a6704dbdd78be0054cc3463e368ce6deb5ff02af09c1972516eb162"
        },
        {
            "imageDigest": "sha256:f2bd92fc77dc3f8dcfe1b9a196ac5e12cedb4e7a17e2c9a1c65c5052c8362740",
            "imageTag": "latest"
        }
    ]
}
$ aws ecr batch-delete-image --repository-name insta485 --image-ids imageDigest=sha256:0bee367b4a6704dbdd78be0054cc3463e368ce6deb5ff02af09c1972516eb162
{
    "imageIds": [
        {
            "imageDigest": "sha256:0bee367b4a6704dbdd78be0054cc3463e368ce6deb5ff02af09c1972516eb162"
        }
    ],
    "failures": []
}
$ aws ecr list-images --repository-name insta485
{
    "imageIds": [
        {
            "imageDigest": "sha256:f2bd92fc77dc3f8dcfe1b9a196ac5e12cedb4e7a17e2c9a1c65c5052c8362740",
            "imageTag": "latest"
        }
    ]
}
AWS Fargate and ECS
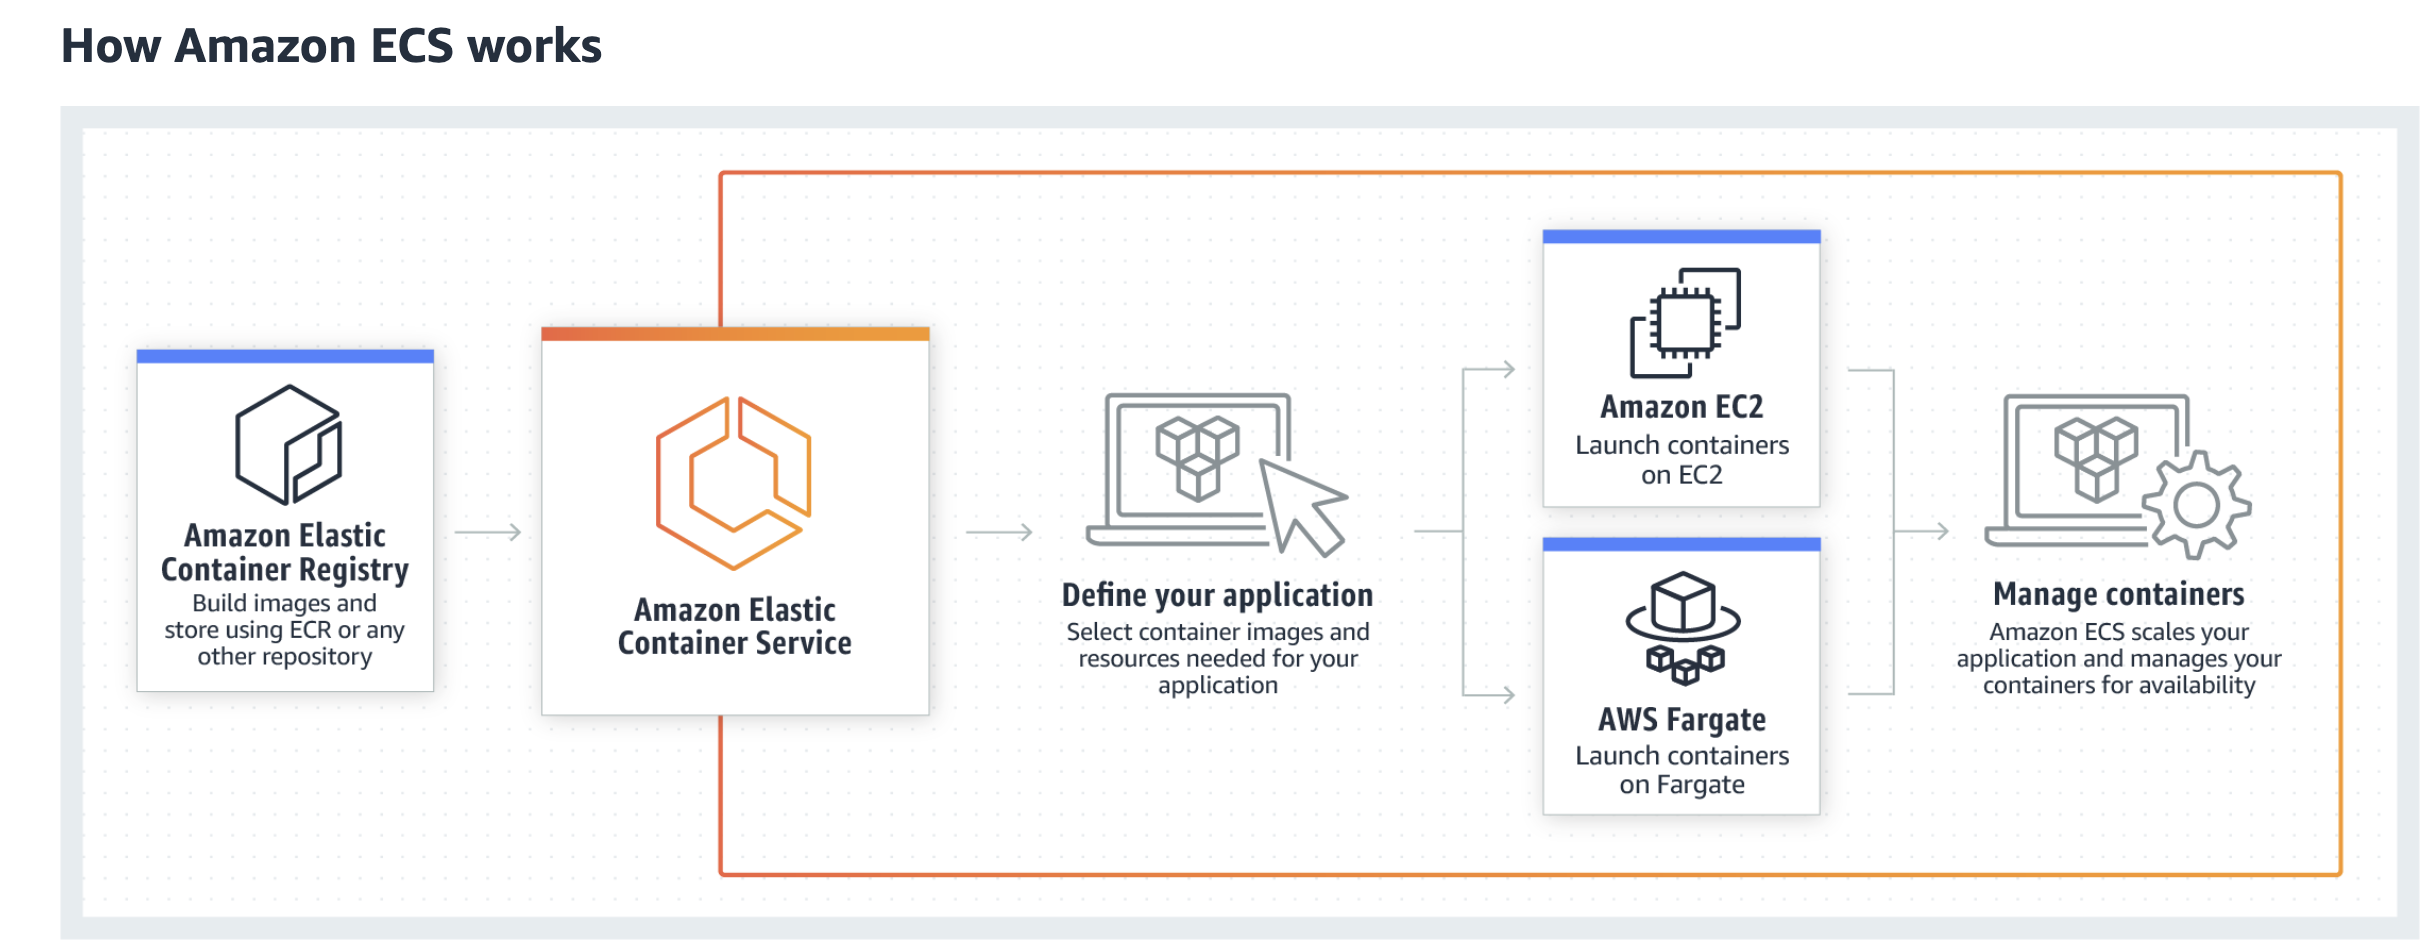
By the end of this lab, you will deploy your Docker container (which contains the instructions for running your web application) using Amazon ECS, a fully managed container orchestration service. ECS allows you to easily run, stop, and manage containers on a cluster. In other words, ECS manages containers that you push to Amazon ECR (Elastic Container Registry), which you can deploy either to EC2 servers or on a serverless infrastructure that is managed by AWS Fargate. We will be using Fargate solution.
Create infrastructure
Infrastructure as code is the process of provisioning cloud resources by writing template files defining what you want in a way that is human readable, for the most part. This process allows us as developers to quickly provision infrastructure (servers, databases, etc.) quickly and reliably. For AWS development, their service for infrastructure as code is AWS CloudFormation. Using CloudFormation, we can create templates describing the infrastructure that we want and CloudFormation will convert the template into provisioned infrastructure for us.
Download the following files and place them in your project 3 root directory.
- aws-insta485-core.yml
- aws-insta485-task-definition-template.json
- aws-insta485-service-definition-template.json
If you look at the aws-insta485-core.yml, you will see that the infrastructure that we want provisioned is defined, including the IAM roles for our ECS tasks, networking information, and more. To create this CloudFormation stack run the following code
$ aws cloudformation create-stack \
    --stack-name Insta485CoreStack \
    --capabilities CAPABILITY_NAMED_IAM \
    --template-body file://aws-insta485-core.yml
Verify that your CloudFormation stack was created. You can also verify by going to the AWS CloudFormation console.
$ aws cloudformation describe-stacks --stack-name Insta485CoreStack
{
    "Stacks": [
        {
            "StackId": "arn:aws:cloudformation:us-east-2:403881461553:stack/Insta485CoreStack/bbc36690-bf9c-11ea-9c7b-02>
            "StackName": "Insta485CoreStack",
...
Create cluster
Now that we have the infrastructure in place, we can start creating our ECS cluster and begin the process of deploying our Docker image.
Create your cluster.
$ aws ecs create-cluster --cluster-name Insta485-Cluster
$ aws ecs list-clusters
{
    "clusterArns": [
        "arn:aws:ecs:us-east-2:403881461553:cluster/Insta485-Cluster"
    ]
}
Create log group
AWS CloudWatch gives AWS developers an easy way to manage all of their log streams. Logging is a very important aspect in web development as it allows developers to more easily diagnose any bugs and track metrics for applications.
To create a log group:
$ aws logs create-log-group --log-group-name insta485-logs
$ aws logs describe-log-groups # Verify creation
{
    "logGroups": [
        {
            "logGroupName": "insta485-logs",
            "creationTime": 1597545885790,
            "metricFilterCount": 0,
            "arn": "arn:aws:logs:us-east-2:943896243526:log-group:insta485-logs:*",
            "storedBytes": 0
        }
    ]
}
Register task definition
Now that we have set up our ECS cluster, we need to write a task definition for Amazon ECS. A task definition is the set of instructions, written in json, that Amazon ECS uses to run tasks on your cluster. Some the parameters that you can include in a task definition are the logging configuration, the Docker image to use in each container, the IAM role that your tasks should use, the command that is run when the container is started, and the CPU and memory allocations for each task.
For more information, read this AWS ECS Task Definition document.
In this section, we will be modifying aws-insta485-task-definition-template.json. First, rename the file to aws-insta485-task-definition.json.
Now, let’s fix the REPLACE_ME_*s in aws-insta485-task-definition.json.
Replace REPLACE_ME_REGION with the region your AWS resources are in (ex. us-east-2)
Replace REPLACE_ME_IMAGE_TAG_USED_IN_ECR_PUSH in the json with your Docker image name. The image name is REPOSITORY_URI:IMAGE_TAG, for example 403881461553.dkr.ecr.us-east-2.amazonaws.com/insta485:latest. The following commands get the URI and image tag.
$ aws ecr describe-repositories | grep repositoryUri
            "repositoryUri": "403881461553.dkr.ecr.us-east-2 amazonaws.com/insta485",

$ aws ecr list-images --repository-name insta485 | grep imageTag
            "imageTag": "latest"
Replace REPLACE_ME_ECS_SERVICE_ROLE_ARN in the json with the OutputValue above REPLACE_ME_ECS_SERVICE_ROLE_ARN. Replace REPLACE_ME_ECS_TASK_ROLE_ARN in the json with the OutputValue above REPLACE_ME_ECS_TASK_ROLE_ARN.
$ aws cloudformation describe-stacks --stack-name Insta485CoreStack | egrep '(OutputValue|Description)'
            "Description": "This stack deploys the core network infrastructure and IAM resources to be used for a service hosted in Amazon ECS using AWS Fargate.",
                    ...
                    "OutputValue": "arn:aws:iam::650350012262:role/Insta485CoreStack-ECSTaskRole-U4U271VLF5TV",
                    "Description": "REPLACE_ME_ECS_TASK_ROLE_ARN",
                    ...
                    "OutputValue": "arn:aws:iam::650350012262:role/Insta485CoreStack-EcsServiceRole-NTQ8KA366P7N",
                    "Description": "REPLACE_ME_ECS_SERVICE_ROLE_ARN",
...
Replace REPLACE_ME_FLASK_SECRET_KEY with your Flask secret key for encrypting cookies.
Replace REPLACE_ME_POSTGRESQL_DATABASE_PASSWORD with your POSTGRESQL database password.
Replace REPLACE_ME_LOG_GROUP with insta485-logs or whatever you named your CloudWatch log group.
Now, let’s create the task definition.
$ aws ecs register-task-definition --cli-input-json file://aws-insta485-task-definition.json
See the task definition you created. You can also see your task definition in the AWS ECS management console. Click Task Definitions in the side bar.
$ aws ecs list-task-definitions
{
    "taskDefinitionArns": [
        "arn:aws:ecs:us-east-2:403881461553:task-definition/insta485service:1"
    ]
}
Amazon Elastic Load Balancer
Now that you have your ECS cluster registered, configured, and ready to deploy, we could go ahead and finish deploying your website to AWS Fargate. However, let’s say that you suddenly get a massive spike in load and 1 million people try to access your website. Fargate has an auto-scaling functionality, which will increase the automatically increase the number of server instances during peak load; however, this would mean that you would have to worry about DNS records so that clients are routed to the correct server.
Instead, we can use a load balancer (Amazon Elastic Load Balancing) in addition to the auto-scaling functionality to alleviate this problem. The load balancer will serve as a single entry point for clients and will manage incoming requests by optimally routing traffic so that no one instance is overwhelmed. When a server instance is added during peak times, the new instance will automatically register with the load balancer to get incoming traffic and, when a server instance is removed, it will automatically unregister with the load balancer to stop receiving traffic.
Create a network load balancer
We’re going to need the ID of our two public subnets from our CloudFormation stack. Your ids may be different.
$ aws cloudformation describe-stacks --stack-name Insta485CoreStack
...
                {
                    "OutputKey": "PublicSubnetOne",
                    "OutputValue": "subnet-0d9c6083c78b891c2",
                    "Description": "REPLACE_ME_PUBLIC_SUBNET_ONE",
                    "ExportName": "Insta485CoreStack:PublicSubnetOne"
                },
...
                {
                    "OutputKey": "PublicSubnetTwo",
                    "OutputValue": "subnet-0300f760d8c247cb9",
                    "Description": "REPLACE_ME_PUBLIC_SUBNET_TWO",
                    "ExportName": "Insta485CoreStack:PublicSubnetTwo"
                },
...
Create a network load balancer with AWS ELB. Replace subnet-0d9c6083c78b891c2 and subnet-0300f760d8c247cb9 with your public subnet IDs.
$ aws elbv2 create-load-balancer \
    --name insta485-nlb \
    --scheme internet-facing \
    --type network \
    --subnets subnet-0d9c6083c78b891c2 subnet-0300f760d8c247cb9
See the load balancer you created. You can also see your load balancer in the AWS EC2 management console. Click “Load Balancers” in the side bar, it’s under the “LOAD BALANCING” heading.
$ aws elbv2 describe-load-balancers
{
    "LoadBalancers": [
        {
            ...
            "DNSName": "insta485-nlb-f8b5729dc7e5bad9.elb.us-east-2.amazonaws.com",
            "LoadBalancerName": "insta485-nlb",
            "Scheme": "internet-facing",
            "State": {
                "Code": "active"
            },
            ...
For the next step, we’ll need the VPC ID from our CloudFormation stack. Your id may be different.
$ aws cloudformation describe-stacks --stack-name Insta485CoreStack
...
                {
                    "OutputKey": "VPCId",
                    "OutputValue": "vpc-0e5d7592843ea2325",
                    "Description": "REPLACE_ME_VPC_ID",
                    "ExportName": "Insta485CoreStack:VPCId"
                },
...
Create a target group. Change vpc-0e5d7592843ea2325 to your VPC ID.
$ aws elbv2 create-target-group \
  --name Insta485-TargetGroup \
  --port 8000 \
  --protocol TCP \
  --target-type ip \
  --vpc-id vpc-0e5d7592843ea2325 \
  --health-check-interval-seconds 10 \
  --health-check-path / \
  --health-check-protocol HTTP \
  --healthy-threshold-count 3 \
  --unhealthy-threshold-count 3
See the load balancer target group you created. You can also see your load balancer target group in the AWS EC2 management console. Click “Target Groups” in the side bar, it’s under the “LOAD BALANCING” heading.
$ aws elbv2 describe-target-groups
{
    "TargetGroups": [
        {
            "TargetGroupArn": "arn:aws:elasticloadbalancing:us-east-2:403881461553:targetgroup/Insta485-TargetGroup/a421732d636add8f",
            "TargetGroupName": "Insta485-TargetGroup",
            "Protocol": "TCP",
            "Port": 8000,
            ...
        }
    ]
}
For the next step, we’ll need the ARN (Amazon Resource Name) of our load balancer.
$ aws elbv2 describe-load-balancers
{
    "LoadBalancers": [
        {
            "LoadBalancerArn": "arn:aws:elasticloadbalancing:us-east-2:403881461553:loadbalancer/net/insta485-nlb/f8b5729dc7e5bad9",
            ...
            "LoadBalancerName": "insta485-nlb",
            ...
        }
    ]
}
Create a load balancer listener. Replace the target group ARN arn:aws:elasticloadbalancing:us-east-2:403881461553:targetgroup/Insta485-TargetGroup/a421732d636add8f with your own. Be careful to preserve the ,Type=forward part. Replace the load balancer ARN (arn:aws:elasticloadbalancing:us-east-2:403881461553:loadbalancer/net/insta485-nlb/f8b5729dc7e5bad9) with your own.
$ aws elbv2 create-listener \
  --default-actions TargetGroupArn=arn:aws:elasticloadbalancing:us-east-2:403881461553:targetgroup/Insta485-TargetGroup/a421732d636add8f,Type=forward \
  --load-balancer-arn arn:aws:elasticloadbalancing:us-east-2:403881461553:loadbalancer/net/insta485-nlb/f8b5729dc7e5bad9 \
  --port 80 \
  --protocol TCP
See the load balancer listener you created. You can also see your load balancer listener in the AWS EC2 management console. Click “Load Balancers” in the side bar, it’s under the “LOAD BALANCING”. Then, click the “Listeners” tab.
$ aws elbv2 describe-listeners \
  --load-balancer-arn arn:aws:elasticloadbalancing:us-east-2:403881461553:loadbalancer/net/insta485-nlb/f8b5729dc7e5bad9
{
    "Listeners": [
        {
            ...
            "Port": 80,
            "Protocol": "TCP",
            ...
        }
    ]
}
Create a service linked role for ECS. If you get an error about the role existing already, you can ignore it.
$ aws iam create-service-linked-role --aws-service-name ecs.amazonaws.com
See the role you created. You can also see it in the AWS IAM management console. Click “roles”.
$ aws iam list-roles
Create the service
Now that all of infrastructure is set up for our ECS cluster (i.e. container with application level instructions, load balancer, etc.), let’s finish the deployment process. We need to define how to run the ECS service altogether with ECS service definition json file.
First, we’ll need more information from our CloudFormation stack.
$ aws cloudformation describe-stacks --stack-name Insta485CoreStack
                ...
                {
                    "OutputKey": "FargateContainerSecurityGroup",
                    "OutputValue": "sg-0c4929c9346158469",
                    "Description": "REPLACE_ME_SECURITY_GROUP_ID",
                    "ExportName": "Insta485CoreStack:FargateContainerSecurityGroup"
                },
                ...
                {
                    "OutputKey": "PrivateSubnetTwo",
                    "OutputValue": "subnet-0c41051bc7292d708",
                    "Description": "REPLACE_ME_PRIVATE_SUBNET_TWO",
                    "ExportName": "Insta485CoreStack:PrivateSubnetTwo"
                },
                ...
                {

                    "OutputKey": "PrivateSubnetOne",
                    "OutputValue": "subnet-0826ad10168e6a735",
                    "Description": "REPLACE_ME_PRIVATE_SUBNET_ONE",
                    "ExportName": "Insta485CoreStack:PrivateSubnetOne"
                }
                ...
We’ll also need the ARN of our target group.
$ aws elbv2 describe-target-groups
{
    "TargetGroups": [
        {
            "TargetGroupArn": "arn:aws:elasticloadbalancing:us-east-2:403881461553:targetgroup/Insta485-TargetGroup/a421732d636add8f",
            "TargetGroupName": "Insta485-TargetGroup",
            "Protocol": "TCP",
            "Port": 8000,
            ...
        }
    ]
}
Edit aws-insta485-service-definition.json using the information from the aws cloudformation describe-stacks and aws elbv2 describe-target-groups commands. Replace each value marked REPLACE_ME_*.
Create service.
$ aws ecs create-service \
  --cli-input-json file://aws-insta485-service-definition.json
See the service you created. You can also see the service in the AWS ECS management console. Click “Insta485-Cluster”, where you’ll see the “Insta485-Service”. Make sure that it’s active.
$ aws ecs describe-services \
  --cluster Insta485-Cluster \
  --services Insta485-Service
Test the service
Congratulations! You just deployed a fully scalable version of Insta485! To test your service out, we need the DNS name of our load balancer.
$ aws elbv2 describe-load-balancers
            "DNSName": "insta485-nlb-f8b5729dc7e5bad9.elb.us-east-2.amazonaws.com",
            ...
            "LoadBalancerName": "insta485-nlb",
Load the web app at the CLI or in the your browser. Be sure to use your own DNS name.
$ curl -L insta485-nlb-f8b5729dc7e5bad9.elb.us-east-2.amazonaws.com
<!DOCTYPE html>
<html lang="en">
  <head>
    <title>Insta485</title>
Clean up resources
NOTE: This is super important so that you do not recieve unnecessary charges from AWS.
S3
$ aws s3 ls
2020-08-24 20:50:46 uniqname.static.insta485.com
2020-08-24 19:16:53 uniqname.uploads.insta485.com
2020-08-24 15:03:57 logs.uniqname.com
$ aws s3 rb s3://uniqname.static.insta485.com --force
$ aws s3 rb s3://uniqname.uploads.insta485.com --force
$ aws s3 rb s3://log.uniqname.com --force
$ aws s3 ls # Verify that those buckets do not exist anymore
ECR
$ aws ecr delete-repository --repository-name insta485 --force
{
    "repository": {
        "repositoryArn": "arn:aws:ecr:us-east-2:943896243526:repository/insta485",
        "registryId": "943896243526",
        "repositoryName": "insta485",
        "repositoryUri": "943896243526.dkr.ecr.us-east-2.amazonaws.com/insta485",
        "createdAt": "2020-08-17T16:19:56-04:00"
    }
}
CloudFront
To delete your CloudFront distribution, click on your distribution in the CloudFront console, disable your distribution, and then delete your distribution and confirm any actions.
Amazon RDS
To delete your RDS instance, click on your RDS instance in the RDS console, click on Actions, and then click on Delete and confirm any actions.
ECS
$ aws ecs delete-service \
    --cluster Insta485-Cluster \
    --service Insta485-Service \
    --force
$ aws ecs delete-cluster \
    --cluster Insta485-Cluster
$ aws ecs deregister-task-definition --task-definition insta485service:2 # The last number may be different
{
    "taskDefinition": {
        "taskDefinitionArn": "arn:aws:ecs:us-east-2:943896243526:task-definition/insta485service:2",
CloudFormation
$ aws cloudformation delete-stack --stack-name Insta485CoreStack
Load Balancer
$ aws elb delete-load-balancer --load-balancer-name insta485-nlb
Note: Verify that all these services and resources were properly deleted by going to the console for each service. Some of these CLI commands will succeed even if the resource you specified does not exist. You can delete from the console if the CLI deletes were not successful.
Tag Editor
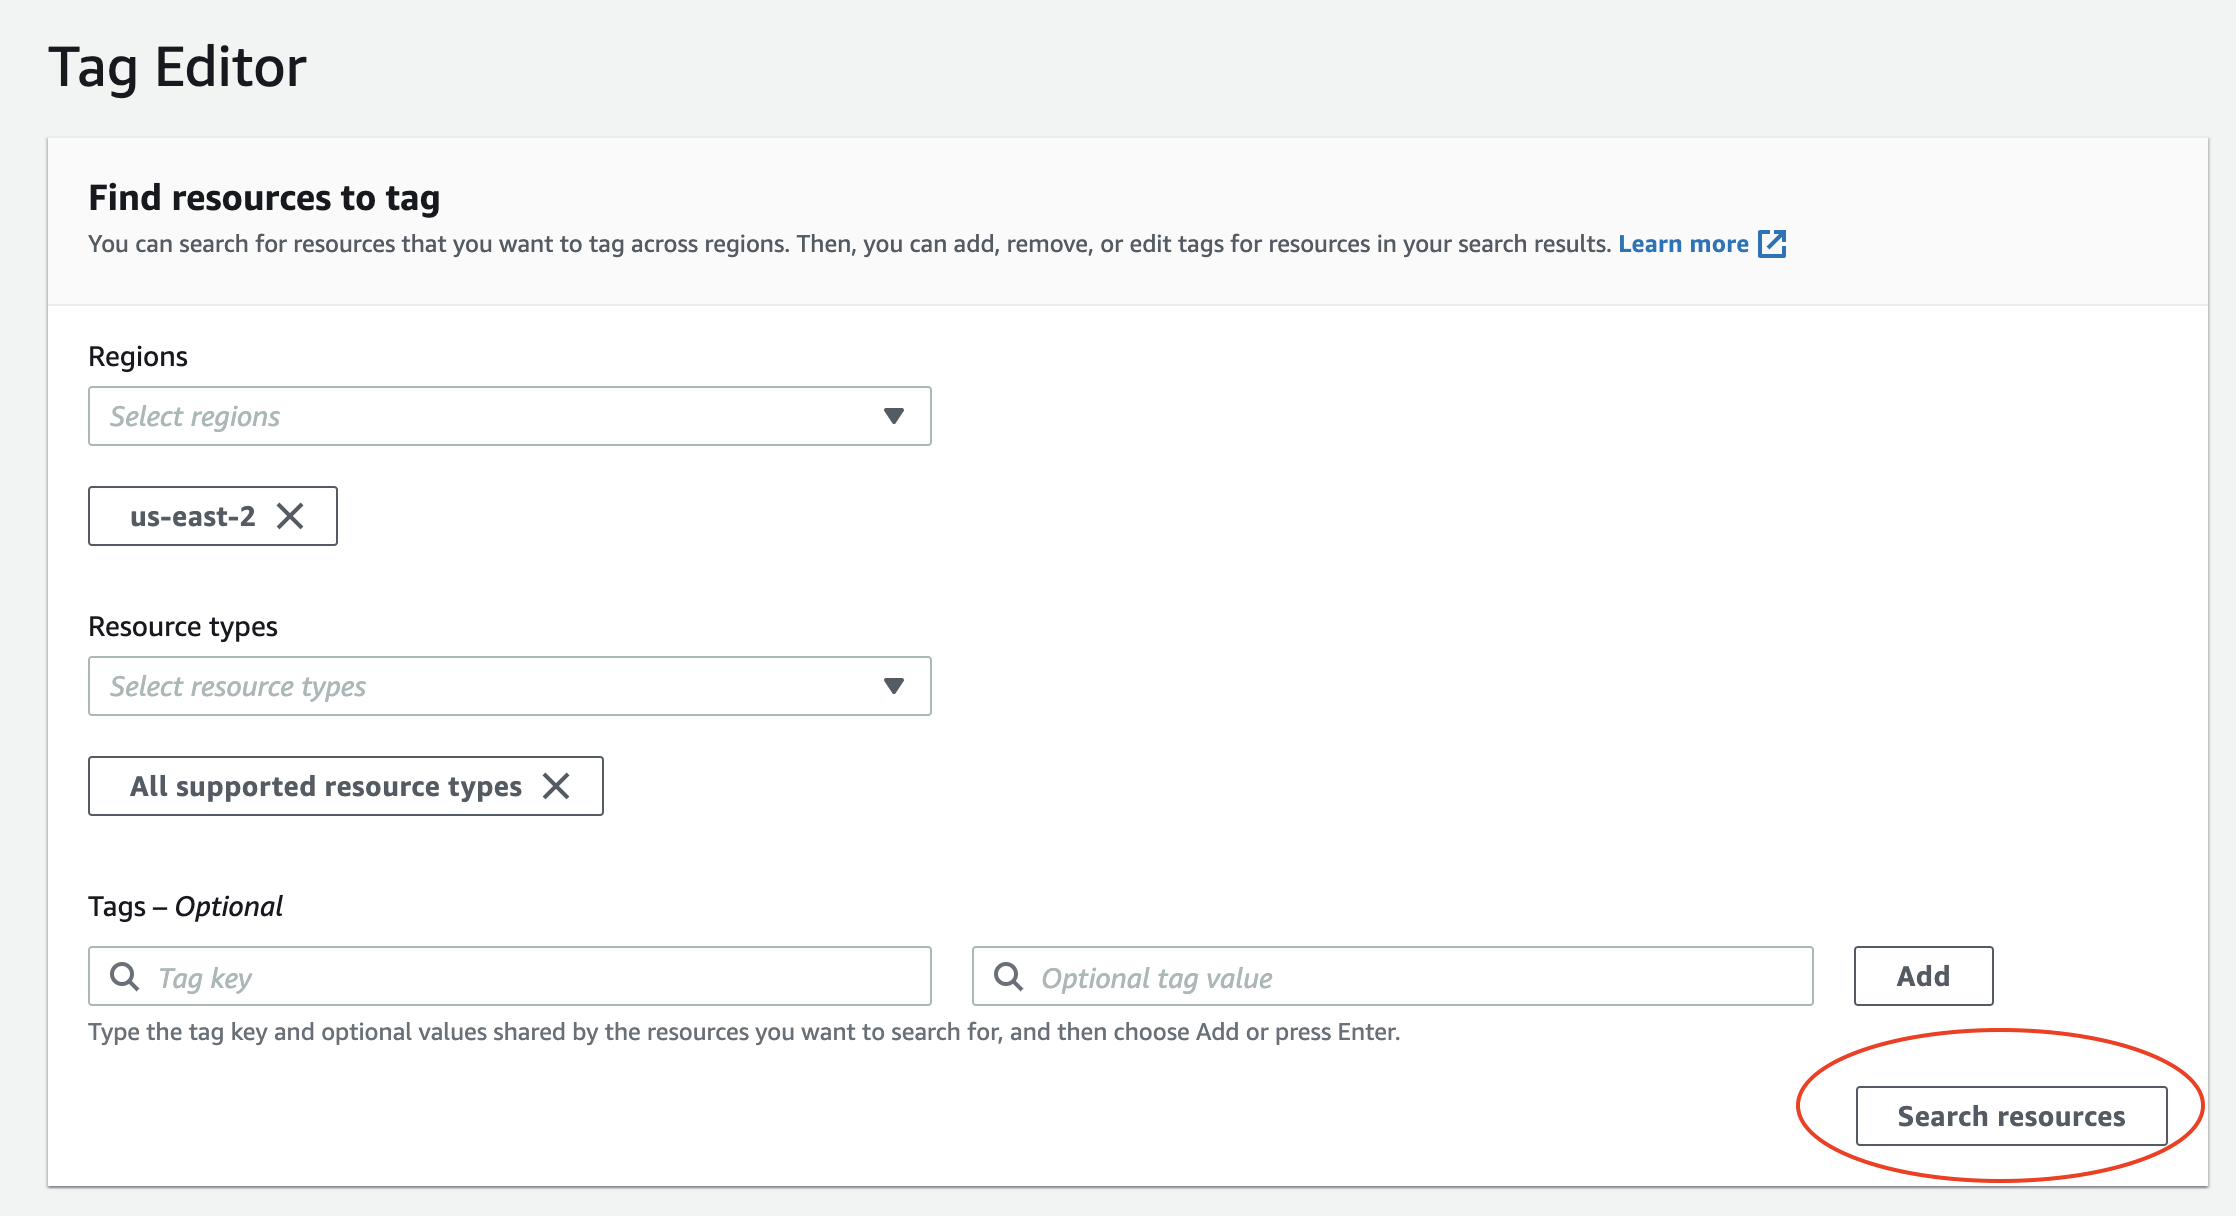
Go to the Tag Editor, select us-east-2 as your region and All supported resource types for resource types, and click on Search Resources. Scroll down to the search results (may take a few seconds to populate) and verify that you have no actively running resources (i.e. look out for instance in the Type column).
Also, you can go to the Billing console to view which resources are being used and verify that you clean those up. Make sure to look out for provisioned EC2 and RDS instances especially.
Completion Criteria
- Deployed a scalable version of Insta485
- Cleaned up all AWS resources
Check
Go through the S3 console, CloudFront console, RDS console, ECS console, CloudFormation console, and ELB console, Tag Editor, and verify that you have no more resources provisioned.
Also, you can go to the Billing console to view which resources are being used and verify that you clean those up. Make sure to look out for provisioned EC2 and RDS instances especially.
Lab Quiz
Complete the lab quiz by the due date.