p3-insta485-clientside
EECS485 P3: Client-side Dynamic Pages
Due 8:00PM ET July 24, 2026. This is a group project to be completed in groups of two to three.
Change log
Initial release for SU26
Introduction
An Instagram clone implemented with client-side dynamic pages. This is the third of an EECS 485 three project sequence: a static site generator from templates, server-side dynamic pages, and client-side dynamic pages.
Build an application using client-side dynamic pages and a REST API. Reuse server-side code from project 2, refactoring portions of it into a REST API. Write a client application in JavaScript that runs in the browser and makes AJAX calls to the REST API.
The learning goals of this project are client-side dynamic pages, JavaScript programming, asynchronous programming (AJAX), and REST APIs. You’ll also gain more practice with the command line.
Server-side vs Client-side Dynamic Pages
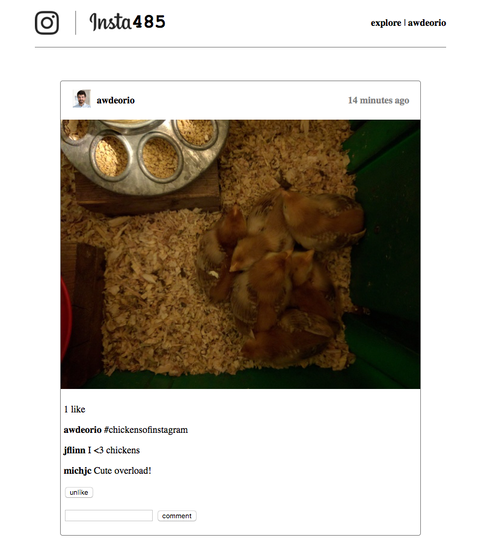
When you finish this project, the main page should look just like it did in Project 2. While Project 2 used server-side dynamic pages, Project 3 will use client-side dynamic pages.
Server-side dynamic pages example
Project 2 used server-side dynamic pages. Each time a client made a request to the server, a Python function ran on the server. The output of the function was a string containing HTML. The client loads the HTML into the Document Object Model (DOM).
The Python function run by the server returns an HTML-formatted string.
@insta485.app.route('/')
def show_index():
    # Get posts from the database
    cur = connection.execute(...)
    context = cur.fetchall()

    # Fill out template and return HTML formatted string
    return flask.render_template("index.html", **context)
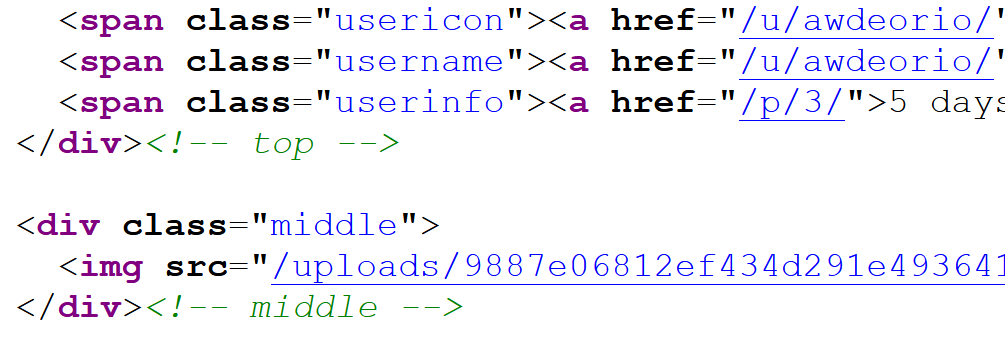
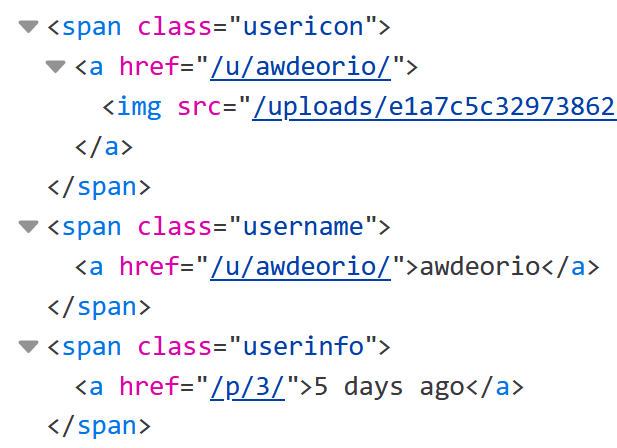
With server-side dynamic pages, you’ll see that the HTML source and the DOM are very similar.
| HTML | DOM |
|
|
Client-side dynamic pages example
Project 3 uses client-side dynamic pages. The first time a client loads Insta485, the server responds with a small amount of HTML that links to a larger JavaScript program. The client then runs the JavaScript program, which modifies the DOM.
The JavaScript code run by the client gets data from a REST API and then uses that data to modify the DOM.
function Post() {
  const [postId, setPostId] = useState("");
  useEffect(() => {
    // Get data from REST API
    fetch('/api/v1/posts/')
    .then(response => response.json());
    .then(json => setPostId(...));

    return () => {
      // Cleanup effect
     ...
    };
  });
  // Use data to modify the DOM
  return <p>{postId}</p>;
}
With client-side dynamic pages, you’ll see that the HTML source is small and references a JavaScript program. You’ll also see that the DOM looks a lot like it did with server-side dynamic pages. The difference is that it was created using JavaScript instead of with HTML.
| HTML | DOM |
|

|
Why bother with client-side dynamic pages? We can implement some really nice user interface features that are impossible with server-side dynamic pages. Here are a few examples:
- Click “like” or “comment” without a page reload or redirection
- Infinite scroll
- Double-click to like
GAI help bot
We are providing a generative AI help bot, Webby, trained on the Project 3 spec, tutorials, and EECS 485 course material. We hope that it will be helpful, but the bot is experimental and it may provide inaccurate or incomplete information. This project spec is the final authority.
Access Webby here.
Setup
If your group has already followed the setup tutorials, you can skip to Fresh install.
Group registration
Register your group on the Autograder.
AWS account and instance
You will use Amazon Web Services (AWS) to deploy your project. AWS account setup may take up to 24 hours, so get started now. Create an account, launch and configure the instance. Don’t deploy yet. AWS Tutorial.
Project folder
Create a folder for this project. Your folder location might be different.
$ pwd
/Users/awdeorio/src/eecs485/p3-insta485-clientside
Pitfall: Avoid paths that contain spaces. Spaces cause problems with some command line tools.
| Bad Example | Good Example |
|---|---|
EECS 485/Project 3 Insta485 Client-side |
eecs485/p3-insta485-clientside |
WSL Pitfall: Avoid project directories starting with /mnt/c/. This shared directory is slow.
| Bad Example | Good Example |
|---|---|
/mnt/c/ ... |
/home/awdeorio/ ... |
Version control
Set up version control using the Version control tutorial.
Be sure to check out the Version control for a team tutorial.
After you’re done, you should have a local repository with a “clean” status and your local repository should be connected to a remote GitHub repository.
$ pwd
/Users/awdeorio/src/eecs485/p3-insta485-clientside
$ git status
On branch main
Your branch is up-to-date with 'origin/main'.

nothing to commit, working tree clean
$ git remote -v
origin	https://github.com/awdeorio/p3-insta485-clientside.git (fetch)
origin	https://github.com/awdeorio/p3-insta485-clientside.git (push)
You should have a .gitignore file (instructions).
$ pwd
/Users/awdeorio/src/eecs485/p3-insta485-clientside
$ head .gitignore
This is a sample .gitignore file that's useful for EECS 485 projects.
...
Python virtual environment
Create a Python virtual environment using the Project 1 Python Virtual Environment Tutorial.
Check that you have a Python virtual environment, and that it’s activated (remember source env/bin/activate).
$ pwd
/Users/awdeorio/src/eecs485/p3-insta485-clientside
$ ls -d env
env
$ echo $VIRTUAL_ENV
/Users/awdeorio/src/eecs485/p3-insta485-clientside/env
Install utilities
Windows Subsystem for Linux (WSL)
Warning You must have WSL2 installed; WSL1 will not work for this project.
Start a Windows PowerShell. Verify that you are using WSL 2. Your Ubuntu version may be different.
PS > wsl -l -v
  NAME                   STATE           VERSION
*  Ubuntu-24.04           Running         2
Start a Bash shell and install other utilities needed for this project.
$ sudo apt-get install sqlite3 curl
$ pip install httpie
Linux
$ sudo apt-get install sqlite3 curl
$ pip install httpie
MacOS
$ brew install sqlite3 curl httpie coreutils
Starter files
Download and unpack the starter files.
$ pwd
/Users/awdeorio/src/eecs485/p3-insta485-clientside
$ wget https://eecs485staff.github.io/p3-insta485-clientside/starter_files.tar.gz
$ tar -xvzf starter_files.tar.gz
Move the starter files to your project directory and remove the original starter_files/ directory and tarball.
$ pwd
/Users/awdeorio/src/eecs485/p3-insta485-clientside
$ mv starter_files/* .
$ mv starter_files/.* .
$ rm -rf starter_files starter_files.tar.gz
You should see these files.
$ tree -a -I '.git|env|__pycache__|*.egg-info|node_modules'
.
├── cypress.config.js
├── package-lock.json
├── package.json
├── requirements.txt
├── pyproject.toml
├── sql
│   └── uploads
│       ...
│       └── e1a7c5c32973862ee15173b0259e3efdb6a391af.jpg
├── tests
│   ...
│   └── utils.py
├── tsconfig.json
├── eslint.config.js
├── .prettierrc.json
├── .prettierignore
└── webpack.config.js
Here’s a brief description of each of the starter files.
cypress.config.js |
Config for the frontend testing framework Cypress |
package-lock.json |
JavaScript packages with dependencies |
package.json |
JavaScript packages |
requirements.txt |
Python package dependencies matching autograder |
pyproject.toml |
Insta485 python package configuration |
sql/uploads/ |
Sample image uploads |
tests/ |
Public unit tests |
tsconfig.json |
Optional TypeScript config |
eslint.config.js |
Config for the JavaScript linter ESLint |
.prettierrc.json |
Config for the JavaScript formatter Prettier |
.prettierignore |
Lists files that Prettier should ignore |
webpack.config.js |
JavaScript bundler config |
Before making any changes to the clean starter files, it’s a good idea to make a commit to your Git repository.
Use pip to install the exact same third party packages as are installed on the autograder.
$ pip install -r requirements.txt
Copy project 2 code
You can reuse much of your code from project 2. The P3 autograder tests avoid routes that are solely P2 server-side dynamic pages routes. Copy these files and directories from project 2 to project 3:
- Scripts
- Server-side version of Insta485
insta485/config.pyinsta485/__init__.py(modified during the REST API tutorial)insta485/model.pyinsta485/views/insta485/templates/insta485/static/(optional)
- Database SQL files
Do not copy:
- Virtual environment files
env/ - Python package files
insta485.egg-info/
Your directory should now look like this:
$ pwd
/Users/awdeorio/src/eecs485/p3-insta485-clientside
$ tree -a -I '.git|env|__pycache__|*.egg-info|node_modules'
.
├── bin
│   ├── insta485db
│   ├── insta485run
│   └── insta485test
├── cypress.config.js
├── insta485
│   ├── __init__.py
│   ├── config.py
│   ├── model.py
│   ├── static
│   │   ├── css
│   │   │   └── style.css
│   │   └── images
│   │       └── logo.png
│   ├── templates
│   │   ...
│   │   └── index.html
│   └── views
│       ├── __init__.py
│       └── ...
├── package-lock.json
├── package.json
├── pyproject.toml
├── requirements.txt
├── sql
│   ├── data.sql
│   ├── schema.sql
│   └── uploads
│       ...
│       └── e1a7c5c32973862ee15173b0259e3efdb6a391af.jpg
├── tests
│   ...
│   └── util.py
├── tsconfig.json
├── eslint.config.js
├── .prettierrc.json
├── .prettierignore
└── webpack.config.js
Run your project 2 code and make sure it still works by navigating to http://localhost:8000/users/awdeorio/.
$ ./bin/insta485db reset
$ ./bin/insta485run
Commit these changes and push to your Git repository.
Disable CSRF
Disable CSRF protection for this project.
WTF_CSRF_ENABLED = False
insta485install script
Installing the tool chain requires a lot of steps! Write a bash script bin/insta485install to install your app. Don’t forget to check for shell script pitfalls.
- Remember the shebang
#!/bin/bash - Stop on errors, print commands
set -Eeuo pipefail set -x - Create a Python virtual environment
python3 -m venv env - Activate Python virtual environment
source env/bin/activate - Install back end
pip install -r requirements.txt pip install -e . - Install front end
npm ci .Remember to add
bin/insta485installto your Git repo and push.
Fresh install
These instructions are useful if your group has already followed the setup tutorials.
Check out a fresh copy of the code and change directory.
$ git clone <your git URL here>
$ cd p3-insta485-clientside/
Alternative: If you already have a copy of the code and want to reinstall, delete these files.
$ rm -rf env/ node_modules/ insta485.egg-info/ insta485/static/js/bundle.js*
Run the installer created during the setup tutorial.
$ ./bin/insta485install
Activate the newly created virtual environment.
$ source env/bin/activate
macOS: Install command line tools.
$ brew install sqlite3 curl httpie coreutils
WSL/Linux: Install command line tools.
$ sudo apt install sqlite3 curl
$ pip install httpie
Database
Use the same database schema and starter data as in the Project 2 Database instructions.
After copying data.sql and schema.sql from project 2, your sql/ directory should look like this.
$ tree sql
sql
├── data.sql
├── schema.sql
└── uploads
    ...
    └── e1a7c5c32973862ee15173b0259e3efdb6a391af.jpg
The REST API tests rely on a correctly configured schema. Run a unit test to ensure that your schema properly autoincrements postids.
$ pytest -vv tests/test_rest_api_posts.py::test_posts_autoincrement
insta485db script
Reuse your same database management shell script (insta485db) from project 2. Your script should already support these subcommands:
$ insta485db create
$ insta485db destroy
$ insta485db reset
$ insta485db dump
Add the insta485db random subcommand, which will generate 100 posts in the database each with owner awdeorio and a randomly generated photo.
Here is a bash snippet that adds 100 posts to the database each with owner awdeorio and a random photo. Note: you will not need to modify this bash snippet, but you will need to add the random subcommand to your bash script.
Install imagemagick before using this.
MacOS:
$ brew install imagemagick
WSL/Linux:
$ sudo apt install imagemagick
DB_FILENAME=var/insta485.sqlite3

if command -v magick &> /dev/null; then
  IM_CMD="magick"
elif command -v convert &> /dev/null; then
  IM_CMD="convert"
else
  echo "Error: Neither 'magick' nor 'convert' command found."
  exit 1
fi

for i in `seq 1 100`; do
  FILENAME="$(uuidgen).png"
  NUMS=()
  for j in `seq 1 6`; do
      NUMS+=($(($RANDOM % 255)))
  done
  "$IM_CMD" -size 360x360 \
          radial-gradient:"rgb(${NUMS[0]},${NUMS[1]},${NUMS[2]})-rgb(${NUMS[3]},${NUMS[4]},${NUMS[5]})" \
          -pointsize 64 -fill black -gravity center -annotate 0 "image $i" "var/uploads/$FILENAME"
  OWNER="awdeorio"
  sqlite3 -echo -batch ${DB_FILENAME} "INSERT INTO posts(filename, owner) VALUES('${FILENAME}','${OWNER}');"
done
REST API
This section describes the REST API implemented by the server.
The REST API is a small portion of this project, so be sure to plan plenty of time for the Client-side Insta485 section.
Setup
The Flask REST API Tutorial will show you how to create a small REST API with Python/Flask.
Run the Flask development server or use ./bin/insta485run from project 2.
$ flask --app insta485 --debug run --host 0.0.0.0 --port 8000
Navigate to http://localhost:8000/api/v1/posts/1/. You should see this JSON response, which is a simplified version of what you’ll implement later.
{
  "created": "2017-09-28 04:33:28",
  "imgUrl": "/uploads/122a7d27ca1d7420a1072f695d9290fad4501a41.jpg",
  "owner": "awdeorio",
  "ownerImgUrl": "/uploads/e1a7c5c32973862ee15173b0259e3efdb6a391af.jpg",
  "ownerShowUrl": "/users/awdeorio/",
  "postShowUrl": "/posts/1/",
  "url": "/api/v1/posts/1/"
}
Commit these changes and push to your Git repository.
Routes
The following table describes each REST API method.
| HTTP Method | Example URL | Action |
|---|---|---|
GET |
/api/v1/ |
Return API resource URLs |
GET |
/api/v1/posts/ |
Return 10 newest post urls and ids |
GET |
/api/v1/posts/?size=N |
Return N newest post urls and ids |
GET |
/api/v1/posts/?page=N |
Return N’th page of post urls and ids |
GET |
/api/v1/posts/?postid_lte=N |
Return post urls and ids no newer than post id N |
GET |
/api/v1/posts/<postid>/ |
Return one post, including comments and likes |
POST |
/api/v1/likes/?postid=<postid> |
Create a new like for the specified post id |
DELETE |
/api/v1/likes/<likeid>/ |
Delete the like based on the like id |
POST |
/api/v1/comments/?postid=<postid> |
Create a new comment based on the text in the JSON body for the specified post id |
DELETE |
/api/v1/comments/<commentid>/ |
Delete the comment based on the comment id |
GET /api/v1/
Return a list of services available. The output should look exactly like this example. Does not require user to be authenticated. This example uses the HTTPie command line tool (http).
$ http "http://localhost:8000/api/v1/"
HTTP/1.0 200 OK
...
{
  "comments": "/api/v1/comments/",
  "likes": "/api/v1/likes/",
  "posts": "/api/v1/posts/",
  "url": "/api/v1/"
}
You should now pass one unit test.
$ pytest -vv tests/test_rest_api_simple.py::test_resources
Access control
Most routes require an authenticated user. All REST API routes requiring authentication should work with either session cookies (like Project 2) or HTTP Basic Access Authentication (below).
Every REST API route should return 403 if a user is not authenticated. The only exception is /api/v1/, which is publicly available.
HTTP Basic Access Authentication
HTTP Basic Access Authentication includes a username and password in the headers of every request.
Here’s an example without HTTP Basic Access Authentication.
GET localhost:8000/api/v1/posts/ HTTP/1.1
Here’s an example with HTTP Basic Access Authentication. It adds an Authorization header with the username awdeorio and password chickens encoded using base 64, which looks like YXdkZW9yaW86Y2hpY2tlbnM. Base 64 is an encoding, not an encryption algorithm.
GET localhost:8000/api/v1/posts/ HTTP/1.1
Authorization: Basic YXdkZW9yaW86cGFzc3dvcmQ=
Warning: Always use HTTPS with Basic Access Authentication. Never use HTTP because the username and password are sent in cleartext where a network eavesdropper could read it. For simplicity, this project uses HTTP only.
HTTP Basic Auth and HTTPie
Send HTTP basic auth credentials using HTTPie (http command). In this example, the username is awdeorio and the password is chickens. HTTPie will base64-encode the password.
$ http -a awdeorio:chickens localhost:8000/api/v1/posts/
HTTP/1.0 200 OK
...
{
    "results": [
        ...
}
The REST API should return 403 if the credentials are wrong. See the HTTP response codes section for more.
$ http -a awdeorio:wrongpassword localhost:8000/api/v1/posts/
HTTP/1.0 403 FORBIDDEN
...
{
    "message": "Forbidden",
    "status_code": 403
}
HTTP Basic Auth and Flask
Here’s an example of how to access the username and password sent via HTTP Basic Access Authentication headers from a Flask app. See the Flask docs for more info.
username = flask.request.authorization['username']
password = flask.request.authorization['password']
GET /api/v1/posts/
Return the 10 newest posts. The posts should meet the following criteria: each post is made by a user which the logged in user follows or the post is made by the logged in user. The URL of the next page of posts is returned in next. Note that postid is an int, not a string.
Pro-tip: Returning the newest posts can be tricky due to the fact
that all the posts are generated at nearly the same instant. If you
tried to order by timestamp, this could potentially cause
‘ties’. Take advantage of the fact that postid is automatically
incremented in the order of creation.
$ http -a awdeorio:chickens "http://localhost:8000/api/v1/posts/"
HTTP/1.0 200 OK
...
{
  "next": "",
  "results": [
    {
      "postid": 3,
      "url": "/api/v1/posts/3/"
    },
    {
      "postid": 2,
      "url": "/api/v1/posts/2/"
    },
    {
      "postid": 1,
      "url": "/api/v1/posts/1/"
    }
  ],
  "url": "/api/v1/posts/"
}
Run a unit test.
$ pytest -vv tests/test_rest_api_posts.py::test_posts_list
Authentication
HTTP Basic Access Authentication should work (see later section). This is true for every route with the exception of /api/v1/.
$ http -a awdeorio:chickens "http://localhost:8000/api/v1/posts/"
$ pytest tests/test_rest_api_simple.py::test_http_basic_auth
Authentication with session cookies should also work. This is true for every route with the exception of /api/v1/.
$ http \
  --session=./session.json \
  --form POST \
  "http://localhost:8000/accounts/" \
  username=awdeorio \
  password=chickens \
  operation=login
$ http \
  --session=./session.json \
  "http://localhost:8000/api/v1/posts/"
$ pytest tests/test_rest_api_simple.py::test_login_session
Pagination
Request results no newer than postid with ?postid_lte=N. This is useful later in the situation where a user adds a new post while another user is scrolling, triggering a REST API call via the infinite scroll mechanism. When postid_lte is not specified, default to the most recent postid.
$ http -a awdeorio:chickens "http://localhost:8000/api/v1/posts/?postid_lte=2"
HTTP/1.0 200 OK
...
{
  "next": "",
  "results": [
    {
      "postid": 2,
      "url": "/api/v1/posts/2/"
    },
    {
      "postid": 1,
      "url": "/api/v1/posts/1/"
    }
  ],
  "url": "/api/v1/posts/?postid_lte=2"
}
Request a specific number of results with ?size=N.
$ http -a awdeorio:chickens "http://localhost:8000/api/v1/posts/?size=1"
HTTP/1.0 200 OK
...
{
  "next": "/api/v1/posts/?size=1&page=1&postid_lte=3",
  "results": [
    {
      "postid": 3,
      "url": "/api/v1/posts/3/"
    }
  ],
  "url": "/api/v1/posts/?size=1"
}
Request a specific page of results with ?page=N.
$ http -a awdeorio:chickens "http://localhost:8000/api/v1/posts/?page=1"
HTTP/1.0 200 OK
...
{
  "next": "",
  "results": [],
  "url": "/api/v1/posts/?page=1"
}
Put postid_lte, size and page together.
$ http -a awdeorio:chickens "http://localhost:8000/api/v1/posts/?postid_lte=2&size=1&page=1"
HTTP/1.0 200 OK
...
{
  "next": "/api/v1/posts/?size=1&page=2&postid_lte=2",
  "results": [
    {
      "postid": 1,
      "url": "/api/v1/posts/1/"
    }
  ],
  "url": "/api/v1/posts/?postid_lte=2&size=1&page=1"
}
The size parameter must be a positive integer and page must be a non-negative integer.
Pro-tip: let Flask coerce to the integer type in a query string like this:
flask.request.args.get("size", default=<some number>, type=int).
$ http -a awdeorio:chickens "http://localhost:8000/api/v1/posts/?page=-1"
HTTP/1.0 400 BAD REQUEST
...
{
  "message": "Bad Request",
  "status_code": 400
}
$ http -a awdeorio:chickens "http://localhost:8000/api/v1/posts/?size=-1"
HTTP/1.0 400 BAD REQUEST
...
{
  "message": "Bad Request",
  "status_code": 400
}
Run the unit tests for pagination.
$ pytest -vv tests/test_rest_api_posts.py::test_posts_pagination_simple \
             tests/test_rest_api_posts.py::test_posts_pagination_page_size \
             tests/test_rest_api_posts.py::test_posts_pagination_upload_between_requests \
             tests/test_rest_api_posts.py::test_posts_pagination_errors
Pro-tip: Use a SQL query with LIMIT and OFFSET, which you can compute from the page and size parameters.
Some students get confused about when the next field should be blank. When a request returns fewer than size posts, next should be an empty string. Remember that size defaults to 10. Some examples:
- A
GETrequest is made to/api/v1/posts/. There are 9 posts in the database that were made by the logged in user or by users they follow. Thenextfield should be an empty string. - A
GETrequest is made to/api/v1/posts/. There are 10 posts in the database that were made by the logged in user or by users they follow. The newest post returned has apostidof 10. Thenextfield should be/api/v1/posts/?size=10&page=1&postid_lte=10, even though aGETrequest to that url will return no posts. - A
GETrequest is made to/api/v1/posts/. There are 11 posts in the database that were made by the logged in user or by users they follow. The newest post returned has apostidof 11. Thenextfield should be/api/v1/posts/?size=10&page=1&postid_lte=11. AGETrequest to thenexturl will return 1 post in this case.
GET /api/v1/posts/<postid>/
Return the details for one post. Example:
$ http -a awdeorio:chickens "http://localhost:8000/api/v1/posts/3/"
HTTP/1.0 200 OK
...
{
  "comments": [
    {
      "commentid": 1,
      "lognameOwnsThis": true,
      "owner": "awdeorio",
      "ownerShowUrl": "/users/awdeorio/",
      "text": "#chickensofinstagram",
      "url": "/api/v1/comments/1/"
    },
    {
      "commentid": 2,
      "lognameOwnsThis": false,
      "owner": "jflinn",
      "ownerShowUrl": "/users/jflinn/",
      "text": "I <3 chickens",
      "url": "/api/v1/comments/2/"
    },
    {
      "commentid": 3,
      "lognameOwnsThis": false,
      "owner": "michjc",
      "ownerShowUrl": "/users/michjc/",
      "text": "Cute overload!",
      "url": "/api/v1/comments/3/"
    }
  ],
  "comments_url": "/api/v1/comments/?postid=3",
  "created": "2021-05-06 19:52:44",
  "imgUrl": "/uploads/9887e06812ef434d291e4936417d125cd594b38a.jpg",
  "likes": {
    "lognameLikesThis": true,
    "numLikes": 1,
    "url": "/api/v1/likes/6/"
  },
  "owner": "awdeorio",
  "ownerImgUrl": "/uploads/e1a7c5c32973862ee15173b0259e3efdb6a391af.jpg",
  "ownerShowUrl": "/users/awdeorio/",
  "postShowUrl": "/posts/3/",
  "postid": 3,
  "url": "/api/v1/posts/3/"
}
NOTE: “created” should not be returned as human-readable from the API.
Pro-tip: <postid> must be an integer. Let Flask enforce the integer type in a URL like this:
@insta485.app.route('/api/v1/posts/<int:postid_url_slug>/')
def get_post(postid_url_slug):
Post IDs that are out of range should return a 404 error.
$ http -a awdeorio:chickens "http://localhost:8000/api/v1/posts/1000/"
HTTP/1.0 404 NOT FOUND
...
{
  "message": "Not Found",
  "status_code": 404
}
Likes detail
A likes object, which is nested in a post object, corresponds to a database row (if any) in the likes table.
If the logged in user likes the post, then the likeid in the url should be the likeid corresponding to the database row storing the logged in user’s like of the post. For example, logged in user awdeorio likes post id 2 and the url of the likes object is /api/v1/likes/4/.
{
  ...
  "likes": {
    "lognameLikesThis": true,
    "numLikes": 2,
    "url": "/api/v1/likes/4/"
  },
  "url": "/api/v1/posts/2/"
  ...
}
If the logged in user does not like the post, then the like url should be null. For example, the logged in user jflinn does not like post id 3 and the url of the likes object is null.
{
  ...
  "likes": {
    "lognameLikesThis": false,
    "numLikes": 1,
    "url": null
  },
  "url": "/api/v1/posts/3/"
  ...
}
Run the unit test for retrieving post details.
$ pytest -vv tests/test_rest_api_posts.py::test_posts_detail
POST /api/v1/likes/?postid=<postid>
Create one “like” for a specific post. Return 201 on success. Example:
$ http -a awdeorio:chickens \
  POST \
  "http://localhost:8000/api/v1/likes/?postid=3"
HTTP/1.0 201 CREATED
...
{
  "likeid": 7,
  "url": "/api/v1/likes/7/"
}
If the “like” already exists, return the like object with a 200 response.
$ http -a awdeorio:chickens \
  POST \
  "http://localhost:8000/api/v1/likes/?postid=3"
HTTP/1.0 200 OK
...
{
  "likeid": 6,
  "url": "/api/v1/likes/6/"
}
Post IDs that are out of range should return a 404 error.
Run the unit tests.
$ pytest -vv tests/test_rest_api_likes_and_comments.py::test_likes_post \
             tests/test_rest_api_likes_and_comments.py::test_like_exists
DELETE /api/v1/likes/<likeid>/
Delete one “like”. Return 204 on success.
If the likeid does not exist, return 404.
If the user does not own the like, return 403.
$ http -a awdeorio:chickens \
  DELETE \
  "http://localhost:8000/api/v1/likes/6/"
HTTP/1.0 204 NO CONTENT
...
Run the unit test.
$ pytest -vv tests/test_rest_api_likes_and_comments.py::test_likes_delete
POST /api/v1/comments/?postid=<postid>
Add one comment to a post. Include the ID of the new comment in the return data. Return 201 on success.
Pro-tip: sqlite3 provides a special function to retrieve the ID of the most recently inserted item: SELECT last_insert_rowid()
$ http -a awdeorio:chickens \
  POST \
  "http://localhost:8000/api/v1/comments/?postid=3" \
  text='Comment sent from httpie'
HTTP/1.0 201 CREATED
...
{
  "commentid": 8,
  "lognameOwnsThis": true,
  "owner": "awdeorio",
  "ownerShowUrl": "/users/awdeorio/",
  "text": "Comment sent from httpie",
  "url": "/api/v1/comments/8/"
}
The new comment appears in the list now.
$ http -a awdeorio:chickens "http://localhost:8000/api/v1/posts/3/"
HTTP/1.0 200 OK
...
{
  "comments": [
    {
      "commentid": 1,
      "lognameOwnsThis": true,
      "owner": "awdeorio",
      "ownerShowUrl": "/users/awdeorio/",
      "text": "#chickensofinstagram",
      "url": "/api/v1/comments/1/"
    },
    {
      "commentid": 2,
      "lognameOwnsThis": false,
      "owner": "jflinn",
      "ownerShowUrl": "/users/jflinn/",
      "text": "I <3 chickens",
      "url": "/api/v1/comments/2/"
    },
    {
      "commentid": 3,
      "lognameOwnsThis": false,
      "owner": "michjc",
      "ownerShowUrl": "/users/michjc/",
      "text": "Cute overload!",
      "url": "/api/v1/comments/3/"
    },
    {
      "commentid": 8,
      "lognameOwnsThis": true,
      "owner": "awdeorio",
      "ownerShowUrl": "/users/awdeorio/",
      "text": "Comment sent from httpie",
      "url": "/api/v1/comments/8/"
    }
  ],
  "comments_url": "/api/v1/comments/?postid=3",
  "created": "2021-05-06 19:52:44",
  "imgUrl": "/uploads/9887e06812ef434d291e4936417d125cd594b38a.jpg",
  "likes": {
    "lognameLikesThis": true,
    "numLikes": 1,
    "url": "/api/v1/likes/6/"
  },
  "owner": "awdeorio",
  "ownerImgUrl": "/uploads/e1a7c5c32973862ee15173b0259e3efdb6a391af.jpg",
  "ownerShowUrl": "/users/awdeorio/",
  "postShowUrl": "/posts/3/",
  "postid": 3,
  "url": "/api/v1/posts/3/"
}
Post IDs that are out of range should return a 404 error.
Run the unit test.
$ pytest -vv tests/test_rest_api_likes_and_comments.py::test_comments_post
DELETE /api/v1/comments/<commentid>/
Delete a comment. Include the ID of the comment in the URL. Return 204 on success.
If the commentid does not exist, return 404.
If the user doesn’t own the comment, return 403.
$ http -a awdeorio:chickens \
  DELETE \
  "http://localhost:8000/api/v1/comments/8/"
HTTP/1.0 204 NO CONTENT
...
The new comment should not appear in the list now.
$ http -a awdeorio:chickens "http://localhost:8000/api/v1/posts/3/"
HTTP/1.0 200 OK
...
{
  "comments": [
    {
      "commentid": 1,
      "lognameOwnsThis": true,
      "owner": "awdeorio",
      "ownerShowUrl": "/users/awdeorio/",
      "text": "#chickensofinstagram",
      "url": "/api/v1/comments/1/"
    },
    {
      "commentid": 2,
      "lognameOwnsThis": false,
      "owner": "jflinn",
      "ownerShowUrl": "/users/jflinn/",
      "text": "I <3 chickens",
      "url": "/api/v1/comments/2/"
    },
    {
      "commentid": 3,
      "lognameOwnsThis": false,
      "owner": "michjc",
      "ownerShowUrl": "/users/michjc/",
      "text": "Cute overload!",
      "url": "/api/v1/comments/3/"
    }
  ],
  "comments_url": "/api/v1/comments/?postid=3",
  "created": "2021-05-06 19:52:44",
  "imgUrl": "/uploads/9887e06812ef434d291e4936417d125cd594b38a.jpg",
  "likes": {
    "lognameLikesThis": true,
    "numLikes": 1,
    "url": "/api/v1/likes/6/"
  },
  "owner": "awdeorio",
  "ownerImgUrl": "/uploads/e1a7c5c32973862ee15173b0259e3efdb6a391af.jpg",
  "ownerShowUrl": "/users/awdeorio/",
  "postShowUrl": "/posts/3/",
  "postid": 3,
  "url": "/api/v1/posts/3/"
}
Run the unit test.
$ pytest -vv tests/test_rest_api_likes_and_comments.py::test_comments_delete
HTTP Response codes
The Flask documentation has a helpful section on implementing API exceptions. Errors returned by the REST API should take the form:
{
  "message": "<describe the problem here>",
  "status_code": <int goes here>
  ...
}
All routes require a login, except /api/v1/. Return 403 if user is not logged in.
$ http 'http://localhost:8000/api/v1/posts/'  # didn't send cookies
HTTP/1.0 403 FORBIDDEN
Content-Length: 52
Content-Type: application/json
Date: Thu, 11 Feb 2021 02:07:55 GMT
Server: Werkzeug/1.0.1 Python/3.10.9

{
    "message": "Forbidden",
    "status_code": 403
}
$ http "http://localhost:8000/api/v1/"  # didn't send cookies
HTTP/1.0 200 OK
Content-Type: application/json
Content-Length: 50
Server: Werkzeug/1.0.0 Python/3.7.6
Date: Wed, 19 Feb 2020 13:43:43 GMT

{
  "comments": "/api/v1/comments/",
  "likes": "/api/v1/likes/",
  "posts": "/api/v1/posts/",
  "url": "/api/v1/"
}
Note that requests to user-facing pages should still return HTML. For example, if the user isn’t logged in, the / redirects to /accounts/login/.
$ http 'http://localhost:8000/'
HTTP/1.0 302 FOUND
Content-Length: 239
Content-Type: text/html; charset=utf-8
Date: Thu, 11 Feb 2021 02:11:49 GMT
Location: http://localhost:8000/accounts/login/
Server: Werkzeug/1.0.1 Python/3.10.9

<!DOCTYPE HTML PUBLIC "-//W3C//DTD HTML 3.2 Final//EN">
<title>Redirecting...</title>
<h1>Redirecting...</h1>
<p>You should be redirected automatically to target URL: <a href="/accounts/login/">/accounts/login/</a>.  If not click the link.
Testing
At this point, the REST API autograder tests should pass.
$ pytest -v --log-cli-level=INFO tests/test_rest_api_*
All returned JSON should conform to standard formatting. Whitespace doesn’t matter.
Client-side Insta485
You’ll write only the Insta485 Feed on the main page (/) in this project. The other pages (user detail, following, etc.) are server-side dynamic pages copied from Project 2.
Before continuing, review our React/JS code explained and the React quick start.
Setup
The React/JS Tutorial will get you started with a development toolchain and a “hello world” React app.
After completing the tutorial, you should see your example social media Post component in the insta485/js/ directory. You may see other files copied from Project 2.
$ tree insta485/
insta485/
├── js
│   ├── main.jsx
│   └── post.jsx
└── templates
    └── index.html
You should also be able to run JavaScript tools that were installed via npm. Your versions may be different.
$ npx webpack --version
4.41.5
$ npx eslint --version
v6.8.0
$ npx prettier --version
2.7.1
Build the front end using webpack and then start a Flask development server.
$ npx webpack
$ flask --app insta485 --debug run --host 0.0.0.0 --port 8000
Browse to http://localhost:8000/ where you should see the test “Post” React Component.

Commit these changes and push to your Git repository.
insta485run script
After copying your insta485run script from project 2, add code to build the front end using webpack. Use trap to kill background processes on exit. Start webpack in watch mode in the background to automatically rebuild the front end when changes are detected in the JavaScript source files.
$ ./bin/insta485run
+ trap "trap - SIGTERM && kill -- -$$" SIGINT SIGTERM EXIT
+ npx webpack --watch &
+ flask --app insta485 --debug run --host 0.0.0.0 --port 8000
Feed
The main page displays a feed of posts. When you’re done, it should look just like the server-side version from project 2.
The navigation bar should be rendered server-side, just like project 2. Include a link to / in the upper left hand corner. If not logged in, redirect to /accounts/login/. If logged in, include a link to /explore/ and /users/<user_url_slug>/ in the upper right hand corner.
The feed of posts should be rendered by client-side JavaScript code. All posts, including comments, likes, photo, data about the user who posted, etc. must be generated from JavaScript.
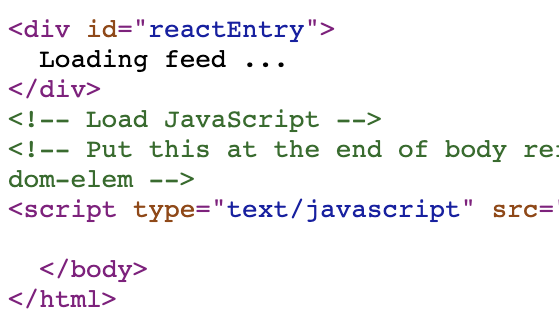
Here’s an outline of the rendered HTML for the main page. Notice that there is no feed content. Rather, there is an entry point for JavaScript to add the feed content.
...
<body>
  <!-- Plain old HTML and jinja2 nav bar goes here -->

  <!--
    We will tell React to use this div as it's entry-point for rendering
    **NOTE**: Make sure to include the "Loading ..." in the div below.
    This will display before our React code runs and modifies the DOM!
  -->
  <div id="reactEntry">
    Loading ...
  </div>
  <!-- Load JavaScript -->
  <script type="text/javascript" src="{{ url_for('static', filename='js/bundle.js') }}"></script>
</body>
...
Pro-tip: Start with a React/JS mock-up and hard coded data. Gradually add features, like retrieving data from the REST API, one at a time. See the Thinking in React docs for a good example.
Pro-tip: You already have a Post component; here’s an example of how to render a list of components.
Pitfall: Don’t change state directly; update objects (or arrays) in state using a copy. Spread syntax is helpful here.
// Concatenate list of posts using spread syntax ("...")
setPosts([...posts, ...data.results]);
Pitfall: A component should render without errors even if fetched data has not yet arrived. The first render occurs before fetched data arrives.
For example, a Post component could show “Loading”, and should not show an image, like button, or any other data-dependent content until the fetched data arrives. Check out the React docs on conditional rendering.
Human readable timestamps
The API call GET /api/v1/posts/<postid> returns the created time of a post in the format Year-Month-Day Hour:Minutes:Seconds.
Use the dayjs library, which is already included in package.json. You’ll need the relativeTime and utc plugins. Here’s the library import code.
import dayjs from "dayjs";
import relativeTime from "dayjs/plugin/relativeTime";
import utc from "dayjs/plugin/utc";

dayjs.extend(relativeTime);
dayjs.extend(utc);
The times in the database are stored in UTC time. Convert a UTC time to local time and then display it in human readable form like a few seconds ago. The utc() docs are a good place to start.
Timestamps must update automatically every minute so that the displayed relative time remains accurate without requiring a page reload. You can implement this by maintaining a now state and re-rendering the timestamp every 60 seconds. (Hint: look into setInterval)
Like in Project 2, each timestamp should link back to the corresponding post. Render the timestamp with the data-testid attribute post-time-ago in order for the autograder to find it. Feel free to style this sample code or add other HTML attributes.
<a href={FIXME postid URL} data-testid="post-time-ago">
  FIXME human readable timestamp here
</a>
Likes update
Likes added or deleted by the logged in user should appear immediately on the user interface without a page reload.
Pro-tip: The React docs on state have a helpful example of a toggle button that’s useful for the like/unlike button. They use ideas from the React docs on responding to Events and reacting to input with state.
Pro-tip: If you decide to create a Likes or Comments component, use the Lifting State Up technique.
The parent Post component stores the state (number of likes) and a state setter function.
The child Likes component displays the number of likes, which is passed as props by the parent Post component.
The child Likes component uses a function reference passed as props by the parent Post component when the Like button is pressed.
Pitfall: Avoid copying props to state (React docs). This anti-pattern can create bugs because updates to the prop won’t be reflected in the state.
function Likes({ numLikes }) {
  const [numLikesVal, setNumlikesVal] = useState(numLikes);  // Don't do this!
}
The like button must contain the data-testid attribute like-unlike-button in order for the autograder to find it. Feel free to style this sample code or add other HTML attributes. This applies only to the main page.
<button data-testid="like-unlike-button">
  FIXME button text here
</button>
Comment update
Comments added or deleted by the logged in user should appear immediately on the user interface without a page reload.
To prevent the page from reloading, check out the React docs’ section on event.preventDefault().
Create a comment by pressing the enter (return) key. Do not include a comment submit button on the user interface.
Remove a comment by pressing the delete comment button. Only comments created by the logged-in user should display a delete comment button.
Addding and deleting comment demo video.
Pro-tip: The React docs on Reacting to Input with State are helpful for the comment input box. It might also help to read the API reference page for <input>.
The comment form must contain the data-testid attribute comment-form in order for the autograder to find it. Feel free to style this sample code or add other HTML attributes. This applies only to the main page.
<form data-testid="comment-form">
  <input type="text" value=""/>
</form>
The comment text must contain the data-testid attribute comment-text. You may use this HTML code. Feel free to style it, add other HTML attributes, or use a different type of element instead of <span>. This only applies to the main page.
<span data-testid="comment-text">FIXME comment text here</span>
The delete comment button must contain the data-testid attribute delete-comment-button. Feel free to style this sample code or add other HTML attributes. This applies only to the main page. Only comments created by the logged in user should display a delete comment button. This is a new feature in project 3 and applies only to the main page.
<button data-testid="delete-comment-button">
  FIXME button text here
</button>
Double-click to like
Double clicking on an unliked image should like the image. Likes added by double clicking on the image should appear immediately on the user interface without a page reload. The like count and text on the like button should also update immediately.
Double clicking on a liked image should do nothing. Do not unlike an image when it is double clicked.
Double click demo video, the heart animation is optional.
Infinite scroll
Scrolling to the bottom of the page causes additional posts to be loaded and displayed. Load and display the next 10 posts as specified by the next parameter of the most recent API call to /api/v1/posts/. Do not reload the page. You do not need to account for the case of
new posts being added while the user is scrolling.
We recommend the React Infinite Scroll Component, which is already included in package.json.
The page should behave the same when reloaded (refreshed) as it does when a logged-in user first lands on the page, regardless of whether or not the infinite scroll mechanism was triggered previously:
- The scroll position is set to the top of the page.
- The 10 most recent posts are rendered, including any new posts made before the reload.
Pro-tip: to test this feature, you can use insta485db random.
(Note that in some visual demos, we use the same pictures multiple times, which might make you think that infinite scroll should at some point “cycle back to the start.” That’s NOT how it should work. Infinite scroll should keep scrolling until there are no more pictures available.)
Code style
Rendered html text should be in the appropriate tags.
// good
return (<p>{some_bool ? 'Hello' : 'Goodbye'}</p>);

// bad
return (some_bool ? 'Hello' : 'Goodbye');
Put unique content in separate tags. This is better code style, and it will prevent issues with the autograder parsing your HTML.
// good (comment owner and comment are in separate tags)
return (
  <div>
    <p>{comment_owner}</p>
    <p>{comment}</p>
  </div>
);

// bad (comment owner and comment are in same tag)
return (<p>{comment_owner}{comment}</p>);
As in project 2, all HTML should be W3C compliant, as reported by the Nu Html Checker (v.Nu). Python code should contain no errors or warnings from pycodestyle, pydocstyle, and pylint.
$ pycodestyle -v insta485
$ pydocstyle -v insta485
$ pylint -v insta485
All JavaScript source code should conform to the AirBnB JavaScript coding standard. Use eslint to test it. Refer to the React Tutorial eslint section.
$ npx eslint insta485/js/
All JavaScript source code should also conform to the default Prettier formatting rules. You can also have prettier fix formatting automatically. Refer to the React Tutorial prettier section.
$ npx prettier --check insta485/js  # Check
$ npx prettier --write insta485/js  # Fix
You may only use JavaScript libraries that are contained in package.json from the starter files and the built-in Web APIs.
You must use the fetch API for AJAX calls.
Pitfall: Don’t forget a dependency array and a cleanup function. Our Data Fetching in React with useEffect explains why. Use our example code as a starting point.
Testing
Learn how to use a JavaScript debugger and a React debugging extension with React/JS Debugging Tutorial, and make sure that you’ve completed the end-to-end testing tutorial!
Several end-to-end tests are published with the starter files. Make sure you’ve copied the tests directory. Your files may be slightly different.
$ ls tests/cypress/e2e
test_index_public.cy.js  test_scroll_public.cy.js  test_slow_server_index_public.cy.js
Rebuild your JavaScript bundle and then run your back end development server. Your ./bin/insta485run may automatically rebuild the front end bundle.
$ npx webpack
$ ./bin/insta485run
Run and debug front end tests. Run this command in a separate terminal from the back end. See the Run a test section of the End-to-end Testing Tutorial.
$ npx cypress open
Run all front end tests in headless mode. Run this command in a separate terminal from the back end. We recommend headless mode only as a sanity check before submitting to the autograder.
$ npx cypress run
Pitfall: Make sure your back end dev server (./bin/insta485run) is running in a separate terminal before running Cypress tests.
Pro-tip: In headless mode, Cypress records a video of the test in tests/cypress/videos. If a test fails, Cypress records a screenshot at the point of failure in tests/cypress/screenshots. Remember to use headless mode sparingly though: Cypress is most useful in the browser.
insta485test script
Add JavaScript style checking to your insta485test script from project 2. In addition to the tests run in project 2, insta485test should run eslint and prettier on all files within the insta485/js/ directory. Refer back to the eslint and prettier instructions.
$ ./bin/insta485test
+ npx eslint insta485/js
+ npx prettier --check insta485/js
...
Running Cypress from your insta485test script is not recommended.
Deploy to AWS
You should have already created an AWS account and instance (instructions). Resume the Project 2 AWS Tutorial - Deploy a web app .
After you have deployed your site, download the main page along with a log. Do this from your local development machine, not while SSH’d into your EC2 instance.
$ pwd
/Users/awdeorio/src/eecs485/p3-insta485-serverside
$ hostname
awdeorio-laptop  # NOT AWS
$ curl \
  --request POST \
  --cookie-jar cookies.txt \
  --form 'username=awdeorio' \
  --form 'password=chickens' \
  --form 'operation=login' \
  "http://<Public DNS (IPv4)>/accounts/"
$ curl -v -b cookies.txt "http://<Public DNS (IPv4)>/" > deployed_index.html 2> deployed_index.log
$ curl -v -b cookies.txt "http://<Public DNS (IPv4)>/static/js/bundle.js" > deployed_bundle.js 2> deployed_bundle.log
Be sure to verify that the output in deployed_index.log and deployed_bundle.log doesn’t include errors like “Couldn’t connect to server”. If it does contain an error like this, it means curl couldn’t successfully connect with your flask app. Verify that your logs have a 200 OK status in them, not 302 REDIRECT.
Also be sure to verify that the output in deployed_index.html looks like the index.html file you coded while deployed_bundle.js contains Javascript code.
Submitting and grading
One team member should register your group on the autograder using the create new invitation feature.
Submit a tarball to the autograder, which is linked from https://eecs485.org. Include the --disable-copyfile flag only on macOS and the tsconfig.json file only if you used TypeScript.
$ tar \
  --disable-copyfile \
  --exclude '*__pycache__*' \
  -czvf submit.tar.gz \
  bin \
  insta485 \
  package-lock.json \
  package.json \
  sql \
  webpack.config.js \
  tsconfig.json \
  deployed_index.html \
  deployed_index.log \
  deployed_bundle.js \
  deployed_bundle.log
The autograder will run pip install -e YOUR_SOLUTION and cd YOUR_SOLUTION && npm ci .. The exact library versions in requirements.txt and package-lock.json are cached on the autograder, so be sure not to add extra library dependencies.
We won’t run Project 2 test cases on your Project 3 code, but some of the Project 3 tests rely on a working server-side login.
WARNING The autograder for this project can be slow to grade your submissions. Leave ample time for submitting this project to the autograder.
Requirements and restrictions
The main page should load without errors (exceptions), even when the REST API takes a long time to respond. Put another way, the React framework will render your components before any AJAX data arrives. The page should still render without errors, and should not display inaccurate content like an image without an src (see this pitfall for more).
Use the asynchronous Fetch API to make REST API calls from JavaScript (Mozilla Fetch API documentation). Do not use jQuery. Do not use XMLHttpRequest.
Rubric
This is an approximate rubric.
| Tests | Value |
|---|---|
| Public Unit tests | 60% |
| Public Python, JS, and HTML style | 15% |
| Hidden unit tests run after the deadline | 15% |
| AWS deployment | 10% |
FAQ
My JavaScript code doesn’t work. What do I do?
- Make sure it’s
eslintclean. Instructions here. - Make sure it’s free from exceptions by checking the developer console for exception messages. See here for Chrome and here for Firefox.
- Try the React Developer tools browser extension.
- Check your assumptions about how state works.
- Add
console.log()messages to each relevant component and callback function to identify the problem and its causes.
Do trailing slashes in URLs matter?
Yes. Use them in the route decorator for your REST API. See the “Unique URLs / Redirection Behavior” section in the Flask quickstart.
Can we use console.log()?
Yes. Ideally you should only log in the case of an error.
Keys in an array of React components
When using a collection of React components, they need to have unique key attributes. Otherwise, you’ll get an error in your browser console:
Warning: Each child in a list should have a unique “key” prop.
This enables the fast virtual DOM-to-real DOM update performed by React. More info here.
How to fix pylint “Similar lines in 2 files”
The REST API shares some code in common with portions of insta485’s static pages that haven’t been modified. For example, both the REST API and the static /posts/<postid>/ read the comments and likes from the database. This could lead to pylint detecting copy-paste errors.
************* Module insta485.views.user
R:  1, 0: Similar lines in 2 files
==insta485.api.comments:30
==insta485.views.post:42
A nice way to resolve this problem is by adding helper functions to your model. The canonical way to solve this problem is an Object Relational Model (ORM), but we’re simplifying in this project.
History
In past semesters, a section of this project was “don’t break the back button”. Prior to the introduction of browser back/forward cache, developers of apps with client-side dynamic pages had to manually code browser back button behavior in JavaScript.
Here’s an example of what would happen if an app did not implement the browser back button behavior.
- Load
/and scroll until the infinite scroll mechanism kicks in, displaying 20 posts. - Click on a post to view the post details at
/posts/<postid>/. - Click the back button, returning to
/. You’ll only see 10 posts.
This is not expected behavior for a few reasons. First, when you hit the back button you expect to see the same posts again. Second, they might not even be the same posts because somebody else might have created a new post.
In November 2021, Google Chrome version 96 implemented a back/forward cache that automatically handles browser history. This made it difficult for students to test if they had correctly implemented the history portion of the project because everything appeared fine when they tested it in their browser. For that reason, we have decided to remove this feature from the project. Long live “don’t break the back button!”
If you are interested in how we ensured correct behavior in past semesters, check out the MDN documentation on the history API for help in manipulating browser history and the PerformanceNavigationTiming API for help in checking how the user is navigating to and from a page.
Reach Goals
All reach goals are entirely optional.
TypeScript
If you choose to, you may write your React app in TypeScript instead of JavaScript. TypeScript is a superset of JavaScript (meaning that any valid JavaScript program is a valid TypeScript program), but with strong and static typing. To opt into this, just use .tsx and .ts file extensions instead of .jsx and .js.
We’ve already configured the TypeScript configuration file tsconfig.json for you, but you may modify it if you wish.
If you’re not already familiar with TypeScript but want to learn it, see the official TypeScript handbook.
EECS 485 staff members may not be able to help with typing issues.
Acknowledgments
Original project written by Andrew DeOrio awdeorio@umich.edu, fall 2017. Updated by the EECS 485 team, February 2019. Updated by Noah Weingarden nwein@umich.edu to use React Hooks and Cypress end-to-end testing, winter 2023.
This document is licensed under a Creative Commons Attribution-NonCommercial 4.0 License. You’re free to copy and share this document, but not to sell it. You may not share source code provided with this document.