p4-mapreduce
EECS 485 Project 4: MapReduce
Due 11:59pm ET March 31st, 2026. This is a group project to be completed in groups of two to three.
Change log
- Changed due date from March 24th to March 31st, 2026.
Introduction
Implement a MapReduce framework in Python inspired by Google’s original MapReduce paper. The framework executes MapReduce programs with distributed processing on a cluster of computers like AWS EMR, Google Dataproc, or Microsoft MapReduce.
The learning goals of this project include MapReduce program execution, basic distributed systems, fault tolerance, OS-provided concurrency facilities (threads and processes), and networking (sockets). Mutual exclusion, such as locks, is not a learning goal.
The MapReduce framework consists of two major pieces of code. A Manager listens for user-submitted MapReduce jobs and distributes the work among Workers. Multiple Worker instances receive instructions from the Manager and execute map and reduce tasks that combine to form a MapReduce program.
The execution of a MapReduce program with two inputs and two Workers looks like this.
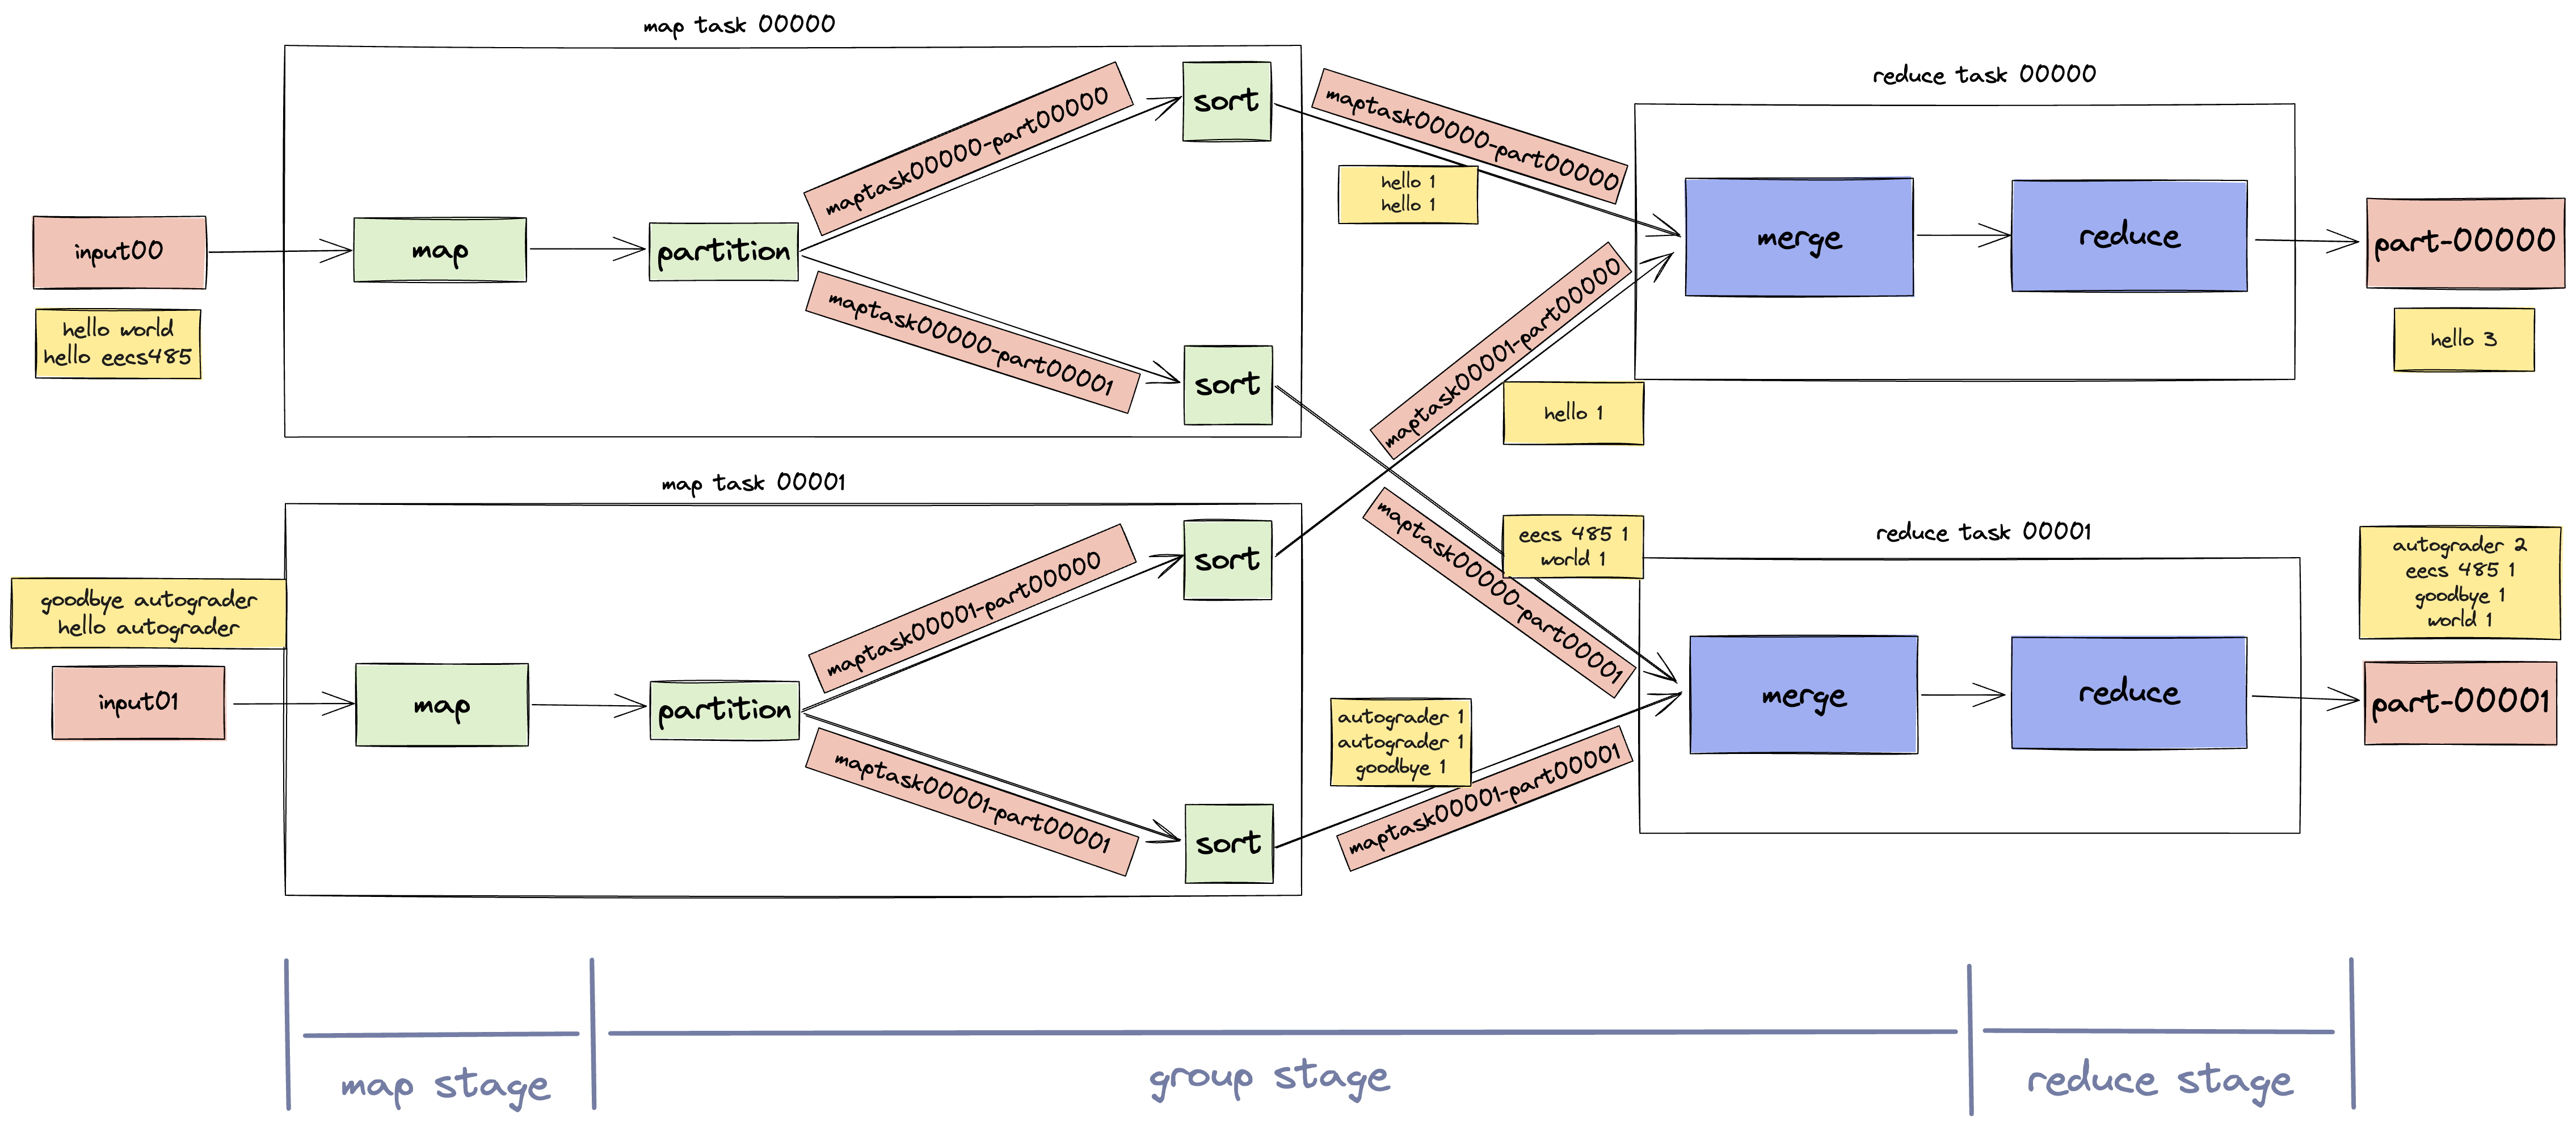
Here’s an example of a tiny MapReduce job running on a completed MapReduce framework. First, take a look at the input files.
$ head tests/testdata/input_small/file*
==> tests/testdata/input_small/file01 <==
hello world
hello eecs485

==> tests/testdata/input_small/file02 <==
goodbye autograder
hello autograder
Start a Manager and two Workers, then submit a Word Count job.
$ mapreduce-manager
$ mapreduce-worker --port 6001
$ mapreduce-worker --port 6002
$ mapreduce-submit --input tests/testdata/input_small
Submitted job to Manager localhost:6000
input directory      tests/testdata/input_small
output directory     output
mapper executable    tests/testdata/exec/wc_map.sh
reducer executable   tests/testdata/exec/wc_reduce.sh
Take a look at the output. We can see that the word hello appears 3 times among all the input files.
$ head output/part-*
==> output/part-00000 <==
hello	3

==> output/part-00001 <==
autograder	2
eecs485	1
goodbye	1
world	1
Before you begin, check out the threads and sockets tutorial for background and examples.
GAI help bot
We are providing a generative AI help bot, Webby, trained on the Project 4 spec, tutorials, and EECS 485 course material. We hope that it will be helpful, but the bot is experimental and it may provide inaccurate or incomplete information. This project spec is the final authority.
Access Webby here.
Setup
If your group has already followed the setup tutorials, you can skip to Fresh install.
Group registration
Register your group on the Autograder (see Submitting and grading).
Project folder
Create a folder for this project. Your folder location might be different.
$ pwd
/Users/awdeorio/src/eecs485/p4-mapreduce
Pitfall: Avoid paths that contain spaces. Spaces cause problems with some command line tools.
| Bad | Good |
|---|---|
EECS 485/Project 4 MapReduce |
eecs485/p4-mapreduce |
WSL Pitfall: Avoid project directories starting with /mnt/c/. This shared directory is slow.
| Bad | Good |
|---|---|
/mnt/c/ ... |
/home/awdeorio/ ... |
Version control
Set up version control using the Version control tutorial. You might also take a second look at the Version control for a team tutorial.
After you’re done, you should have a local repository with a “clean” status and your local repository should be connected to a remote GitHub repository.
$ pwd
/Users/awdeorio/src/eecs485/p4-mapreduce
$ git status
On branch main
Your branch is up-to-date with 'origin/main'.

nothing to commit, working tree clean
$ git remote -v
origin	git@github.com:awdeorio/p4-mapreduce.git (fetch)
origin	git@github.com:awdeorio/p4-mapreduce.git (push)
You should have a .gitignore file (instructions).
$ pwd
/Users/awdeorio/src/eecs485/p4-mapreduce
$ head .gitignore
This is a sample .gitignore file that's useful for EECS 485 projects.
...
Starter files
Download and unpack the starter files. Only one group member needs to download and unpack the starter files and the rest of the group can clone the repository.
$ pwd
/Users/awdeorio/src/eecs485/p4-mapreduce
$ wget https://eecs485staff.github.io/p4-mapreduce/starter_files.tar.gz
$ tar -xvzf starter_files.tar.gz
Move the starter files to your project directory and remove the original starter_files/ directory and tarball.
$ pwd
/Users/awdeorio/src/eecs485/p4-mapreduce
$ mv starter_files/* .
$ rm -rf starter_files starter_files.tar.gz
You should see these files.
$ tree
.
├── mapreduce
│   ├── __init__.py
│   ├── manager
│   │   ├── __init__.py
│   │   └── __main__.py
│   ├── submit.py
│   ├── utils
│   │   └── __init__.py
│   │   └── ordered_dict.py
│   └── worker
│       ├── __init__.py
│       └── __main__.py
├── requirements.txt
├── pyproject.toml
├── tests
│   ├── testdata
|   │   ├── correct
|   │   │   ├── grep_correct.txt
|   │   │   └── word_count_correct.txt
|   │   ├── exec
|   │   │   ├── grep_map.py
|   │   │   ├── grep_reduce.py
|   │   │   ├── wc_map.sh
|   │   │   ├── wc_map_slow.sh
|   │   │   ├── wc_reduce.sh
|   │   │   └── wc_reduce_slow.sh
|   │   ├── input
|   │   │   ├── file01
                ...
|   │   │   └── file08
|   │   ├── input_small
|   │   │   ├── file01
|   │   │   └── file02
|   |   ├── input_large
|   │   │   ├── file01
|   │   │   ├── file02
|   │   │   ├── file03
|   │   │   └── file04
        ...
│   ├── test_worker_08.py
│   └── utils
Activate the virtual environment and install packages.
$ source env/bin/activate
$ pip install -r requirements.txt
$ pip install -e .
Here’s a brief description of each of the starter files.
mapreduce |
MapReduce Python package skeleton files |
mapreduce/manager/ |
MapReduce Manager skeleton module, implement this |
mapreduce/worker/ |
MapReduce Worker skeleton module, implement this |
mapreduce/submit.py |
Provided code to submit a new MapReduce job |
mapreduce/utils/ |
Code shared between Manager and Worker |
mapreduce/utils/ordered_dict.py |
A class for using a dictionary in multiple threads |
requirements.txt |
Python package dependencies matching autograder |
pyproject.toml |
MapReduce Python package configuration |
tests/ |
Public unit tests |
tests/testdata/exec/ |
Sample MapReduce programs, all use stdin and stdout |
tests/testdata/correct/ |
Sample MapReduce program correct output |
tests/testdata/input/ |
Sample MapReduce program input |
tests/testdata/input_small/ |
Sample MapReduce program input for fast testing |
tests/testdata/input_large/ |
Sample MapReduce program input for testing on large input |
testdata/ |
Files used by our public tests |
Before making any changes to the clean starter files, it’s a good idea to make a commit to your Git repository.
Python virtual environment
Each group member should create a Python virtual environment inside of the project directory using the Project 1 Python Virtual Environment Tutorial.
Check that you have a Python virtual environment, and that it’s activated (remember source env/bin/activate).
$ pwd
/Users/awdeorio/src/eecs485/p4-mapreduce
$ ls -d env
env
$ echo $VIRTUAL_ENV
/Users/awdeorio/src/eecs485/p4-mapreduce/env
MapReduce program example
Next we will write a MapReduce word count program. You’ll use Michigan Hadoop (madoop), a light weight MapReduce framework, to run your program. Madoop is similar to your project, but it’s single-threaded and has fewer features.
First, install Madoop. Make sure your virtual environment is activated. Your version might be different.
$ source env/bin/activate
$ pip install madoop
$ madoop --version
Madoop 1.0.1
Write a word count mapper in tests/testdata/exec/wc_map.py. Create the file and add the sample code below. Feel free to refer to the Hadoop Streaming in Python Map section for the answer.
#!/usr/bin/env python3
"""Word count mapper."""
import sys


for line in sys.stdin:
    words = line.split()
    assert False, "FIXME: for each word, print the word and a '1'"
Write a word count reducer in tests/testdata/exec/wc_reduce.py. Create the file and add the sample code below. Feel free to refer to the Hadoop Streaming in Python Reducer using groupby() section for the answer.
#!/usr/bin/env python3
"""
Template reducer.

https://github.com/eecs485staff/madoop/blob/main/README_Hadoop_Streaming.md
"""
import sys
import itertools


def reduce_one_group(key, group):
    """Reduce one group."""
    assert False, "IMPLEMENT ME"


def keyfunc(line):
    """Return the key from a TAB-delimited key-value pair."""
    return line.partition("\t")[0]


def main():
    """Divide sorted lines into groups that share a key."""
    for key, group in itertools.groupby(sys.stdin, keyfunc):
        reduce_one_group(key, group)


if __name__ == "__main__":
    main()
Make sure the executable bit is set.
$ chmod +x tests/testdata/exec/wc_map.py
$ chmod +x tests/testdata/exec/wc_reduce.py
Take a look at the provided small input.
$ head tests/testdata/input_small/*
==> tests/testdata/input_small/file01 <==
hello world
hello eecs485

==> tests/testdata/input_small/file02 <==
goodbye autograder
hello autograder
Run your program using the provided small input.
$ madoop \
    -input tests/testdata/input_small \
    -output output \
    -mapper tests/testdata/exec/wc_map.py \
    -reducer tests/testdata/exec/wc_reduce.py
INFO: Starting map stage
INFO: Finished map executions: 2
INFO: Starting group stage
INFO: Starting reduce stage
INFO: Finished reduce executions: 3
INFO: Output directory: output
See the output either in separate files or concatenated.
$ head output/part-0000*
==> output/part-00000 <==
eecs485 1
goodbye 1

==> output/part-00001 <==
hello 3

==> output/part-00002 <==
autograder 2
world 1
$ cat output/part-0000*
eecs485 1
goodbye 1
hello 3
autograder 2
world 1
Congratulations! You have successfully written a MapReduce program.
Fresh install
These instructions are useful if your group has already followed the setup tutorials.
Check out a fresh copy of the code and change directory.
$ git clone <your git URL here>
$ cd p4-mapreduce/
Create a virtual environment, activate it, and install Python packages.
$ python3 -m venv env
$ source env/bin/activate
$ pip install -r requirements.txt
$ pip install -e .
Run the MapReduce server
You will write a mapreduce Python package that includes manager and worker modules. Launch a Manager with the command line entry point mapreduce-manager and a Worker with mapreduce-worker. We’ve also provided mapreduce-submit to send a new job to the Manager.
We’ll explain how the MapReduce server works step-by-step in the following sections. We’ve also provide a separate walk-through example with sample log output from our instructor solution.
Start a Manager and Workers
The starter code will run out of the box; it just won’t do anything. The Manager and the Worker run as separate processes. First we start up a Manager which will listen and communicate with the Worker on localhost TCP port 6000 and UDP port 6000. Then we start up two Workers in different terminals, which will communicate with the Manager on port 6000. The first Worker will listen for messages on localhost port 6001 and the second on port 6002.
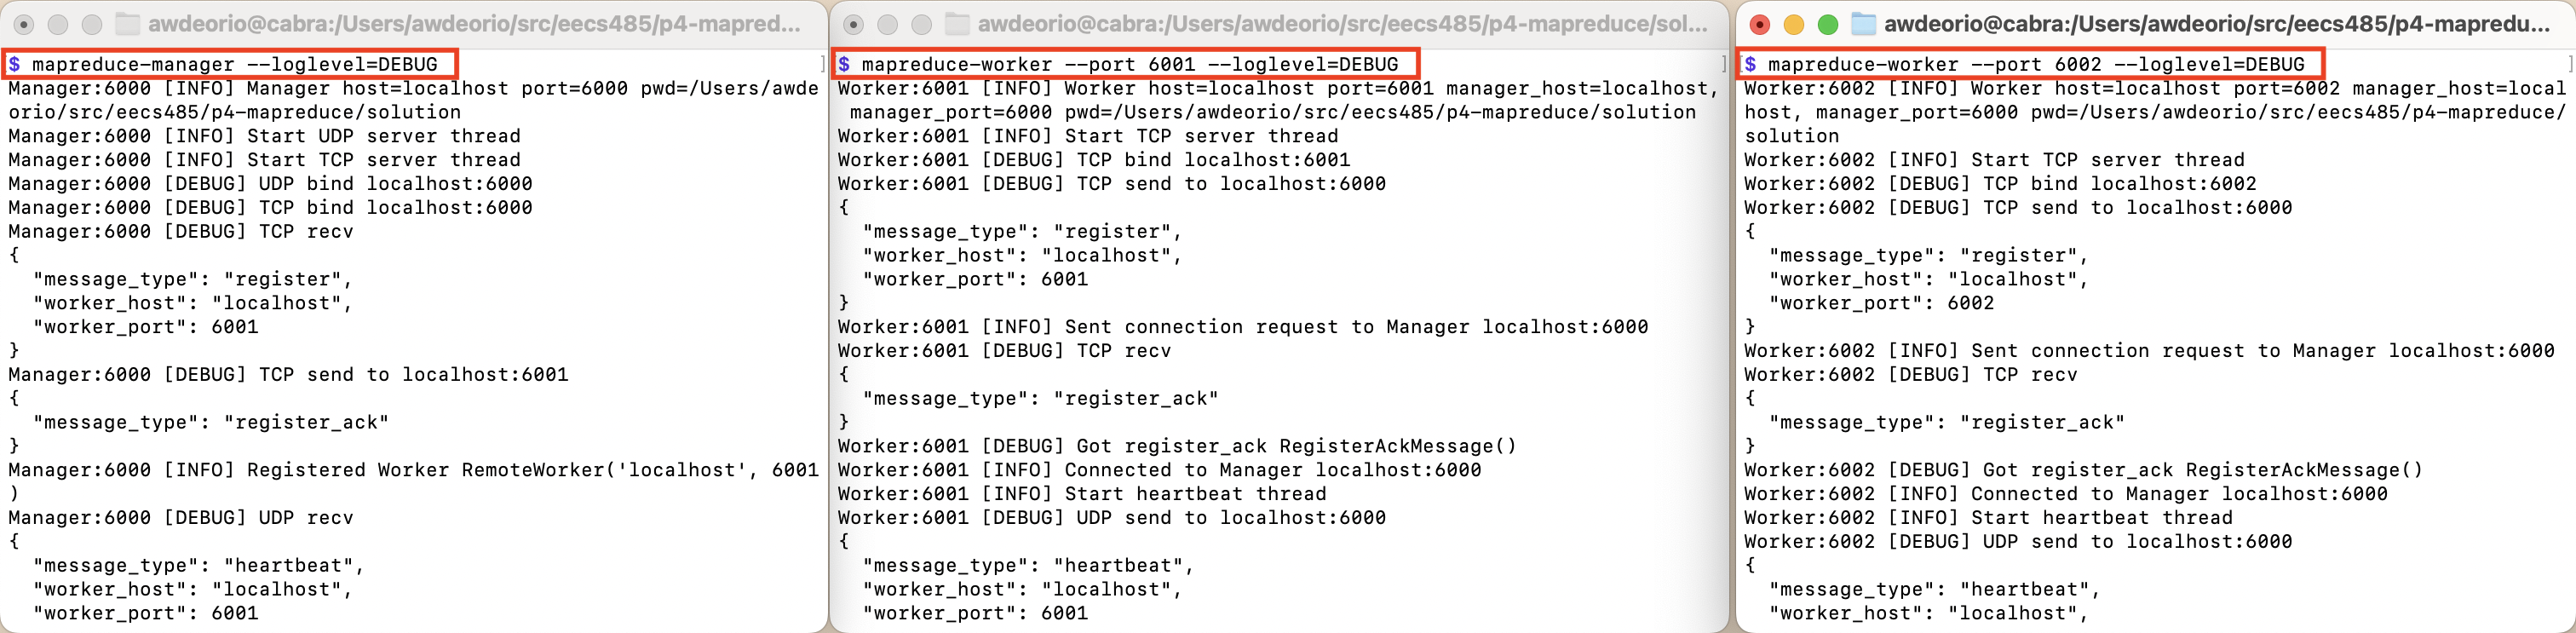
Start a Manager and two Workers in separate terminals including debug output --loglevel=DEBUG.
$ mapreduce-manager --loglevel=DEBUG             # Terminal 1
$ mapreduce-worker --port 6001 --loglevel=DEBUG  # Terminal 2
$ mapreduce-worker --port 6002 --loglevel=DEBUG  # Terminal 3
Submit a MapReduce job
Use the provided mapreduce-submit command to send a new MapReduce job to the Manager.
Pro-tip: mapreduce-submit will fail if you haven’t implemented a server socket for the Manager.
$ mapreduce-submit --input tests/testdata/input_small
Submitted job to Manager localhost:6000
input directory      tests/testdata/input_small
output directory     output
mapper executable    tests/testdata/exec/wc_map.sh
reducer executable   tests/testdata/exec/wc_reduce.sh
num mappers          2
num reducers         2
Init script
The MapReduce server is an example of a service (or daemon), a program that runs in the background. We’ll write an init script to start, stop and check on the MapReduce Manager and Worker processes. It should be a shell script named bin/mapreduce. Print the messages in the following examples. Don’t forget to check for shell script pitfalls.
Start server
Exit 1 if a Manager or Worker is already running. Otherwise, execute the following commands. We’ll use the --logfile option to write Manager and Worker output to separate log files in var/log/. The ampersands (&) will cause each process to start in the background.
mkdir -p var/log
rm -f var/log/manager.log var/log/worker-6002.log var/log/worker-6001.log
mapreduce-manager --host localhost --port 6000 --logfile var/log/manager.log &
sleep 2  # give the Manager time to start
mapreduce-worker --host localhost --port 6001 --manager-host localhost --manager-port 6000 --logfile var/log/worker-6001.log &
mapreduce-worker --host localhost --port 6002 --manager-host localhost --manager-port 6000 --logfile var/log/worker-6002.log &
Example
$ ./bin/mapreduce start
starting mapreduce ...
Example: accidentally start server when it’s already running.
$ ./bin/mapreduce start
Error: mapreduce-manager is already running
Check the logs.
$ tail var/log/*.log
==> var/log/manager.log <==
Manager:6000 [INFO] Starting manager host=localhost port=6000 pwd=/Users/awdeorio/src/eecs485/p4-mapreduce/solution
Manager:6000 [INFO] Listening on UDP port 6000
Manager:6000 [INFO] Listening on TCP port 6000
Manager:6000 [WARNING] Heartbeat from unregistered Worker
Manager:6000 [INFO] Registered Worker ('localhost', 6001)
Manager:6000 [INFO] Registered Worker ('localhost', 6002)

==> var/log/worker-6001.log <==
Worker:6001 [INFO] Starting worker host=localhost port=6001 pwd=/Users/awdeorio/src/eecs485/p4-mapreduce/solution
Worker:6001 [INFO] Listening on TCP port 6001
Worker:6001 [INFO] Connecting to Manager manager_host=localhost manager_port=6000
Worker:6001 [INFO] Starting heartbeat thread
Worker:6001 [INFO] Connected to Manager:6000

==> var/log/worker-6002.log <==
Worker:6002 [INFO] Starting worker host=localhost port=6002 pwd=/Users/awdeorio/src/eecs485/p4-mapreduce/solution
Worker:6002 [INFO] Listening on TCP port 6002
Worker:6002 [INFO] Connecting to Manager manager_host=localhost manager_port=6000
Worker:6002 [INFO] Starting heartbeat thread
Worker:6002 [INFO] Connected to Manager:6000
Pro-tip: Watch a log in real time with tail -F. Control-C to quit.
$ tail -F var/log/manager.log
Manager:6000 [INFO] Starting manager host=localhost port=6000 pwd=/Users/awdeorio/src/eecs485/p4-mapreduce/solution
Manager:6000 [INFO] Listening on UDP port 6000
Manager:6000 [INFO] Listening on TCP port 6000
Manager:6000 [WARNING] Heartbeat from unregistered Worker
Manager:6000 [INFO] Registered Worker ('localhost', 6001)
Manager:6000 [INFO] Registered Worker ('localhost', 6002)
Background processes
Ending a command with an ampersand (&) starts a process in the background. You can see processes running in the background (or foreground) using pgrep. Your PIDs may be different (e.g., 66369, 66372).
$ pgrep -lf mapreduce-  # macOS
$ pgrep -af mapreduce-  # Linux/WSL
66369 /usr/local/Cellar/python@3.10/3.10.8/Frameworks/Python.framework/Versions/3.10/Resources/Python.app/Contents/MacOS/Python /Users/awdeorio/src/eecs485/p4-mapreduce/env/bin/mapreduce-manager --host localhost --port 6000 --logfile var/log/manager.log
66372 /usr/local/Cellar/python@3.10/3.10.8/Frameworks/Python.framework/Versions/3.10/Resources/Python.app/Contents/MacOS/Python /Users/awdeorio/src/eecs485/p4-mapreduce/env/bin/mapreduce-worker --host localhost --port 6001 --manager-host localhost --manager-port 6000 --logfile var/log/worker-6001.log
66373 /usr/local/Cellar/python@3.10/3.10.8/Frameworks/Python.framework/Versions/3.10/Resources/Python.app/Contents/MacOS/Python /Users/awdeorio/src/eecs485/p4-mapreduce/env/bin/mapreduce-worker --host localhost --port 6002 --manager-host localhost --manager-port 6000 --logfile var/log/worker-6002.log
If you need to stop a background process, pkill is one way to do it.
$ pkill -lf mapreduce-  # macOS
$ pkill -f mapreduce-   # Linux/WSL
Stop server
Execute the following commands.
mapreduce-submit --shutdown --host localhost --port 6000 || true
sleep 2  # give the Manager time to receive signal and send to Workers
Check if the Manager and Workers have shut down. If not, kill the processes. pkill ... || true will ignore a non-zero exit status from pkill.
if pgrep -f mapreduce-manager &> /dev/null; then
  echo "killing mapreduce manager ..."
  pkill -f mapreduce-manager || true
fi
if pgrep -f mapreduce-worker &> /dev/null; then
  echo "killing mapreduce worker ..."
  pkill -f mapreduce-worker || true
fi
Example 1, server responds to shutdown message.
$ ./bin/mapreduce stop
stopping mapreduce ...
Example 2, server doesn’t respond to shutdown message and process is killed.
./bin/mapreduce stop
stopping mapreduce ...
killing mapreduce manager ...
killing mapreduce worker ...
Server status
Print whether or not the Manager is running, as well as whether or not any Workers are running. Exit 0 if both the Manager and at least one Worker are running. Exit 1 otherwise. Example:
$ ./bin/mapreduce start
starting mapreduce ...
$ ./bin/mapreduce status
manager running
workers running
$ echo $?
0
$ ./bin/mapreduce stop
stopping mapreduce ...
killing mapreduce manager ...
killing mapreduce worker ...
$ ./bin/mapreduce status
manager not running
workers not running
$ echo $?
1
Restart server
Example
$ ./bin/mapreduce restart
stopping mapreduce ...
killing mapreduce manager ...
killing mapreduce worker ...
starting mapreduce ...
MapReduce server specification
Here we describe the functionality of the MapReduce server. The fun part is that we are only defining the functionality and the communication protocol: the implementation is entirely up to you. You must follow our exact specifications below, and the Manager and Worker should work independently (i.e. do not add any more data or dependencies between the two classes). Remember that the Manager/Workers are listening on TCP/UDP sockets for all incoming messages. Note: To test your server, we will only be checking for the messages listed below. You should not rely on any communication other than the messages listed below.
The Manager and Worker each has a TCP socket that it uses to listen on a loop for incoming messages. Each outgoing TCP message should be communicated using a new TCP connection. Note: All communication in this project will be strings formatted using JSON; sockets receive bytes but your thread must parse them into JSON. See the Python json module for help parsing JSON.
The following sections explain how the MapReduce Manager and Worker code should function. We’ve also provide a separate walk-through example with sample log output from our instructor solution.
Pro-tip: Skim the MapReduce server specification, take a look at the Design Guidance for tips, then come back and read the specification in more detail. The Design Guidance is completely optional.
Manager overview
The Manager should accept five command-line options:
host: host address to listen for messagesport: TCP port to listen for messages and UDP port to listen for heartbeats (TCP sockets and UDP sockets are independent, so we can use the same port number)logfile: a file where logs are written (stderr will be used iflogfileisn’t provided)loglevel: the severity level threshold for writing logsshared_dir: the directory in which a shared temporary directory will be created (a directory chosen by the standard library will be used ifshared_dirisn’t provided)
We’ve already configured these for you in the starter files.
On startup, the Manager should do the following:
- Create a shared directory for temporary intermediate files. Use the Python standard library tempfile.TemporaryDirectory class to create the temporary directory. An example will be provided below.
- Create a new thread, which will listen for UDP heartbeat messages from the Workers.
- Create any additional threads or setup you think you may need. Another thread for fault tolerance could be helpful.
- Create a new TCP socket on the given
portand call thelisten()function. Note: only onelisten()thread should remain open for the whole lifetime of the Manager. - Wait for incoming messages! Ignore invalid messages, including those that fail JSON decoding. To ignore these messages use a try/except when you to try to load the message as shown below
try: msg = json.loads(msg) except JSONDecodeError: continue - Wait to return from the Manager constructor until all Manager threads have exited.
Here’s an example of how to use tempfile.TemporaryDirectory with the right naming convention for the shared temporary directory.
prefix = f"mapreduce-shared-"
with tempfile.TemporaryDirectory(prefix=prefix) as tmpdir:
    LOGGER.info("Created tmpdir %s", tmpdir)
    # FIXME: Add all code needed so that this `with` block doesn't end until the Manager shuts down.
LOGGER.info("Cleaned up tmpdir %s", tmpdir)
Pitfall: Don’t delete the shared temporary directory until the Manager shuts down. In the above example, the temporary directory will be automatically deleted when the code leaves the with block.
Worker overview
The Worker should accept six command-line options, which are already configured in the starter files:
host: host address to listen for messagesport: TCP port to listen for messagesmanager-host: address at which to send messages to the Managermanager-port: Manager TCP and UDP port to send messageslogfile: a file where logs are written (stderr will be used iflogfileisn’t provided)loglevel: the severity level threshold for writing logs
On initialization, a Worker should:
- Create a TCP socket on the given
portand call thelisten()function. Thelisten()should remain open for the lifetime of the Worker. Ignore invalid messages, including those that fail JSON decoding. - Send a
registermessage to the Manager. Make sure you are listening before sending this message. - After receiving a
register_ackmessage from the Manager, begin sending heartbeat messages to the Manager.
NOTE: The Manager should ignore any heartbeat messages from a “misbehaving” Worker before that Worker successfully registers with the Manager.
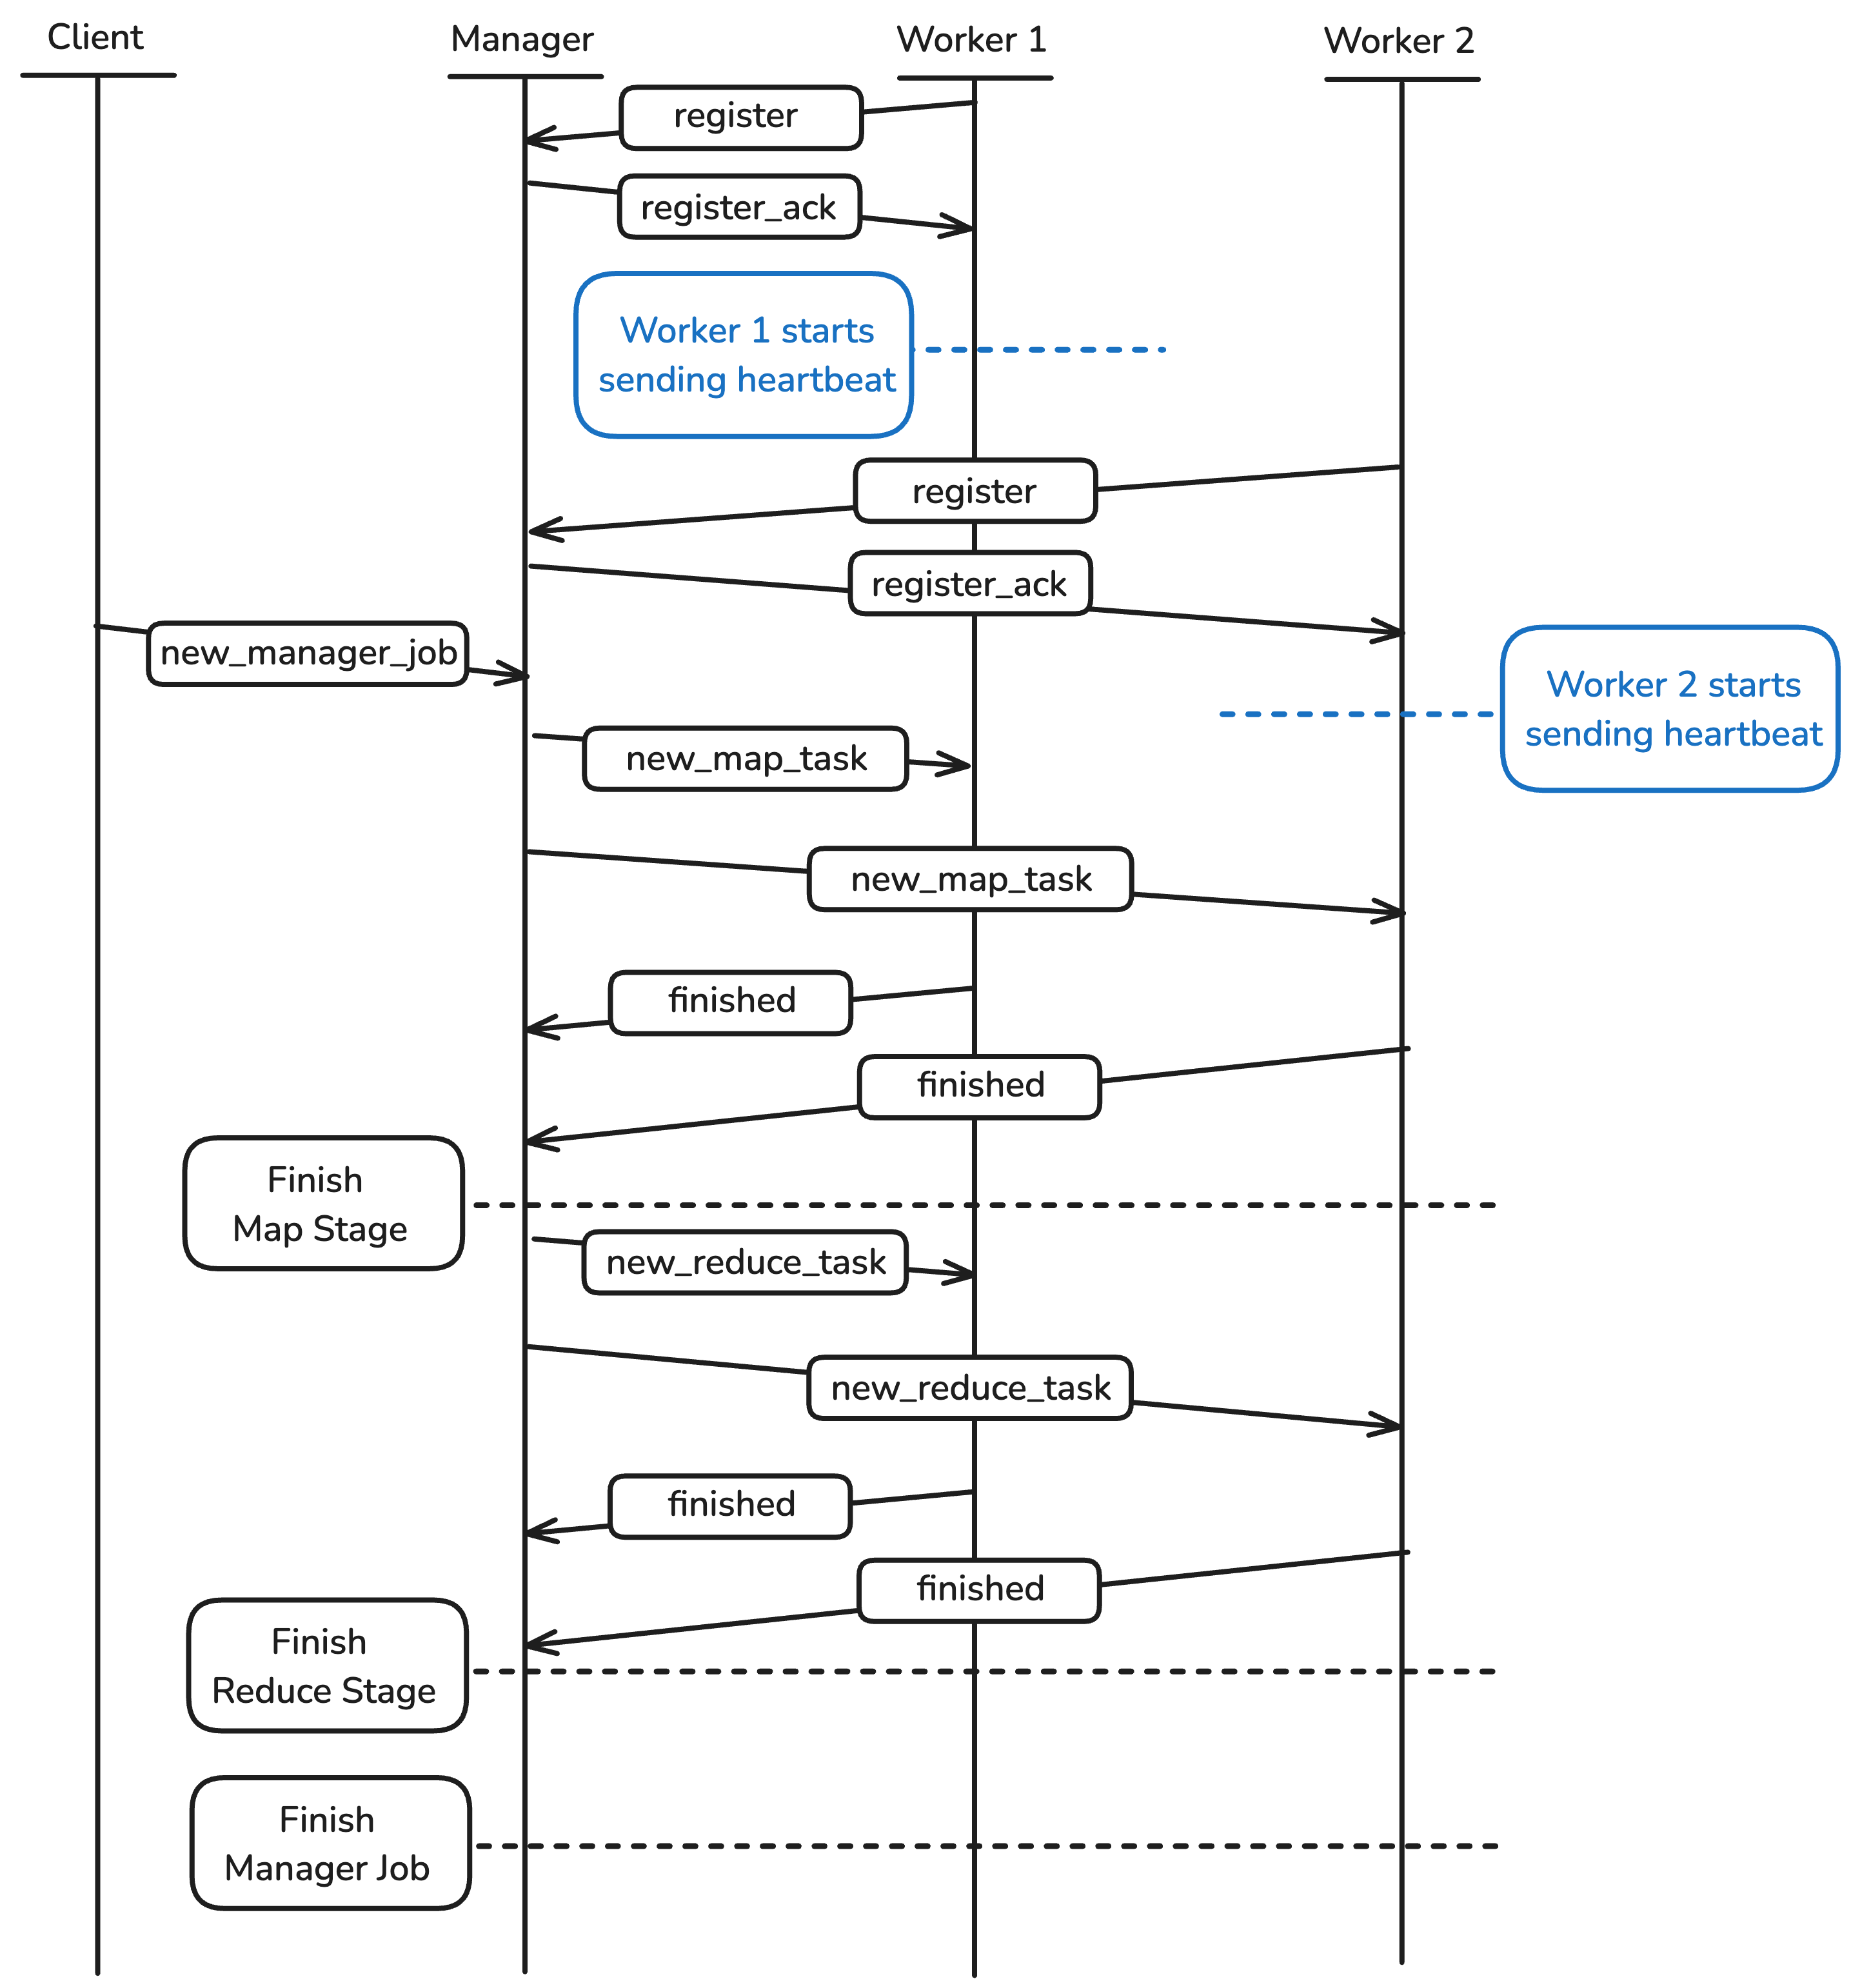
Messages overview
The messages between the Client, Manager and Worker in the walk-through example look like this.
Shutdown [Manager + Worker]
Because all of our tests require shutdown to function properly, it should be implemented first. The Manager can receive a special message to initiate server shutdown. The shutdown message will be of the following form and will be received on the main TCP socket:
{
  "message_type": "shutdown"
}
The Manager should forward this message to all of the living Workers that have registered with it. The Workers, upon receiving the shutdown message, should terminate as soon as possible. If the Worker is already in the middle of executing a task (as described below), it is okay for it to complete that task before handling the shutdown message, as both of these happen inside a single thread.
After forwarding the message to all Workers, the Manager should terminate itself.
At this point, you should be able to pass these tests:
$ pytest -vvsx --log-cli-level=INFO tests/test_manager_00.py::test_shutdown
$ pytest -vvsx --log-cli-level=INFO tests/test_worker_00.py
See the walk-through example for example log output of shutting down the MapReduce server.
See the Mocking Tutorial for an explanation of how Manager tests use mock Worker network messages instead of running real Worker code (and vice versa).
Worker registration [Manager + Worker]
The Manager should keep track of all Workers at any given time so that the work is only distributed among the ready Workers. Workers can be in the following states:
ready: Worker is ready to accept workbusy: Worker is performing a taskdead: Worker has failed to ping for some amount of time
The Manager must listen for registration messages from Workers. Once a Worker is ready to listen for instructions, it should send a message like this to the Manager:
{
  "message_type" : "register",
  "worker_host" : string,
  "worker_port" : int,
}
The Manager will then respond with a message acknowledging the Worker has registered, formatted like this. After this message has been received, the Worker should start sending heartbeats. Remember, Workers ideally will only send heartbeats after receiving this message, but the Manager should be able to safely handle heartbeats from unregistered Workers. We’ll discuss heartbeats later in the spec.
{
  "message_type": "register_ack",
}
After the first Worker registers with the Manager, the Manager should check the job queue (described later) if it has any work it can assign to the Worker (because a job could have arrived at the Manager before any Workers registered). If the Manager is already in the middle of a job, it should assign the Worker the next available task immediately.
At this point, you should be able to pass the following tests:
$ pytest -vvsx --log-cli-level=INFO tests/test_manager_00.py::test_shutdown
$ pytest -vvsx --log-cli-level=INFO tests/test_manager_00.py::test_shutdown_workers
$ pytest -vvsx --log-cli-level=INFO tests/test_worker_01.py
See the walk-through example for example log output after a Worker registers.
New job request [Manager]
In the event of a new job, the Manager will receive the following message on its main TCP socket:
{
  "message_type": "new_manager_job",
  "input_directory": string,
  "output_directory": string,
  "mapper_executable": string,
  "reducer_executable": string,
  "num_mappers" : int,
  "num_reducers" : int
}
Assign a job_id which starts from zero and increments.
Add the job to a queue.
Run job [Manager]
If there is no current executing MapReduce job, then pop a job off the queue and execute it. The Manager runs each job to completion before starting a new job.
First, delete the output directory if it already exists. Next, create the output directory.
Create a directory for this job’s intermediate files in the shared temporary directory you created for Manager overview. Name it job-{job_id}, where job_id is 5 digits long. For example, the first job should have a directory called job-00000, followed by job-00001, and so on.
At this point, you should be able to pass the following tests:
$ pytest -vvsx --log-cli-level=INFO tests/test_manager_01.py
See the walk-through example for example log output after submitting a job.
Input partitioning [Manager]
The Manager scans the input directory and divides the input files into several partitions. Each partition (a group of files) will be a new_map_task.
First, the Manager sorts the input files by name and divides them into num_mappers partitions using round robin. Here’s an example with num_mappers=4.
# Before partitioning
["file03", "file02", "file01", "file05", "file04"]

# After partitioning
[
    ["file01","file05"],  # task_id: 0
    ["file02"],  # task_id: 1
    ["file03"],  # task_id: 2
    ["file04"],  # task_id: 3
]
Assign each partition a task_id, starting from 0, based on the order in which you generate them.
After partitioning the input, the Manager allocates tasks to Workers by sending JSON messages. The tasks are allocated in the order that the Workers registered. Each JSON message looks like this:
{
  "message_type": "new_map_task",
  "task_id": int,
  "input_paths": [list of strings],
  "executable": string,
  "output_directory": string,
  "num_partitions": int,
}
num_partitions will be used by the mappers to determine how many partitions of output to create. The number of partitions should be num_reducers, since the output of the Map Stage will determine the input to each reducer.
Mapping [Manager]
The Manager assigns one task at a time to a Worker, assigning tasks in order of Worker registration. If all the Workers are busy, the Manager will need to wait. Because we don’t know ahead of time which Worker will become available first, which Worker performs which task could change with different executions of the same program (the program is non-deterministic). The autograder test cases accept all valid scenarios.
Here’s an example. Consider a MapReduce job with 2 Workers, 5 input files ["file01", "file02", "file03", "file04", "file05"] and 4 map tasks specified.
Continuing our previous example, we’ll assume that there are two Workers and neither is busy. Worker 0 registered first. Steps 3-6 would be slightly different if Worker 0 finished first.
- Manager sends Worker 0 a task with input paths
["file01", "file05"] - Manager sends Worker 1 a task with input paths
["file02"] - Manager waits for a Worker to finish. In this example, it’s Worker 1.
- Manager sends Worker 1 a task with input paths
["file03"] - Manager waits for a Worker to finish. In this example, it’s Worker 0.
- Manager sends Worker 0 a task with input paths
["file04"]
At this point, you should be able to pass the following tests:
$ pytest -vvsx --log-cli-level=INFO tests/test_manager_02.py
See the walk-through example for example log output of the Manager distributing map tasks to Workers.
Mapping [Worker]
The Worker has four steps during the Map Stage.
- Run the map executable on the specified input files.
- Partition output of the map executable into a new temporary directory, local to the Worker.
- Sort each output file by line using UNIX sort.
- Move each sorted output file to the shared temporary directory specified by the Manager.
This section describes the Map Stage in the flowchart, shown with green boxes.
First, run the map executable on the input files. The output of the map executable consists of tab-separated key-value pairs.
Second, partition the map output into several intermediate partition files. Each partition file will later be sent to a different reducer. Compute the partition by hashing the key and then applying the modulo operator. This policy ensures that all lines with the same key will be sent to the same reducer. Recall that there should be as many reduce partitions as there are reducers.
Here’s how to compute the partition of one key.
import hashlib
hexdigest = hashlib.md5(key.encode("utf-8")).hexdigest()
keyhash = int(hexdigest, base=16)
partition_number = keyhash % num_partitions
The names of the intermediate files should be in the form maptask{task_id}-part{partition_number}. Create a temporary output directory with tempfile.TemporaryDirectory (see Run job [Manager] for more) and write the intermediate files inside of it. Use the prefix parameter to make sure that the name of the directory starts with "mapreduce-local-task{task_id}-".
For example, say the current mapper is handling a new_map_task with task_id 0 and num_partitions 2. If the key for a line of output hashes to 3, then the output path for the file containing that line should be mapreduce-local-task00000-{random_tmpdir_name}/maptask00000-part00001. Make sure that the task_id and partition_number are represented with 5 digits in each filename.
Up to this point, the map task should use O(1) memory. Do not store the entire map output in memory. Do not create any files besides the ones explicitly required. We show how to do this in our Pipe executable output example.
After all of the intermediate files are complete, you must sort them one at a time using UNIX sort.
Pro-tip: Use this sample code to sort the intermediate files.
subprocess.run(["sort", "-o", filename, filename], check=True)
This will overwrite filename with its sorted contents. Sorting in a new process makes it easier to profile your memory usage.
Move the sorted output files into the output_directory specified by the new_map_task JSON message. The output_directory in the Map Stage will always be the Manager’s temporary directory.
Once a Worker has finished its task, it should send a TCP message to the Manager’s main socket in the form:
{
  "message_type": "finished",
  "task_id": int,
  "worker_host": string,
  "worker_port": int
}
At this point, you should be able to pass the following tests:
$ pytest -vvsx --log-cli-level=INFO tests/test_worker_03.py
$ pytest -vvsx --log-cli-level=INFO tests/test_worker_04.py
$ pytest -vvsx --log-cli-level=INFO tests/test_worker_05.py
See the walk-through example for example log output of Workers performing their map tasks.
NOTE: You may be curious why both the Manager and the Worker create a temporary directory, instead of the Worker writing its output directly to the directory specified by the Manager. If we ran each Worker on a different machine, each Worker’s temporary directory would be on local disk, while the Manager’s would be on a shared file system. Writing to local disk is much faster than writing over the network!
ExitStack and Open
ExitStack is helpful for working with multiple open files at the same time. It’s like keeping a bunch of context managers active at the same time, entering and exiting them all together. It is much faster than frequently opening and closing files. See the docs.
with contextlib.ExitStack() as stack:
    # Open all files first
    infiles = [stack.enter_context(p.open() for p in paths)]

    # Now you can read from all files inside this context
    for infile in infiles:
        for line in infile:
            process(line)

# At the end of the with-block, all files are closed automatically
Pipe executable output
Pipe output from the map executable to memory. The partition code should consume the map output from memory line-by-line as it is produced. This approach avoids storing the entire intermediate output in memory all at once. Put another way, the Map Stage should use O(1) memory, not O(n).
Use the Python standard library subprocess.Popen class to run the map executable in a new process. The input should be a file and the output should be piped to memory. Add Python code that performs the partitioning using the output. We’ve provided sample code below.
executable = # map executable
input_path = # map input filename

with open(input_path) as infile:
    with subprocess.Popen(
        [executable],
        stdin=infile,
        stdout=subprocess.PIPE,
        text=True,
    ) as map_process:
        for line in map_process.stdout:
            # Add line to correct partition output file
Pitfall: Use Python’s .partition() string method to read in the map output. Avoid .strip() and .split(), which can cause bugs with whitespace input.
Reducing [Manager]
During the Reduce Stage, the Manager should apportion reduce tasks to Workers ordered by registration time, just like during the Map Stage.
When the Manager assigns a reduce task to a Worker, the JSON message should look like this:
{
  "message_type": "new_reduce_task",
  "task_id": int,
  "executable": string,
  "input_paths": [list of strings],
  "output_directory": string,
}
Generate the task_id the same way you did during the Map Stage.
The input_paths will be files from the Manager’s shared temporary directory that were created during the Map Stage in sorted order by task_id. Each Map Stage output partition will form the input for one reducer. For example, if the shared temporary directory contains these files:
maptask00000-part00000
maptask00000-part00001
maptask00001-part00000
maptask00001-part00001
Send the partition 0 files to the reducer with task_id=0:
maptask00000-part00000
maptask00001-part00000
Send the partition 1 files to the reducer with task_id=1:
maptask00000-part00001
maptask00001-part00001
The output_directory for each reduce task will be the same output_directory specified in the original job submission.
See the walk-through example for example log output of the Manager distributing reduce tasks to Workers.
Pro-tip: Pathlib’s glob is a great way to get a list of all the files that belong to the same partition.
Reducing [Worker]
For the Worker, the Reduce Stage has three steps:
- Merge input files into one sorted output stream.
- Run the reduce executable on merged input, writing output to a single file.
- Move the output file to the final output directory specified by the Manager.
Each input file should already be sorted from the Map Stage.
This section describes the Reduce Stage in the flowchart, shown with purple boxes.
While the Worker is running the reduce executable, it should stream each line of input from memory one-by-one. Use subprocess.Popen for this: it will be similar to what you used while implementing the Map Stage. The input should be sorted collectively across each input file: the first line of input to the executable should be the lexicographically least across all input files, and the last line should be the greatest across all input files. This means that you will need to merge all of the input while streaming it. We show how to pipe input to a process in our Pipe executable input example.
Understanding the problem of merging sorted lists will help you to iterate over each line while maintaining the sorting invariant. We strongly encourage you to use heapq.merge(). Check out the heapq Tutorial on how to use this function. Do not assume that all of a Worker’s input can fit into memory at once.
The output from the reduce executable should all be written to a file named part-{task_id}, where task_id is formatted as a 5-digit number. Create a temporary output directory with tempfile.TemporaryDirectory see Run job [Manager] for more) and write the file to it. Use the prefix parameter to make sure that the name of the directory starts with "mapreduce-local-task{task_id}-", just like in the Map Stage.
After you have finished writing, move the file to the output_directory originally specified in the new_manager_job message. The Python shutil module may be helpful for this.
Once a Worker has finished its task, it should send a TCP message to the Manager’s main socket in the form:
{
  "message_type": "finished",
  "task_id": int,
  "worker_host": string,
  "worker_port": int
}
At this point, you should be able to pass the following tests:
$ pytest -vvsx --log-cli-level=INFO tests/test_worker_07.py
$ pytest -vvsx --log-cli-level=INFO tests/test_worker_08.py
See the walk-through example for example log output of Workers performing their reduce tasks. There is also an example of what the final output should be.
Pipe executable input
Pipe input from memory to the reduce executable. Merge the sorted intermediate files using heapq.merge(). Pipe the output of heapq.merge() into the subprocess’s stdin. Do not write the merge output to file.
Use the Python standard library subprocess.Popen class to run the reduce executable in a new process. The input should be the output of heapq.merge(). The output is a file. We’ve provided sample code below, which you’ll need to augment with a call to heapq.merge().
executable = # reduce executable
instream = # merged input files
outfile = # open output file

with subprocess.Popen(
    [executable],
    text=True,
    stdin=subprocess.PIPE,
    stdout=outfile,
) as reduce_process:

    # Pipe input to reduce_process
    for line in instream:
        reduce_process.stdin.write(line)
ExitStack is also helpful here. See ExitStack and Open.
Wrapping up [Manager]
After finishing a MapReduce job, delete the job’s directory for intermediate files within the shared directory, e.g. job-00000. On shutdown, this should happen automatically, but you need to make sure it happens at the end of each job as well.
Execute the next job on the queue, if any.
At this point, you should be able to pass the following test:
$ pytest -vvsx --log-cli-level=INFO tests/test_manager_03.py
You might also consider the optional Deploy to AWS after finishing your MapReduce implementation.
Fault tolerance and heartbeats [Manager + Worker]
Workers can die at any time and may not finish tasks that you send them. Your Manager must accommodate this. If a Worker misses more than 5 pings in a row, you should assume that it has died, and assign whatever work it was responsible for to another Worker.
Each Worker will have a heartbeat thread to send updates to the Manager via UDP. The messages should look like this, and should be sent every 2 seconds:
{
  "message_type": "heartbeat",
  "worker_host": string,
  "worker_port": int
}
If a Worker dies after the Manager assigned it a task but before completing the task and notifying the Manager, then the Manager should reassign the task to a free Worker when one becomes available. For simplicity, the Manager should first assign all tasks in the current stage before reassigning tasks from dead Workers.
If the Manager attempts to send a TCP message to a Worker and gets a ConnectionRefusedError, mark the Worker as dead. Mark it as dead even if 10 seconds (5 pings) have not yet elapsed. If the Manager was trying to send that Worker a task, treat the task as a normal unassigned task and assign it to the next available Worker.
When a Worker dies, mark the failed Worker as dead, but do not remove it from the Manager’s internal data structures. This is due to constraints on the Python dictionary data structure. It can result in an error when keys are modified while iterating over the dictionary. For more info on this, please refer to this link.
A Worker may die and then revive and re-register before the Manager is able to mark it as dead. Even if this happens, all tasks in the running job must be completed. Whether or not to use the Worker’s most recent registration when determining task assignment order is up to you.
Your Manager should attempt to maximize concurrency, but avoid duplication. In other words, don’t send the same task to different Workers until you know that the Worker who was previously assigned that task has died. Remember that a Worker can die during any stage. If all Workers die, the Manager should wait until a new Worker registers, then resume.
You can assume Workers will not die concurrently with incoming messages.
At this point, you should be able to pass the following test:
$ pytest -vvsx --log-cli-level=INFO tests/test_manager_05.py
$ pytest -vvsx --log-cli-level=INFO tests/test_worker_13.py
MapReduce server implementation
Manager code goes in the mapreduce/manager package. We provide mapreduce/manager/__main__.py as a starting point.
Worker code goes in the mapreduce/worker package. We provide mapreduce/worker/__main__.py as a starting point.
Shared code goes in the mapreduce/utils package.
Design guidance
The MapReduce server specification defines only the communication protocol for the Manager and the Worker. The implementation is entirely up to you.
It can be tempting to try and write all of your code within the Manager and Worker classes, but this tends to result in a solution that is difficult to debug and modify. Some things to think about:
- Is there any functionality that can be shared by the Manager and the Worker?
- What state does the Manager maintain? Which abstractions should maintain that state?
Spend some time thinking about how you can break up your solution into small and manageable pieces. Here are a few ideas from the instructor solution. Remember that none of these are required and we encourage you to go with a design that makes the most sense to you!
Shared networking code
Consider adapting the provided code in the Threads and Sockets Tutorial to create networking functions that can be used by both the Manger and Worker:
- A
tcp_serverfunction that continuously listens for messages on a socket, and calls a callback “handler” function when a message is received.def tcp_server(host, port, signals, handle_func): # ... - A
udp_serverfunction that does the same but for UDP messages. tcp_clientandudp_clientfunctions that can be reused to send messages over the network.
Here’s how your imports would look if you defined tcp_server() in mapreduce/utils/network.py.
from mapreduce.utils.network import tcp_server
from mapreduce.utils import tcp_server
# Call the function later
# tcp_server(...)
Manager
If you’re not very familiar with classes in Python, we recommend you read A First Look at Classes to familiarize yourself with class syntax and semantics in Python.
Consider creating a Job class to manage the state that is specific to a particular job, like pending tasks and the current phase of the job.
class Job:
    def next_task(self):
        """Return the next pending task to be assigned to a Worker."""

    def task_reset(self, task):
        """Re-enqueue a pending task, e.g., when a Worker is marked dead."""

    def task_finished(self, task):
        """Mark a pending task as completed."""

    # Add constructor and other methods
Consider creating a RemoteWorker class to represent the Manager’s view of a Worker process and keep track of its state.
class RemoteWorker:
    def assign_task(self, task):
        """Assign task to this Worker."""

    def unassign_task(self):
        """Unassign task and return it, e.g., when Worker is marked dead."""

    # Add constructor and other methods
Next, consider how you might manage a pool of Workers that have registered with the Manager. What methods might be useful on a collection of remote Workers?
You may choose to use some or none of the abstractions mentioned above. This design guidance is completely optional. Ultimately, you should decide for yourself how you’d like to design your solution!
Thread-safe OrderedDict
Consider using the ThreadSafeOrderedDict class that we provide for you in mapreduce.utils if you need a dictionary that’s accessed in multiple threads. It can be used exactly the same way as a normal dictionary, but avoids concurrency bugs during simultaneous accesses from multiple threads . Here’s a simple example:
from mapreduce.utils import ThreadSafeOrderedDict

dict_example = ThreadSafeOrderedDict()
dict_example["a"] = 1
dict_example["b"] = 2
Libraries
Here are some quick links to the libraries we used in our instructor implementation.
- Python Subprocess
- Python Multithreading
- Python Sockets
- Python JSON Library
- Python heapq Library
- Python pathlib Library (Object-oriented filesystem paths)
- Python tempfile Library
- Python Logging facility
- Python shutil Library
A note about paths
This project will use a lot of file paths. First, using Pathlib will help a lot with file path manipulation.
Second, a program shouldn’t assume that paths will be absolute (start with /) or relative. For example, it should work if the mapper executable is supplied as tests/testdata/exec/wc_map.sh or /Users/awdeorio/src/eecs485/p4-mapreduce/tests/testdata/exec/wc_map.sh.
A note about sockets
Use context managers to automatically close sockets (explanation).
Good example:
with socket.socket(socket.AF_INET, socket.SOCK_STREAM) as sock:
    ...
Bad example:
sock = socket.socket(socket.AF_INET, socket.SOCK_STREAM)
...
sock.close()
Logging
Use Python logging to print messages from concurrent processes and threads. With logging, you can enable and disable messages (see here) and see which Worker or Manager printed the message.
Good example:
LOGGER.info("Assigned task to Worker %s %s", task, worker)
Bad example:
print(f"Assigned task to Worker {task} {worker}")
The Python logging facility is helpful for monitoring multiple processes. For logging output similar to the instructor solution, use the logging code included in the starter files.
Do not use the print() function in project 4. If you do, you will quickly find that it becomes unwieldy when trying to understand the output produced by multiple processes and threads all running concurrently. The logging module provides more powerful tools that give you more control over your debugging output. The doc link provided at the top of this section contains a lot of information if you’d like to make the most of what the logging module has to offer. At a minimum, however, you should use LOGGER.info() and LOGGER.debug() like in the starter files.
Pretty-print with __repr__()
The __repr__() method produces a string representation of an object. It’s useful for logging and debugging. Python docs on repr
This example uses the MapTask class from our instructor solution. One MapTask represents one map task. It is created by the Manager and sent to a Worker for execution. We’ve simplified it here by removing most of the member functions and member variables.
class MapTask:
    """Represent one map task."""

    def __init__(self, input_files, executable, output_directory):
        self.input_files = input_files
        self.executable = executable
        self.output_directory = output_directory

    def __repr__(self):
        """Return a string representation of the object."""
        return (
            "MapTask("
            f"input_files={repr(self.input_files)}, "
            f"executable={repr(self.executable)}, "
            f"output_directory={repr(self.output_directory)}"
            ")"
        )
With a __repr__() function, we get nice, human-readable output.
>>> from task import WorkerTask
>>> task = MapTask(input_files=["file01", "file02"], executable="map0.py", output_directory="output")
>>> task
MapTask(input_files=['file01', 'file02'], executable='map.py', output_directory='output')
Without a __repr__() function, we would see an object’s address in memory, which isn’t very helpful.
>>> task
<__main__.MapTask object at 0x102a8ff10>
Logging with __repr__
Here’s an example of the instructor solution logging output. We log a Task object and a RemoteWorker object. Both have __repr__() functions.
LOGGER = logging.getLogger(__name__)
class Manager():
    # ...
    def run_next_task(self):
        # ...
        LOGGER.info("Assigned task to Worker %s %s", task, worker)
When we run our solution, we get easy-to-read log messages.
$ ./bin/mapreduce start
$ mapreduce-submit
...
Manager:6000 [INFO] Assigned task to Worker MapTask(input_files=['file01', 'file05'], executable='wc_map.sh', output_directory='mapper-output') RemoteWorker(host='localhost', port=6002, pid=42319)
...
Testing
We have provided a decently comprehensive public test suite for project 4. However, you should attempt to test some features of your MapReduce solution on your own. As stated above, the walk-through example should help you get started on testing your solution’s functionality.
We have provided a simple word count map and reduce example. Run these executables at the command line without your MapReduce code to generate the correct answers in correct.txt. Then, concatenate your MapReduce server’s output into one file, output.txt. The default output directory provided by submit.py is output, but it is configurable.
$ cat tests/testdata/input/* | tests/testdata/exec/wc_map.sh | sort | \
    tests/testdata/exec/wc_reduce.sh > correct.txt
$ ./bin/mapreduce start
$ mapreduce-submit
$ ./bin/mapreduce stop
$ cat output/* | sort > output.txt
$ diff output.txt correct.txt
Note that the map and reduce executables can be in any language–your server should not limit us to running map and reduce jobs written in Python! To help you test this, we have also provided you with a word count solution written in a shell script (see section below).
Note that the autograder will watch your Worker and Manager only for the messages we specified above. Your code should have no other dependencies besides the communication protocol, and the messages sent in your system must match those listed in this spec exactly.
Run the public unit tests. Add the -vvs flag to pytest to show output and the--log-cli-level=INFO flag to show logging messages. The -x option will stop after the first failed test.
$ pwd
/Users/awdeorio/src/eecs485/p4-mapreduce
$ pytest -vvsx --log-cli-level=INFO
Mocking
The test cases use mocking, which imitates the behavior of a component during testing. For example, test_worker_01.py uses a mock Manager to test your real Worker.
Refer to the Project 4 Test Cases and Mocking Tutorial to understand the project 4 test cases.
Test for busy-waiting
A solution that busy-waits may pass on your development machine and fail on the autograder due to a timeout. Your laptop is probably much more powerful than the restricted autograder environment, so you might not notice the performance problem locally. See the Threads and Sockets Tutorial for an explanation of busy-waiting.
To detect busy-waiting, time a Manager without any Workers. After a few seconds, kill it by pressing Control-C several times. Ignore any errors or exceptions. We can tell that this solution busy-waits because the user time is similar to the real time.
$ time mapreduce-manager
Manager:6000 [INFO] Starting manager:6000
...

real	0m4.475s
user	0m4.429s
sys	0m0.039s
This example does not busy-wait. Notice that the user time is small compared to the real time.
$ time mapreduce-manager
Manager:6000 [INFO] Starting manager:6000
...

real	0m3.530s
user	0m0.275s
sys	0m0.036s
Testing fault tolerance
This section will help you verify fault tolerance. The general idea is to kill a Worker while it’s running an intentionally slow MapReduce job.
We have provided an intentionally slow MapReduce job in tests/testdata/exec/wc_map_slow.sh and tests/testdata/exec/wc_reduce_slow.sh. These executables use sleep statements to simulate a slow running task. You may want to increase the sleep time.
Start the MapReduce server.
$ ./bin/mapreduce restart
Submit an intentionally slow MapReduce job and wait for the mappers to begin executing.
$ mapreduce-submit \
    --input tests/testdata/input_small \
    --output output \
    --mapper tests/testdata/exec/wc_map_slow.sh \
    --reducer tests/testdata/exec/wc_reduce_slow.sh \
    --nmappers 2 \
    --nreducers 2
Kill one of the Workers while it is executing a map or reduce job. Quickly use pgrep to find the PID of a Worker, and then use kill on its PID. You can use pgrep again to check that you actually killed the Worker.
$ pgrep -f mapreduce-worker
77811
77893
$ kill 77811
$ pgrep -f mapreduce-worker
77893
Here’s a way to kill one Worker with one line.
$ pgrep -f mapreduce-worker | head -n1 | xargs kill
Finally, verify the correct behavior by checking the logs for the number of map tasks or reduce tasks. In this example, the Manager resends the map task with task_id=1. Your log messages might be different.
$ grep 'Received task MapTask' var/log/worker-600*
var/log/worker-6001.log:Worker:6001 [INFO] Received task MapTaskMessage(task_id=1, input_paths=['tests/testdata/input_small/file02'], executable='tests/testdata/exec/wc_map_slow.sh', output_directory='/var/folders/kg/lqyv94dn1ybdkjgdpj1rd5ch0000gq/T/mapreduce-shared-97koskaf/job-00000', num_partitions=2)
var/log/worker-6002.log:Worker:6002 [INFO] Received task MapTaskMessage(task_id=0, input_paths=['tests/testdata/input_small/file01'], executable='tests/testdata/exec/wc_map_slow.sh', output_directory='/var/folders/kg/lqyv94dn1ybdkjgdpj1rd5ch0000gq/T/mapreduce-shared-97koskaf/job-00000', num_partitions=2)
var/log/worker-6002.log:Worker:6002 [INFO] Received task MapTaskMessage(task_id=1, input_paths=['tests/testdata/input_small/file02'], executable='tests/testdata/exec/wc_map_slow.sh', output_directory='/var/folders/kg/lqyv94dn1ybdkjgdpj1rd5ch0000gq/T/mapreduce-shared-97koskaf/job-00000', num_partitions=2)
Pro-tip: Script this test! Here’s an example. You might need to the change the pattern in the grep command.
#!/bin/bash
set -Eeuxo pipefail

./bin/mapreduce restart
mapreduce-submit \
    --input tests/testdata/input_small \
    --output output \
    --mapper tests/testdata/exec/wc_map_slow.sh \
    --reducer tests/testdata/exec/wc_reduce_slow.sh \
    --nmappers 2 \
    --nreducers 2
sleep 2
pgrep -f mapreduce-worker | head -n1 | xargs kill
tail -F var/log/worker-*.log | grep --line-buffered -i received
Code style
As in previous projects, all Python code should contain no errors or warnings from pycodestyle, pydocstyle, and pylint.
You may not use any external dependencies aside from what is provided in pyproject.toml.
Submitting and grading
One team member should register your group on the autograder using the create new invitation feature.
Submit a tarball to the autograder, which is linked from https://eecs485.org. Include the --disable-copyfile flag only on macOS.
$ tar \
  --disable-copyfile \
  --exclude '*__pycache__*' \
  --exclude '*tmp*' \
  -czvf submit.tar.gz \
  bin \
  mapreduce
Rubric
This is an approximate rubric.
| Deliverable | Value |
|---|---|
| Public unit tests | 60% |
| Hidden unit tests run after the deadline | 40% |
Deploy to AWS
This section is optional. Once you’ve finished implementing your MapReduce server, you may choose to deploy it on a cluster of AWS EC2 instances by following the instructions in the MapReduce AWS tutorial.
This is a great way to see your project working in action as a distributed system!
Shutting down AWS Resources
Be sure to shut down your EC2 instances when you’re done with them (Stop EC2 Instance Instructions). You should also remove your EFS file system when you’ve finished the project.
FAQ
Q: I can start my Manager/Worker with commands correctly, but when I run the tests, my code seems to not be doing anything.
A: Make sure you start up your Manager/Worker instances in the constructor.
Q: What is StopIteration error?
A: Repeated calls to the mock test functions (fake Manager or fake Worker) will return values from a hardcoded sequence (an iterable). When the iterable is exhausted, a StopIteration exception is raised. https://docs.python.org/3/library/exceptions.html#StopIteration
In the tests, we are using a Mock class to fake the socket functions. Whenever socket.recv() is called, the tests will send a pre-defined fake message (see worker_message_generator and manager_message_generator in each test for details). When socket.recv() is called but no message is given (the message generators run out of pre-defined fake messages), a StopIteration exception is raised.
Make sure socket.recv() is not called after the last fake message, which is the shutdown message.
Q: Why am I getting a Failed to close threads or Connection Refused error?
A: In the tests, we call the Manager / Worker class constructors to run your program. Make sure the constructors start your program and only exit when all threads are closed.
Q: Why do I get TypeError: Object of type PosixPath is not JSON serializable?
A: By default the Python json library does not know how to convert a pathlib.Path object to a string. Here’s how to do it:
class PathJSONEncoder(json.JSONEncoder):
    """
    Extended the Python JSON encoder to encode Pathlib objects.

    Docs: https://docs.python.org/3/library/json.html

    Usage:
    >>> json.dumps({
            "executable": TESTDATA_DIR/"exec/wc_map.sh",
        }, cls=PathJSONEncoder)
    """

    def default(self, o):
        """Override base class method to include Path object serialization."""
        if isinstance(o, pathlib.Path):
            return str(o)
        return super().default(o)
Q: I need to open multiple files at once, but Pylint fails with R1732: Consider using 'with' for resource-allocating operations (consider-using-with). How can I open multiple files using a context manager?
A: You’ll have to use a contextlib.ExitStack object when opening multiple files at once to pass the style tests. See ExitStack and Open for more.
Acknowledgments
Original document written by Andrew DeOrio awdeorio@umich.edu, Prateek Sachdeva, and Isaac Bowen. Noah Weingarden contributed features and removed many bugs.
This document is licensed under a Creative Commons Attribution-NonCommercial 4.0 License. You’re free to copy and share this document, but not to sell it. You may not share source code provided with this document.