chat485
EECS 485 P3: Client-side Dynamic Pages
A ChatGPT clone implemented with client-side dynamic pages.
Due 11:59pm ET October 16, 2026. This is a group project to be completed in groups of two or three.
Change Log
October 5, 2026: Fixed an ES module import error in the starter cypress.config.js. If Cypress reports require is not defined in ES module scope, download the updated starter files and replace your cypress.config.js.
F26 Release.
Introduction
Build a generative AI chat application using client-side dynamic pages and a REST API. Write a client application in JavaScript that runs in the browser and makes asynchronous requests to the REST API. The backend uses an LLM as a black box.
The learning goals of this project are client-side dynamic pages, asynchronous programming, REST APIs, testing, LLM integration, and guided use of generative AI tools.
Products like ChatGPT look like a single smart system, but they are really two parts: a stateless API and a stateful application. The LLM API takes messages in and returns a response. It remembers nothing. The backend application stores conversations in a database, manages sessions, and assembles message history into a prompt for each API call. In this project, you build the application layer and learn that conversation continuity comes from your code, not the model.
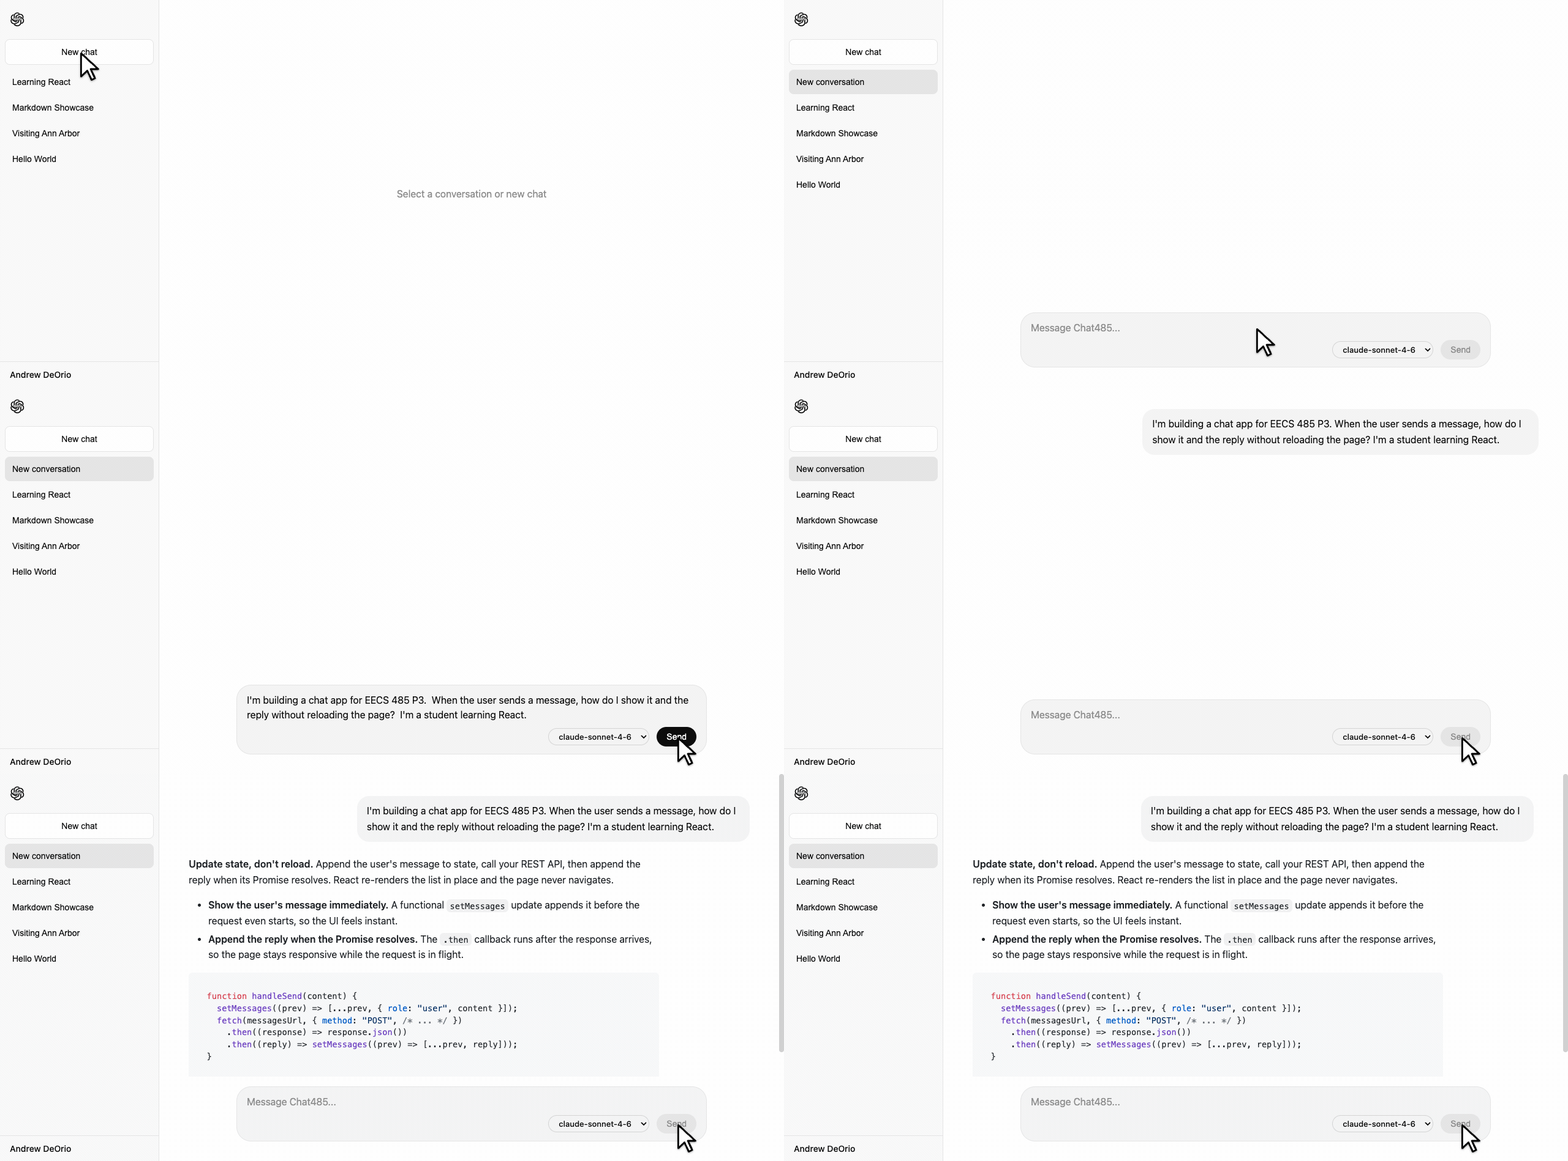
Glossary
- Model (LLM, Large Language Model): A stateless neural network that takes a list of messages as input and returns a response. Examples include
gpt-5from OpenAI andclaude-sonnet-4-6from Anthropic. - Chat application (harness): The stateful layer wrapped around a stateless model. It stores conversations, manages sessions, and orchestrates each request by assembling message history and a system prompt into the model’s input. Chat485 and ChatGPT are chat applications.
- Conversation: A sequence of user and assistant messages on a single topic, stored by the chat application and shown as one item in the sidebar.
- User message: What the human sends.
- Assistant message: What the model sends.
- System prompt: Instructions from the chat application that shape the model’s behavior, e.g., its name, response style.
- Prompt: The full input sent to the model on each request, including the system prompt and all prior user and assistant messages in the conversation.
- Response: The model’s generated output.
Generative AI policy
A learning goal of this project is guided use of generative AI tools. Use GenAI to learn, not to write the code you submit.
Core rule: Do not use GenAI to write any code you submit for the core project (backend route handlers, database code, SQL queries, React components, JSX, your tests/cypress/e2e/test_student.cy.js test suite, and the bin/ shell scripts). CSS and styling are fine. If GenAI writes your useEffect, the next bug feels like magic.
For learning: Use GenAI to explain concepts, compare approaches, and surface tradeoffs, then write the code yourself. Identify yourself as a student in the prompt so the model explains rather than codes. Example:
What is the difference between state and props in React, and how do I decide which one to use? I am a student learning React.
Exceptions: Codegen, including agentic tools, is allowed for reach goals.
Your responsibility: You are responsible for every line you submit. If you cannot explain a line, you should not have submitted it.
GenAI pro-tip: U-M GPT is free for U-M students. Pick a recent model, such as “GPT-5.6 Sol”, or a model with reasoning enabled, such as “GPT-5.5 Reasoning” (model names at the time of this writing). Reasoning models generally perform better on engineering tasks.
GenAI pro-tip: To chat about the spec, include it as context.
If you’re using U-M GPT, first save the spec as a PDF and upload it. (It can’t browse the web and only accepts PDFs.) With this page open in your browser, print to PDF (Cmd+P on macOS, Ctrl+P on Windows) and choose “Save as PDF”. Skip this step if your chat can browse the web.
I’m a student working on EECS 485 Project 3, a React and Flask chat app. The spec is here: https://eecs485staff.github.io/p3-chat485-clientside/ Act as a tutor. Explain concepts, compare approaches, and point me to the relevant spec section or tutorial, but don’t write code I’ll submit (Flask route handlers, SQL, React components, or JSX); I’ll write that myself. Cite the spec section your answer draws from so I can verify it, and if the spec doesn’t cover something, say so instead of guessing.
My question: How do I get started?
Setup
If your group has already followed the setup tutorials, you can skip to Fresh install.
Group registration
Please register your group on the Autograder.
Install utilities
Install these utilities.
Linux and Windows Subsystem for Linux
$ sudo apt-get install sqlite3
MacOS
$ brew install sqlite3
Project folder
Create a folder for this project. Your folder location might be different.
$ pwd
/Users/awdeorio/src/eecs485/p3-chat485-clientside
Pitfall: Avoid paths that contain spaces. Spaces cause problems with some command line tools.
| Bad | Good |
|---|---|
EECS 485/Project 3 Chat485 |
eecs485/p3-chat485-clientside |
WSL Pitfall: Avoid project directories starting with /mnt/c/. This shared directory is slow.
| Bad | Good |
|---|---|
/mnt/c/ ... |
/home/awdeorio/ ... |
Version control
Set up version control using the Version control tutorial.
After you’re done, you should have a local repository with a “clean” status and your local repository should be connected to a remote GitHub repository.
$ git status
On branch main
Your branch is up-to-date with 'origin/main'.

nothing to commit, working tree clean
$ git remote -v
origin	https://github.com/awdeorio/p3-chat485-clientside.git (fetch)
origin	https://github.com/awdeorio/p3-chat485-clientside.git (push)
You should have a .gitignore file (instructions).
Starter files
Download and unpack the starter files in your project directory.
$ pwd
/Users/awdeorio/src/eecs485/p3-chat485-clientside
$ wget https://eecs485staff.github.io/p3-chat485-clientside/starter_files.tar.gz
$ tar -xvzf starter_files.tar.gz
Move the starter files to your project directory and remove the original starter_files/ directory. The second mv picks up dotfiles like .prettierrc.json and .prettierignore, which the first glob skips.
$ mv starter_files/* .
$ mv starter_files/.* .
$ rm -rf starter_files starter_files.tar.gz
You should see these files. tree -a includes dotfiles like .prettierrc.json.
$ tree -a -I 'env|node_modules|__pycache__|.ruff_cache|.git|*.egg-info'
.
├── .prettierignore
├── .prettierrc.json
├── AGENTS.md
├── chat485
│   └── echo.py
├── CLAUDE.md
├── cypress.config.js
├── eslint.config.js
├── package-lock.json
├── package.json
├── pyproject.toml
├── requirements.txt
├── tests
│   ├── conftest.py
│   ├── cypress
│   │   ├── e2e
│   │   │   ├── test_accounts_public.cy.js
│   │   │   ├── test_chat_public.cy.js
│   │   │   ├── test_conversation_public.cy.js
│   │   │   └── test_selectors_public.cy.js
│   │   └── support
│   │       ├── commands.js
│   │       └── e2e.js
│   ├── test_rest_api_accounts_public.py
│   ├── test_rest_api_conversations_public.py
│   ├── test_rest_api_messages_public.py
│   ├── test_rest_api_public.py
│   ├── test_style_public.py
│   ├── testdata
│   │   ├── eslint.config.js -> ../../eslint.config.js
│   │   └── ruff.toml
│   └── utils.py
├── tsconfig.json
└── webpack.config.js
AGENTS.md, CLAUDE.md |
The Generative AI policy, in a form coding agents follow |
requirements.txt |
Python package dependencies matching autograder |
pyproject.toml |
Chat485 Python package configuration |
package.json, package-lock.json |
JavaScript package dependencies |
webpack.config.js, eslint.config.js, cypress.config.js, tsconfig.json, .prettierrc.json, .prettierignore |
Frontend tool chain configuration |
chat485/echo.py |
Staff-provided OpenAI-compatible chat completions echo server |
tests/ |
Public pytest tests and public Cypress tests |
Before making any changes to the clean starter files, it’s a good idea to make a commit to your Git repository.
Python virtual environment
Create a Python virtual environment inside of the project directory using the Python Virtual Environment Tutorial.
Pitfall: Don’t forget to activate your virtual environment at the start of every coding session or new shell.
$ source env/bin/activate
You should now have Python tools and third party packages installed locally. Notice that the path to python is in the virtual environment (p3-chat485-clientside/env/bin).
$ which python
/Users/awdeorio/src/eecs485/p3-chat485-clientside/env/bin/python
Sanity-check your Flask version. Your version may be different, but they should match. If not, re-run pip install -r requirements.txt.
$ flask --version
Python 3.12.0
Flask 3.1.2
Werkzeug 3.1.5
$ grep -i ^flask requirements.txt
Flask==3.1.2
chat485install script
Installing the tool chain requires a lot of steps! Write a bash script bin/chat485install to install your app. Don’t forget to check for shell script pitfalls.
- Remember the shebang
#!/bin/bash - Stop on errors, print commands
set -Eeuo pipefail set -x - Create a Python virtual environment
python3 -m venv env - Activate Python virtual environment
source env/bin/activate - Install back end
pip install -r requirements.txt pip install -e . - Install front end
npm ci .
Remember to add bin/chat485install to your Git repo and push.
Fresh install
These instructions are useful if you’ve already followed the setup tutorials.
Check out a fresh copy of the code and change directory.
$ git clone <your git URL here>
$ cd p3-chat485-clientside/
Create a virtual environment, activate it, and install Python and JavaScript packages.
$ python3 -m venv env
$ source env/bin/activate
$ pip install -r requirements.txt
$ pip install -e .
$ npm ci
Reset the database.
$ ./bin/chat485db reset
Run the development server.
$ ./bin/chat485run
Browse to http://localhost:8000/.
Database
Use the same database schema and starter data as in the Project 2 Database instructions.
After copying data.sql and schema.sql from project 2, your sql/ directory should look like this.
$ tree sql
sql
├── data.sql
└── schema.sql
Reuse your same database management shell script (chat485db) from project 2 tutorial. Your script should already support these subcommands:
$ chat485db create
$ chat485db destroy
$ chat485db reset
REST API
The chat application exposes a JSON REST API used by the React frontend. Every endpoint lives under /api/v1/, grouped by resource: /api/v1/conversations/, /api/v1/models, /api/v1/accounts/.
Setup
Complete the Flask Tutorial, which walks through the Python package, run script, database connection, and a small REST API. The same patterns apply here.
Run the Flask development server, or use ./bin/chat485run from the Flask tutorial run script section:
$ flask --app chat485 --debug run --host 0.0.0.0 --port 8000
Navigate to http://localhost:8000/api/v1/. You should see the resource index, which you implement next:
{
  "chat_completions": "/api/v1/chat/completions",
  "conversations": "/api/v1/conversations/",
  "models": "/api/v1/models",
  "url": "/api/v1/"
}
We ship an OpenAI-compatible chat completions endpoint in chat485/echo.py so chat485 works end-to-end without an external LLM provider. It carries forward from Project 2: see Setup (Project 2). Register it in chat485/__init__.py:
import chat485.api  # noqa: E402
import chat485.echo  # noqa: E402
import chat485.model  # noqa: E402
import chat485.views  # noqa: E402
The echo server’s request/response behavior is documented in Calling the chat completions API.
Lint early and often. As you write code, fix style problems automatically.
$ ruff check --fix chat485
$ ruff format chat485
Commit these changes and push to your Git repository.
Routes
The following table describes each REST API endpoint. Conversation and message URLs use a UUID slug in place of a numeric ID. Detailed descriptions follow in the subsections below.
| HTTP method | Example URL | Action |
|---|---|---|
GET |
/api/v1/ |
List API resources |
GET |
/api/v1/models |
List configured chat models |
GET |
/api/v1/conversations/ |
List conversations, newest first |
POST |
/api/v1/conversations/ |
Create a new conversation |
GET |
/api/v1/conversations/<uuid>/ |
Get one conversation (metadata only) |
DELETE |
/api/v1/conversations/<uuid>/ |
Delete one conversation |
GET |
/api/v1/conversations/<uuid>/messages/ |
List messages in a conversation, newest first |
POST |
/api/v1/conversations/<uuid>/messages/ |
Send a user message and receive the assistant reply |
POST |
/api/v1/accounts |
Create an account (signup) |
GET |
/api/v1/accounts/<userid> |
Get account details |
PATCH |
/api/v1/accounts/<userid> |
Edit account |
POST |
/api/v1/accounts/sessions |
Log in |
DELETE |
/api/v1/accounts/sessions |
Log out |
GET |
/api/v1/accounts/sessions/me |
Get the current logged-in user |
Sessions
The session model is described in the Project 2 spec: Sessions (Project 2). The mechanics carry forward unchanged. This project replaces the form-POST delivery layer with a REST API; the session cookie, anonymous browsing, the claim-and-rotate merge at login, and session deletion at logout all behave exactly the same.
Authentication
The backend authenticates protected routes two ways: the session cookie (used by the React frontend) or HTTP Basic Auth (http -a email:password). Use Basic Auth from the command line so you can test protected routes as you build them, without managing a cookie jar. When a request carries valid Basic Auth credentials, scope it to that user’s most recent session, so http -a returns the same conversations the React frontend would see if that user were logged in. Basic Auth works on every protected route, not only /accounts/; use it interchangeably with the session cookie.
Security warning: Always use HTTPS with HTTP Basic Auth in production. Over plain HTTP, the credentials travel base64-encoded but not encrypted, so any network eavesdropper can decode them. This project uses plain HTTP for simplicity.
API index
GET /api/v1/
Return the list of available API resources. The output should match this example exactly. This route is publicly accessible and does not depend on the current session. The example uses the HTTPie command line tool (http).
$ http "http://localhost:8000/api/v1/"
HTTP/1.0 200 OK
...
{
  "chat_completions": "/api/v1/chat/completions",
  "conversations": "/api/v1/conversations/",
  "models": "/api/v1/models",
  "url": "/api/v1/"
}
Pro-tip: The url field always echoes the path of the request. Use flask.request.path so the value stays correct if the route ever moves.
You should now pass one unit test:
$ pytest -v tests/test_rest_api_public.py::test_resources
Models list
GET /api/v1/models
Return the list of chat models the backend is configured to talk to. The response follows the OpenAI models list format: a data field holding a list of objects, each with an id. The top-level response is exactly {data: [...]} with no url or next field. This route is publicly accessible. The frontend calls it to populate the model selector dropdown.
$ http "http://localhost:8000/api/v1/models"
HTTP/1.0 200 OK
...
{
  "data": [
    {"id": "echo-1"},
    {"id": "llama3.2:3b"}
  ]
}
Models are defined in chat485/config.py. A model appears in the response when its config entry omits api_key (the echo server and Ollama) or when api_key resolves to a non-empty value. Paid models whose key resolves to None (environment variable unset) or to an empty string (environment variable set but blank) are filtered out, so unconfigured providers never reach the UI. See Model providers for Ollama and Paid providers for how to add optional paid provider API keys.
MODELS = [
    # Echo Server (Free, Built-in)
    # Returns the most recent user message verbatim.  No setup required.
    {
        "model": "echo-1",
        "api_url": "http://localhost:8000/api/v1/chat/completions",
    },
    # Ollama Models (Free, Local)
    # Requires 8 GB RAM (16 GB comfortable).
    # 1. Install: brew install ollama
    # 2. Start the service: brew services start ollama
    # 3. Pull the model: ollama pull llama3.2:3b
    {
        "model": "llama3.2:3b",
        "api_url": "http://localhost:11434/v1/chat/completions",
    },
]
You should now pass one unit test:
$ pytest -v tests/test_rest_api_public.py::test_models_list
Conversations list
GET /api/v1/conversations/
Return the conversations in the current session, newest first. The response is a JSON object with exactly two top-level keys: results (the list of conversations) and url (the request path). Unlike the message list, the conversation list is not paginated; do not include a next field.
$ http -a awdeorio@umich.edu:chickens "http://localhost:8000/api/v1/conversations/"
HTTP/1.0 200 OK
...
{
  "results": [
    {
      "uuid": "c3d4e5f6-a7b8-9012-cdef-123456789012",
      "title": "Visiting Ann Arbor",
      "created": "2026-01-03 10:00:00"
    },
    {
      "uuid": "a1b2c3d4-e5f6-7890-abcd-ef1234567890",
      "title": "Hello World",
      "created": "2026-01-01 10:00:00"
    }
  ],
  "url": "/api/v1/conversations/"
}
A fresh request (no cookie) gets a brand-new anonymous session with no conversations. Each conversation in results carries uuid, title, and created once the session has any. See Sessions.
Pro-tip: Hardcode the seed userid (1) inside your route handler to start writing list and detail against the seed conversations before you wire up cookies and sessions.
Exam skill: Write a Flask REST API route handler without AI assistance.
Write the GET /api/v1/conversations/ handler. Identify the current session’s user, query the database for that user’s conversations ordered newest first, and return a JSON object with exactly two keys: results (a list of conversations, each with uuid, title, and created) and url (the request path).
Write your answer first, then paste it into a chat for feedback.
You are an exam tutor. I’m studying for a closed-book EECS 485 exam where I can’t use AI, so do not write or correct code for me, and do not reveal the answer even if I ask; give a hint instead. Tell me whether my answer is correct and point me toward any mistake, then give me one follow-up question to try.
Question: [paste]
My answer: [paste]
Conversation create
POST /api/v1/conversations/
Create a conversation in the current session and return its metadata with status 201. The request body is empty. The conversation starts with a null title; the backend fills in the title from the first user message that arrives (see Conversation title).
$ http POST "http://localhost:8000/api/v1/conversations/"
HTTP/1.0 201 CREATED
...
{
  "uuid": "0eca689c-bdd8-4687-a5f1-18de9b37f470",
  "title": null,
  "created": "2026-05-11 13:13:49",
  "url": "/api/v1/conversations/0eca689c-bdd8-4687-a5f1-18de9b37f470/"
}
The endpoint accepts anonymous requests. See Sessions for how the backend assigns sessions and what happens at login.
Generate the UUID server-side with uuid.uuid4() and store it as a string in the uuid column. Never reuse the integer conversationid in any URL.
You should now pass one unit test:
$ pytest -v tests/test_rest_api_conversations_public.py::test_conversations_create
Conversation detail
GET /api/v1/conversations/<uuid>/
Return one conversation’s metadata: uuid, title, created, and url. The response does not include messages. Fetch those separately with GET /api/v1/conversations/<uuid>/messages/.
$ http -a awdeorio@umich.edu:chickens "http://localhost:8000/api/v1/conversations/a1b2c3d4-e5f6-7890-abcd-ef1234567890/"
HTTP/1.0 200 OK
...
{
  "uuid": "a1b2c3d4-e5f6-7890-abcd-ef1234567890",
  "title": "Hello World",
  "created": "2026-01-01 10:00:00",
  "url": "/api/v1/conversations/a1b2c3d4-e5f6-7890-abcd-ef1234567890/"
}
Security warning: In production, use unguessable IDs (like UUIDs) for every public URL so attackers can’t enumerate resources by incrementing. Conversation URLs use UUIDs. Other URLs in this project (for example /api/v1/accounts/<userid>) keep sequential IDs for simplicity. A real deployment should not.
Each conversation belongs to either the session that created it (anonymous) or the user that owns it (logged-in). A request whose session matches the conversation’s owning column (sessionid for anonymous, userid for logged-in) succeeds; otherwise the response is 403. Requesting a UUID that does not exist returns 404. See Error handling.
$ http "http://localhost:8000/api/v1/conversations/00000000-0000-0000-0000-000000000000/"
HTTP/1.0 404 NOT FOUND
...
{
  "message": "Not Found",
  "status_code": 404
}
Conversation delete
DELETE /api/v1/conversations/<uuid>/
Delete one conversation and all of its messages. Return 204 with an empty body on success.
$ http -a awdeorio@umich.edu:chickens DELETE "http://localhost:8000/api/v1/conversations/a1b2c3d4-e5f6-7890-abcd-ef1234567890/"
HTTP/1.0 204 NO CONTENT
...
The access rules match GET /api/v1/conversations/<uuid>/: a missing UUID returns 404, and a conversation whose owner does not match the requester’s session returns 403.
Pro-tip: Messages cascade-delete with their parent conversation when you set ON DELETE CASCADE on the messages.conversationid foreign key. No second DELETE needed.
Messages list
GET /api/v1/conversations/<uuid>/messages/
Return the messages in one conversation, newest first (messageid descending). The frontend reverses each page before display (see Pagination). The response is a JSON object with next (the URL of the next page, or an empty string when no more pages exist), results (the list of messages), and url (the request path with its query string).
Query parameters:
size: messages per page. Default 10. Must be positive.before: amessageidcursor. Return the page of messages strictly older than this id (messageid <the cursor). Omit it for the newest page. Must be positive when present.
Invalid values (size <= 0, or before <= 0) return 400. See Pagination for how the frontend consumes next.
$ http -a awdeorio@umich.edu:chickens "http://localhost:8000/api/v1/conversations/a1b2c3d4-e5f6-7890-abcd-ef1234567890/messages/"
HTTP/1.0 200 OK
...
{
  "next": "",
  "results": [
    {
      "messageid": 6,
      "conversationid": 1,
      "role": "assistant",
      "content": "Hello world!",
      "created": "2026-01-01 10:05:00"
    },
    {
      "messageid": 5,
      "conversationid": 1,
      "role": "user",
      "content": "Hello world!",
      "created": "2026-01-01 10:05:00"
    }
  ],
  "url": "/api/v1/conversations/a1b2c3d4-e5f6-7890-abcd-ef1234567890/messages/"
}
Each item in results has exactly five keys: messageid, conversationid, role, content, and created. There is no per-item url; the url field on the response applies to the whole list.
When the server returns a full page, next points to the following page, with before set to the messageid of the oldest message in the current page. When fewer than size results remain, next is the literal empty string "", not JSON null and not an omitted key.
$ http -a awdeorio@umich.edu:chickens "http://localhost:8000/api/v1/conversations/c3d4e5f6-a7b8-9012-cdef-123456789012/messages/?size=10"
HTTP/1.0 200 OK
...
{
  "next": "/api/v1/conversations/c3d4e5f6-a7b8-9012-cdef-123456789012/messages/?size=10&before=34",
  "results": [...],
  "url": "/api/v1/conversations/c3d4e5f6-a7b8-9012-cdef-123456789012/messages/?size=10"
}
The access rules match GET /api/v1/conversations/<uuid>/: a missing UUID returns 404, and a conversation whose owner does not match the requester’s session returns 403.
Message create
POST /api/v1/conversations/<uuid>/messages/
Send a user message to a conversation and return the assistant’s reply with status 201. The request body is a JSON object with content (required) and model (optional, defaults to echo-1). The backend saves the user message, forwards the recent conversation history to the chosen model’s chat completions endpoint, saves the assistant reply, and returns the saved assistant message.
$ http -a awdeorio@umich.edu:chickens POST "http://localhost:8000/api/v1/conversations/a1b2c3d4-e5f6-7890-abcd-ef1234567890/messages/" \
    content="What is React?" \
    model=echo-1
HTTP/1.0 201 CREATED
...
{
  "messageid": 7,
  "role": "assistant",
  "content": "What is React?",
  "created": "2026-05-12 14:22:31"
}
The response contains only the assistant message. The backend saves the user message to the database but does not echo it back; the frontend already has the content it sent. The response has exactly four keys: messageid, role, content, and created. Unlike the messages list endpoint, it does not include conversationid; the caller already has it from the URL.
A request with no content returns 400. The access rules match GET /api/v1/conversations/<uuid>/: a missing UUID returns 404, and a conversation whose owner does not match the requester’s session returns 403.
The first user message in a conversation sets the conversation’s title. The generation rule (the 30-character cap, the cut at the last space, and the three-character ASCII "..." suffix) carries forward from Project 2: see Conversation title (Project 2). The frontend reflects this title change as described in Conversation title.
Calling the chat completions API
The mechanics carry forward from Project 2: see Calling the chat completions API (Project 2). The 20-message window, the system prompt prepended at index 0, the OpenAI-compatible request and response shapes, the requests.post() pitfall, and the end-to-end echo server example all apply unchanged.
As a reminder, here’s an example of a message that exceeds the 8000-character context window of the echo-1 model:
$ http POST http://localhost:8000/api/v1/chat/completions \
    model=echo-1 \
    messages:="$(python3 -c 'import json; print(json.dumps([{"role":"user","content":"x"*8001}]))')"

{
    "error": {
        "code": "context_length_exceeded",
        "message": "Request exceeds context window of 8000 characters (got 8001)."
    }
}
You should now pass one unit test:
$ pytest -v tests/test_rest_api_messages_public.py::test_messages_create
Account create
POST /api/v1/accounts
Create a new user account and log the new user in. The request body is a JSON object with three required fields: fullname, email, and password. The backend hashes the password (see Password storage), inserts the new row, claims any anonymous conversations for the new user, and returns the new account with status 201.
$ http POST "http://localhost:8000/api/v1/accounts" \
    fullname="New User" \
    email=newuser@umich.edu \
    password=password123
HTTP/1.0 201 CREATED
...
{
  "userid": 2,
  "fullname": "New User",
  "email": "newuser@umich.edu",
  "created": "2026-05-12 14:30:00"
}
A request missing any of the three required fields, or one without a JSON body, returns 400. A request whose email already exists in the database returns 409.
Signup claims any anonymous conversations in the current browser session for the new user, then rotates the sessionid. See Sessions. Account creation logs the new user in immediately: the response sets the session cookie so the next request from the same client is authenticated as the new user.
Pro-tip: If you hardcoded userid = 1 earlier, replace it with real cookie + session handling now. Account routes depend on it.
Password storage
Store and verify passwords exactly as in Project 2: see Password storage (Project 2). The algorithm$salt$hexdigest column format, the sha512 hashing, the salt-and-compare verification, and the rainbow-table rationale all carry forward unchanged.
Account detail
GET /api/v1/accounts/<userid>
Return one user’s account: userid, fullname, email, and created.
$ http -a awdeorio@umich.edu:chickens "http://localhost:8000/api/v1/accounts/1"
HTTP/1.0 200 OK
...
{
  "userid": 1,
  "fullname": "Andrew DeOrio",
  "email": "awdeorio@umich.edu",
  "created": "2026-01-01 09:00:00"
}
This route requires a logged-in user. Anonymous requests return 403. A request for a userid that does not exist returns 404.
Account edit
PATCH /api/v1/accounts/<userid>
Update one or more fields on the logged-in user’s account. The request body is a JSON object containing any subset of fullname and email. Omitted fields keep their current values. Return the updated account with status 200.
$ http -a awdeorio@umich.edu:chickens PATCH "http://localhost:8000/api/v1/accounts/1" \
    fullname="AWD"
HTTP/1.0 200 OK
...
{
  "userid": 1,
  "fullname": "AWD",
  "email": "awdeorio@umich.edu",
  "created": "2026-01-01 09:00:00"
}
A user may edit only their own account. Requests from an anonymous session return 403, and so do requests where the logged-in userid does not match the URL userid. A missing or empty request body returns 400.
Account login
POST /api/v1/accounts/sessions
Authenticate a user. The request body is a JSON object with email and password. Return {userid, fullname} with status 200.
$ http POST "http://localhost:8000/api/v1/accounts/sessions" \
    email=awdeorio@umich.edu \
    password=chickens
HTTP/1.0 200 OK
...
{
  "userid": 1,
  "fullname": "Andrew DeOrio"
}
The login response has exactly two keys: userid and fullname. It does not include email or created; the frontend calls Account session immediately after login to fetch those.
A request without a body, or with email or password missing or empty, returns 400. Wrong credentials return 403. The backend verifies the password by recomputing the hash (see Password storage) and comparing it to the stored hexdigest.
Login claims any anonymous conversations in the current browser session for the user, then rotates the sessionid. See Sessions.
You should now pass one unit test:
$ pytest -v tests/test_rest_api_accounts_public.py::test_login
Account logout
DELETE /api/v1/accounts/sessions
Delete the current session row and clear the session cookie. Return 204 with an empty body on success. Subsequent requests from the same browser start as a fresh anonymous session.
$ http DELETE "http://localhost:8000/api/v1/accounts/sessions"
HTTP/1.0 204 NO CONTENT
...
Account session
GET /api/v1/accounts/sessions/me
Return the logged-in user’s account: userid, fullname, and email. Use this route to check whether the current session is authenticated. The frontend calls it on page load to choose between the user menu and the login modal.
$ http -a awdeorio@umich.edu:chickens "http://localhost:8000/api/v1/accounts/sessions/me"
HTTP/1.0 200 OK
...
{
  "userid": 1,
  "fullname": "Andrew DeOrio",
  "email": "awdeorio@umich.edu"
}
An anonymous request returns 403.
Error handling
Every error response is a JSON object with two keys:
{
  "status_code": <int>,
  "message": "<your message>"
}
The status_code value duplicates the HTTP status. The message value is a human-readable string; its content is up to you (the HTTP reason phrase, e.g., "Bad Gateway" or "Not Found", is a fine default).
Testing
Lint with ruff, which checks conformance to the PEP 8 Style Guide and PEP 257 Docstring Conventions. Do not add inline suppressions like # noqa; refactor the code instead.
$ ruff check chat485              # Report style and correctness problems
$ ruff check --fix chat485        # Fix lint errors automatically where possible
$ ruff format --check chat485     # Check formatting
$ ruff format chat485             # Fix formatting
Run all backend tests:
$ pytest -v tests/test_rest_api_*.py
Backend reach goals
Reach goals are optional extensions. The autograder does not test them.
Reach goals are the place to practice driving an agentic GenAI tool (Claude Code, Cursor, GitHub Copilot agent mode, etc.). Codegen is allowed here, but you are still responsible for every line you submit.
Reach goals carry forward across the Chat485 project sequence. For example, CSS styling or system-prompt customization can stay in your P3 submission.
Paid providers
Connect Chat485 to a real LLM. The setup is documented in the Project 2 spec: Paid providers (Project 2). Storing the API key, the .env workflow, and the Anthropic / OpenAI / Gemini config snippets all carry forward unchanged.
Client-side Chat485
Implement a single-page app using React and React Router.
Before continuing, review the React docs quick start.
Setup
Complete the React/JS Tutorial if you have not already. That tutorial covers installing Node, npm, and the JSX tool chain, and walks through a sample Models component that fetches /api/v1/models. The same patterns (props, state, useEffect, fetch) apply throughout this section.
After completing the tutorial, you should have these files in chat485/js/. You may see other files copied from earlier work.
$ tree chat485/js/
chat485/js/
├── main.jsx
└── models.jsx
You should also be able to run JavaScript tools that were installed via npm. Your versions may be different.
$ npx eslint --version
v9.39.2
$ npx prettier --version
3.8.1
$ npx cypress --version
Cypress package version: 15.10.0
Cypress binary version: 15.10.0
Electron version: 37.6.0
Bundled Node version: 22.19.0
Lint early and often. As you write code, fix problems automatically.
$ npx eslint --fix chat485/js/
$ npx prettier --write chat485/js
chat485run script
You created bin/chat485run earlier in the Run Script section of the Flask Tutorial. Update it now to also build the front end with webpack. Use trap to kill background processes on exit. Start webpack in watch mode in the background so the bundle rebuilds whenever a JavaScript source file changes.
#...

# Kill all background processes in this process group on exit
trap "trap - SIGTERM && kill -- -$$" SIGINT SIGTERM EXIT

# Compile in the background
npx webpack --watch &

# Run development server
flask --app chat485 --debug run --host 0.0.0.0 --port 8000
Run the dev server:
$ ./bin/chat485run
...
* Serving Flask app 'chat485'
Browse to http://localhost:8000/.
Home page
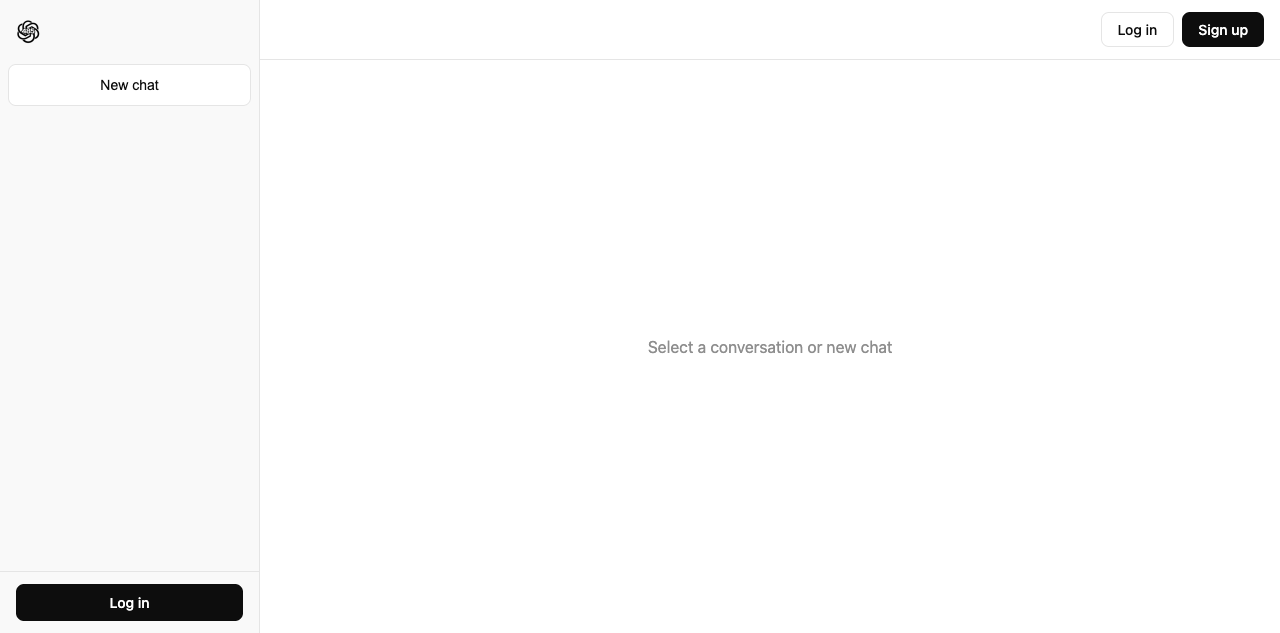
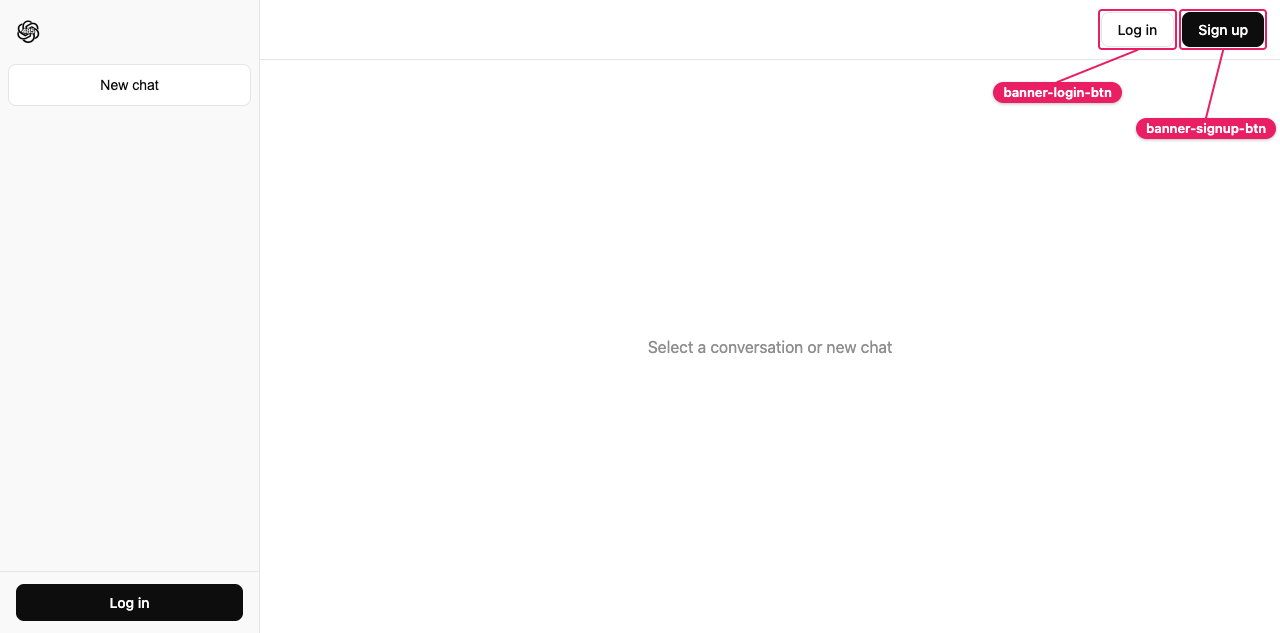
A new user lands on the page logged out, with "Log in" and "Sign up" buttons in the upper right.
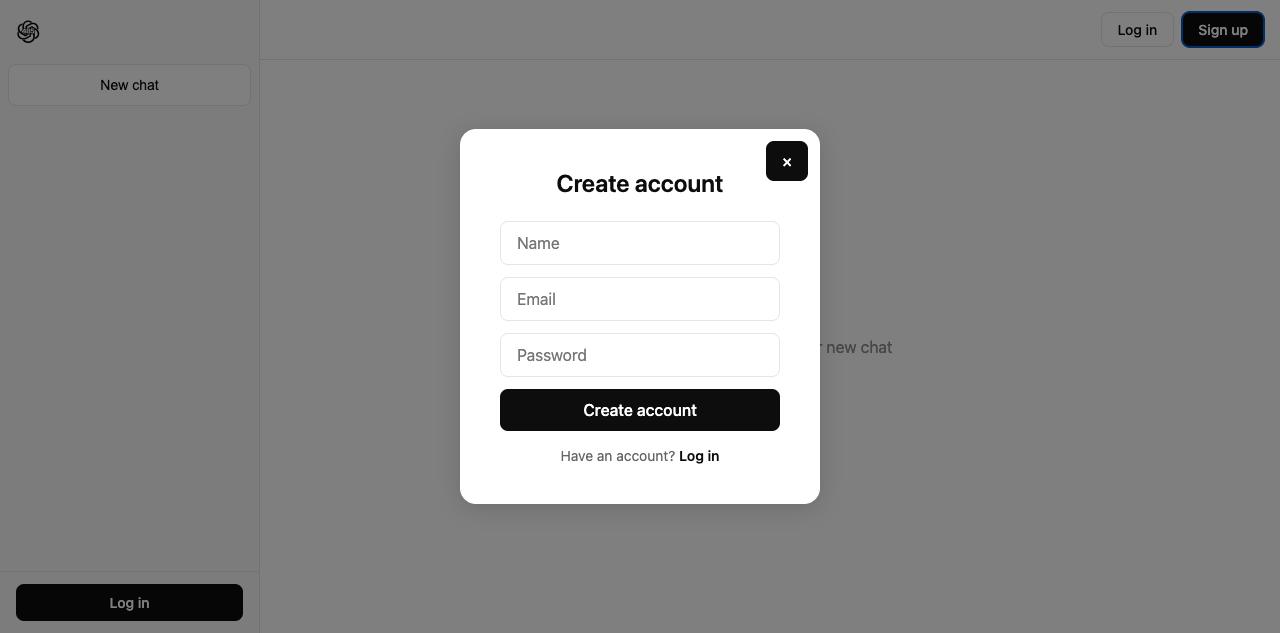
Clicking "Sign up" opens the signup modal.
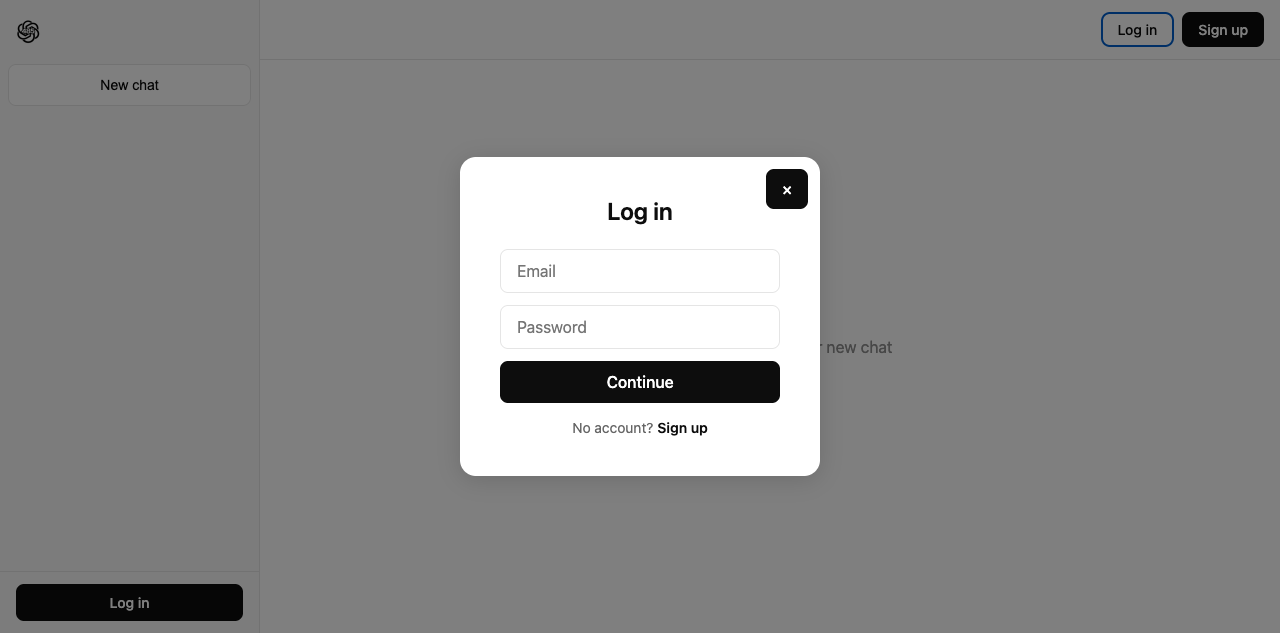
Returning users click "Log in" instead, which opens the login modal.
Once logged in, the sidebar shows the user’s conversations. Pick one to read and send messages.
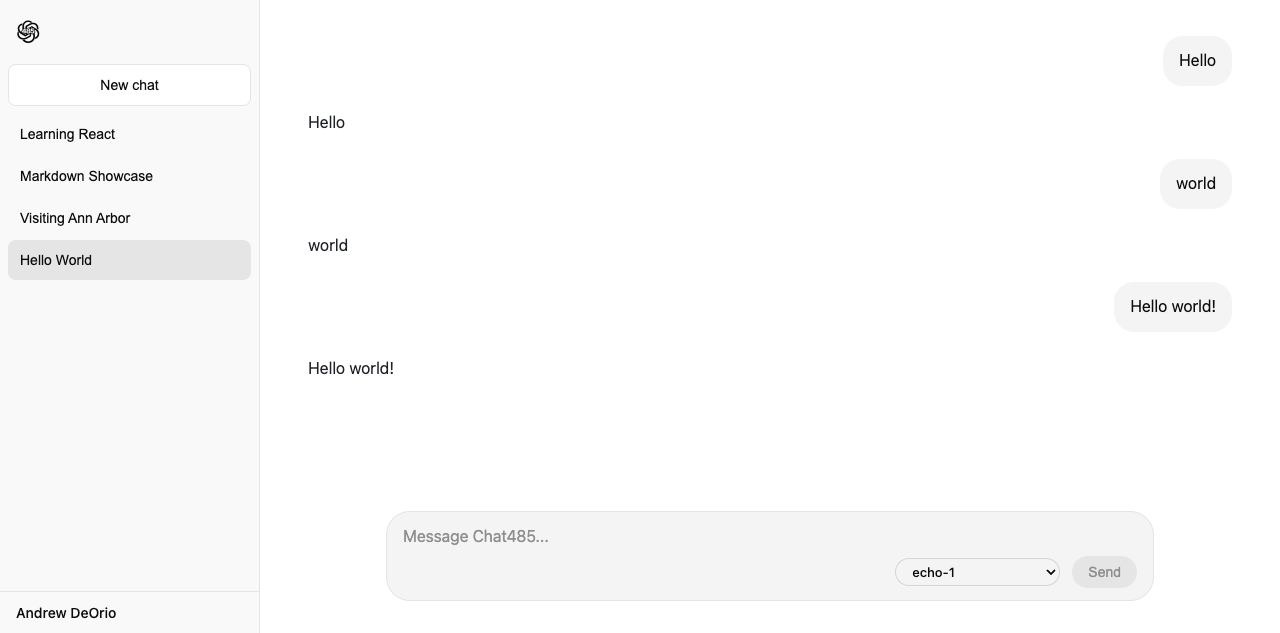
- Conversation list: Sidebar showing all conversations. Each entry can be selected or deleted. Includes a “New chat” button. Mark the active conversation by adding
aria-current="page"to its sidebar<li>. No conversation is marked when none is selected. Styling the marked conversation is optional. - Message list: Displays messages for the selected conversation, or a placeholder in the main area when no conversation is selected. Text entry field for new chat message.
- Model selector: Dropdown populated from
GET /api/v1/models. Shows whichever models the backend returns (echo, Ollama, Anthropic, OpenAI, Gemini, or any OpenAI-compatible provider) and never renders unconfigured paid providers. - Login modal: Heading
"Log in". Email and password form. Includes a button labeled"Sign up"that switches to the signup modal. - Signup modal: Heading
"Create account". Name, email, and password form. Includes a button labeled"Log in"that switches back to the login modal. - Banner buttons:
"Log in"and"Sign up"buttons in the upper right when not logged in. - Settings modal: See Settings.
Exam skill: Write a React component like the conversation list without AI assistance.
Write a React component ConversationList. Fetch conversations from /api/v1/conversations/ and render each as a selectable <li>, adding aria-current="page" to the active conversation and none when nothing is selected. Include a “New chat” button.
Write your answer first, then paste it into a chat for feedback.
You are an exam tutor. I’m studying for a closed-book EECS 485 exam where I can’t use AI, so do not write or correct code for me, and do not reveal the answer even if I ask; give a hint instead. Tell me whether my answer is correct and point me toward any mistake, then give me one follow-up question to try.
Question: [paste]
My answer: [paste]
Model selector
Display a dropdown of available models populated from GET /api/v1/models. Each model is an <option> whose value is the model id (for example <option value="echo-1">), so the selected value is what you send on the message POST. Send the selected model with each message POST so the backend forwards the request to the matching provider. The dropdown only shows models the backend advertises, so unconfigured paid providers never appear. Default to echo-1 so the app works out of the box without any external API keys. To make more models show up in the dropdown, see Model providers.
Message input
Enter submits the message. Trim whitespace first and do not submit blank content (after trim). Clear the textarea after the POST succeeds.
The send button is disabled whenever the trimmed content is blank.
Shift+Enter inserts a newline and does not submit.
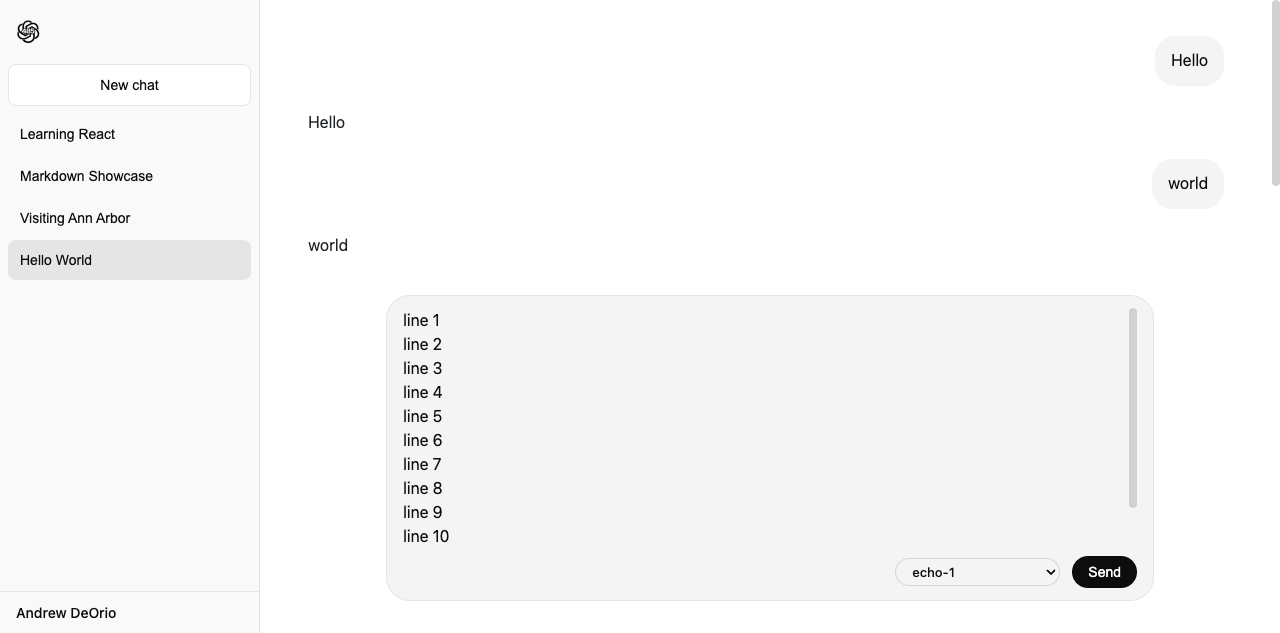
The message textarea grows with content from one line up to ten lines, then scrolls internally. A simple solution is CSS. A JavaScript implementation that produces the same height behavior is also acceptable.
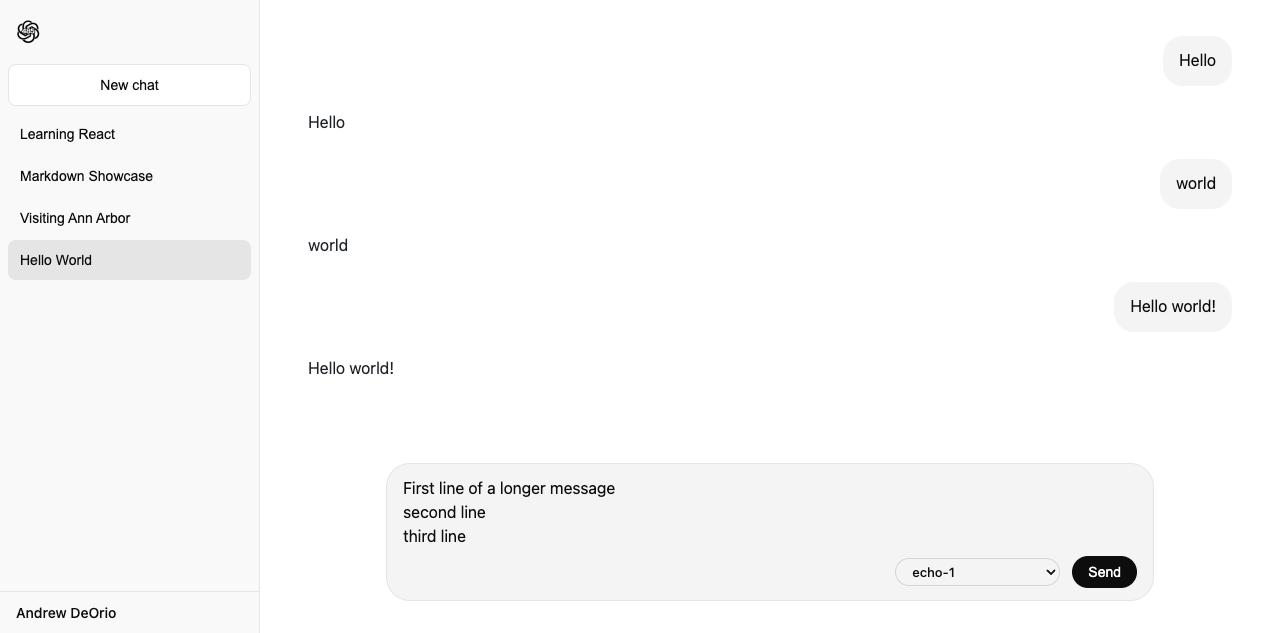
Past ten lines, the textarea stops growing and scrolls internally.
GenAI pro-tip: Ask a chat about approaches to handling keyboard shortcuts in a form.
I have an input form in a React component. Pressing Enter should submit the form, but pressing Shift+Enter should insert a newline. How do keyboard events work in React and what does
event.preventDefaultdo? I am a student learning React.
GenAI pro-tip: Ask a chat about approaches to building an auto-resizing textarea.
I want a
textareato auto-resize from one line up to ten lines as the user types, then start scrolling. Let’s compare CSS and JavaScript approaches and their tradeoffs. I am a student learning React and CSS.
Chat completions API failure
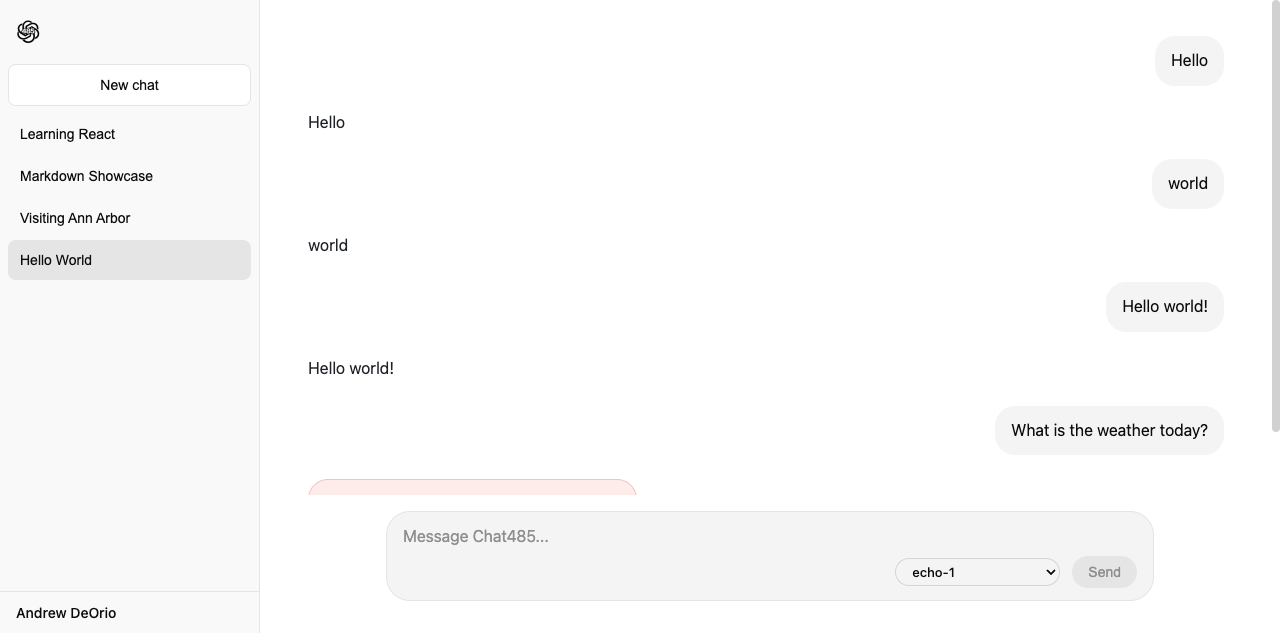
Any chat completions API can fail. A request can exceed the model’s context window, the upstream service can be down, or the network can drop. When that happens, the backend has already saved the user’s message to the database, so it stays. The backend returns HTTP 502 with a JSON body matching the rest of the API’s error shape. No assistant message is saved.
The frontend renders an inline error bubble immediately after the failed user message with a generic message (“Something went wrong, please try again.”). The user’s own message bubble must remain on screen even though the POST failed; render it optimistically before the POST resolves so a network failure does not unrender it. The error bubble is client-side state only. It does not persist across page reload or conversation switch.
Markdown rendering
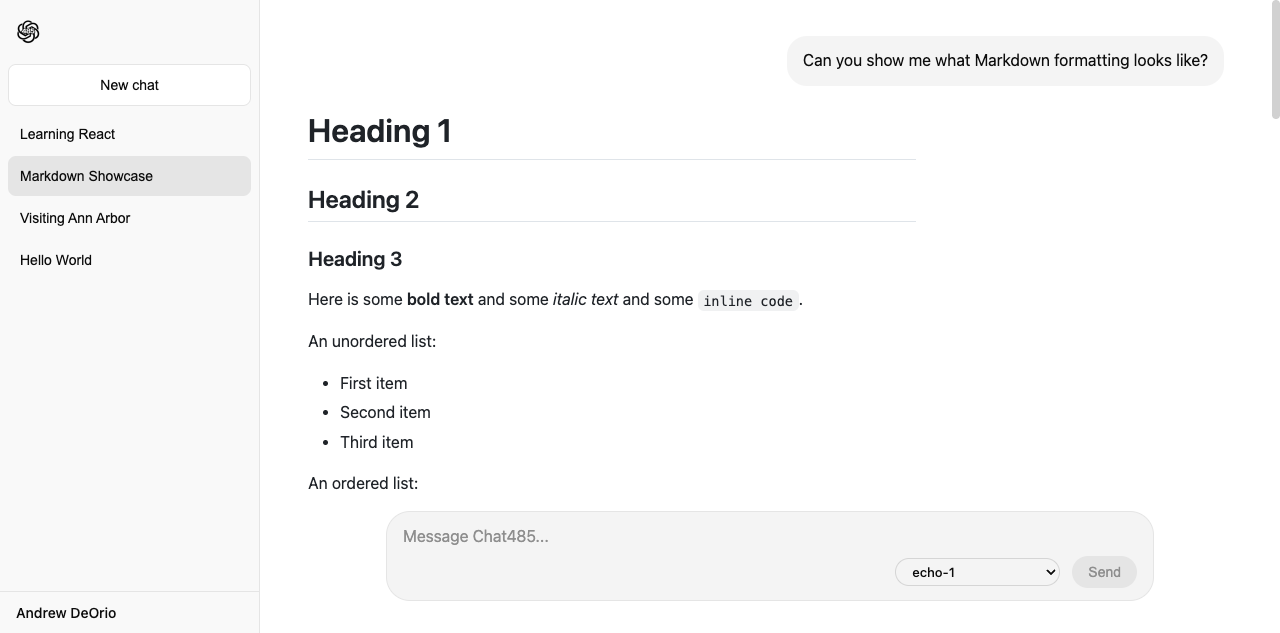
Render every message as Markdown. Format fenced code blocks with syntax highlighting. Use the react-markdown package.
In P2 you rendered this same Markdown on the server; here it moves to the client, where the React app renders it in the browser as messages arrive over the API.
GenAI pro-tip: Ask a chat about approaches to rendering Markdown in a React component.
I want to display assistant messages that contain Markdown syntax like headings, lists, and fenced code blocks in my React app. Let’s brainstorm approaches for parsing and rendering Markdown in the browser and their tradeoffs. I am a student learning React.
My instructor suggested
react-markdownwith theremark-gfmplugin, so let’s focus on how those fit together. I also need fenced code blocks to be syntax-highlighted. Whatreact-markdownplugin handles that, and what CSS classes does it apply to the rendered HTML?
react-markdown renders CommonMark by default. GitHub Flavored Markdown (GFM) extensions (tables, strikethrough, task lists, and autolinks) require the remark-gfm plugin. Fenced code blocks need a separate plugin for syntax highlighting.
import Markdown from "react-markdown";
import remarkGfm from "remark-gfm";
import rehypeHighlight from "rehype-highlight";
import "highlight.js/styles/github.css";

<Markdown remarkPlugins={[remarkGfm]} rehypePlugins={[rehypeHighlight]}>
  {content}
</Markdown>
Add a seed conversation and messages with Markdown syntax (headings, code blocks, lists, tables) to sql/data.sql so you can see the rendering as you build.
Your rendering may look plainer than the screenshot. The autograder checks for h1/h2/h3, strong/em/code, etc. as well as hljs and language-... classes from rehype-highlight. It does not grade CSS. react-markdown plus rehype-highlight emits all of these for you; there is no manual HTML to generate.
Optional: For a more polished GitHub-style appearance on tables, blockquotes, lists, and code blocks, add the github-markdown-css stylesheet to your page (for example, copy github-markdown-light.css into your static CSS directory and link it from index.html the same way as highlight.css) and add the markdown-body class to the element wrapping <Markdown>. This is optional and not graded.
Autoscroll
Autoscroll the message list to the bottom. The scrollable element must be the [data-cy="message-list"] element itself, not a parent or body. The autograder reads scrollTop, scrollHeight, and clientHeight from that element to verify the bottom-aligned state.
In P2 you did this without JavaScript, working around the full-page reload; here a few lines of client-side JavaScript scroll the list directly, with no reload.
GenAI pro-tip: Ask a chat about approaches to scrolling a list to the bottom in React.
I have a list of messages and I want it scroll to the bottom whenever a new message is appended. Let’s brainstorm implementation options. I am a student learning React.
Conversation title
The backend sets the conversation title from the first user message. The frontend discovers this title change by polling GET /api/v1/conversations/<uuid>/ once every 500 milliseconds starting on conversation create. Until the polled response returns a non-null title, render the sidebar row with the literal placeholder text "New conversation". Replace it with the real title the moment it arrives, and stop polling that conversation.
This feature requires lifting state up. The MessageList component knows about the first message and the title in the response, but the conversation title state lives in the ConversationList. Lift the conversation state up to a common parent so both components can read and update it.
GenAI pro-tip: Ask a chat about approaches to sharing state between sibling components.
I’m working on a GenAI chat app. A MessageList component receives the updated conversation title from a network response, but the title is displayed by a sibling ConversationList component. What are the common approaches to sharing state between sibling components in React, and which is most idiomatic here? I am a student learning React.
GenAI pro-tip: Ask a chat about scheduling recurring work from inside a React component.
What is the standard browser API for running a function repeatedly on a fixed interval, and what is the idiomatic way to start and stop it from inside a React component? I am a student learning React.
Performance warning: Asking “is the title ready yet?” every 500 ms wastes about 120 requests per minute on unchanged data. A push model would be cheaper: the backend sends the new title to the frontend the moment it is set, using Server-Sent Events or WebSockets. We use polling here for simplicity.
Pagination
The Message List displays a “Load more” button at the top when older messages are available. Clicking it fetches the next page and prepends the older messages. The API returns messages newest-first, so the frontend reverses each page before displaying. Render the button only when the most recent page response had a non-empty next. When next is the empty string, do not render the button. Autoscroll to the bottom fires on initial load and new messages, but not when loading older messages. Refer to the Message List REST API.
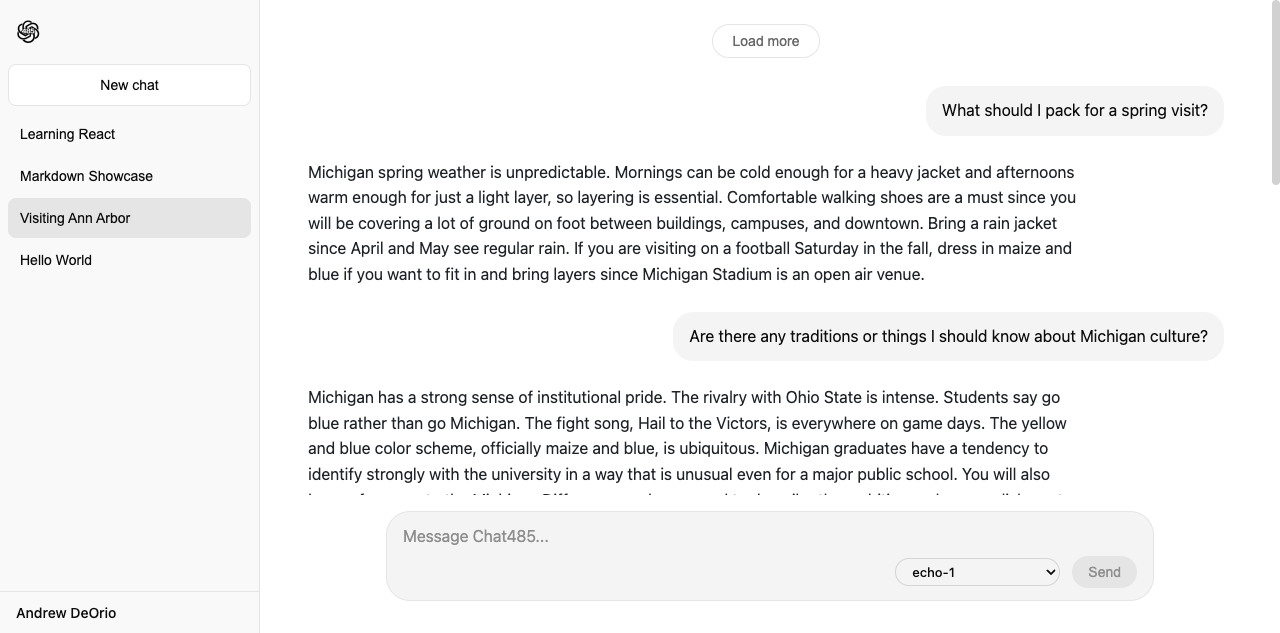
The Conversation List is not paginated. The sidebar scrolls.
Settings
Open the settings modal from the user menu in the sidebar.
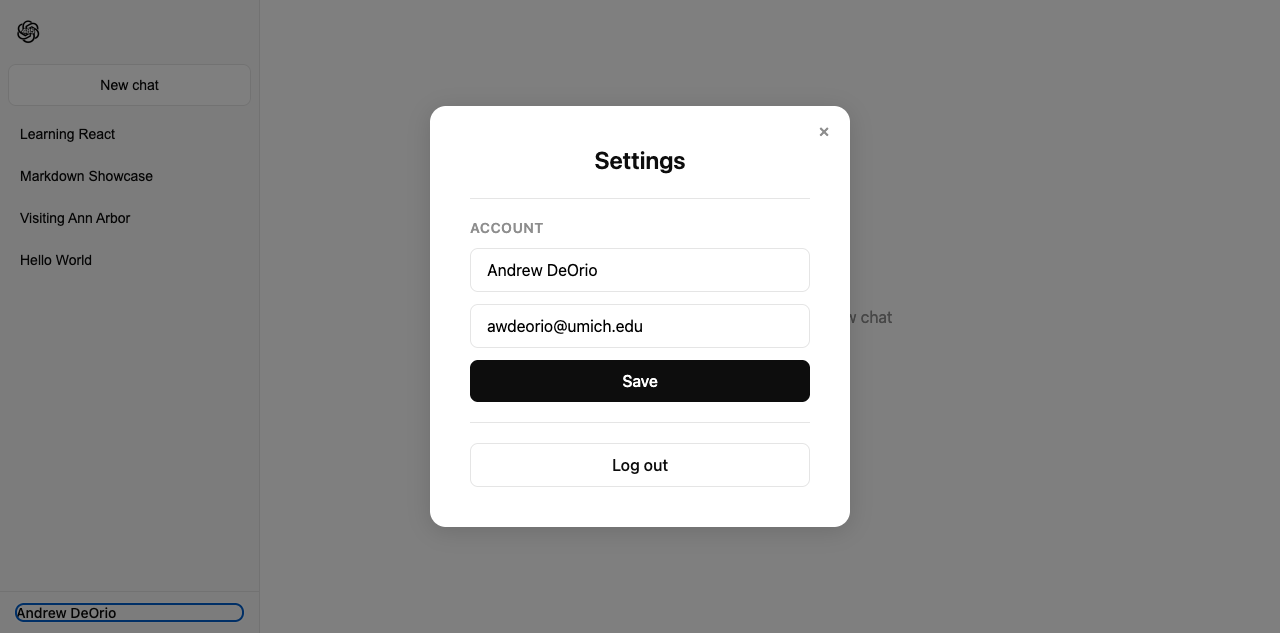
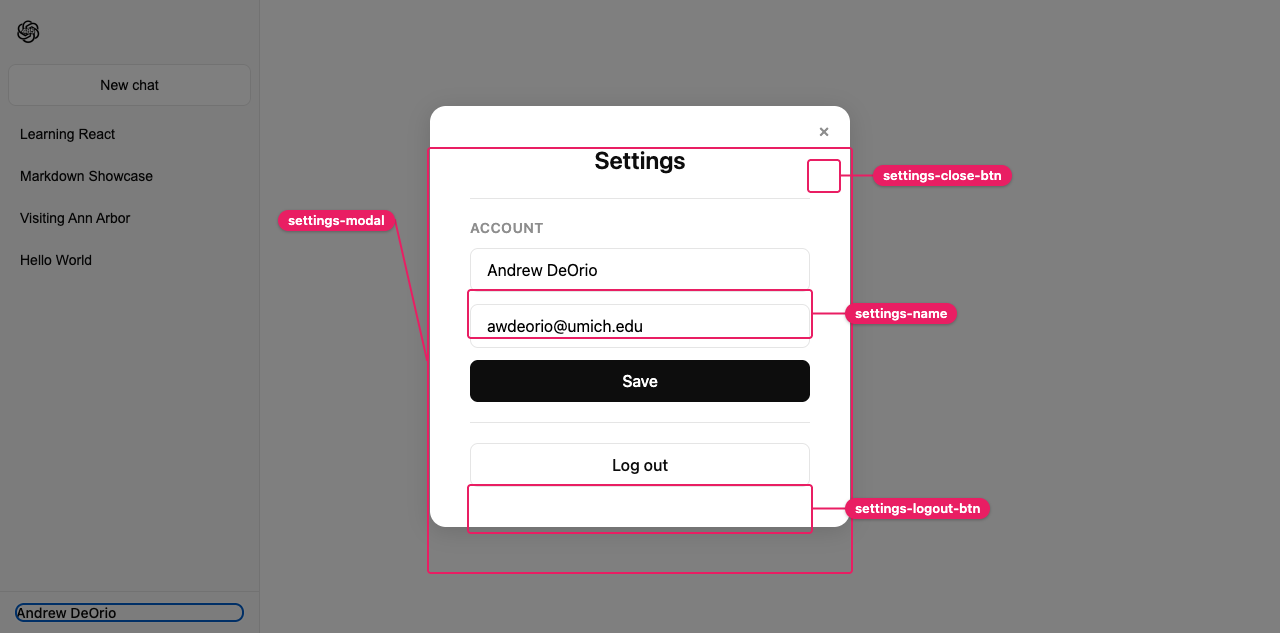
The Account section lets the user edit their name and email. The submit button reads "Save", and a successful save renders the message "Account updated".
A Log out button signs the user out.
Model providers
Adding model providers is optional. The echo server works out of the box. Local Ollama and paid providers (Anthropic, OpenAI, Gemini) carry forward from Project 2: see Ollama local model (Project 2) and Paid providers (Project 2). Every provider speaks the OpenAI chat completions format.
Frontend reach goals
Reach goals are optional extensions. The autograder does not test them.
Reach goals are the place to practice driving an agentic GenAI tool (Claude Code, Cursor, GitHub Copilot agent mode, etc.). Codegen is allowed here, but you are still responsible for every line you submit.
Reach goals carry forward across the Chat485 project sequence. For example, system-prompt customization can stay in your P3 submission.
CSS / styling
Style your pages with CSS. This reach goal originates in Project 1, where you first style static pages, and carries forward here. Add a stylesheet to your static CSS directory and link it from index.html.
Ideas
- Light/dark theme
- Three dot pulse animation while AI is thinking
- Welcome page creates new conversation from first message
- Usage metering
- Voice input with web speech API
- File upload and processing, e.g., for pdfs
Testing
Lint with ESLint and Prettier. Do not add inline suppressions like // eslint-disable; refactor the code instead.
$ npx eslint chat485/js/            # Flag anti-patterns
$ npx eslint --fix chat485/js/      # Fix lint errors automatically where possible
$ npx prettier --check chat485/js   # Check formatting
$ npx prettier --write chat485/js   # Fix formatting
Rebuild the JavaScript bundle and start the backend dev server in one terminal:
$ npx webpack
$ ./bin/chat485run
If you haven’t yet, follow the End-to-end Testing Tutorial, which covers Cypress and the runner UI.
Run Cypress in headless mode in a second terminal. Without arguments it runs every spec under tests/cypress/e2e/:
$ npx cypress run
Open the Cypress runner UI for interactive debugging:
$ npx cypress open
Pitfall: The backend dev server (./bin/chat485run) must already be running in a separate terminal before you launch Cypress.
Pro-tip: In headless mode, Cypress records a video of each run in tests/cypress/videos/ and a screenshot at the point of failure in tests/cypress/screenshots/. Use them to inspect what the UI looked like when a test failed.
Each shipped spec exercises one slice of the frontend.
test_selectors_public.cy.js pins the data-cy= attributes that the hidden grading tests look up.
$ npx cypress run --spec tests/cypress/e2e/test_selectors_public.cy.js
test_accounts_public.cy.js drives the login modal UI, calls POST /api/v1/accounts/sessions, and then DELETE /api/v1/accounts/sessions:
$ npx cypress run --spec tests/cypress/e2e/test_accounts_public.cy.js
test_chat_public.cy.js sends one user message through the chat UI and asserts the assistant reply renders. See Message create:
$ npx cypress run --spec tests/cypress/e2e/test_chat_public.cy.js
test_conversation_public.cy.js reads the conversation list, deletes one conversation, and re-reads its messages. See Conversations list, Conversation delete, and Messages list:
$ npx cypress run --spec tests/cypress/e2e/test_conversation_public.cy.js
Selector contract
The autograder’s hidden Cypress tests locate elements via data-cy= attributes on your JSX. For example:
<button data-cy="login-btn">Log in</button>
data-cy |
Where it goes |
|---|---|
banner-login-btn |
The banner button in the upper right that opens the login modal. |
banner-signup-btn |
The banner button in the upper right that opens the signup modal. |
login-btn |
The header button shown when no user is logged in. Clicking it opens the login modal. |
data-cy |
Where it goes |
|---|---|
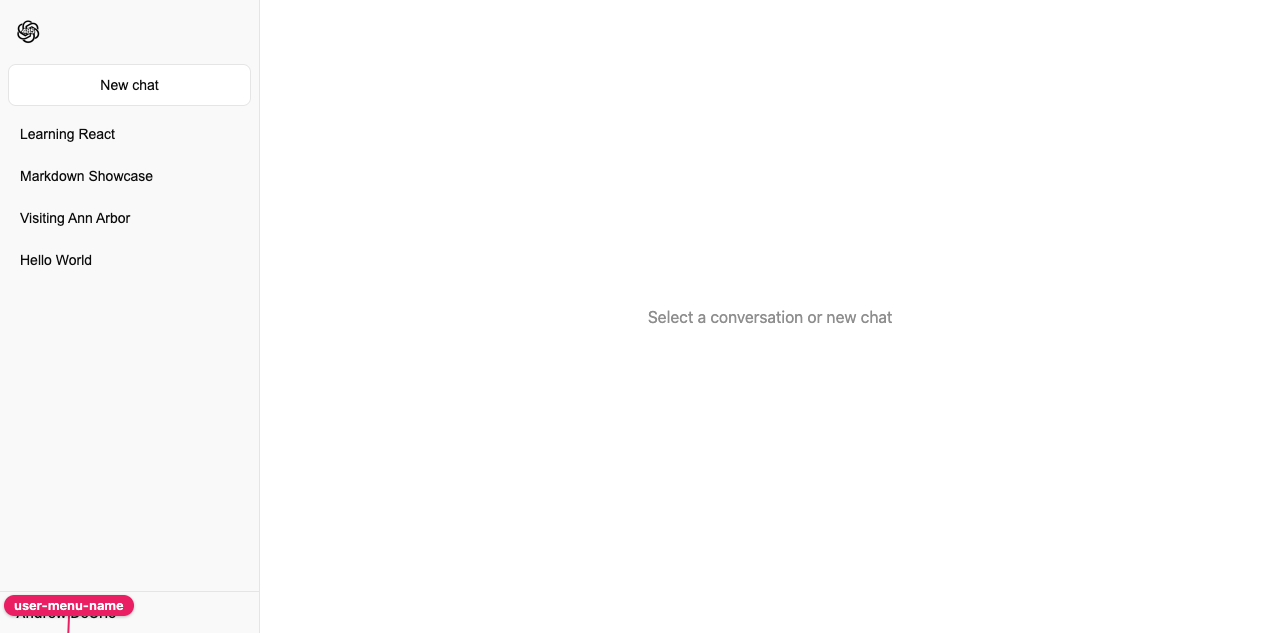
user-menu-name |
The element that displays the logged-in user’s full name. |
settings-btn |
The header button that opens the Settings modal. |
data-cy |
Where it goes |
|---|---|
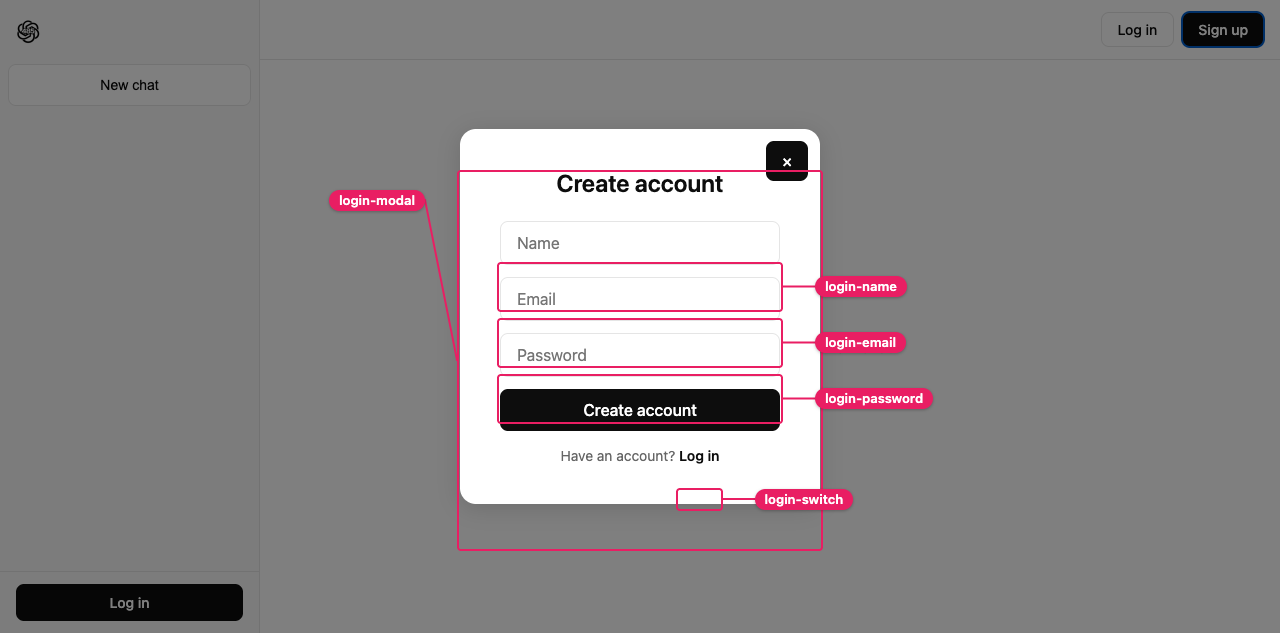
login-modal |
The modal container. Both login mode and signup mode reuse this same value. |
login-name |
The Name input (signup mode only). |
login-email |
The Email input. |
login-password |
The Password input. |
login-switch |
The button that toggles between login and signup modes. |
login-error |
The inline error message shown after a failed login or signup. |
data-cy |
Where it goes |
|---|---|
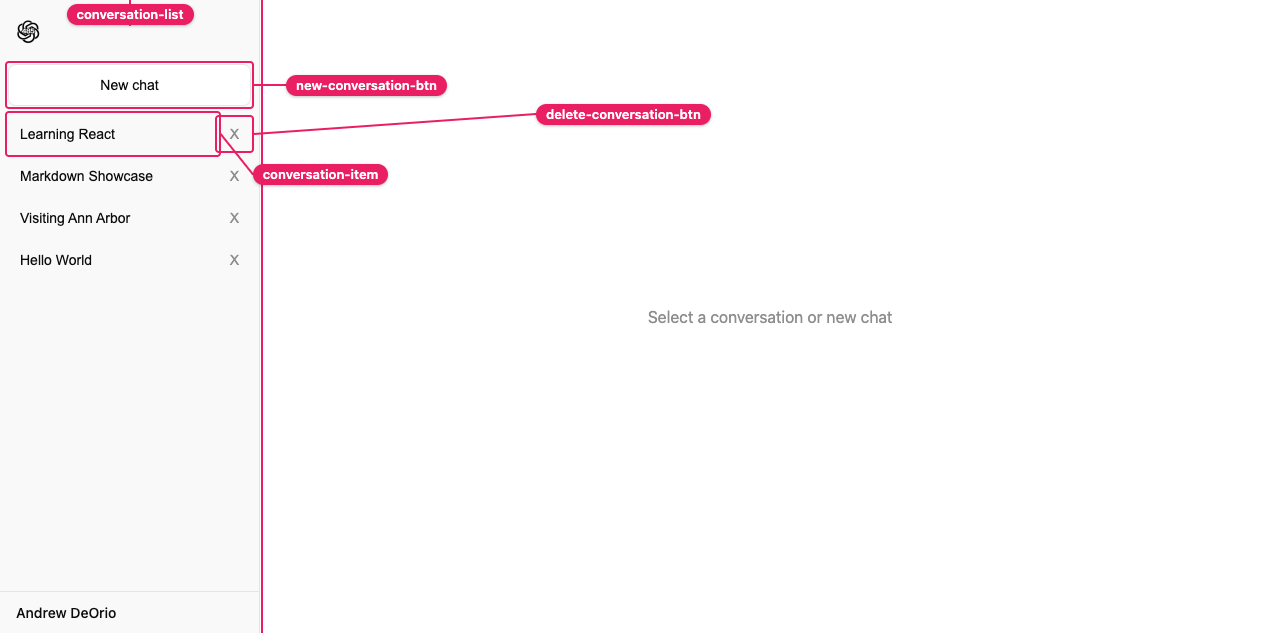
conversation-list |
The sidebar container. |
conversation-item |
Each row in the sidebar (one per conversation). |
new-conversation-btn |
The “New chat” button. |
delete-conversation-btn |
The per-row delete control on each conversation item. |
data-cy |
Where it goes |
|---|---|
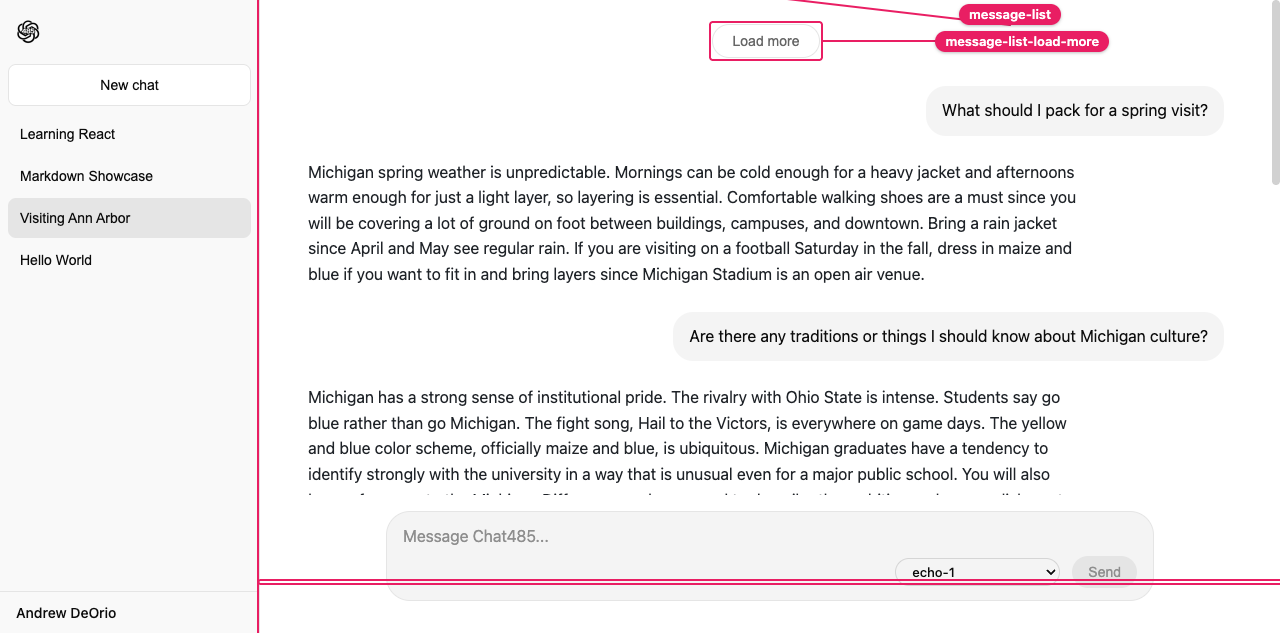
message-list |
The scrollable container that holds all message bubbles. |
message-list-load-more |
The “Load more” button at the top of message-list. |
message-input |
The container at the bottom that wraps the textarea, model selector, and submit button. |
model-selector |
The <select> element that lets the user pick a chat model. |
data-cy |
Where it goes |
|---|---|
message-user |
A user-role message bubble. |
message-assistant |
An assistant-role message bubble. |
message-content |
The rendered Markdown body inside any message bubble. |
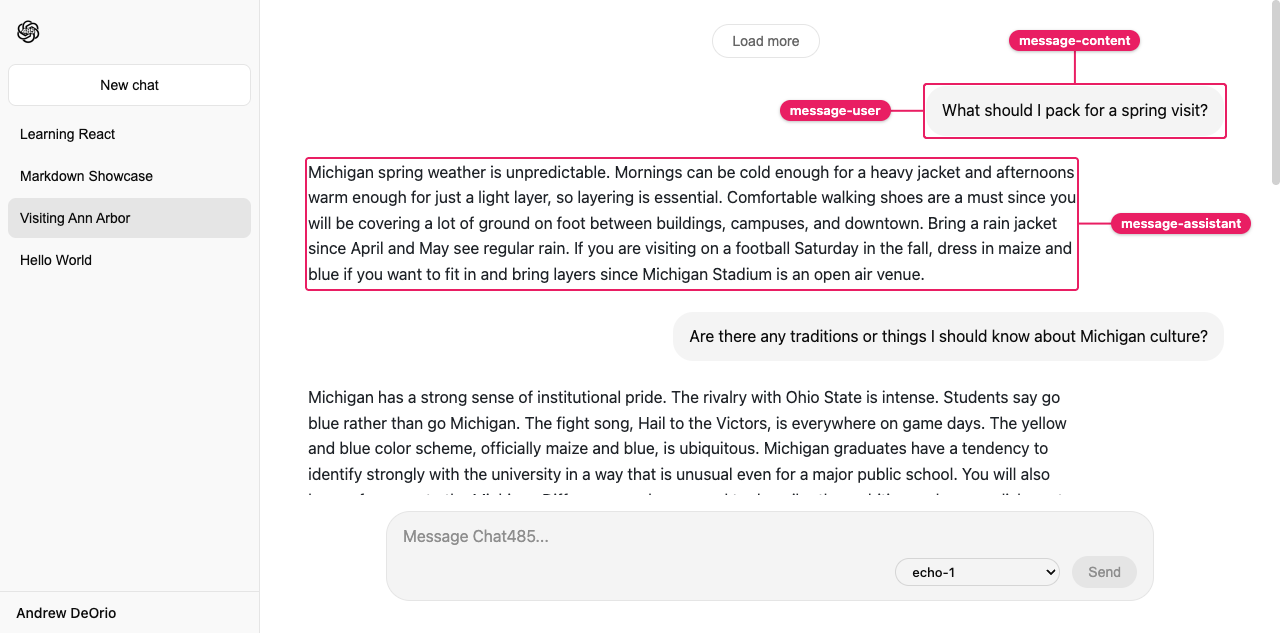
message-error is shown in context under Chat completions API failure.
data-cy |
Where it goes |
|---|---|
settings-modal |
The modal container. |
settings-close-btn |
The button that closes the modal. |
settings-logout-btn |
The Log out button inside the modal. |
settings-name |
The Name field in the Account section. |
Pro-tip: data-cy follows the Cypress Best Practices guide. A dedicated attribute decouples grading from CSS, so you can rename or restructure your styles without breaking the tests.
Race conditions
Async work started inside a useEffect can outlive the state it was started for. Two cases come up in this project:
- Switching conversations: when the user clicks a different conversation while the previous one’s
GET /api/v1/conversations/<uuid>/messages/is still in flight, the late response from the deselected conversation must not overwrite the new conversation’s messages. - Title polling: stop polling a conversation the moment its title arrives, and do not let a deferred poll fire after the component unmounts. Creating a new conversation must not cancel polling for an earlier untitled one. See Conversation title.
Pro-tip: The Data Fetching in React with useEffect Tutorial names this race and shows the cleanup-flag idiom for fixing it.
Pro-tip: The React/JS Debugging Tutorial shows how to inspect component state in React DevTools and step through your useEffect in the browser debugger.
Exam skill: Explain the stale-response race and how to prevent it, without AI assistance.
When the user switches conversations while the previous one’s GET /api/v1/conversations/<uuid>/messages/ is still in flight, the late response can overwrite the new conversation’s messages. Explain why this happens, and how a cleanup flag in the useEffect (together with the right dependency array) prevents it.
Write your explanation first, then paste it into a chat for feedback.
You are an exam tutor. I’m studying for a closed-book EECS 485 exam where I can’t use AI, so do not answer the question for me, and do not reveal the answer even if I ask; give a hint instead. Tell me whether my explanation is correct and point me toward any mistake, then give me one follow-up question to try.
Question: [paste]
My explanation: [paste]
Write your own tests
Write your own end-to-end tests in tests/cypress/e2e/test_student.cy.js. Each it() block is one test.
Run your tests the same way as the instructor-written tests:
$ npx cypress run --spec tests/cypress/e2e/test_student.cy.js
Your tests are graded by mutation testing and also linted. Target distinct spec-mandated behavior the public specs do not already cover.
GenAI pro-tip: Ask a chat to explain one of the instructor-written Cypress tests.
$ cat tests/cypress/e2e/test_chat_public.cy.js | pbcopy  # macOS
$ cat tests/cypress/e2e/test_chat_public.cy.js | clip.exe  # WSL
Walk me through how a Cypress test works. I am a student learning end-to-end web app testing. Help me understand, do not write tests for me.
[paste test]
Submitting and grading
One team member should register your group on the autograder.
Submit a tarball to the autograder, which is linked from https://eecs485.org. Include the --disable-copyfile flag only on macOS.
$ tar \
  --disable-copyfile \
  --exclude '*__pycache__*' \
  -czvf submit.tar.gz \
  bin \
  chat485 \
  sql \
  tests/cypress/e2e/test_student.cy.js
The autograder uses its own build, dependency, and lint configuration. Do not add or change dependencies, and do not relax lint rules.
Public tests run with their full output visible on the autograder. Private tests show only pass/fail status. No additional tests run after the deadline.
WARNING The autograder for this project can be slow to grade your submissions. Allow plenty of time for submitting this project to the autograder.
Testing
Run these before submitting; the autograder runs the same checks plus hidden ones.
Lint:
$ ruff check chat485
$ ruff format --check chat485
$ npx eslint chat485/js tests/cypress/e2e/test_student.cy.js
$ npx prettier --check chat485/js tests/cypress/e2e/test_student.cy.js
Backend tests:
$ pytest -v tests/
Frontend tests. start-server-and-test runs the backend.
$ npx start-server-and-test --expect 200 './bin/chat485run' http://127.0.0.1:8000 'npx cypress run'
chat485test script
Write a shell script bin/chat485test that does this:
- Stop on errors and print commands
- Run
npx eslint chat485/js - Run
npx prettier --check chat485/js - Run
ruff check chat485 - Run
ruff format --check chat485 - Run the backend tests with
pytest -v tests - Run the end-to-end tests with
npx start-server-and-test --expect 200 './bin/chat485run' http://127.0.0.1:8000 'npx cypress run'
Mutation testing
We autograde the tests you write in tests/cypress/e2e/test_student.cy.js. See Write your own tests for the file and run command.
A suite must run within the autograder’s time limit and contain 10 or fewer it() blocks. Each it() title must be one line, unique within the file, start with a letter or digit, and contain only letters, digits, _, and -, for example it("01-test-feature", ...) or it("02-validate-data", ...).
To grade your tests, we use a set of intentionally buggy instructor solutions called mutants. You earn points for catching the bugs.
- We rebuild the app with the correct solution and run your tests.
- Tests that pass are valid.
- Tests that fail are invalid; they falsely report a bug and earn no credit.
- We run your valid tests against each buggy solution (mutant).
- If any of your tests fails, you caught the bug.
- You earn points for each mutant you catch.
Every mutant is a frontend bug, so only Cypress tests can catch them. The more distinct behaviors your tests pin down, the more mutants you catch.
Acknowledgments
Original project written by Andrew DeOrio awdeorio@umich.edu, 2026.
This document is licensed under a Creative Commons Attribution-NonCommercial 4.0 License.