chat485
EECS 485 P2: Server-side Dynamic Pages
A ChatGPT clone implemented with server-side dynamic pages.
Due 11:59pm ET September 29, 2026. This is a group project to be completed in groups of two or three.
Change Log
F26 release.
- 2026-09-21: Updated the screenshots that show the sidebar so the per-conversation delete button is visible. It was previously styled to appear only on hover, so it did not show up in a screenshot. See Pages overview.
- 2026-09-22: Added a “Using the model” section to the Flask Tutorial that queries the database from a view and renders the result in a template.
- 2026-09-28: Fixed an autograder test that required the “Load older messages” link to be written with no spaces around the
hrefattribute’s equals sign. Any valid HTML spelling of the attribute is accepted; the spec has always constrained only the?before=<messageid>cursor. See Pagination. - 2026-09-30: Fixed an autograder test that rejected some valid solutions for scrolling to the bottom. The required behavior has not changed. We will re-run the autograder on affected submissions as needed. See Scroll to bottom.
Introduction
Build a generative AI chat application using server-side dynamic pages. Every page is rendered on the server with a Jinja template and returned as a complete HTML document. The server uses an LLM as a black box.
The learning goals of this project are server-side dynamic pages, CRUD over a SQL database, sessions and access control, LLM integration, and guided use of generative AI tools.
Products like ChatGPT look like a single smart system, but they are really two parts: a stateless API and a stateful application. The LLM API takes messages in and returns a response. It remembers nothing. The backend application stores conversations in a database, manages sessions, and assembles message history into a prompt for each API call. In this project, you build the application layer and learn that conversation continuity comes from your code, not the model.
Glossary
- Model (LLM, Large Language Model): A stateless neural network that takes a list of messages as input and returns a response. Examples include
gpt-5from OpenAI andclaude-sonnet-4-6from Anthropic. - Chat application (harness): The stateful layer wrapped around a stateless model. It stores conversations, manages sessions, and orchestrates each request by assembling message history and a system prompt into the model’s input. Chat485 and ChatGPT are chat applications.
- Conversation: A sequence of user and assistant messages on a single topic, stored by the chat application and shown as one item in the sidebar.
- User message: What the human sends.
- Assistant message: What the model sends.
- System prompt: Instructions from the chat application that shape the model’s behavior, e.g., its name and response style.
- Prompt: The full input sent to the model on each request, including the system prompt and all prior user and assistant messages in the conversation.
- Response: The model’s generated output.
- Session: The server’s record of one browser, tracked with a cookie. A session can be anonymous or linked to a logged-in user.
Generative AI policy
A learning goal of this project is guided use of generative AI tools. Use GenAI to learn, not to write the code you submit.
Core rule: Do not use GenAI to write any code you submit for the core project. This includes the Flask route handlers, the database code, the SQL queries and schema, the Jinja templates, your tests/test_student.py test suite, and the bin/ shell scripts. CSS and styling are fine. If GenAI writes your route handler, the next bug feels like magic.
For learning: Use GenAI to explain concepts, compare approaches, and surface tradeoffs, then write the code yourself. Identify yourself as a student in the prompt so the model explains rather than codes. Example:
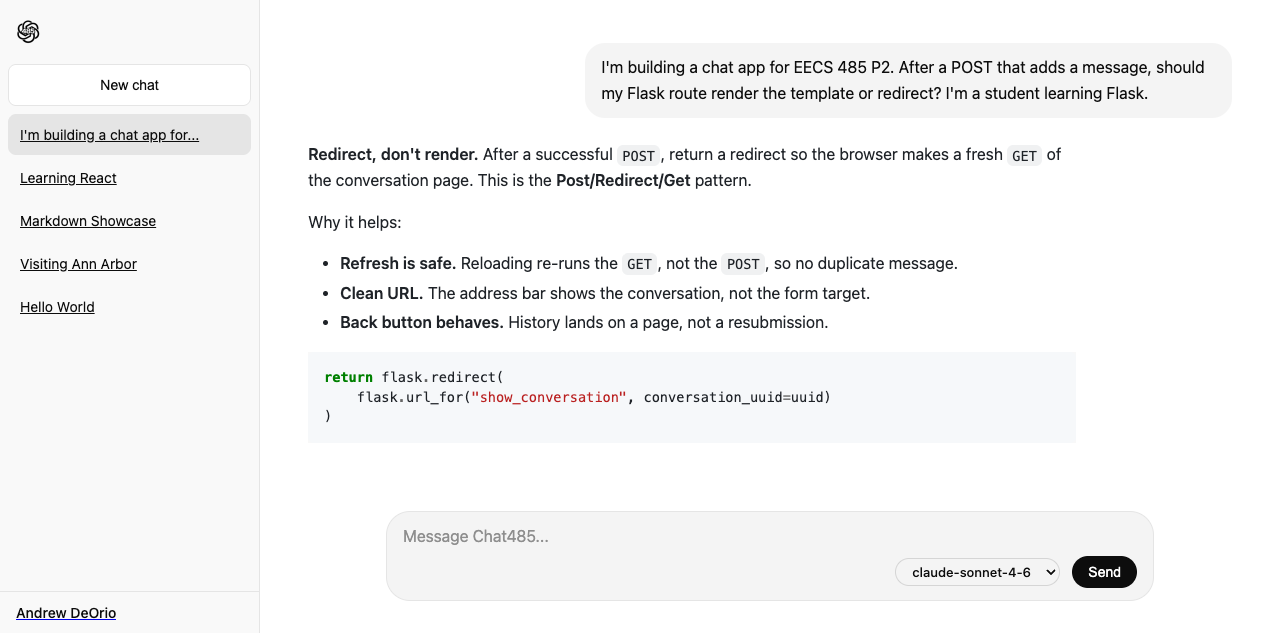
What is the difference between a Flask route that handles GET and one that handles POST, and when does a POST handler redirect instead of rendering a template? I am a student learning Flask.
Exceptions: Codegen, including agentic tools, is allowed for reach goals.
Your responsibility: You are responsible for every line you submit. If you cannot explain a line, you should not have submitted it.
GenAI pro-tip: U-M GPT is free for U-M students. Pick a recent model, such as “GPT-5.6 Sol”, or a model with reasoning enabled, such as “GPT-5.5 Reasoning” (model names at the time of this writing). Reasoning models generally perform better on engineering tasks.
GenAI pro-tip: To chat about the spec, include it as context.
If you’re using U-M GPT, first save the spec as a PDF and upload it. (It can’t browse the web and only accepts PDFs.) With this page open in your browser, print to PDF (Cmd+P on macOS, Ctrl+P on Windows and WSL) and choose “Save as PDF”. Skip this step if your chat can browse the web.
I’m a student working on EECS 485 Project 2, a server-side Flask chat app. The spec is here: https://eecs485staff.github.io/p2-chat485-serverside/ Act as a tutor. Explain concepts, compare approaches, and point me to the relevant spec section or tutorial, but don’t write code I’ll submit (Flask route handlers, SQL, or Jinja templates); I’ll write that myself. Cite the spec section your answer draws from so I can verify it, and if the spec doesn’t cover something, say so instead of guessing.
My question: How do I get started?
Setup
If your group has already followed the setup tutorials, you can skip to Fresh install.
Group registration
Register your group on the Autograder.
Project folder
Create a folder for this project. Your folder location might be different.
$ pwd
/Users/awdeorio/src/eecs485/p2-chat485-serverside
Version control
Set up version control using the Version control tutorial.
After you’re done, you should have a local repository with a “clean” status and your local repository should be connected to a remote GitHub repository.
$ git status
On branch main
Your branch is up-to-date with 'origin/main'.

nothing to commit, working tree clean
$ git remote -v
origin	https://github.com/awdeorio/p2-chat485-serverside.git (fetch)
origin	https://github.com/awdeorio/p2-chat485-serverside.git (push)
You should have a .gitignore file (instructions).
Starter files
Download and unpack the starter files in your project directory.
$ pwd
/Users/awdeorio/src/eecs485/p2-chat485-serverside
$ wget https://eecs485staff.github.io/p2-chat485-serverside/starter_files.tar.gz
$ tar -xvzf starter_files.tar.gz
Move the starter files into your project directory and remove the original folder.
$ mv starter_files/* .
$ rmdir starter_files
You should have these files.
$ tree
.
├── AGENTS.md
├── chat485
│   └── echo.py
├── CLAUDE.md
├── pyproject.toml
├── requirements.txt
└── tests
    └── ...
AGENTS.md, CLAUDE.md |
The Generative AI policy, in a form coding agents follow |
requirements.txt |
Python package dependencies matching autograder |
pyproject.toml |
Chat485 Python package configuration |
chat485/echo.py |
Staff-provided OpenAI-compatible chat completions echo server |
tests/ |
Public pytest tests |
Before making any changes to the clean starter files, it’s a good idea to make a commit to your Git repository.
Python virtual environment
Create a Python virtual environment inside of the project directory using the Python Virtual Environment Tutorial.
Pitfall: Don’t forget to activate your virtual environment at the start of every coding session or new shell.
$ source env/bin/activate
You should now have Python tools and third party packages installed locally. Notice that the path to python is in the virtual environment (p2-chat485-serverside/env/bin).
$ which python
/Users/awdeorio/src/eecs485/p2-chat485-serverside/env/bin/python
Sanity-check your Flask version. Your version may be different, but they should match. If not, re-run pip install -r requirements.txt.
$ flask --version
Python 3.12.0
Flask 3.1.2
Werkzeug 3.1.5
$ grep -i ^flask requirements.txt
Flask==3.1.2
Install utilities
Install sqlite3.
Linux and Windows Subsystem for Linux
$ sudo apt-get install sqlite3
MacOS
$ brew install sqlite3
chat485install script
Write an installation shell script bin/chat485install. It creates a Python virtual environment and installs the back end.
#!/bin/bash
set -Eeuo pipefail
set -x

# Python virtual environment
python3 -m venv env
source env/bin/activate

# Install back end
pip install -r requirements.txt
pip install -e .
Make your script executable and run it.
$ chmod +x bin/chat485install
$ ./bin/chat485install
Fresh install
Here’s how to start over with a fresh install. This removes your database and reinstalls dependencies.
$ deactivate  # If your virtual environment is activated
$ rm -rf env var
$ ./bin/chat485install
$ source env/bin/activate
Database
If you’re new to SQL, take a look at the w3Schools SQL Intro.
This project assumes you have completed the SQLite Tutorial.
chat485db script
Write a database management shell script bin/chat485db following the Database management shell script section of the SQLite Tutorial. Your script should support these subcommands:
$ ./bin/chat485db create
$ ./bin/chat485db destroy
$ ./bin/chat485db reset
Schema
Create sql/schema.sql to create four tables: users, sessions, conversations, and messages. The list below describes the tables and columns. Include the line PRAGMA foreign_keys = ON; at the top of schema.sql so SQLite enforces foreign key constraints.
userstableuserid, integer, primary key, automatically incremented withAUTOINCREMENTfullname, at most 255 charsemail, at most 255 chars, uniquepassword, at most 255 charscreated,DATETIMEtype, automatically set by SQL engine to current date/time
sessionstable- The column design of the sessions table is up to you. Deleting a user should automatically remove their session rows. See Sessions for how the backend uses the table.
conversationstableconversationid, integer, primary key, automatically incremented withAUTOINCREMENTuuid, at most 36 chars, unique. This is the public identifier used in URLs. Use a canonical lowercase-hex UUID, the 36-char8-4-4-4-12form produced bystr(uuid.uuid4())(for example550e8400-e29b-41d4-a716-446655440000).sessionid, at most 36 chars, nullable, foreign key tosessions. Set on conversations created by an anonymous session;NULLon conversations owned by a logged-in user.userid, integer, nullable, foreign key tousers. Set on conversations owned by a logged-in user;NULLon anonymous conversations.title, at most 255 chars, nullable.created,DATETIMEtype, automatically set by SQL engine to current date/time- Deleting a session or user should automatically remove the conversations linked to it.
- Exactly one of
sessionidanduseridis set per row, never both and never neither. Enforce this with aCHECKconstraint.
messagestablemessageid, integer, primary key, automatically incremented withAUTOINCREMENTconversationid, integer, foreign key toconversationsrole, at most 20 chars. One ofuser,assistant, orsystem.content,TEXTtypecreated,DATETIMEtype, automatically set by SQL engine to current date/time- Deleting a conversation should automatically remove its messages.
Every column listed above is required (see NOT NULL) unless explicitly marked optional or nullable. PRIMARY KEY and DEFAULT attributes automatically imply the NOT NULL constraint.
GenAI pro-tip: Several tables should automatically remove rows when a row in a related table is deleted. Ask a chat how to express this in a SQL schema before you write it yourself.
I’m writing a SQLite schema and want deleting a row in a parent table to automatically delete the related rows in a child table. Explain the foreign-key option that does this and how to declare it. I am a student learning SQL; explain the concept, do not write my schema.
GenAI pro-tip: The conversations table carries two nullable foreign keys (sessionid and userid) with a CHECK constraint that exactly one is set. Ask a chat to explain the tradeoffs of this design before you write the schema yourself.
A
conversationstable can be owned by either an anonymous session or a logged-in user, never both. I’m comparing two designs: two nullable foreign keys with aCHECKthat exactly one is set, versus a separate owner table. Walk me through the tradeoffs of each. I am a student new to database design; explain the concepts, do not write my schema.
With schema.sql written, you should pass one unit test.
$ source env/bin/activate  # Make sure virtual environment is activated
$ pytest -v tests/test_database_public.py::test_sql_schema
Sessions
The backend tracks one session per browser using a cookie. The session implementation supports anonymous browsing while still keeping each user’s conversation history separate.
A write request (a form POST) with no cookie mints a fresh session UUID and inserts a row into the sessions table with no user attached. Anonymous users can create and view conversations the same way logged-in users can; each anonymous session sees only its own conversations.
A read request (a page GET) never mints a session. An HTTP GET must be safe: it reports whatever session it finds, and finds none for a first-time visitor, rather than creating one as a side effect.
Logging in or signing up makes the user’s conversations visible in any future login, including anonymous conversations from this browser and conversations they previously owned on any browser. The backend does two things:
- Claim anonymous conversations. Every conversation currently linked to this session by
sessionidgetsuseridset to the authenticated user and itssessionidcleared, so it now belongs to the user. - Rotate the sessionid. The backend mints a fresh session UUID, inserts a new
sessionsrow linked to the user, deletes the old session row, and sets the new sessionid cookie on the response.
Logging out deletes the session row and clears the sessionid cookie. The next write request from the same browser mints a fresh anonymous session, the same path a first-time visitor takes.
GenAI pro-tip: This design keeps session state in a database table and stores only an opaque UUID in the cookie. Ask a chat to compare that approach with a stateless one before you build it yourself.
A web app tracks sessions by storing a row per session in a database and putting only an opaque UUID in the cookie. Compare that with a stateless approach that puts signed session data directly in the cookie. What are the tradeoffs around server storage, revoking a session, and cookie size? I am a student new to web programming; explain the concepts, do not write my code.
Exam skill: Explain why a GET must not mint a session.
A write request with no cookie mints a fresh session, but a page GET never does. Explain why, in terms of HTTP safe methods, and what could go wrong if a GET created a session as a side effect.
Write your explanation first, then paste it into a chat for feedback.
You are an exam tutor. I’m studying for a closed-book EECS 485 exam where I can’t use AI, so do not answer the question for me, and do not reveal the answer even if I ask; give a hint instead. Tell me whether my explanation is correct and point me toward any mistake, then give me one follow-up question to try.
Question: [paste]
My explanation: [paste]
Data
Create sql/data.sql to add initial data for each table. Do not specify created timestamps in your INSERT statements; let the SQL engine fill them in automatically.
Paste the hashed (“encrypted”) password directly into data.sql. It looks like this: sha512$34e94a05$7eaca2b4, explained later under Password storage. The plain text password for awdeorio@umich.edu is chickens.
Seed the database with:
- The awdeorio user (
userid = 1), full nameAndrew DeOrio, emailawdeorio@umich.edu. - A
sessionsrow with session UUID550e8400-e29b-41d4-a716-446655440000linked to awdeorio (userid = 1). - Two conversations owned by awdeorio:
Hello WorldandVisiting Ann Arbor, with their messages.
Reproduce the seed contents in docs/chat485db-dump.txt for the awdeorio user, the seed sessions row, and conversations 1 (“Hello World”) and 2 (“Visiting Ann Arbor”) with their messages. Tests pin the titles and message contents, not the timestamps; your timestamps will differ and that is fine. You may add more rows for your own development or manual testing, but do not change the provided conversations or messages.
GenAI pro-tip: Write a few INSERT statements by hand to learn the syntax, then paste rows from docs/chat485db-dump.txt and ask a chat to reformat the rest.
Reformat each row in this database dump into a SQL
INSERTstatement. Transcribe the values exactly; do not create or modify any data.[Paste rows from the dump here.]
With data.sql written, you should pass one unit test.
$ pytest -v tests/test_database_public.py::test_sql_data
Make sure both database tests pass before moving on. The other tests rely on a working database and bin/chat485db script.
Exam skill: Create an SQL table without AI assistance.
Write the CREATE TABLE for a hypothetical attachments table. Each row has its own id, belongs to one messages row, and stores a filename and a created timestamp. When a message is deleted, its attachments go too.
Write your answer first, then paste it into a chat for feedback.
You are an exam tutor. I’m studying for a closed-book EECS 485 exam where I can’t use AI, so do not write or correct code for me, and do not reveal the answer even if I ask; give a hint instead. Tell me whether my answer is correct and point me toward any mistake, then give me one follow-up question to try.
Question: [paste]
My answer: [paste]
Server-side Chat485
Build the Flask application that renders pages and handles form submissions.
Setup
Complete the Flask Tutorial.
You should now have a directory containing a chat485 Python module.
$ tree chat485 -I '__pycache__'
chat485
├── __init__.py
├── config.py
├── model.py
├── static
│   └── css
│       └── style.css
├── templates
│   └── index.html
└── views
    ├── __init__.py
    └── index.py
Run the Flask development server.
$ flask --app chat485 --debug run --host 0.0.0.0 --port 8000
Navigate to http://localhost:8000/. You should see the “hello world” page from the Flask Tutorial, which confirms your app is wired up. You’ll replace it with the real home page next.
Lint early and often. As you write code, fix style problems automatically.
$ ruff check --fix chat485
$ ruff format chat485
Commit these changes and push to your Git repository.
chat485run script
Write a shell script bin/chat485run that starts the development server on port 8000.
#!/bin/bash
set -Eeuo pipefail

# Make sure database exists
if [ ! -e var/chat485.sqlite3 ]; then
  echo "Error: can't find database var/chat485.sqlite3"
  echo "Try: ./bin/chat485db create"
  exit 1
fi

set -x
flask --app chat485 --debug run --host 0.0.0.0 --port 8000
Reset the database and start the server.
$ ./bin/chat485db reset
$ ./bin/chat485run
Navigate to http://localhost:8000/.
Chat completions API
We ship an OpenAI-compatible chat completions endpoint (chat485/echo.py) that echoes messages back to the user. Your forwarding code (see Forwarding the request) calls it exactly as it would a real LLM provider.
Register the echo server in chat485/__init__.py:
import chat485.echo  # noqa: E402
import chat485.model  # noqa: E402
import chat485.views  # noqa: E402
Try the echo server end-to-end from the command line:
$ brew install httpie  # macos
$ apt install httpie   # WSL
$ http POST http://localhost:8000/api/v1/chat/completions \
    model=echo-1 \
    messages:='[{"role": "user", "content": "Hello world"}]'

{
    "choices": [
        {
            "finish_reason": "stop",
            "index": 0,
            "message": {
                "content": "Hello world",
                "role": "assistant"
            }
        }
    ],
    "created": 1747055123,
    "id": "chatcmpl-7b3c2d1e4f5a67890abcdef123456",
    "model": "echo-1",
    "object": "chat.completion"
}
The echo server returns the last user message regardless of the system prompt and earlier messages. Sending the full message history is how a stateless model would know about the conversation so far.
The echo server enforces a hard-coded context window of 8000 characters across all messages in a single request, including the system prompt. Requests over the limit return HTTP 400 with an OpenAI-style error body. Real providers enforce similar limits in tokens. The echo server uses characters so it is deterministic and easy to test.
$ http POST http://localhost:8000/api/v1/chat/completions \
    model=echo-1 \
    messages:="$(python3 -c 'import json; print(json.dumps([{"role":"user","content":"x"*8001}]))')"

{
    "error": {
        "code": "context_length_exceeded",
        "message": "Request exceeds context window of 8000 characters (got 8001)."
    }
}
Pages overview
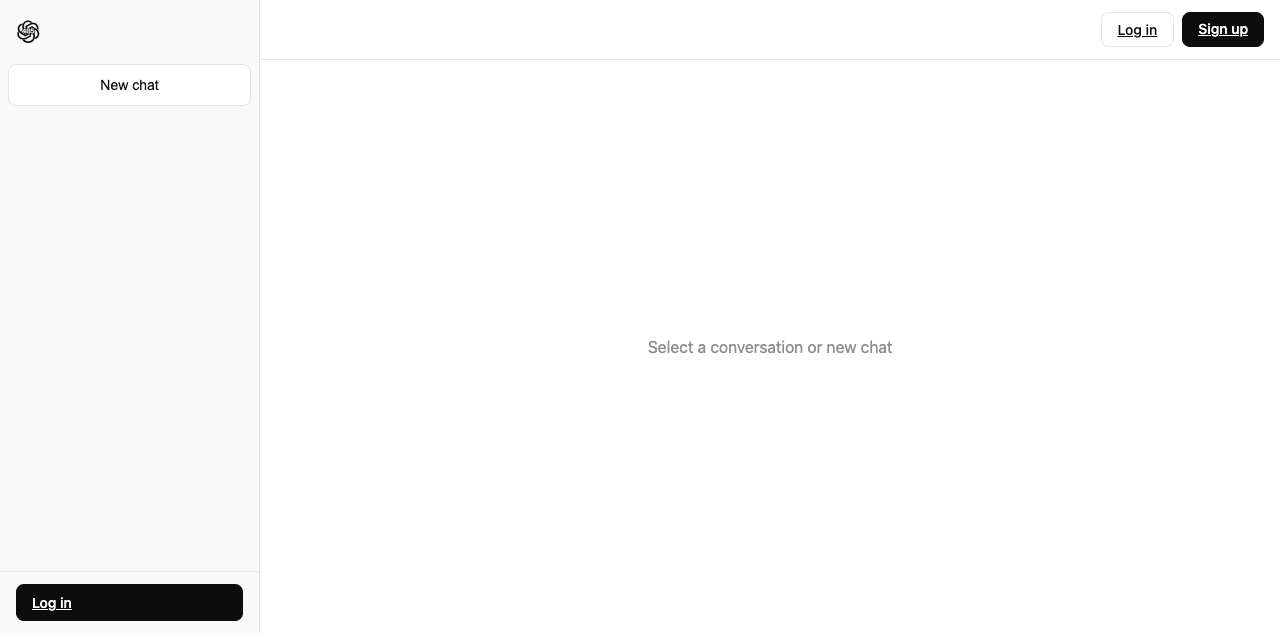
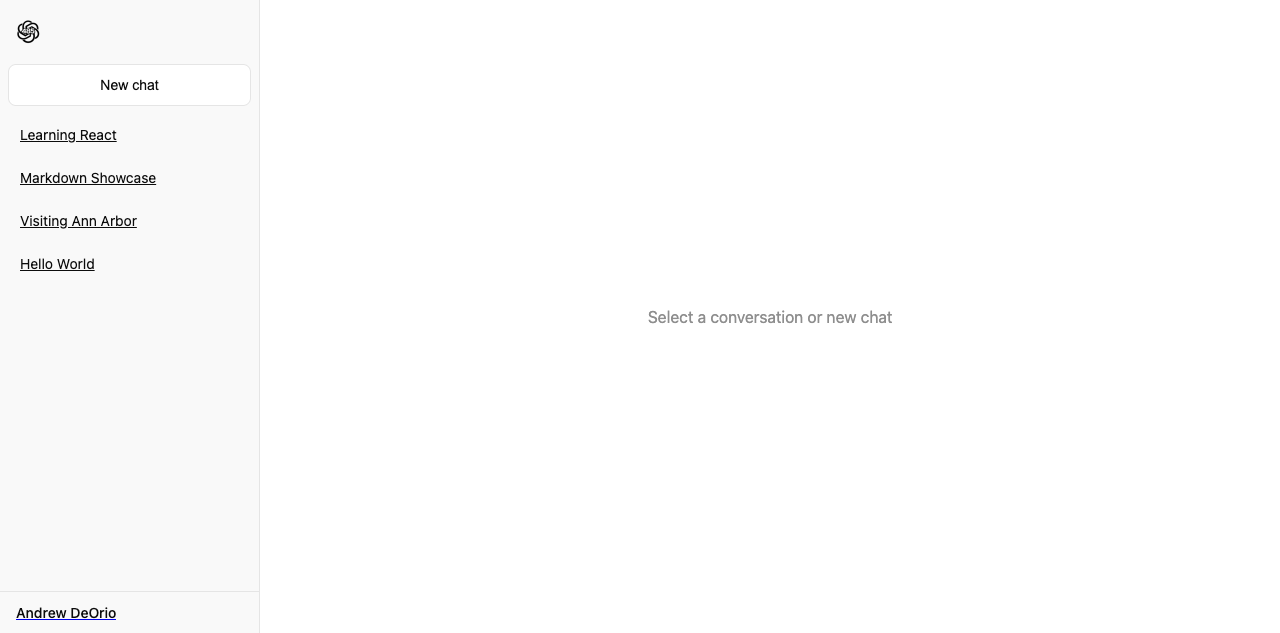
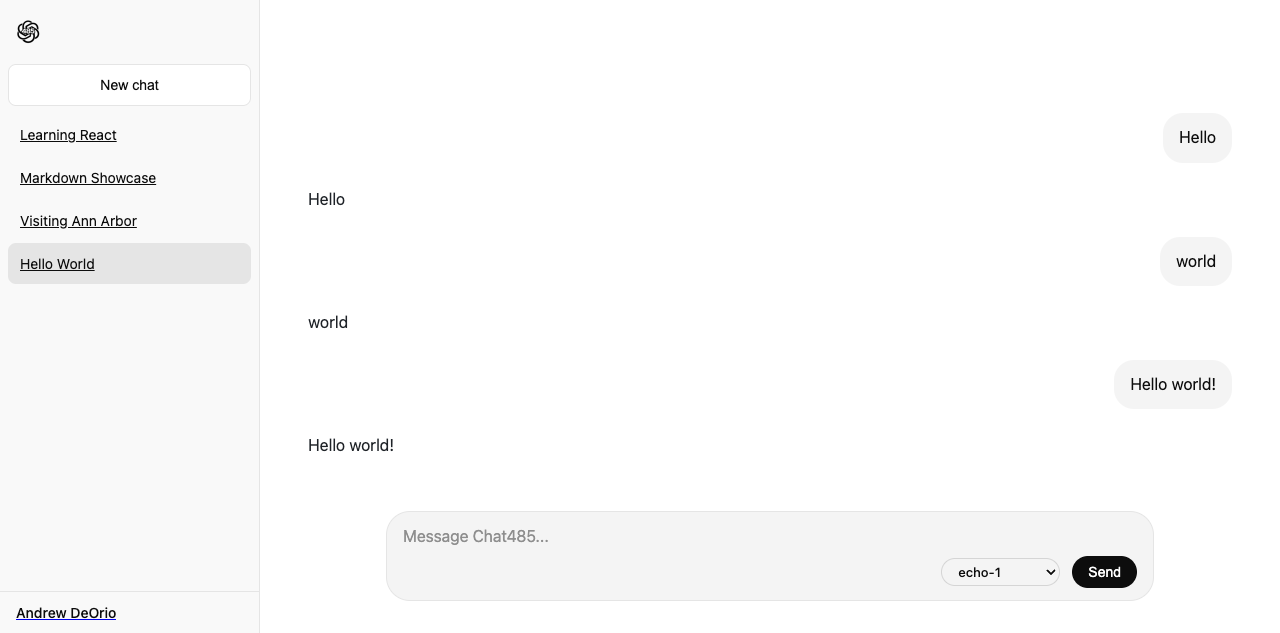
Chat485 is five distinct pages, all rendered server-side from Jinja templates: the home page, a conversation page, and three account pages (create, login, edit). This section is a quick visual tour so the route specs that follow have a picture to attach to.
A first-time visitor lands on the home page anonymously, with an empty sidebar.
After logging in, the sidebar lists the user’s conversations. A brand-new conversation that has not yet received a first message shows the literal placeholder “New conversation”; older conversations show their generated title.
Clicking a conversation renders its messages and a send form.
The three account pages are conventional forms. Create-account collects full name, email, and password. Login collects email and password. Edit-account is pre-filled with the current full name and email.
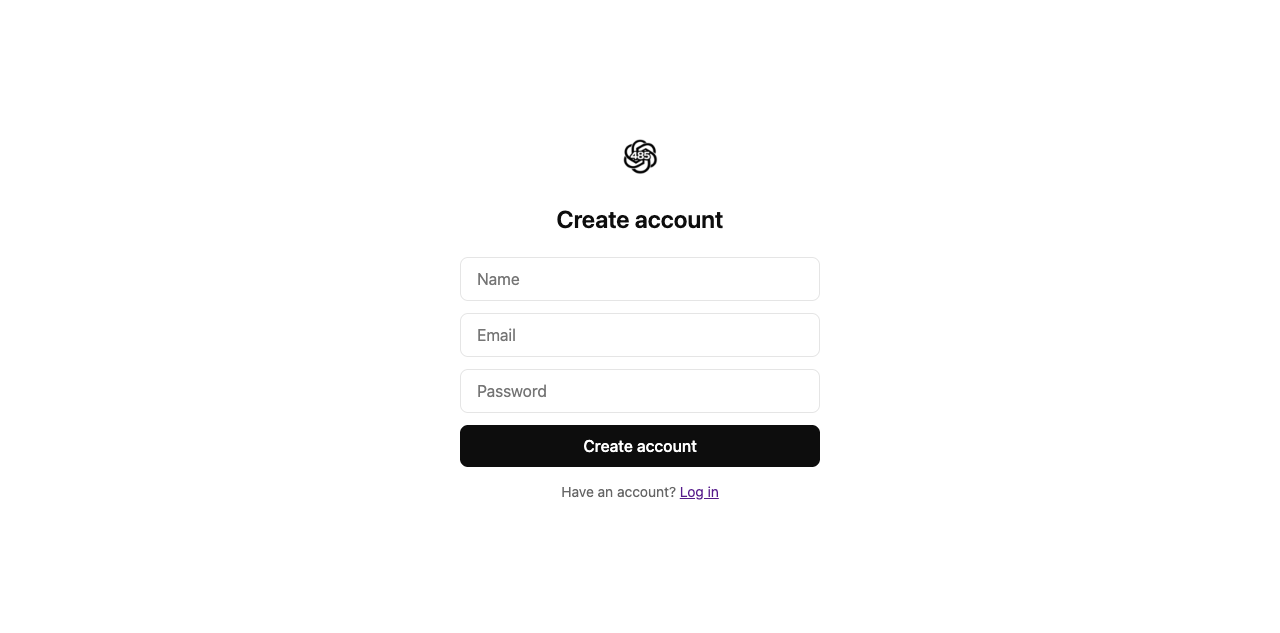
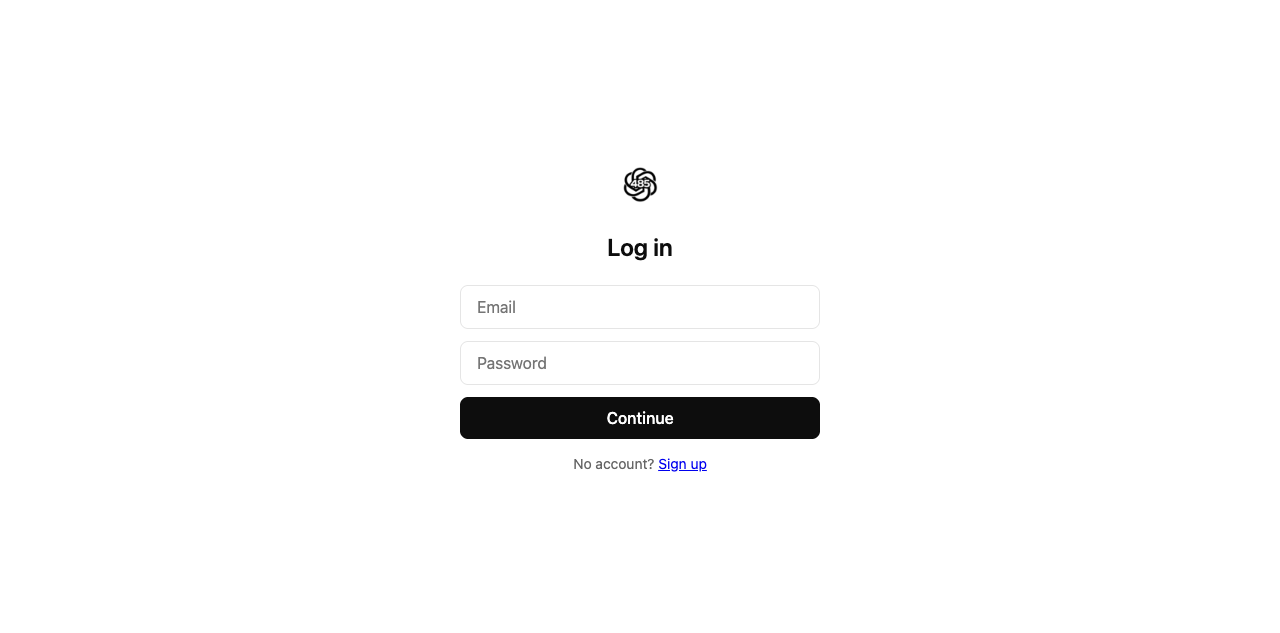
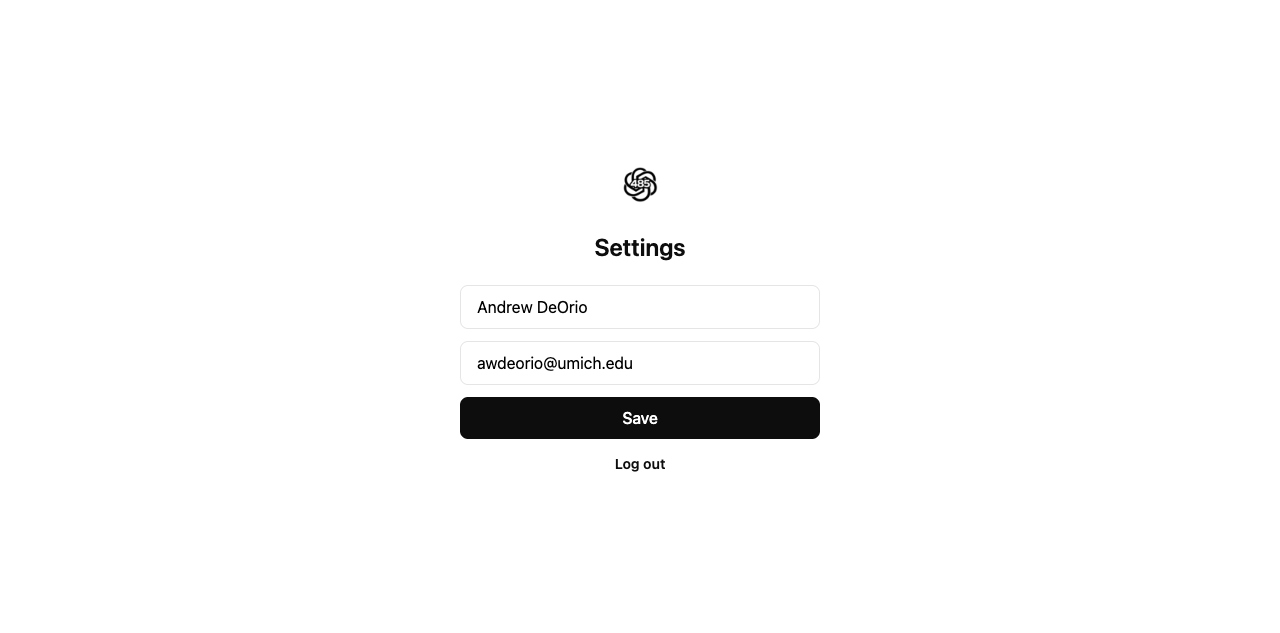
The home and conversation pages share a sidebar layout; the three account pages are standalone forms. Build each shared layout as a base template that leaf templates extend with {% extends %}, so the common parts lives in one place.
The recurring pieces:
- Sidebar: Appears on the home and conversation pages. Lists the current session’s conversations, newest first, each linking to its conversation page. Includes a “New chat” button at the top and, at the bottom, the current user’s full name (when logged in) or a “Log in” link (when anonymous).
- Conversation list: The body of the sidebar. Each entry shows the conversation’s
title, or “New conversation” when the title is stillNULL. Each entry has a delete button. On a conversation page, mark the current conversation (the one whoseuuidequalscurrent_uuid) by addingaria-current="page"to its sidebar link. The home page marks no conversation. Styling the marked conversation is optional (see Reach goals). - Send form: Below the messages on the conversation page only. A
<textarea name="content">, a<select name="model">model picker, and a submit button. - Account pages: Standalone forms at
/accounts/create/,/accounts/login/, and/accounts/edit/.
Authentication and access control
A conversation belongs to exactly one of a session (anonymous) or a user (logged in).
- A logged-in user owns conversations by
userid. These survive logout and are reachable on any browser after login. - An anonymous session owns conversations by
sessionid.
For any route that names a conversation by UUID:
- If no conversation with that UUID exists, respond
404 Not Found. - If the conversation exists but the current session does not own it, respond
403 Forbidden.
Pro-tip: Build the conversation list and conversation pages against the seed data first. Hardcode userid = 1 in your view functions and confirm the seed conversations render. Wire up cookies and sessions later, when you build the account routes.
Home page
GET /
Render the sidebar (the current session’s conversations) and an empty main area inviting the user to select a conversation or start a new chat.
An anonymous visitor with no conversations sees an empty sidebar. A logged-in user sees their conversations.
You should now pass one unit test, which renders the home page for an anonymous visitor.
$ pytest -v tests/test_index_public.py::test_index_anonymous
Conversation detail
GET /conversations/<uuid>/
Render the conversation’s 10 most recent messages in chronological order with the oldest first.
Below the messages, render a send form (see Message create) containing:
- a
<textarea name="content">for the message text. - a
<select name="model">model picker, populated from the models configured inchat485/config.py. Each model is an<option>whosevalueis the model id, for example<option value="echo-1">.echo-1is always present, listed first, and selected by default; additional models appear when configured (see Reach goals). - a submit button.
Apply the access control rules: 404 if the UUID does not exist, 403 if the current session does not own it.
See Pagination for loading older messages. See Markdown rendering for formatting Markdown in the message text.
Conversation create
POST /conversations/
Create a new conversation owned by the current session, then respond with a 302 redirect to its conversation page (see Conversation detail).
A new conversation starts with a NULL title. Later, the first user message will set the title.
If the request arrives with no session, mint a fresh anonymous session, insert the conversation under that session, and set the sessionid cookie on the redirect response.
You should now pass one unit test, which creates a conversation and follows the redirect to its page.
$ pytest -v tests/test_conversations_public.py::test_create_redirects_to_conversation
Pro-tip: Generate a fresh session UUID with Python’s uuid module.
import uuid
sessionid = str(uuid.uuid4())  # e.g. '550e8400-e29b-41d4-a716-446655440000'
Pro-tip: Set the cookie on a response with response.set_cookie() and read it on a request with flask.request.cookies.get(). See the Flask docs on cookies.
GenAI pro-tip: Responding to a state-changing POST with a 302 redirect to a GET page, instead of rendering the template in the POST response, is a pattern called Post/Redirect/Get (PRG). Every redirect in this spec follows it. Ask a chat why it is worth doing:
A Flask route handles a form
POST, changes server state, then shows a result page. Why respond with a302redirect to a separateGETpage instead of rendering the template directly in thePOSTresponse? What happens when the user refreshes the page in each case? I am a student learning Flask.
Exam skill: Write a Flask route handler without AI assistance.
Write the POST /conversations/ handler. Create a new conversation owned by the current session, then respond with a 302 redirect to its conversation page. If the request arrives with no session, mint a fresh anonymous session, insert the conversation under that session, and set the sessionid cookie on the redirect response.
Write your answer first, then paste it into a chat for feedback.
You are an exam tutor. I’m studying for a closed-book EECS 485 exam where I can’t use AI, so do not write or correct code for me, and do not reveal the answer even if I ask; give a hint instead. Tell me whether my answer is correct and point me toward any mistake, then give me one follow-up question to try.
Question: [paste]
My answer: [paste]
Message create
POST /conversations/<uuid>/messages/
Send a message. This is the route that triggers the LLM round-trip.
The form body has two fields: content (the message text) and model (the model id from the picker). On success:
- Save the user’s message with role
user. - If this is the first message in the conversation, set the conversation title (see Conversation title).
- Forward the recent history to the chat completions API (see Chat completions API).
- Save the assistant’s reply with role
assistant. - Respond with a
302redirect back to the conversation page so the browser reloads with both new messages rendered.
If content is empty, do nothing and respond with a 302 redirect back to the conversation page.
If the chat completions call fails, see Chat completions API failure.
Apply the access control rules: 404 if the UUID does not exist, 403 if the current session does not own it.
Once a sent message stores both the user message and the echoed assistant reply, you should pass one unit test.
$ pytest -v tests/test_messages_public.py::test_send_message_echo_reply
Forwarding the request
Forward the conversation history to the chosen model’s chat completions endpoint with requests.post(). Send at most the 20 most recent messages, including the user message you just persisted. Older messages remain in the database but do not enter the upstream request. This keeps request size bounded so long conversations do not exceed the model’s context window or grow request latency without bound. Send the messages in chronological order (oldest first), not the newest-first order a database query returns.
Prepend a system prompt at index 0 with role system. Its content must include the product name Chat485. Beyond naming the product, the wording is yours: a typical system prompt also gives guidelines for response style and states the current date. Build it at request time, and do not store it in the database. Shaping the assistant’s personality through this prompt is a reach goal.
The outgoing payload is a JSON object with two keys: model (the model id from the form, or echo-1 if omitted) and messages (the OpenAI-compatible list of role and content objects). Example for a conversation with two prior exchanges plus a new user message:
{
  "model": "echo-1",
  "messages": [
    {"role": "system", "content": "You are Chat485..."},
    {"role": "user", "content": "Hello"},
    {"role": "assistant", "content": "Hi there"},
    {"role": "user", "content": "Tell me a joke"},
    {"role": "assistant", "content": "..."},
    {"role": "user", "content": "What is Flask?"}
  ]
}
Store assistant content from the reply verbatim in the database. The endpoint’s request and response format, including its context-window limit, are documented in Chat completions API.
GenAI pro-tip: Ask a chat about patterns for calling an HTTP API from inside a server handler.
I’m calling an HTTP API from Python with the
requestslibrary. The request body and response body are both JSON. How does thejson=argument onrequests.post()work, and what doesresponse.json()give me back? Walk me through how a JSON object maps to a Pythondictand a JSON array maps to a Pythonlist. I am a student new to web programming.
Let’s include handling timeouts, the upstream being down, and the upstream returning a non-200 status.
Conversation delete
POST /conversations/<uuid>/delete/
Delete a conversation and all of its messages, then respond with a 302 redirect to the home page (see Home page).
Apply the access control rules: 404 if the UUID does not exist, 403 if the current session does not own it.
The delete button lives in each conversation-list entry (see Pages overview).
GenAI pro-tip: Ask a chat how to wire each delete button to the right conversation.
In a Jinja2 template I’m rendering a list of items, each with its own delete button. Each button needs to send a
POSTto a different URL. How do I structure the HTML so a click submits aPOSTto the right item’s URL? I am a student new to web programming.
Pro-tip: If you hardcoded userid = 1 earlier, replace it with real cookie + session handling now. The account routes depend on it.
Account create
GET, POST /accounts/create/
The create-account page. GET renders the form. POST processes it.
The form has three fields: fullname, email, and password. On POST:
- If any field is empty, re-render the form with an error message and no redirect.
- If the email already belongs to an existing account, re-render the form with an error message and no redirect.
- Otherwise, hash the password (see Password storage), insert the new user, log the new user in (claim anonymous conversations and rotate the sessionid, see Sessions), and respond with a
302redirect to the home page.
Password storage
Store each password in a single password column formatted as algorithm$salt$hexdigest. Use the sha512 algorithm:
import hashlib
import uuid

algorithm = "sha512"
salt = uuid.uuid4().hex
hash_obj = hashlib.new(algorithm)
password_salted = salt + password
hash_obj.update(password_salted.encode("utf-8"))
password_hash = hash_obj.hexdigest()
password_db_string = "$".join([algorithm, salt, password_hash])
To verify a login attempt, split the stored entry on $ to recover the algorithm and salt, hash salt + candidate_password with the same algorithm, and compare the result against the stored hexdigest.
Salting defeats rainbow-table attacks. An attacker who steals the database cannot precompute a single lookup table and reuse it across accounts because each row uses a unique salt.
Account edit
GET, POST /accounts/edit/
The edit-account page. This route requires a logged-in user; an anonymous request returns 403 Forbidden.
GET renders the form pre-filled with the user’s current full name and email. POST updates the user’s fullname and email, then responds with a 302 redirect to the home page. If a field is empty, or the new email already belongs to a different account, re-render the form with an error message and no redirect.
Account login
GET, POST /accounts/login/
The login page. GET renders the form. POST processes it.
The form has two fields: email and password. On POST:
- If the credentials are invalid, re-render the form with an error message and no redirect.
- Otherwise, log the user in (claim anonymous conversations and rotate the sessionid, see Sessions) and respond with a
302redirect to the home page.
Account logout
POST /accounts/logout/
Delete the current session row, clear the sessionid cookie, and respond with a 302 redirect to the home page. The user’s owned conversations are unaffected because they are keyed off userid.
With login and logout both working, you should pass one unit test that logs the seed user in and back out.
$ pytest -v tests/test_accounts_public.py::test_login_logout_round_trip
Enhancements
These features are graded but not needed for the core send-and-reply flow. Build them once the happy path works. They are independent and can be done in any order.
Conversation title
The first user message in a conversation sets the conversation’s title. Title generation rule:
- If the message is 30 characters or fewer, the title equals the message verbatim.
- Otherwise, take the first 30 characters. If that window contains a space, cut at the last space (drop the partial trailing word, no trailing space). If the window contains no space at all, keep all 30 characters.
- Append the three-character ASCII suffix
"..."(not the Unicode…character).
Examples:
| Input | Title |
|---|---|
What is React? |
What is React? |
Tell me everything you know about the history of computing |
Tell me everything you know... |
Supercalifragilisticexpialidocious explained |
Supercalifragilisticexpialidoc... |
Chat completions API failure
A request can fail two ways: the LLM API returns an error response, or it never completes (a timeout or unreachable server). In either case, no assistant message is saved; the user’s message stays in the database.
Redirect back to the conversation page (same as a successful send), then render an inline error bubble below the last message, “Something went wrong, please try again.” Do not render the error when the conversation is opened again later.
See chat completions call for API failure examples.
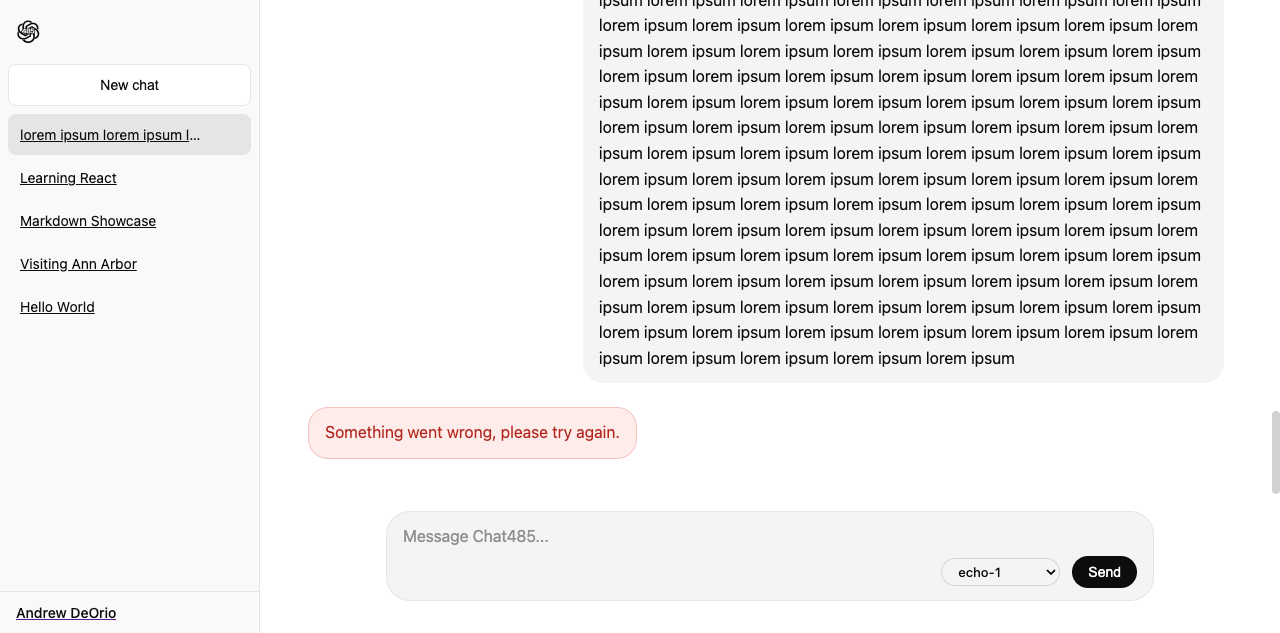
Pro-tip: Here’s a quick way to generate a message that exceeds echo-1’s 8000-character context window and copy it to the clipboard:
$ python3 -c 'print("lorem ipsum " * 700)' | pbcopy    # macos
$ python3 -c 'print("lorem ipsum " * 700)' | clip.exe  # WSL
GenAI pro-tip: Explore the trade-offs of different error propagation mechanisms.
In a Flask app, processing a POST request fails. I want the next page to show an error. What are the common ways to carry an error message from a POST to the page the user lands on? Consider browser refresh, the URL, and security. I’m a student learning Flask.
Markdown rendering
Render every message as Markdown, and syntax-highlight fenced code blocks by language. Use the Markdown library with the fenced_code, tables, and codehilite extensions.
Use a custom Jinja filter applied in a template with the | syntax:
<div>
{{ message.content | markdown }}
</div>
Define the filter in chat485/filters.py:
import markdown
import markupsafe

import chat485


@chat485.app.template_filter("markdown")
def render_markdown(text):
    """Render Markdown text to safe HTML."""
    html = markdown.markdown(
        text or "",
        extensions=["fenced_code", "tables", "codehilite"],
    )
    return markupsafe.Markup(html)
Register the filter in chat485/__init__.py:
import chat485.echo  # noqa: E402
import chat485.filters  # noqa: E402
import chat485.model  # noqa: E402
import chat485.views  # noqa: E402
Add a seed conversation with Markdown messages (headings, code blocks, lists, tables) to sql/data.sql so you can see the rendering as you build.
The autograder checks the generated HTML: h1/h2/h3, strong/em/code, ul/ol/li, blockquote, table, and syntax-highlighted code (codehilite wraps each token in a span). The Markdown library emits all of these for you. It does not grade CSS.
Optional: Two stylesheets make the rendering look polished, and neither is graded. github-markdown.css styles the markdown-body container; highlight.css colors the code blocks (pygmentize ships with Pygments). Generate them, link both in base.html ahead of style.css, and add the markdown-body class to the container around assistant messages.
$ wget https://cdn.jsdelivr.net/npm/github-markdown-css@5/github-markdown-light.css -O chat485/static/css/github-markdown.css
$ pygmentize -S default -f html -a .codehilite > chat485/static/css/highlight.css
<link rel="stylesheet" type="text/css"
      href="{{ url_for('static', filename='css/github-markdown.css') }}">
<link rel="stylesheet" type="text/css"
      href="{{ url_for('static', filename='css/highlight.css') }}">
In P3 you’ll move this same Markdown rendering to the client, where the React app renders it in the browser as messages arrive over the API.
Scroll to bottom
Show the newest message at the bottom of the message list, the way a chat app shows the latest reply without a manual scroll. Apply this when a conversation opens and after every user message.
Every send round-trips through Post/Redirect/Get, so the browser reloads the whole page and lands back at the top. Solve it with CSS or markup, not client-side JavaScript, and without moving keyboard focus to force the scroll (for example, by focusing a hidden element).
Your solution must hold up once a conversation is long enough to overflow the message area: the newest message starts in view at the bottom, and the user can still scroll up to read the oldest messages.
The awkwardness of this implementation is the point. In P3 you’ll rebuild this page with client-side JavaScript, where a few lines handle the scroll with no reload and no tricks.
GenAI pro-tip: Ask a chat how to pin a scrollable list to its bottom without JavaScript.
I have a server-rendered list of chat messages and no client-side JavaScript. When the page loads I want the newest message in view at the bottom. Let’s discuss the trade-offs of different approaches.
Pagination
A conversation page renders the 10 most recent messages, not the whole transcript. When older messages exist, render a “Load older messages” link at the top of the message list. With 10 or fewer messages, render no link.
Following the link is a full-page GET to /conversations/<uuid>/?before=<messageid>, where <messageid> is the id of the oldest message currently shown. The page re-renders with the 10 newest messages that are older than <messageid>, again with the link if more remain. Reopen the conversation to return to the newest messages.
Use a messageid cursor, not a page number: messages are only appended at the newest end, so an id stays stable as the conversation grows, while a page number would shift whenever the user sends more.
Pagination is a display concern, separate from the model-history cap (see Message create) that bounds how many messages reach the model; the two limits are independent.
Testing
Lint with ruff, which checks conformance to the PEP 8 Style Guide and PEP 257 Docstring Conventions. Do not add inline suppressions like # noqa; refactor the code instead.
$ ruff check chat485              # Report style and correctness problems
$ ruff check --fix chat485        # Fix lint errors automatically where possible
$ ruff format --check chat485     # Check formatting
$ ruff format chat485             # Fix formatting
With every page and its GET route in place, you should pass one unit test, which validates the HTML5 of all five rendered pages (see Pages overview).
$ pytest -v tests/test_html_validation_public.py::test_html_valid
Run all tests.
$ pytest -v
Pitfall: Trailing slashes matter. POST /conversations/ and POST /conversations/<uuid>/messages/ end in slashes. Register your routes exactly as shown.
Pitfall: Do not change the form input names (content, model, fullname, email, password). The autograder POSTs to them.
Write your own tests
Write your own tests in tests/test_student.py. Each def test_... function is one test.
Run your tests the same way as the instructor-written tests:
$ pytest -v tests/test_student.py
Your tests are graded by mutation testing. Target distinct spec-mandated behavior the public tests do not already cover.
GenAI pro-tip: Ask a chat to explain one of the instructor-written tests.
$ cat tests/test_accounts_public.py | pbcopy  # macOS
$ cat tests/test_accounts_public.py | clip.exe  # WSL
Walk me through how a pytest test works. I am a student learning back end testing. Help me understand, do not write tests for me.
[paste test]
Reach goals
Reach goals are optional. The autograder does not test them. A reach goal you complete stays in your submission and the autograder still passes, because it checks required behavior, not the absence of extras.
The Paid providers and Ollama reach goals add models to chat485/config.py. A model is available, and appears in the send form’s picker, when it has no API key requirement (echo-1 and the local Ollama model) or when its API key is set in the environment (a paid provider). A paid provider with no key configured is hidden.
Paid providers
Connect Chat485 to a real LLM. Chat485 already speaks the OpenAI chat completions format, so the setup is short: get an API key, add it to .env, update config.py, and attach the key as an Authorization header when you forward the request.
Authenticating requests
A paid provider authenticates each request with your API key, sent as an HTTP Authorization: Bearer <key> header. In your chat completions forwarding code (see Forwarding the request), add the header only when the chosen model’s config.py entry has an api_key. The echo server and the Ollama model have no key, so their requests send no Authorization header:
headers = {}
api_key = model_config.get("api_key")
if api_key:
    headers["Authorization"] = f"Bearer {api_key}"
response = requests.post(
    # ...
    headers=headers,
)
Storing secrets
Chat485 reads API keys from a .env file at the project root. Before you create the file, add .env to .gitignore so it can never be committed:
...
# API keys
.env
We included python-dotenv so flask --app chat485 run automatically loads .env.
Security warning: Never commit an API key. Automated scanners harvest public repos within minutes, so rotate any leaked key on the provider immediately. Force-pushing the commit does not undo the leak.
Anthropic. Get an API key, add credits, and set a spending cap.
CHAT485_ANTHROPIC_API_KEY=sk-ant-...
# Anthropic Models (Paid)
# 1. Get an API key at https://console.anthropic.com/settings/keys
# 2. Add it to .env: CHAT485_ANTHROPIC_API_KEY=sk-ant-...
# 3. Set a spending cap and add credits at
#    https://platform.claude.com/settings/billing
{
    "model": "claude-sonnet-4-6",
    "api_url": "https://api.anthropic.com/v1/chat/completions",
    "api_key": os.environ.get("CHAT485_ANTHROPIC_API_KEY"),
},
OpenAI. Get an API key, add credits, and set a spending cap.
CHAT485_OPENAI_API_KEY=sk-...
# OpenAI Models (Paid)
# 1. Get an API key at https://platform.openai.com/api-keys
# 2. Add it to .env: CHAT485_OPENAI_API_KEY=sk-...
# 3. Set a spending cap and add credits at
#    https://platform.openai.com/settings/organization/billing
{
    "model": "gpt-5",
    "api_url": "https://api.openai.com/v1/chat/completions",
    "api_key": os.environ.get("CHAT485_OPENAI_API_KEY"),
},
Gemini. Get an API key, add credits, and set a spending cap.
CHAT485_GEMINI_API_KEY=...
# Google Gemini Models (Paid)
# 1. Get an API key at https://aistudio.google.com/apikey
# 2. Add it to .env: CHAT485_GEMINI_API_KEY=...
# 3. Set a spending cap and add credits at
#    https://aistudio.google.com/billing
{
    "model": "gemini-3.0-flash",
    "api_url": "https://generativelanguage.googleapis.com"
    "/v1beta/openai/chat/completions",
    "api_key": os.environ.get("CHAT485_GEMINI_API_KEY"),
},
When a key is present, its model appears in the model picker.
Ollama local model
Ollama downloads and runs pretrained LLMs locally. It has a built-in REST API compatible with the OpenAI format. The echo server works without Ollama, but you can optionally install it to chat with a real model.
Install Ollama and start the service:
$ brew install ollama
$ brew services start ollama
Select a model. We recommend llama3.2:3b. 8 GB of RAM is enough if you close down most apps. 16 GB is comfortable.
Pull a model. The llama3.2:3b model is about 2 GB and could take 10 minutes:
$ ollama pull llama3.2:3b
Once running, the local model appears in the model picker.
Custom system prompt
Give your assistant a personality, extending the system prompt you wrote in Forwarding the request. Keep the product name Chat485 in the prompt so your submission still meets the requirement.
ChatGPT’s personalization settings are a good source of ideas. The settings are not a different model and not retraining: they are text appended to the system prompt.
Consider using a chat to refine drafts of your system prompt. Here are a few ideas to try:
- Persona: A patient tutor, a terse senior engineer, a pirate.
- Traits: Warm, enthusiastic, witty, encouraging, formal, skeptical.
- Response length: Guidance that scales length to the question.
- Formatting: Bullets versus prose, when to use a code block, whether to use headings, LaTeX for math.
- Emoji: More, less, preferred.
The echo server ignores the system prompt and returns your own text, so switch to a real model from the Paid providers or Ollama local model reach goal before you experiment.
CSS / styling
Style your pages with CSS. This reach goal originates in Project 1, where you first style static pages, and carries forward here. Add a stylesheet under chat485/static/ and link it from your base template.
Submitting and grading
One team member should register your group on the autograder.
Submit a tarball to the autograder, which is linked from https://eecs485.org. Include the --disable-copyfile flag only on macOS.
$ tar \
  --disable-copyfile \
  --exclude '*__pycache__*' \
  -czvf submit.tar.gz \
  bin \
  chat485 \
  sql \
  tests/test_student.py
Direct link to the Fall 2026 Project 2 autograder: https://autograder.io/web/project/4160
The autograder uses its own build, dependency, and lint configuration. Do not add or change dependencies, and do not relax lint rules.
Public tests run with their full output visible on the autograder. Private tests show only pass/fail status. No additional tests run after the deadline.
Testing
Run these before submitting; the autograder runs the same checks plus hidden ones.
Lint:
$ ruff check chat485
$ ruff format --check chat485
Test:
$ pytest -v
chat485test script
Write a shell script bin/chat485test that does this:
- Stop on errors and print commands
- Run
ruff check chat485 - Run
ruff format --check chat485 - Run all unit tests using
pytest -v
Mutation testing
We autograde the tests you write in tests/test_student.py. See Write your own tests for the file and run command.
A suite must run within the autograder’s time limit and contain 10 or fewer test_ functions.
To grade your tests, we use a set of intentionally buggy instructor solutions called mutants. You earn points for catching the bugs.
- We rebuild the app with the correct solution and run your tests.
- Tests that pass are valid.
- Tests that fail are invalid; they falsely report a bug and earn no credit.
- We run your valid tests against each buggy solution (mutant).
- If any of your tests fails, you caught the bug.
- You earn points for each mutant you catch.
Acknowledgments
Original project written by Andrew DeOrio awdeorio@umich.edu, 2026.
This document is licensed under a Creative Commons Attribution-NonCommercial 4.0 License.