p1-insta485-static
EECS485 P1: Templated Static Site Generator
Due 8:00PM Eastern time July 10, 2026. This is an individual project.
Change Log
Initial Release for SU26
Introduction
An Instagram clone implemented with a templated static site generator. This is the first of an EECS 485 three project sequence: a static site generator from templates, server-side dynamic pages, and client-side dynamic pages.
The learning goals of this project include HTML, CSS, templates, Python programming, and basic shell scripting. It is also a “readiness test” that will give you an idea of what EECS 485 will be like.
Write a Python program that takes as input HTML templates, JSON data and misc. static files (like images and CSS) and generates as output a web site of static content. Then, use your new tool to build a non-interactive website. Jekyll and Pelican are two examples of open source static site generators.
Here’s a preview of what your finished project will look like. insta485generator is the name of the Python program you will write. insta485 is an input directory containing HTML templates, JSON data and misc. static files (like images and CSS). insta485_html is an output directory containing generated static HTML files.
$ insta485generator insta485 -o insta485_html
$ cd insta485_html/
$ python3 -m http.server 8000
Serving HTTP on 0.0.0.0 port 8000 (http://0.0.0.0:8000/) ...
Then you will navigate to http://localhost:8000 and see the non-interactive website that you created.
If you’re new to HTML, CSS and Python, here are some helpful resources:
GAI help bot
We are providing a generative AI help bot, Webby, trained on the Project 1 spec, tutorials, and EECS 485 course material. We hope that it will be helpful, but the bot is experimental and it may provide inaccurate or incomplete information. This project spec is the final authority.
Access Webby here.
Setup
We’ll walk you through setting up your operating system, Python virtual environment and version control.
Command line tools
The command line interface (CLI) lets us interact with the computer using the keyboard instead of the mouse. Select your operating system to install CLI tools.
| macOS | Windows | Linux |
Take a look at our text editor tips and tricks.
Project folder
Create a folder for this project. Your folder location might be different.
$ pwd
/Users/awdeorio/src/eecs485/p1-insta485-static
Pitfall: Avoid paths that contain spaces. Spaces cause problems with some command line tools.
| Bad Example | Good Example |
|---|---|
EECS 485/Project 1 Insta485 Static |
eecs485/p1-insta485-static |
WSL Pitfall: Avoid project directories starting with /mnt/c/. This shared directory is slow.
| Bad Example | Good Example |
|---|---|
/mnt/c/ ... |
/home/awdeorio/ ... |
Version Control
Set up version control using the Version control tutorial.
After you’re done, you should have a local repository with a “clean” status and your local repository should be connected to a remote GitHub repository.
$ pwd
/Users/awdeorio/src/eecs485/p1-insta485-static
$ git status
On branch main
Your branch is up-to-date with 'origin/main'.

nothing to commit, working tree clean
$ git remote -v
origin	https://github.com/awdeorio/p1-insta485-static.git (fetch)
origin	https://github.com/awdeorio/p1-insta485-static.git (push)
You should have a .gitignore file (instructions).
$ pwd
/Users/awdeorio/src/eecs485/p1-insta485-static
$ head .gitignore
This is a sample .gitignore file that's useful for EECS 485 projects.
...
Python virtual environment
Create a Python virtual environment for project 1 using the Python Virtual Environment Tutorial.
You should now have Python tools and third party packages installed locally. Your versions and exact libraries might be different.
$ pwd
/Users/awdeorio/src/eecs485/p1-insta485-static
$ ls
env
$ source env/bin/activate
$ which python
/Users/awdeorio/src/eecs485/p1-insta485-static/env/bin/python
$ which pip
/Users/awdeorio/src/eecs485/p1-insta485-static/env/bin/pip
$ pip list
Package            Version
------------------ ---------
astroid            2.4.2
...
zipp               3.1.0
Python debugger
Learn how to use the Python debugger, pdb using the Python Debugging Tutorial.
Browser tutorial
Learn about the developer tools built into your browser with the Browser Tutorial. Skip the sections on Cookies, Private Browsing, and JavaScript Debugging.
Starter files
Download and unpack the starter files.
$ pwd
/Users/awdeorio/src/eecs485/p1-insta485-static
$ wget https://eecs485staff.github.io/p1-insta485-static/starter_files.tar.gz
$ tar -xvzf starter_files.tar.gz
Move the starter files to your project directory and remove the original starter_files/ directory.
$ pwd
/Users/awdeorio/src/eecs485/p1-insta485-static
$ mv starter_files/* .
$ rm -rf starter_files starter_files.tar.gz
You should see these files.
$ tree -I 'env|__pycache__'
.
├── hello
│   ├── config.json
│   └── templates
│       └── index.html
├── hello_css
│   ├── config.json
│   ├── static
│   │   └── css
│   │       └── style.css
│   └── templates
│       └── index.html
├── insta485
│   ├── config.json
│   └── static
│       └── uploads
            ...
│           └── e1a7c5c32973862ee15173b0259e3efdb6a391af.jpg
├── pyproject.toml
├── requirements.txt
└── tests
    ...
    └── util.py
hello/ |
Sample input for insta485generator |
hello_css/ |
Sample input for insta485generator |
insta485/ |
Static templated Insta485 goes here |
insta485/config.json |
Data for future Insta485 templates |
insta485/static/uploads/ |
Sample images for Insta485 |
pyproject.toml |
insta485generator Python package configuration |
requirements.txt |
Python package dependencies matching autograder |
tests/ |
Public unit tests |
Before making any changes to the clean starter files, it’s a good idea to make a commit to your Git repository.
Hand coded HTML
Once you have your computer set up, you’ll write two HTML files by hand: handcoded_html/index.html and handcoded_html/users/awdeorio/index.html. This will give you practice with HTML and CSS, which you’ll later generate using Python code.
Setup
Navigate to your project’s root directory. Also, remember to activate your Python virtual environment every time you begin a coding session or start a new shell.
$ pwd
/Users/awdeorio/src/eecs485/p1-insta485-static
$ source env/bin/activate
Create a directory layout using mkdir. The image logo.png is optional; you can style your website however you like. Here are some commands to get you started.
$ pwd
/Users/awdeorio/src/eecs485/p1-insta485-static
$ mkdir handcoded_html/
$ mkdir handcoded_html/css/
$ mkdir handcoded_html/images/
$ mkdir handcoded_html/users/
$ mkdir handcoded_html/users/awdeorio/
$ mkdir handcoded_html/uploads/
$ touch handcoded_html/css/style.css  # touch creates empty files
$ touch handcoded_html/index.html
$ touch handcoded_html/users/awdeorio/index.html
$ cp insta485/static/uploads/* handcoded_html/uploads/
Add the initial file structure to the git repo.
Here are the files you should have when you are done.
$ pwd
/Users/awdeorio/src/eecs485/p1-insta485-static
$ tree handcoded_html/
handcoded_html/
├── css
│   └── style.css
├── images
├── index.html
├── users
│   └── awdeorio
│       └── index.html
└── uploads
    ├── 122a7d27ca1d7420a1072f695d9290fad4501a41.jpg
    ├── 2ec7cf8ae158b3b1f40065abfb33e81143707842.jpg
    ├── 505083b8b56c97429a728b68f31b0b2a089e5113.jpg
    ├── 5ecde7677b83304132cb2871516ea50032ff7a4f.jpg
    ├── 73ab33bd357c3fd42292487b825880958c595655.jpg
    ├── 9887e06812ef434d291e4936417d125cd594b38a.jpg
    ├── ad7790405c539894d25ab8dcf0b79eed3341e109.jpg
    └── e1a7c5c32973862ee15173b0259e3efdb6a391af.jpg
Start your two HTML files (handcoded_html/index.html and handcoded_html/users/awdeorio/index.html) like this. Edit HTML files with a text editor.
<!DOCTYPE html>
<html lang="en">
Hello world!
</html>
Run a test server and browse to http://localhost:8000/ where you will see “hello world”. Again, recall that this is a static file server, which serves copies of files from the server’s file system. In this example, the file is a plain text file containing HTML.
$ pwd
/Users/awdeorio/src/eecs485/p1-insta485-static
$ cd handcoded_html/
$ python3 -m http.server 8000
Serving HTTP on 0.0.0.0 port 8000 (http://0.0.0.0:8000/) ...
Pitfall: Do not preview HTML files by opening them in your browser (e.g., double click an .html file). Always run a development HTTP server from the correct html directory.
$ pwd
/Users/awdeorio/src/eecs485/p1-insta485-static/handcoded_html
$ python3 -m http.server 8000
Keep up your good git habits by committing files when you’ve completed each small task.
Index /
Continue working on handcoded_html/index.html. When you’re done, the page should have the following content, although yours might look different. For example, a logo is not required. To be clear: there are no autograder tests for your CSS layout. You can make it look however you want. What you must include is the text, images, and links shown in the screenshot below. It’s okay if some links lead to nowhere for this hand-coded portion. Don’t forget to git add and git commit when you’re done.
- Include a link to
/. If you choose not to include a logo, include some text to make sure this link is clickable. - Include a link to
/explore/and/users/awdeorio/. - Include
<title>insta485</title>. Nothing else should be in the<title>section - Link to the post detail page by clicking on the timestamp.
- The first post will be:
/posts/3/ - The second post will be:
/posts/2/ - The third post will be:
/posts/1/
- The first post will be:
- Link to the post owner’s page
/users/<POST_OWNER>/by clicking on their username or profile picture. - Time since the post was created
- Number of likes
- Comments, with owner’s username
- Link to the comment owner’s page
/users/<COMMENT_OWNER>/by clicking on their username.
- Link to the comment owner’s page
- Actual image corresponding to the post.
Pitfall: Always use absolute paths, including links, images, and stylesheets. Absolute paths start with /.
Pitfall: Always end paths to directories with a trailing /. For example: /users/awdeorio/ instead of /users/awdeorio
User /users/awdeorio/
Next, code handcoded_html/users/awdeorio/index.html. When you’re done, the page should have the following content, although yours might have different styling. Again, we’re not requiring any particular CSS styling. Don’t forget to git add and git commit when you’re done. The page must include the following elements:
- Include a link to
/. - Include a link to
/explore/and/users/awdeorio/. - Include
<title>insta485</title>. Nothing else should be in the<title>section - username
- Relationship
- number of followers and following
- Number of posts
- Number of followers
- Link to
/users/awdeorio/followers/
- Link to
- Number following
- Link to
/users/awdeorio/following/
- Link to
- Name
- A small image for each post
- Clicking on the first image links to
/posts/1/ - Clicking on the second image links to
/posts/3/
- Clicking on the first image links to
All HTML should be W3C HTML5 compliant. Here’s how to check yours at the command line.
$ pwd
/Users/awdeorio/src/eecs485/p1-insta485-static
$ html5validator --root handcoded_html/
Test
Install libraries needed by the test suite. You only need to do this once. Make sure your virtual environment is activated first, the pip program should be <project directory>/env/bin/pip. You might have already done this. Doing it a second time won’t hurt.
$ which pip
/Users/awdeorio/src/eecs485/p1-insta485-static/env/bin/pip
$ pip install -r requirements.txt
$ which pytest
/Users/awdeorio/src/eecs485/p1-insta485-static/env/bin/pytest
Run the public autograder testcases on your hand coded HTML.
$ pytest -v tests/test_handcoded_*
Submit to the autograder
You may want to submit to the autograder after completing just the handcoded part of P1 to check your progress. The below command will prepare a submission tarball containing everything you’ve worked on up to this point in the project. Include the --disable-copyfile flag only on macOS.
$ tar \
  --disable-copyfile \
  -czvf submit.tar.gz \
  handcoded_html
Full submission instructions are in the Submission and grading section of this spec.
Static site generator
In this section, you’ll implement a command line program, insta485generator, that creates web pages from templates. The inputs to insta485generator are templated HTML files and data in JSON format. The output is HTML files.
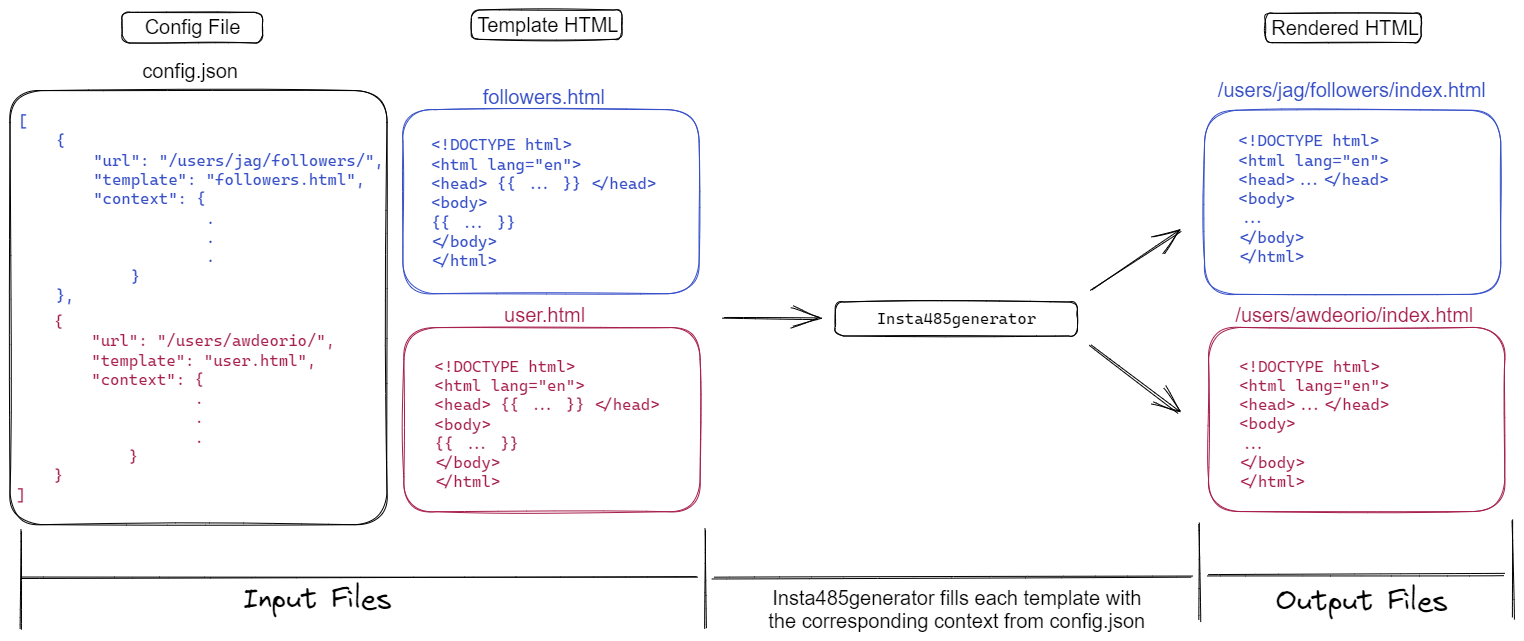
The execution of insta485generator on a config.json with two entries looks like this:
Setup
This section will help you get your Python files set up.
Our program will be called insta485generator. The following steps will help you create a Python package. (More info in the Python documentation on modules, especially the section on packages.)
$ pwd
/Users/awdeorio/src/eecs485/p1-insta485-static
$ mkdir insta485generator/
All Packages must have an __init__.py file. Our starter package is simple, so it won’t do anything. Create the file insta485generator/__init__.py (be sure to include the 2 underscores before and after init) and add a comment like this to it:
"""A static site generator."""
Now within the insta485generator directory, create a new file called __main__.py.
Our main function will go in insta485generator/__main__.py. We have given you the skeleton code below.
"""Build static HTML site from directory of HTML templates and plain files."""


def main():
    """Top level command line interface."""
    print("Hello world!")


if __name__ == "__main__":
    main()
Now, try running it:
$ python3 insta485generator/__main__.py
Hello world!
Next, we’ll install our package into our development environment. Double-check that the development environment is still active. If it’s not, then activate it with source env/bin/activate.
$ echo $VIRTUAL_ENV
/Users/awdeorio/src/eecs485/p1-insta485-static/env
The pyproject.toml file provided with the starter files describes how your package should be installed. It also includes linter configuration. We’ve included some libraries that will be helpful later. You are not allowed to add any additional dependencies other than the ones that we specify.
At this point, we’ve got these files (excluding env, __pycache__ and handcoded_html):
$ tree insta485generator -I __pycache__
insta485generator
├── __init__.py
└── __main__.py
We can now use pip to install insta485generator package using pyproject.toml. We’ll install in editable mode so that we won’t have to reinstall when we make changes to our Python source code. Again, be sure that your virtual envirnment is active.
$ echo $VIRTUAL_ENV
/Users/awdeorio/src/eecs485/p1-insta485-static/env
$ pip install -r requirements.txt
$ pip install -e .
Because of the entry point in pyproject.toml ('insta485generator = insta485generator.__main__:main'), there’s now an executable that calls our insta485generator package’s main() function!
$ insta485generator
Hello world!
How did it do that? When you activate your virtual environment with source env/bin/activate, your shell’s PATH environment variable is temporarily modified to include programs installed to ./env/bin/. Prove it to yourself:
$ echo $PATH
/Users/awdeorio/src/eecs485/p1-insta485-static/env/bin:/usr/local/bin:/usr/local/sbin:/usr/bin:/usr/sbin:/bin:/sbin
$ which insta485generator
/Users/awdeorio/src/eecs485/p1-insta485-static/env/bin/insta485generator
When you get this working, it may be a good point to commit to git
Now you can continue developing insta485generator by adding code to insta485generator/__main__.py. You’re also welcome to add more files to the insta485generator package directory to organize your source code however you please.
Arguments and options
The insta485generator command line utility supports the following options.
$ insta485generator --help
Usage: insta485generator [OPTIONS] INPUT_DIR

  Templated static website generator.

Options:
  -o, --output PATH  Output directory.
  -v, --verbose      Print more output.
  --help             Show this message and exit.
If the help message auto-generated by the click library exactly matches the output above, you can be confident you have correctly configured click.
Pro-tip: Use the Click library to parse command line options and arguments, and automatically generate a help message. Use click.Path() for the input and output directory.
We’ll help get you started with this code snippet. Open __main__.py and add this to your main() function.
@click.command()
@click.argument("input_dir", nargs=1, type=click.Path(exists=True))
def main(input_dir):
    input_dir = pathlib.Path(input_dir)
    print(f"DEBUG input_dir={input_dir}")
The check exists=True enforces that the input directory exists.
Print the argument.
$ insta485generator hello
DEBUG input_dir=hello
Click automatically generates error messages.
$ insta485generator
Usage: insta485generator [OPTIONS] INPUT_DIR
Try 'insta485generator --help' for help.

Error: Missing argument 'INPUT_DIR'.
Render templates
The process to render templates looks like this:
- Read configuration file (e.g.,
hello/config.json) - Render templates
- Read template (e.g.,
hello/templates/index.html) - Render template with context
- Write the rendered template to an output file (e.g.,
hello/html/index.html)
- Read template (e.g.,
- Copy static directory
Read configuration file
Read the configuration file config.json in the input directory using the JSON library.
The input directory contains a configuration file config.json, a templates/ directory and an optional static/ directory. We’ve provide a hello/ example input directory.
$ tree hello/
.
├── config.json
└── templates
    └── index.html
A configuration file (e.g., hello/config.json) is a JSON string with a list of dictionaries. Each dictionary contains a url, the name of a template file and a context dictionary. The template file is rendered using the context dictionary.
[
    {
        "url": "/",
        "template": "index.html",
        "context": {
            "words": [
                "hello",
                "world"
            ]
        }
    }
]
Pro-tip: It’s best practice to use a context manager when opening files. This guarantees that the file is automatically and properly closed after the block ends.
config_filename = pathlib.Path(config_filename)
with config_filename.open() as config_file:
    # config_filename is open within this code block
    config_list = json.load(config_file)
# config_filename is automatically closed
Render templates
For each configuration in the list read from config.json, render a template.
Our hello example contains one configuration object, also called a context.
{'words': ['hello', 'world']}
Read the template file, for example hello/templates/index.html.
<!DOCTYPE html>
<html lang="en">
<head><title>Hello world</title></head>
<body>
{% for word in words %}
{{word}}
{% endfor %}
</body>
</html>
Render the template with the context using the Jinja2 library.
We’d like to save you a bit of frustration getting the jinja2 library working the same way our instruction solution works. First, in order to make template inheritance work correctly, you’ll need to use the FileSystemLoader. Second, we’re going to enable auto escaping for security reasons.
Here’s how we configured our template environment in our instructor solution:
template_env = jinja2.Environment(
    loader=jinja2.FileSystemLoader(str(template_dir)),
    autoescape=jinja2.select_autoescape(['html', 'xml']),
)
Write output
Write the rendered template output to a file called index.html in the output directory.
In our hello example, the default output directory is generated_html and the corresponding output file is generated_html/index.html.
The output of a rendered template no longer contains any template code, for example generated_html/index.html.
<!DOCTYPE html>
<html lang="en">
<head><title>Hello world</title></head>
<body>

hello

world

</body>
</html>
The default output directory is generated_html.
If the input directory does not exist, exit with an error message. Click handles this error for you. Create the output directory, exiting with an error message if the output directory already exists.
Hint: Avoid string concatenation while computing an output filename using the the Pathlib library. output_dir is the command line argument OUTPUT_DIR and url is the URL read from the config.json file.
url = url.lstrip("/")  # remove leading slash
output_dir = pathlib.Path(output_dir)  # convert str to Path object, when --output is provided
output_path = output_dir/url/"index.html"
Test
The entire hello example directory looks exactly the same. Notice the newly created generated_html output directory.
$ tree hello generated_html
hello
├── config.json
└── templates
    └── index.html
generated_html
└── index.html
Serve up the newly created site and browse to http://localhost:8000/.
$ cd generated_html/
$ python3 -m http.server 8000
Serving HTTP on 0.0.0.0 port 8000 (http://0.0.0.0:8000/) ...
We’ve published the test_hello autograder testcase. You can run it yourself like this:
$ pytest -v tests/test_insta485generator_public.py::test_hello
Copy static/ directory
If the input directory contains a static/ subdirectory, copy the contents of the static/ directory to the output directory. Copy what’s inside static/, not the static/ directory itself.
Pro-tip: The shutil.copytree() function is a great way to copy a directory.
The hello_css/ example input directory is provided with the starter files. It contains a static/ directory.
$ tree hello_css
hello_css
├── config.json
├── static
│   └── css
│       └── style.css
└── templates
    └── index.html
This is the config file hello_css/config.json:
[
    {
        "url": "/",
        "template": "index.html",
        "context": {
            "words": [
                "hello",
                "world"
            ]
        }
    }
]
Here’s hello_css/templates/index.html:
<!DOCTYPE html>
<html lang="en">
  <head>
    <title>Hello world</title>
    <link rel="stylesheet" type="text/css" href="/css/style.css">
  </head>
  <body>
    {% for word in words %}
    <div class="important">{{word}}</div>
    {% endfor %}
  </body>
</html>
And hello_css/static/css/style.css:
body {
    background: pink;
}


div.important {
    font-weight: bold;
    font-size: 1000%;
}
Build and list output files. Notice that everything inside hello_css/static/ was copied to generated_html/.
$ tree hello_css
hello_css
├── config.json
├── static
│   └── css
│       └── style.css
└── templates
    └── index.html
$ rm -rf generated_html
$ insta485generator hello_css
$ tree hello_css generated_html
hello_css
├── config.json
├── static
│   └── css
│       └── style.css
└── templates
    └── index.html
generated_html
├── css
│   └── style.css
└── index.html
We’ve published the test_hello_css autograder testcase. You can run it yourself like this:
$ pytest -v tests/test_insta485generator_public.py::test_hello_css
Output
By default, render templates to generated_html. For example:
$ rm -rf generated_html
$ insta485generator hello
$ tree generated_html
generated_html
└── index.html
If the --output option is supplied, render templates directly to OUTPUT_DIR. For example:
$ insta485generator hello --output myout
$ tree myout/
myout/
└── index.html
Verbose
Here’s an example of the --verbose (-v) option with the hello input.
$ rm -rf generated_html
$ insta485generator hello --verbose
Rendered index.html -> generated_html/index.html
This example uses the hello_css input.
$ rm -rf generated_html
$ insta485generator -v hello_css
Rendered index.html -> generated_html/index.html
Copied hello_css/static -> generated_html
You can find a more complicated example of the verbose option in the Static Templated Insta485 Section. The more complicated example won’t work yet because you haven’t written the Insta485 templates, however it will give you and idea of what the output should look like.
Error messages
Catch all FileNotFoundError exceptions, as well as any exception raised by the jinja or json libraries. You should also produce an error when the output directory already exists.
Print a sensible error message beginning with insta485generator error: and exit with a non-zero value. This message is optional when the input directory does not exist because you may let Click handle this error.
The instructor solution has Click handle the input directory check. Also note that echo $? prints the exit code (return value) of the previous command.
$ insta485generator input-does-not-exist
Usage: insta485generator [OPTIONS] INPUT_DIR
Try 'insta485generator --help' for help.

Error: Invalid value for 'INPUT_DIR': Path 'input-does-not-exist' does not exist.
$ echo $?
2
$ insta485generator hello --output myout
$ insta485generator hello --output myout
insta485generator error: 'myout' already exists
$ echo $?
1
$ insta485generator hello
$ insta485generator hello
insta485generator error: 'generated_html' already exists
$ echo $?
1
$ insta485generator input-missing-config
insta485generator error: 'input-missing-config/config.json' not found
$ echo $?
1
$ insta485generator input-invalid-json
insta485generator error: 'input-invalid-json/config.json'
Expecting value: line 12 column 1 (char 186)
$ echo $?
1
$ insta485generator input-invalid-template
insta485generator error: 'test.html'
Unexpected end of template. Jinja was looking for the following tags: 'endfor' or 'else'. The innermost block that needs to be closed is 'for'.
$ echo $?
1
$ insta485generator input-missing-templates
insta485generator error: 'input-missing-templates/templates' not found
$ echo $?
1
Pro-tip: Search for the top level exception in a library and catch that. For example, Google “python json exception” and you’ll find https://docs.python.org/3/library/json.html#exceptions.
Test
Run the public autograder testcases on your insta485generator.
$ pytest -v tests/test_insta485generator_public.py
Pro-tip: Learn how to use the Python pytest unit test utility using the pytest Tutorial.
Code style
Verify that your Python code conforms the PEP 8 Style Guide for Python. Check for common Python errors and additional style guidelines using Pylint. Confirm that internal documentation (comments) conforms to the PEP 257 Docstring Conventions.
$ pip install pycodestyle pydocstyle pylint
$ pycodestyle insta485generator
$ pylint insta485generator

--------------------------------------------------------------------
Your code has been rated at 10.00/10 (previous run: 10.00/10, +0.00)

$ pydocstyle insta485generator
Test style frequently because it’s hard to fix many errors.
Submit to the autograder
You may want to submit to the autograder after completing the project up to this point to check your progress. The below command will prepare a submission tarball containing everything you’ve worked on up to this point in the project. Include the --disable-copyfile flag only on macOS.
$ tar \
  --disable-copyfile \
  --exclude '*__pycache__*' \
  -czvf submit.tar.gz \
  handcoded_html \
  insta485generator \
  pyproject.toml
Full submission instructions are in the Submission and grading section of this spec.
Static Templated Insta485
In this part of the project, you will write HTML template files that you can render using insta485generator to create a non-interactive Instagram clone. First, this section will help you create skeleton files. Then, in the URLs section, we’ll describe each page in detail and provide a screen shot.
First, copy your hand-coded HTML files as a starting point.
$ pwd
/Users/awdeorio/src/eecs485/p1-insta485-static
$ mkdir -p insta485/templates/
$ cp handcoded_html/index.html insta485/templates/index.html
$ cp handcoded_html/users/awdeorio/index.html insta485/templates/user.html
$ cp -R handcoded_html/css insta485/static/
$ cp -R handcoded_html/images insta485/static/
Create blank files for additional templates.
$ touch insta485/templates/followers.html
$ touch insta485/templates/following.html
$ touch insta485/templates/post.html
$ touch insta485/templates/explore.html
Your insta485 directory should look like this. Note that images/logo.png is optional. You are welcome to create any logo you want, or to omit it and use plain text. config.json is from the starter code.
$ tree insta485
insta485/
├── config.json
├── static
│   ├── css
│   │   └── style.css
│   ├── images
│   │   └── logo.png
│   └── uploads
│       ├── 122a7d27ca1d7420a1072f695d9290fad4501a41.jpg
│       ├── 2ec7cf8ae158b3b1f40065abfb33e81143707842.jpg
│       ├── 505083b8b56c97429a728b68f31b0b2a089e5113.jpg
│       ├── 5ecde7677b83304132cb2871516ea50032ff7a4f.jpg
│       ├── 73ab33bd357c3fd42292487b825880958c595655.jpg
│       ├── 9887e06812ef434d291e4936417d125cd594b38a.jpg
│       ├── ad7790405c539894d25ab8dcf0b79eed3341e109.jpg
│       └── e1a7c5c32973862ee15173b0259e3efdb6a391af.jpg
└── templates
    ├── explore.html
    ├── followers.html
    ├── following.html
    ├── index.html
    ├── post.html
    └── user.html
Run insta485generator with insta485_html as the output directory first. Start a development server and you’ll see the rendered templates, which at this point are just copies of your hand coded HTML files or blank files.
$ pwd
/Users/awdeorio/src/eecs485/p1-insta485-static
$ rm -rf insta485_html  # remove output directory, if it exists.
$ insta485generator insta485 -v -o insta485_html
Rendered index.html -> insta485_html/index.html
Rendered user.html -> insta485_html/users/awdeorio/index.html
Rendered following.html -> insta485_html/users/awdeorio/following/index.html
Rendered followers.html -> insta485_html/users/awdeorio/followers/index.html
Rendered user.html -> insta485_html/users/jflinn/index.html
Rendered following.html -> insta485_html/users/jflinn/following/index.html
Rendered followers.html -> insta485_html/users/jflinn/followers/index.html
Rendered user.html -> insta485_html/users/jag/index.html
Rendered following.html -> insta485_html/users/jag/following/index.html
Rendered followers.html -> insta485_html/users/jag/followers/index.html
Rendered user.html -> insta485_html/users/michjc/index.html
Rendered following.html -> insta485_html/users/michjc/following/index.html
Rendered followers.html -> insta485_html/users/michjc/followers/index.html
Rendered post.html -> insta485_html/posts/1/index.html
Rendered post.html -> insta485_html/posts/2/index.html
Rendered post.html -> insta485_html/posts/3/index.html
Rendered post.html -> insta485_html/posts/4/index.html
Rendered explore.html -> insta485_html/explore/index.html
Copied insta485/static -> insta485_html
$ cd insta485_html/
$ python3 -m http.server 8000
Serving HTTP on 0.0.0.0 port 8000 (http://0.0.0.0:8000/) ...
...
$ cd ../
Pitfall: Don’t forget to cd into your insta485_html/ directory before starting up your HTTP server. The server’s present working directory is the root directory for absolute paths in HTML links, etc.
$ pwd
/Users/awdeorio/src/eecs485/p1-insta485-static/insta485_html/
$ python3 -m http.server 8000
Utility scripts
Web developers often use short shell scripts to make their lives easier.
First, complete the Shell Scripting Tutorial.
insta485run script
Write a script to:
- Clean up the
insta485_htmloutput directory - Build the static site using
insta485generator - Start a development server on port 8000
We’ll give you the solution here for bin/insta485run. Create a folder called bin and copy the following code into a file called insta485run (note no file extension). Don’t forget to make the script executable.
#!/bin/bash
#
# insta485run
#
# Clean, build and start server
#
# Andrew DeOrio <awdeorio@umich.edu>


# Stop on errors, print commands
# See https://vaneyckt.io/posts/safer_bash_scripts_with_set_euxo_pipefail/
set -Eeuo pipefail
set -x

# Clean
rm -rf insta485_html

# Build
insta485generator insta485 -o insta485_html

# Serve
cd insta485_html
python3 -m http.server 8000
Check for shell script pitfalls.
insta485test script
Write another script called bin/insta485test:
- Stops on errors and prints commands
- Runs all unit tests using
pytest tests/ - Runs
pycodestyle insta485generator - Runs
pydocstyle insta485generator - Runs
pylint insta485generator - Cleans up a previous
insta485_htmldirectory - Builds a new
insta485_htmldirectory usinginsta485generator - Validates hand-coded HTML in
handcoded_html/usinghtml5validator(html5validator --ignore JAVA_TOOL_OPTIONS --root handcoded_html) - Validates generated HTML in
insta485_html/usinghtml5validator(html5validator --ignore JAVA_TOOL_OPTIONS --root insta485_html)
You should now have a bin directory with two scripts:
$ tree bin/
bin/
├── insta485run
└── insta485test
Check your files
Here’s a complete list of project files up to this point, excluding automatically generated files like env and __pycache__.
$ pwd
/Users/awdeorio/src/eecs485/p1-insta485-static
$ tree -I 'env|__pycache__|*.egg-info'
.
├── bin
│   ├── insta485run
│   └── insta485test
├── hello
│   ├── config.json
│   └── templates
│       └── index.html
├── hello_css
│   ├── config.json
│   ├── static
│   │   └── css
│   │       └── style.css
│   └── templates
│       └── index.html
├── handcoded_html
│   ├── css
│   │   └── style.css
│   ├── images
│   │   └── logo.png
│   ├── index.html
│   ├── uploads
│   │   ├── 122a7d27ca1d7420a1072f695d9290fad4501a41.jpg
            ...
│   │   └── e1a7c5c32973862ee15173b0259e3efdb6a391af.jpg
│   └── users
│       └── awdeorio
│           └── index.html
├── insta485
│   ├── config.json
│   ├── static
│   │   ├── css
│   │   │   └── style.css
│   │   ├── images
│   │   │   └── logo.png
│   │   └── uploads
│   │       ├── 122a7d27ca1d7420a1072f695d9290fad4501a41.jpg
                ...
│   │       └── e1a7c5c32973862ee15173b0259e3efdb6a391af.jpg
│   └── templates
│       ├── explore.html
│       ├── followers.html
│       ├── following.html
│       ├── index.html
│       ├── post.html
│       └── user.html
├── insta485generator
│   ├── __init__.py
│   └── __main__.py
├── pyproject.toml
├── requirements.txt
└── tests
    ├── test_handcoded_html.py
        ...
    └── utils.py
URLs
Now, write templates for each type of URL. You are welcome to add extra files, for example, if you’d like to use template inheritance. Style the pages any way you like.
List of URLs and templates:
/->index.html/users/<user_url_slug>/->user.html/users/<user_url_slug>/followers/->followers.html/users/<user_url_slug>/following/->following.html/posts/<postid_slug>/->post.html/explore/->explore.html
All pages
Include a link to /.
Include a link to /explore/.
Include the text <logged_in_user> with a link to /users/<logged_in_user>/.
Include <title>insta485</title>. Nothing else should be in the <title> section
Index /
All posts from other users that the logged in user is following (including their own). The logged in user is specified by logname in config.json. The posts are in the order that they appear in the JSON config file. For each post:
- Link to the post detail page
/posts/<postid_slug>/by clicking on the timestamp. - Link to the post owner’s page
/users/<user_url_slug>/by clicking on their username or profile picture. - Time since the post was created
- Number of likes, using correct English
- Comments, with owner’s username, in the order that they appear in the JSON config file.
- Link to the comment owner’s page
/users/<user_url_slug>/by clicking on their username.
- Link to the comment owner’s page
- Actual image corresponding to the post.
Here’s an example of correct English for number of likes “0 likes”, “1 like”, “2 likes”. The same plural rules apply to number of posts, likes, and followers. Following is always the same “0 following”, “1 following”, “2 following”.
Pro-tip: Remember to run the insta485run script from your main project directory and then view your work-in-progress in the browser at http://localhost:8000/.
$ ./bin/insta485run
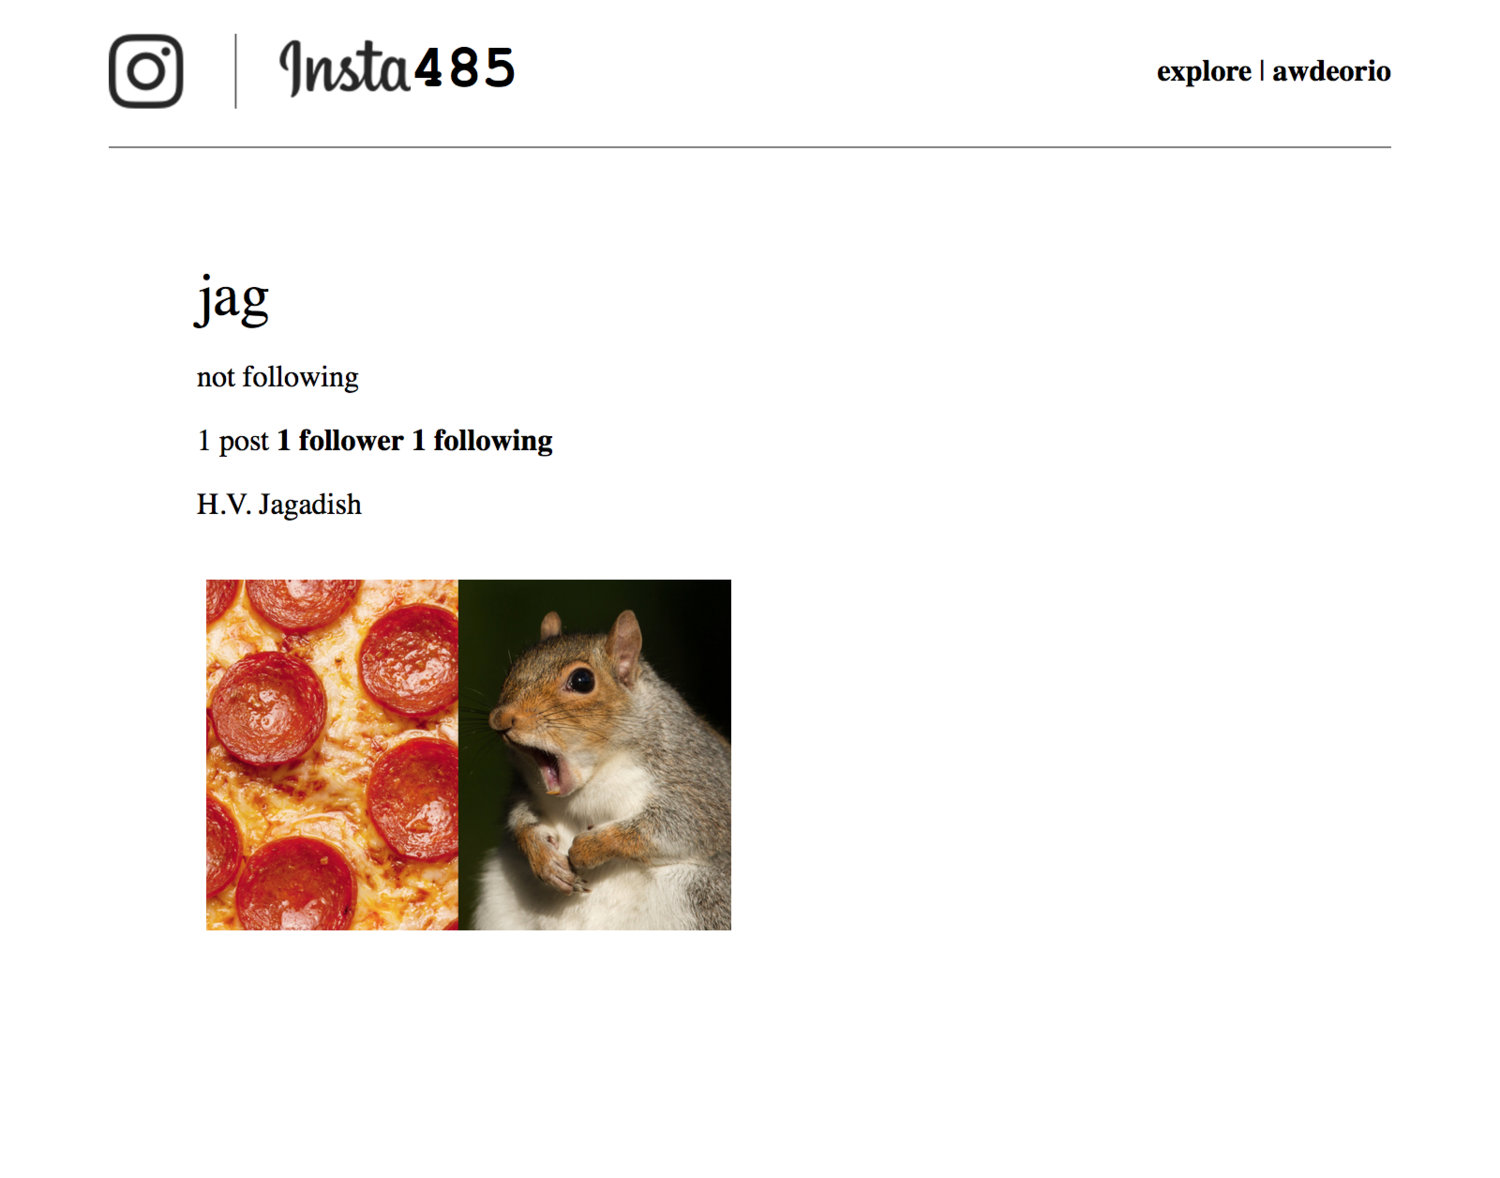
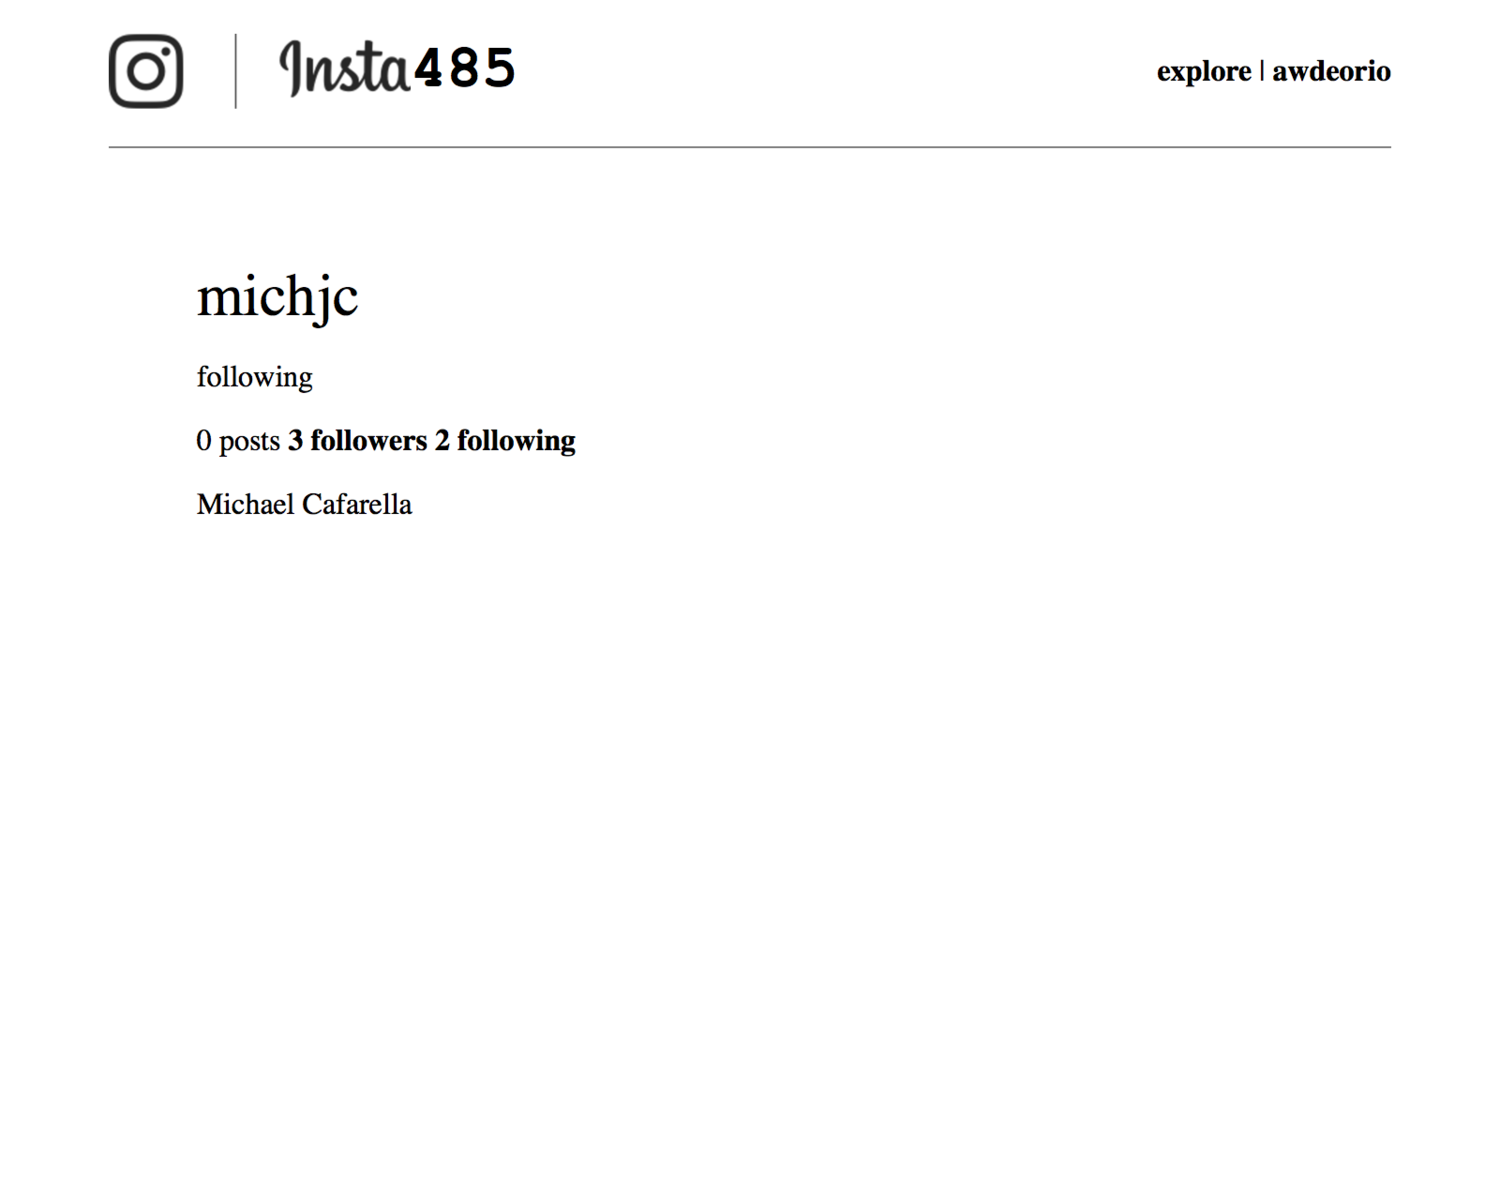
/users/<user_url_slug>/
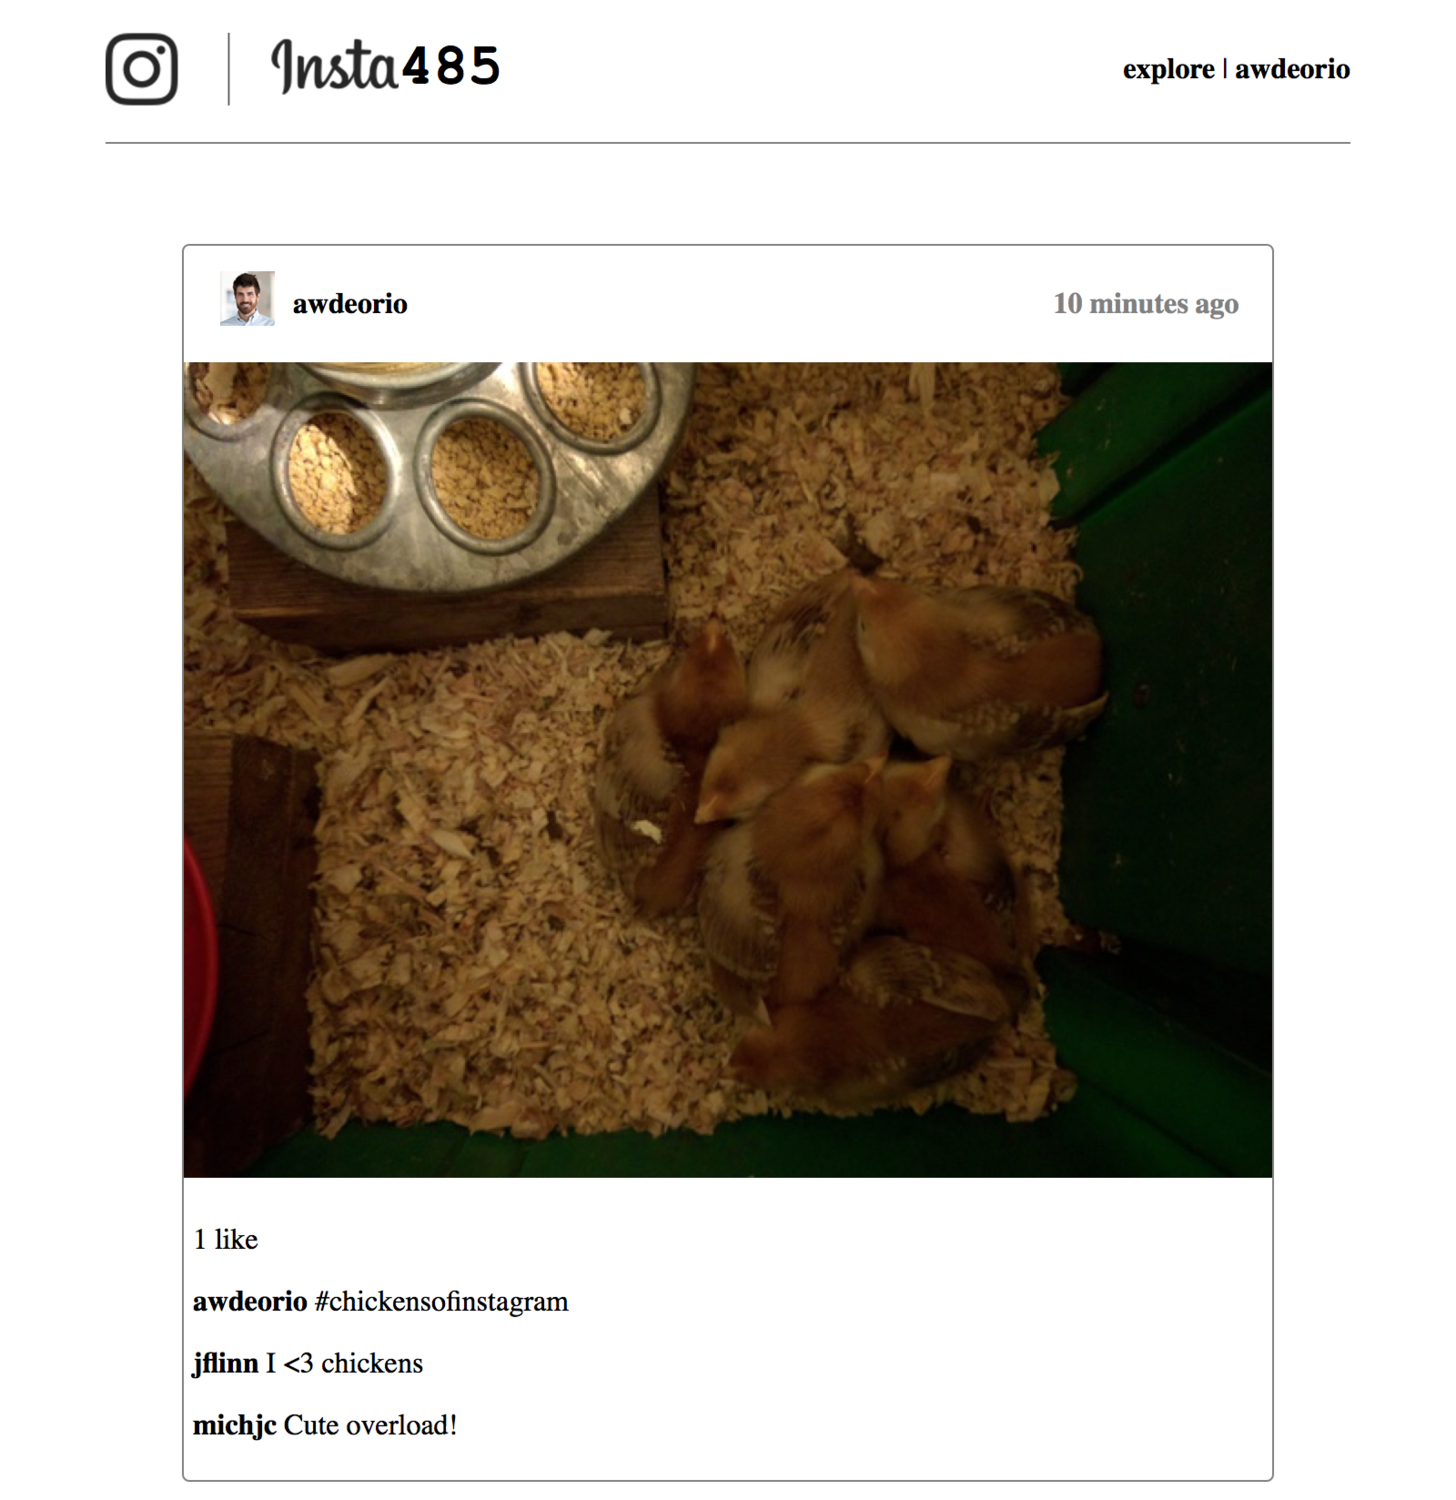
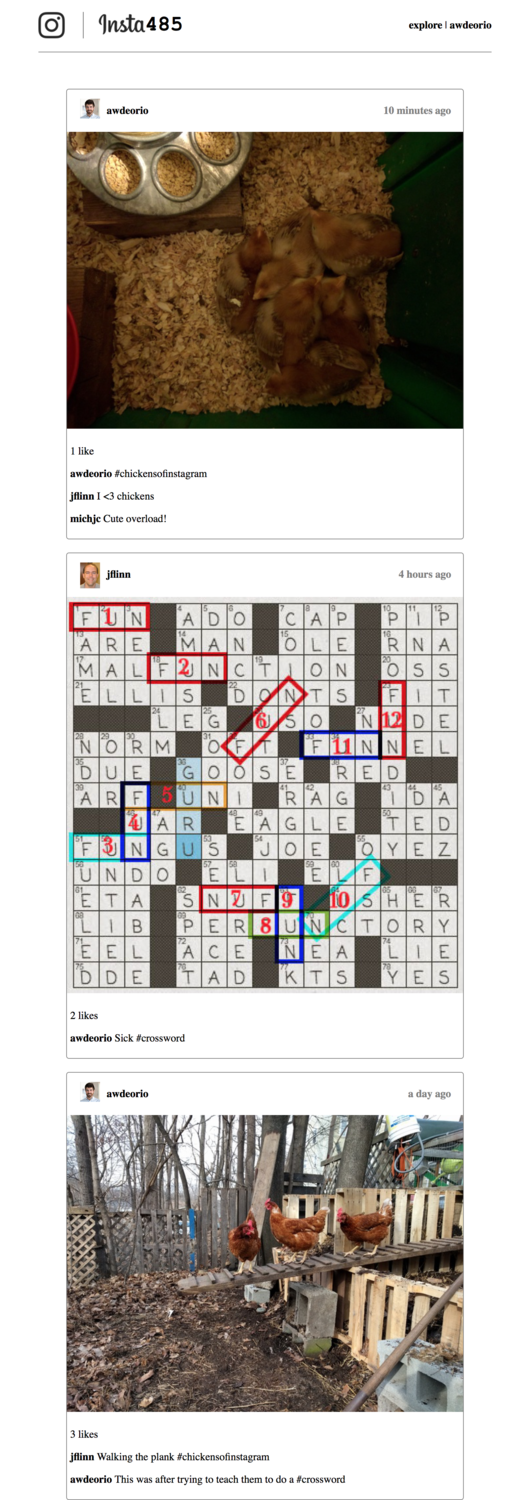
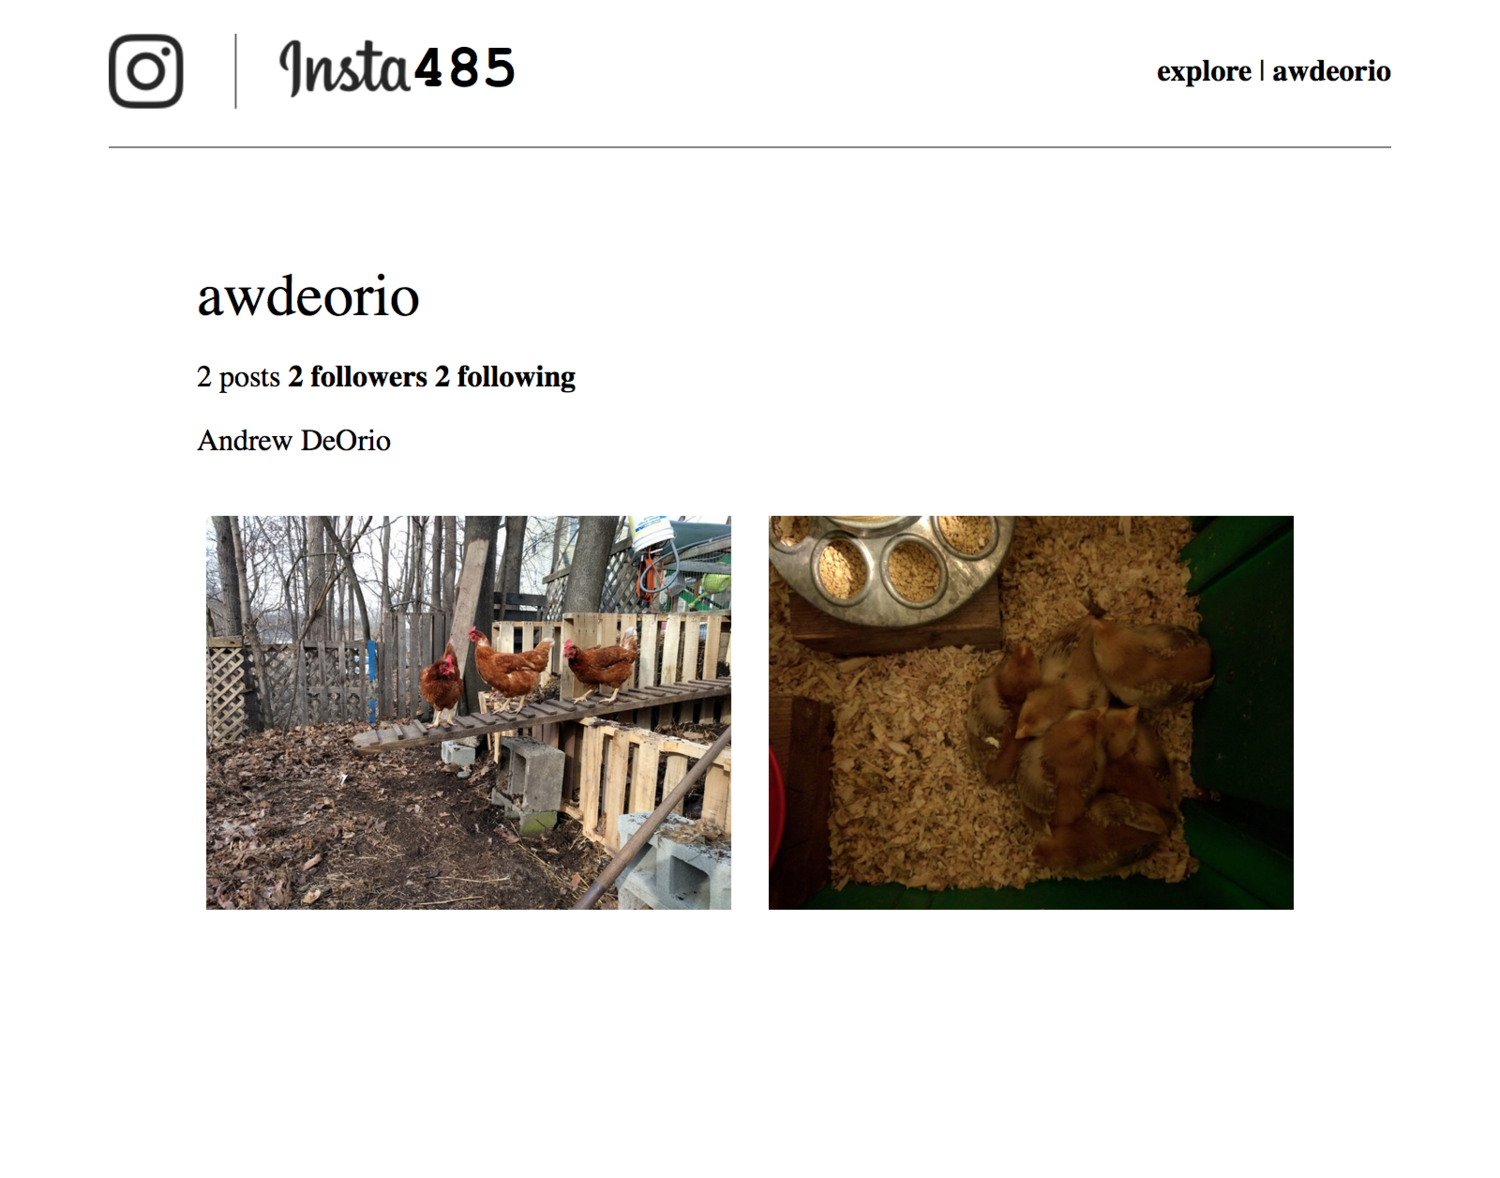
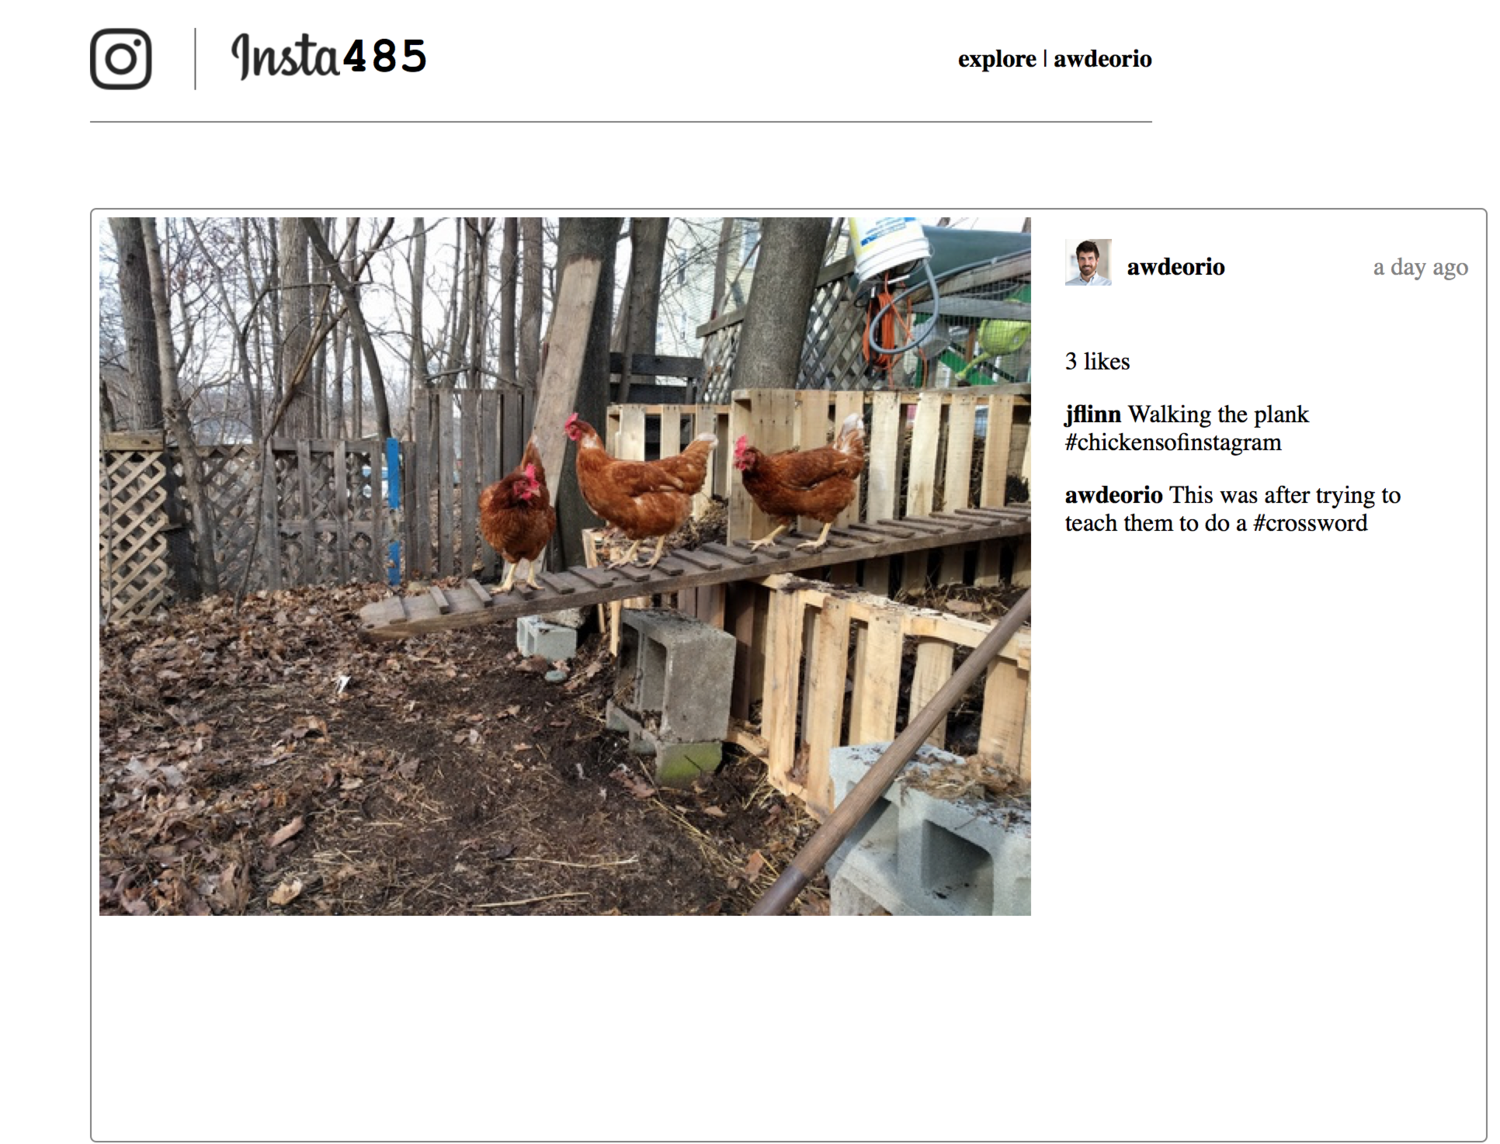
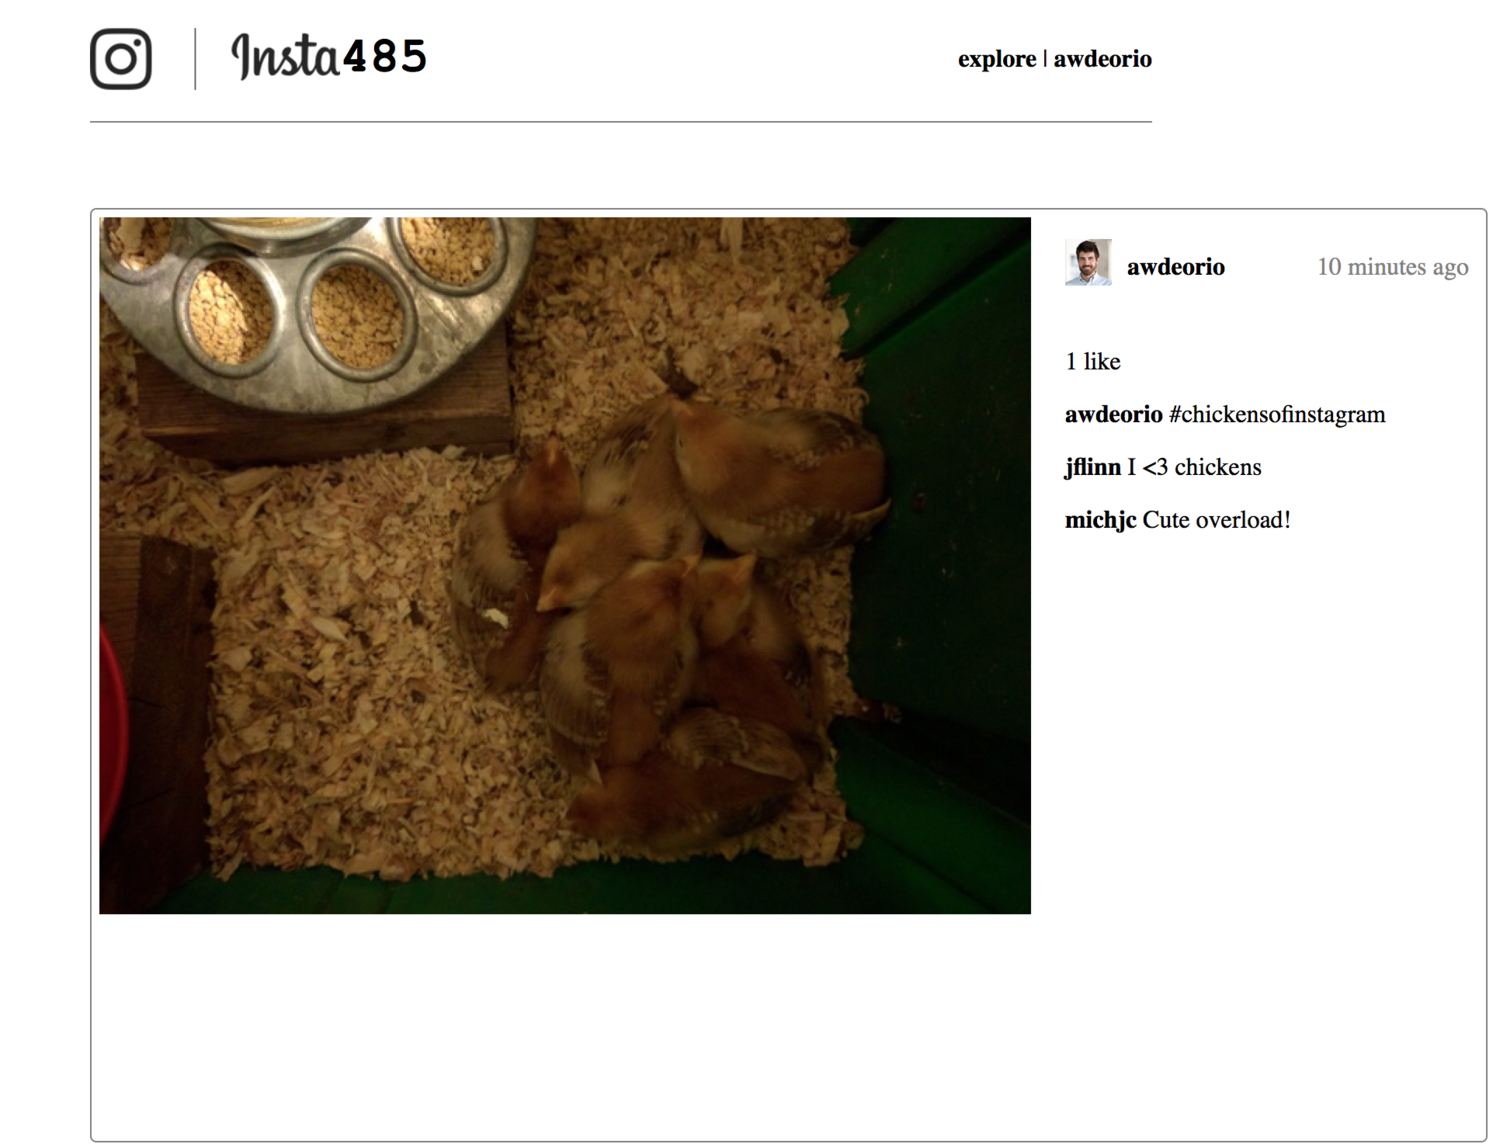
screenshot 1, screenshot 2, screenshot 3, screenshot 4
Be sure to include
- username (
user_url_slug) - Relationship
- “following” if the logged in user is following
user_url_slug - “not following” if the logged in user is not following
user_url_slug - Blank if logged in user ==
user_url_slug
- “following” if the logged in user is following
- Number of posts, with correct English
- Number of followers, with correct English
- Link to
/users/<user_url_slug>/followers/
- Link to
- Number following
- Link to
/users/<user_url_slug>/following/
- Link to
- Name
- A small image for each post
- Clicking on the image links to
/posts/<postid_url_slug>/
- Clicking on the image links to
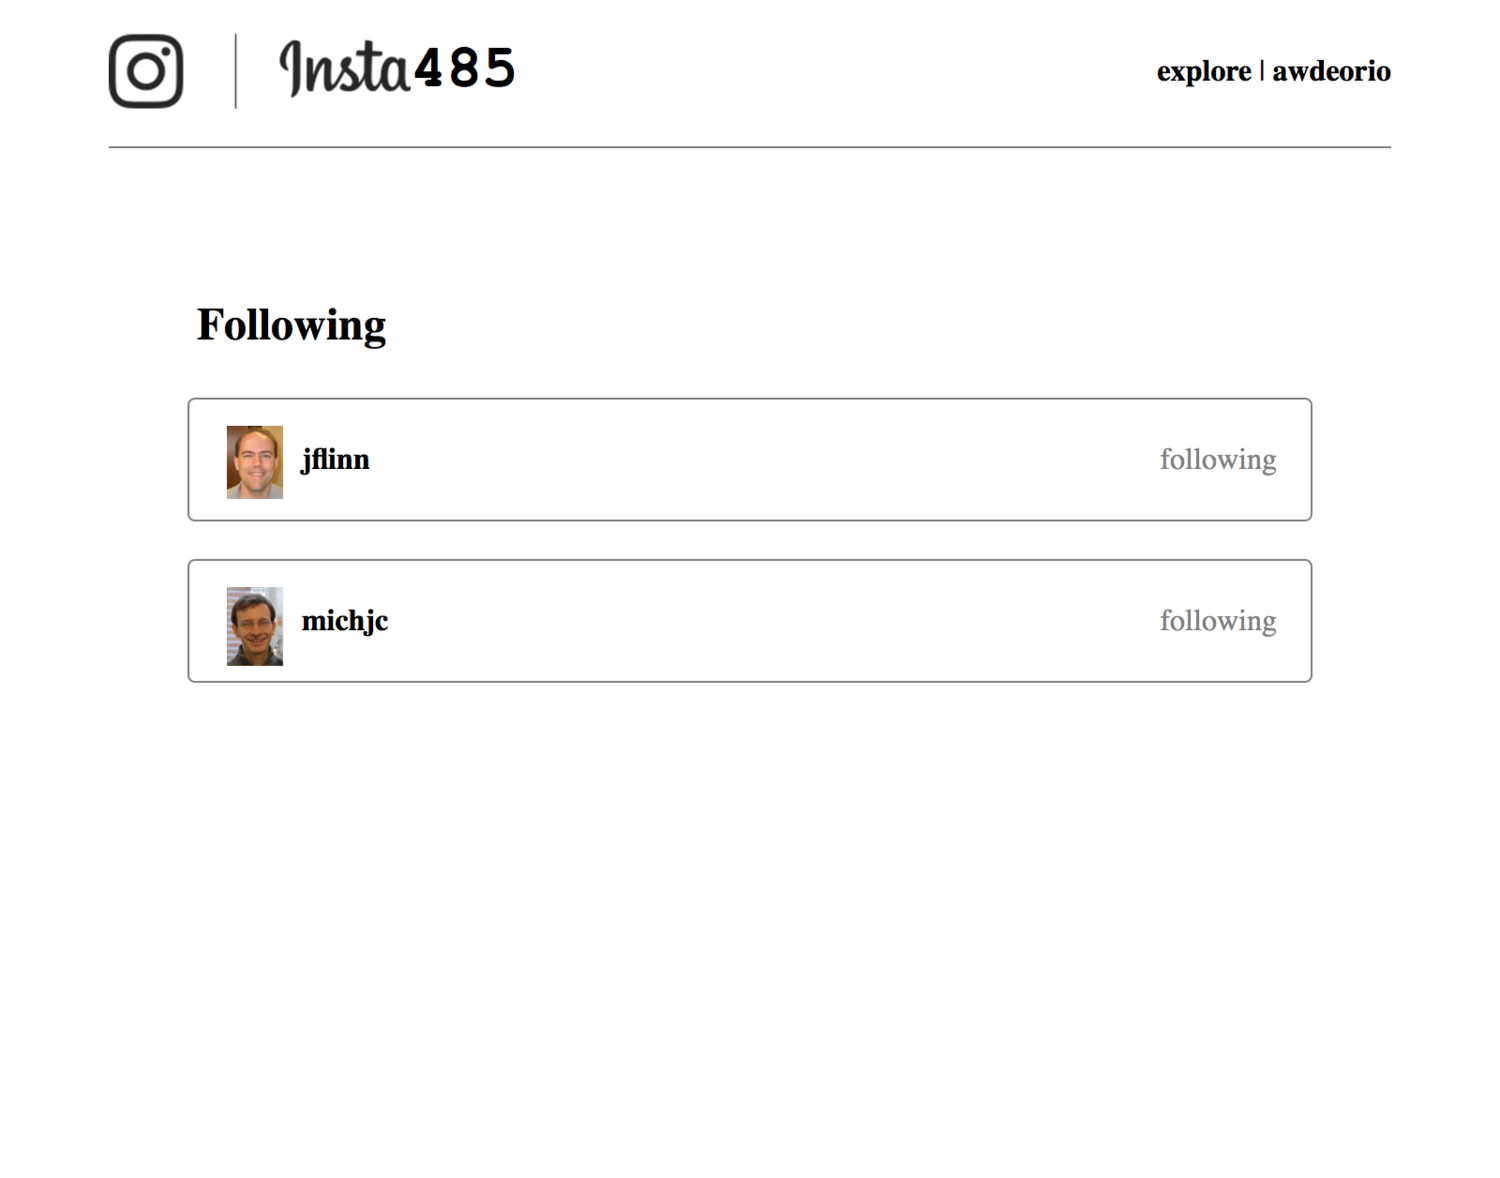
/users/<user_url_slug>/followers/
List the users that are following user_url_slug. For each, include:
- Profile Picture
- Username, with link to
/users/<username>/ - Relationship to logged in user
- “following” if logged in user is following username
- “not following” if logged in user is not following username
- Blank if logged in user == username
/users/<user_url_slug>/following/
List the users that user_url_slug is following. For each, include:
- Profile Picture
- Username, with link to
/users/<username>/ - Relationship to logged in user
- “following” if logged in user is following username
- “not following” if logged in user is not following username
- Blank if logged in user == username
/explore/
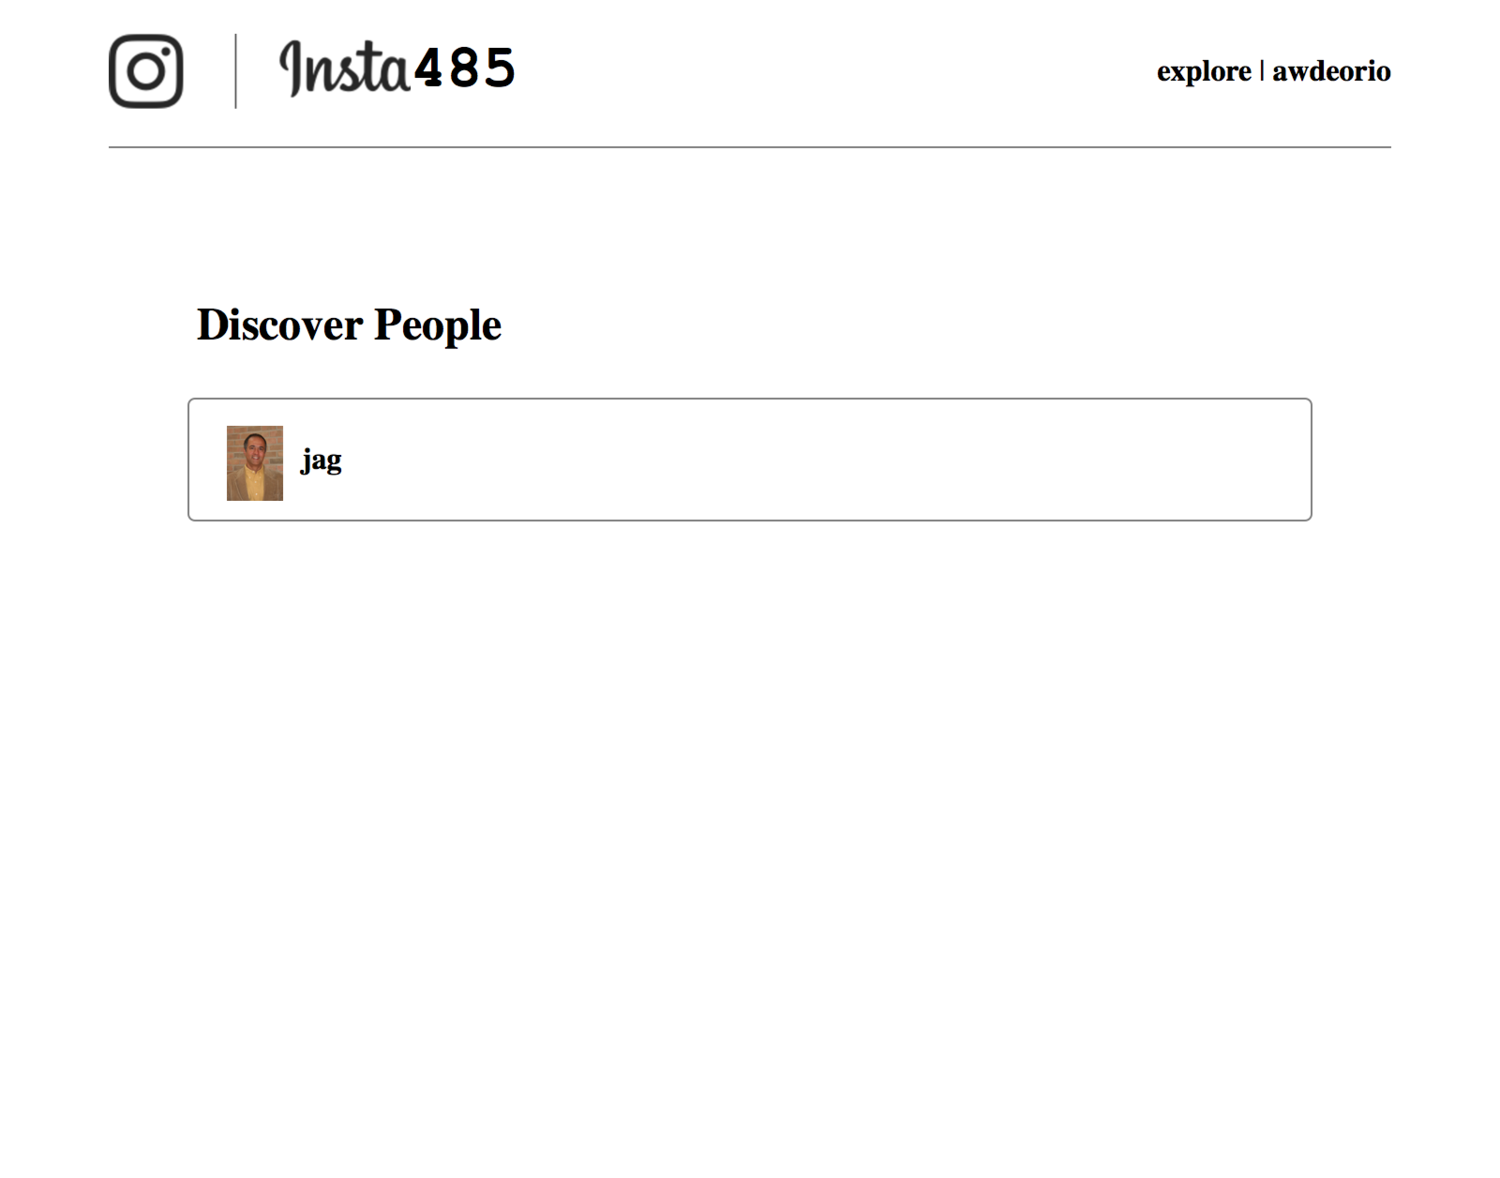
This page lists all users that the logged in user is not following and includes:
- Profile Picture
- Username with link to
/users/<user_url_slug>/
/posts/<postid_url_slug>/
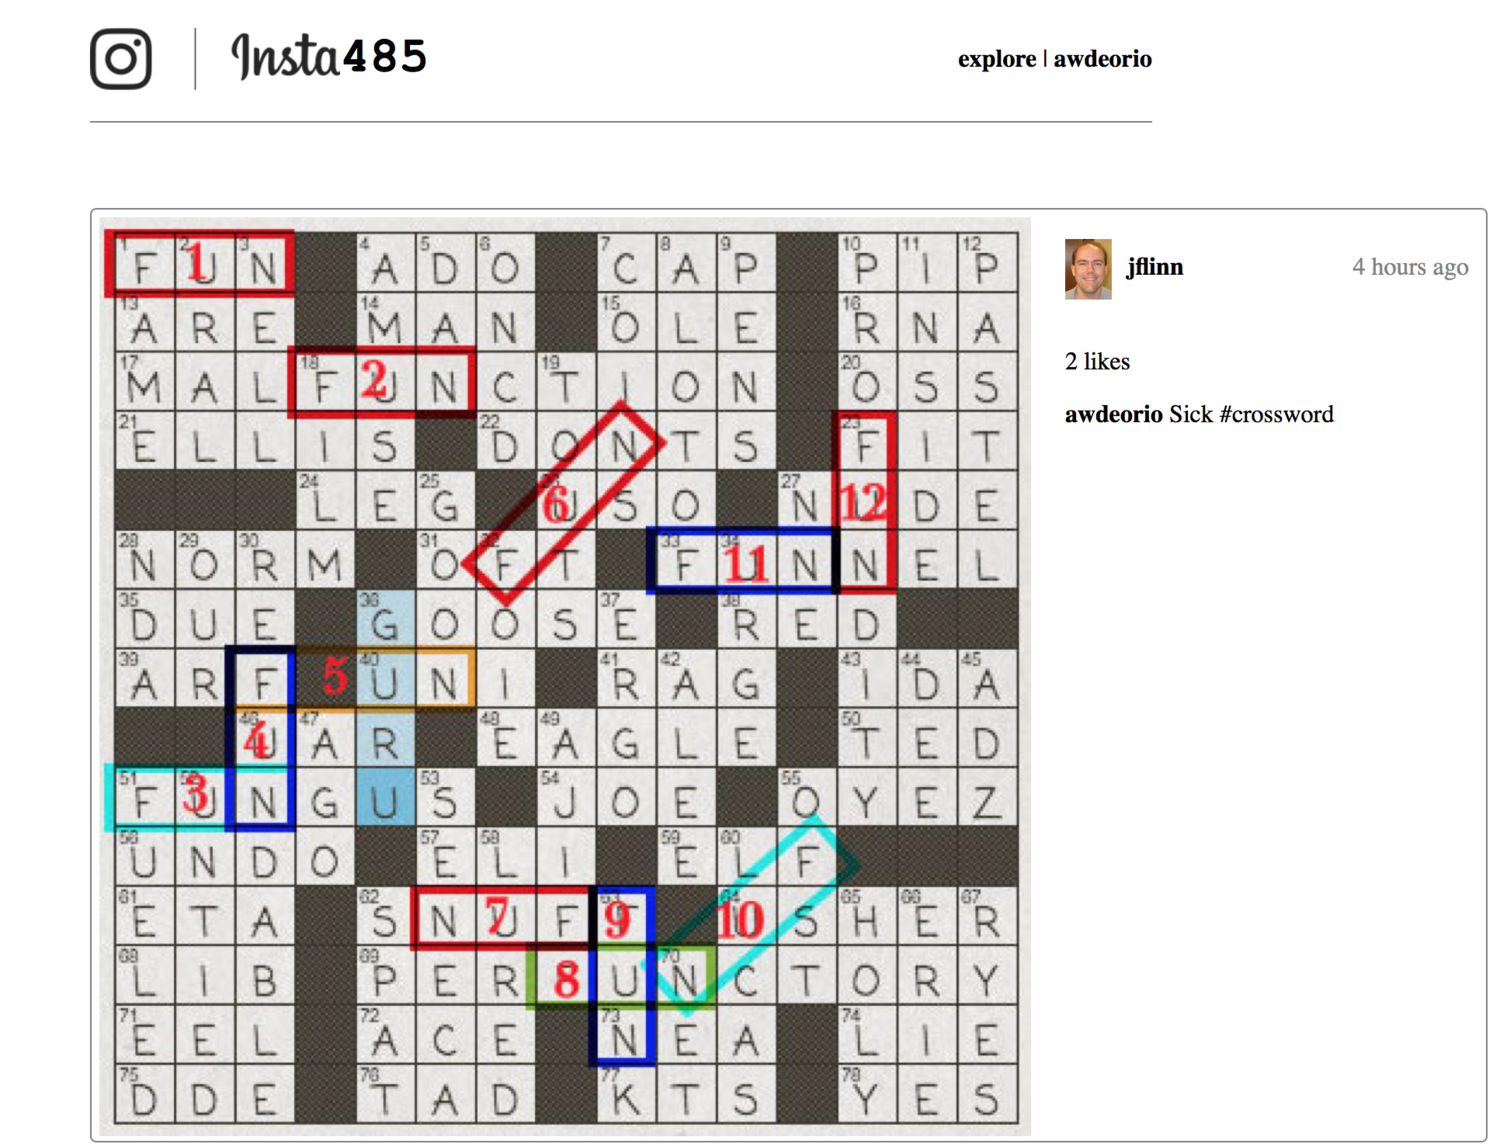
screenshot 1, screenshot 2, screenshot 3, screenshot 4
This page shows one post. Include the same information for this one post as is shown on the main page /.
Test
Run the public autograder testcases on your insta485.
$ pytest -v tests/test_template_*
Submitting and grading
Run the published autograder test cases locally.
$ pytest -v
Submit a tarball to the autograder. Only use the direct link to the autograder for this project, below. Include the --disable-copyfile flag only on macOS. If you have not yet completed the project, you may see an error that looks like tar: bin: Cannot stat: No such file or directory, which is safe to ignore.
$ tar \
  --disable-copyfile \
  --exclude '*__pycache__*' \
  --exclude 'insta485_html' \
  -czvf submit.tar.gz \
  bin \
  handcoded_html \
  insta485 \
  insta485generator
The autograder will run pip install -e YOUR_SOLUTION. The exact library versions in the requirements.txt provided with the starter files is cached on the autograder, so be sure not to add extra library dependencies to requirements.txt or pyproject.toml.
Avoid adding any large images to the tarball. The Autograder may throw an error in case the size of the tarball is greater than 5MB. Use the following command to verify the size of the tarball:
$ du -h submit.tar.gz
2.1M	submit.tar.gz
Direct link to the Summer 2026 Project 1 autograder: https://autograder.io/web/project/3950
Rubric
This is an approximate rubric. Note than we cannot give additional information about what the private testcases do. To maximize points, make sure that you are following all directions in the spec. Note that the public tests cases do not test everything that your program must do.
| Test | Value |
|---|---|
| Public unit tests | 50% |
| Public Python and HTML style | 10% |
| Hidden unit tests run after the deadline | 40% |
Acknowledgments
Original project written by Andrew DeOrio awdeorio@umich.edu, fall 2017.
This document is licensed under a Creative Commons Attribution-NonCommercial 4.0 License. You’re free to copy and share this document, but not to sell it. You may not share source code provided with this document.