chat485
EECS 485 P1: Templated Static Site Generator
A ChatGPT clone implemented with static pages.
Due 11:59pm ET September 15, 2026. This is an individual project.
Change log
F26 release.
- 2026-09-03: Fixed the autograder rejecting handcoded-only checkpoint submissions (Setup failed with exit status 1). See Submitting and grading.
- 2026-09-08: Fixed autograder test
test_hello_world_contentthat required the words “user” and “assistant” to appear in conversation page text. The spec does not ask for visible role labels and we removed those assertions. See Conversation detail. - 2026-09-08: Fixed autograder test
test_current_conversation_markedthat only recognized one specific sidebar markup. It now finds conversation links byhrefinstead of by CSS class name. See Pages. - 2026-09-09: Documented
tests/testdata/as the home for input files used bytests/test_student.py, and added it to the submission tarball commands. See Write your own tests. - 2026-09-10: Documented
aria-current="page"on the hand-coded conversation page. The autograder already required it; the spec described it only for the templated site. See Hand-coded HTML. - 2026-09-14: Documented the
valueattribute on the model picker’s<option>elements, for example<option value="echo-1">echo-1</option>. The autograder already required it and Project 2 specifies it; the P1 spec listed only the model ids. See Hand-coded HTML and Pages.
After the F26 deadline. These changes take effect next semester.
- 2026-10-07: Clarified that
chat485generatorerror messages go to stderr. See Error messages. - 2026-10-07: Fixed autograder tests
test_contentandtest_hello_world_contentthat rejected a “Send” button written as an<input>, for example<input type="submit" value="Send">. They searched the page text, which does not include attribute values. Either form now passes. See Hand-coded HTML and Pages. - 2026-10-07: Clarified that conversation pages don’t need visible role labels (“user” or “assistant”). The autograder doesn’t check for them. See Conversation detail.
- 2026-10-07: Switched the instructor-written tests and the
test_helloexample from pytest’s legacytmpdirfixture to its modern replacement,tmp_path, which is apathlib.Path. Tests you already wrote withtmpdirstill work. See Write your own tests.
Introduction
A ChatGPT clone implemented with a templated static site generator. This is the first of a three project sequence: a static site generator from templates, server-side dynamic pages, and client-side dynamic pages.
The learning goals of this project are HTML, templates, Python programming, basic shell scripting, and guided use of generative AI tools. It is also a readiness test that will give you an idea of what EECS 485 will be like.
Write a Python program that takes as input HTML templates, JSON data, and miscellaneous static files (like images and CSS) and generates as output a website of static content. Then, use your new tool to build a non-interactive Chat485 website. Jekyll and Pelican are two examples of open source static site generators.
Here’s a preview of what your finished project will look like. chat485generator is the name of the Python program you will write. chat485 is an input directory containing HTML templates, JSON data, and miscellaneous static files (like images and CSS). chat485_html is an output directory containing generated static HTML files.
$ chat485generator chat485 -o chat485_html
$ python3 -m http.server 8000 -d chat485_html/
Serving HTTP on 0.0.0.0 port 8000 (http://0.0.0.0:8000/) ...
Then you will navigate to http://localhost:8000 and see the non-interactive website that you created. Unlike the real ChatGPT, this version cannot talk back: the conversations are fixed data, the “Send” button submits nowhere, and there is no model behind it. You build the look of a chat application without the dynamic behavior, which arrives in Project 2.
Generative AI policy
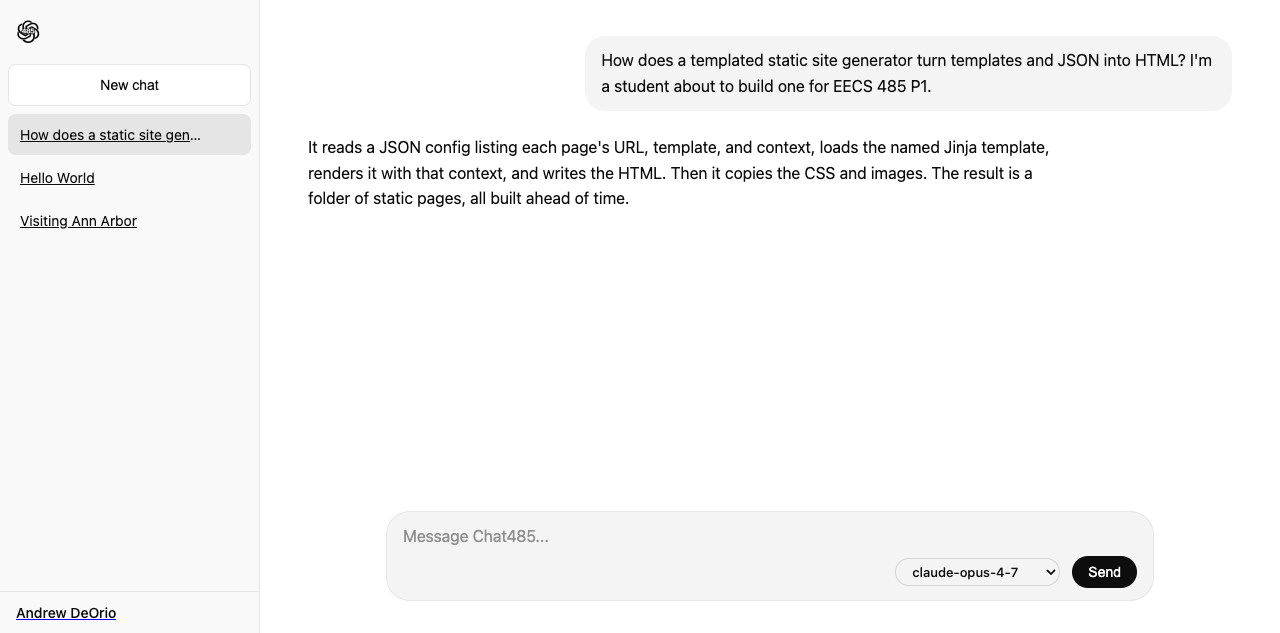
A learning goal of this project is guided use of generative AI tools. Use GenAI to learn, not to write the code you submit.
Core rule: Do not use GenAI to write any code you submit for the core project. This includes the chat485generator Python code, the hand-coded HTML, the Jinja templates, your tests/test_student.py test suite, and the bin/ shell scripts. CSS and styling are fine. If GenAI writes your generator, the next bug feels like magic.
For learning: Use GenAI to explain concepts, compare approaches, and surface tradeoffs, then write the code yourself. Identify yourself as a student in the prompt so the model explains rather than codes. Example:
What is the difference between a command line argument and an option in the Python Click library, and when would I use each? I am a student learning Click.
Exceptions: Codegen, including agentic tools, is allowed for reach goals.
Your responsibility: You are responsible for every line you submit. If you cannot explain a line, you should not have submitted it.
GenAI pro-tip: U-M GPT is free for U-M students. Pick a recent model, such as GPT-5.6 Sol, or a model with reasoning enabled, such as GPT-5.5 Reasoning. Reasoning models generally perform better on engineering tasks.
GenAI pro-tip: To chat about the spec, include it as context.
If you’re using U-M GPT, first save the spec as a PDF and upload it. (It can’t browse the web and only accepts PDFs.) With this page open in your browser, print to PDF (Cmd+P on macOS, Ctrl+P on Windows and WSL) and choose “Save as PDF”. Skip this step if your chat can browse the web.
I’m a student working on EECS 485 Project 1, a Python static site generator for a chat app. The spec is here: https://eecs485staff.github.io/p1-chat485-static/ Act as a tutor. Explain concepts, compare approaches, and point me to the relevant spec section or tutorial, but don’t write code I’ll submit (the chat485generator Python, hand-coded HTML, or Jinja templates); I’ll write that myself. Cite the spec section your answer draws from so I can verify it, and if the spec doesn’t cover something, say so instead of guessing.
My question: How do I get started?
Setup
We’ll walk you through setting up your operating system, Python virtual environment, and version control.
Command line tools
The command line interface (CLI) lets us interact with the computer using the keyboard instead of the mouse. Select your operating system to install CLI tools.
| macOS | Windows | Linux |
Take a look at our text editor tips and tricks.
Project folder
Create a folder for this project. Your folder location might be different.
$ pwd
/Users/awdeorio/src/eecs485/p1-chat485-static
Pitfall: Avoid paths that contain spaces. Spaces cause problems with some command line tools.
| Bad | Good |
|---|---|
EECS 485/Project 1 Chat485 Static |
eecs485/p1-chat485-static |
Pitfall: Avoid project directories starting with /mnt/c/. This shared directory is slow.
| Bad | Good |
|---|---|
/mnt/c/ ... |
/home/awdeorio/ ... |
Version control
Set up version control using the Version control tutorial.
After you’re done, you should have a local repository with a “clean” status and your local repository should be connected to a remote GitHub repository.
$ git status
On branch main
Your branch is up-to-date with 'origin/main'.

nothing to commit, working tree clean
You should have a .gitignore file (instructions).
$ head .gitignore
# This is a sample .gitignore file that's useful for EECS 485 projects.
...
submit.tar.gz
submit.tar.xz
Python virtual environment
Create a Python virtual environment for Project 1 using the Python Virtual Environment Tutorial.
Pitfall: Don’t forget to activate your virtual environment at the start of every coding session or new shell.
$ source env/bin/activate
You should now have Python tools and third party packages installed locally. Notice that the path to python is in the virtual environment (p1-chat485-static/env/bin).
$ which python
/Users/awdeorio/src/eecs485/p1-chat485-static/env/bin/python
Starter files
Download and unpack the starter files in your project directory.
$ pwd
/Users/awdeorio/src/eecs485/p1-chat485-static
$ wget https://eecs485staff.github.io/p1-chat485-static/starter_files.tar.gz
$ tar -xvzf starter_files.tar.gz
Move the starter files to your project directory and remove the original starter_files/ directory.
$ mv starter_files/* .
$ rm -rf starter_files starter_files.tar.gz
You should see these files.
$ tree -I 'env|__pycache__'
.
├── AGENTS.md
├── chat485
│   └── config.json
├── hello
│   ├── config.json
│   └── templates
│       └── index.html
├── hello_css
│   ├── config.json
│   ├── static
│   │   └── css
│   │       └── style.css
│   └── templates
│       └── index.html
├── pyproject.toml
├── requirements.txt
└── tests
    ...
    └── utils.py
| File | Description |
|---|---|
AGENTS.md |
The Generative AI policy, in a form coding agents follow |
hello/ |
Sample input for chat485generator |
hello_css/ |
Sample input for chat485generator |
chat485/ |
Static templated Chat485 goes here |
chat485/config.json |
Data for your Chat485 templates |
pyproject.toml |
chat485generator Python package configuration |
requirements.txt |
Python package dependencies matching the autograder |
tests/ |
Public unit tests |
tests/testdata/ |
Input files for the public tests and your own tests |
Before making any changes to the clean starter files, it is a good idea to make a commit to your Git repository.
Hand-coded HTML
Once you have your computer set up, you’ll write two HTML files by hand. This will give you practice with HTML, which you’ll later generate using templates and Python code.
handcoded_html/index.html(the home page)handcoded_html/conversations/a1b2c3d4-e5f6-7890-abcd-ef1234567890/index.html(one conversation page)
New to HTML? The W3 Schools Beginner’s Guide to HTML will help get you started.
The developer tools built into your browser help you inspect your HTML and CSS. Learn them with the Browser Tutorial. Skip the sections on Cookies, Private Browsing, and JavaScript Debugging.
Setup
Create a directory layout using mkdir inside your project directory. The image logo.png is optional; you can style your website however you like. Here are some commands to get you started.
$ mkdir -p handcoded_html/css/
$ mkdir -p handcoded_html/images/
$ mkdir -p handcoded_html/conversations/a1b2c3d4-e5f6-7890-abcd-ef1234567890/
$ touch handcoded_html/css/style.css  # touch creates empty files
$ touch handcoded_html/index.html
$ touch handcoded_html/conversations/a1b2c3d4-e5f6-7890-abcd-ef1234567890/index.html
Start your two HTML files like this. Edit HTML files with a text editor.
<!DOCTYPE html>
<html lang="en">
Hello world!
</html>
Run a test server and browse to http://localhost:8000/, where you will see “hello world”. python3 -m http.server is a static file server, which serves copies of files from the server’s file system.
$ python3 -m http.server 8000 -d handcoded_html/
Serving HTTP on 0.0.0.0 port 8000 (http://0.0.0.0:8000/) ...
Pitfall: Do not preview HTML files by opening them in your browser (e.g., double click an .html file).
Keep up your good git habits by committing files when you’ve completed each small task.
Home page
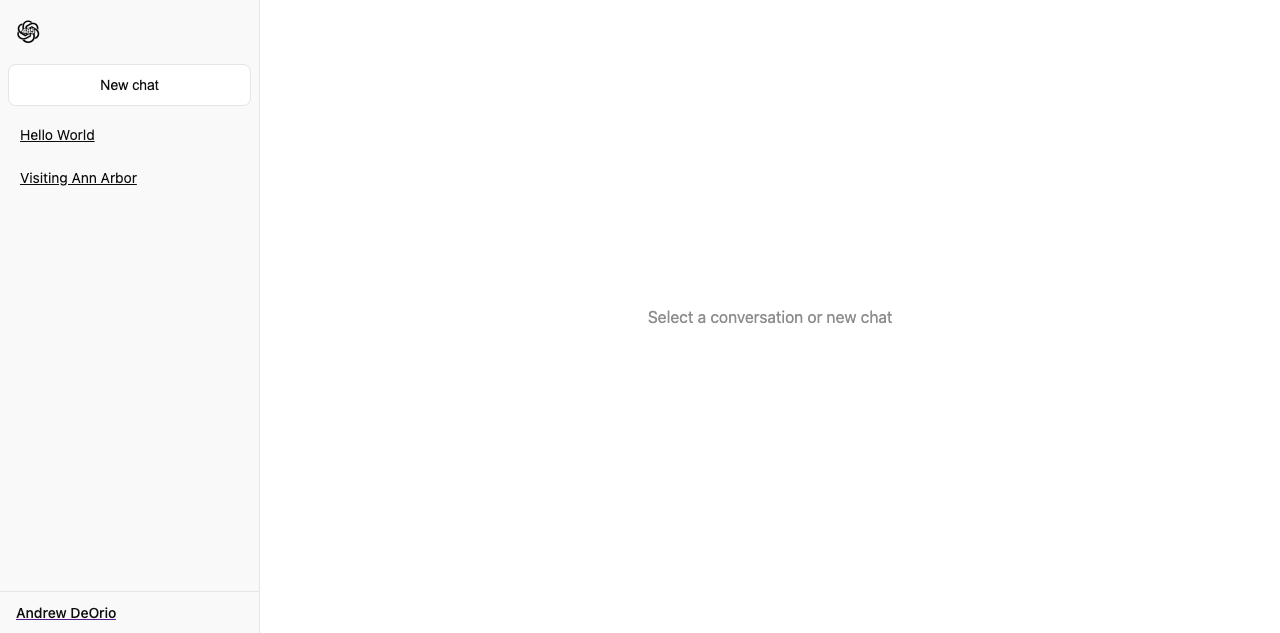
Continue working on handcoded_html/index.html. When you’re done, the page should have the following content, although yours might look different.
The home page is the static analog of the Chat485 home screen: a sidebar that lists conversations and a main area with a welcome message.
- Include
<title>Chat485</title>. Nothing else should be in the<title>section. - Include a link to
/. If you choose not to include a logo, include some text to make sure this link is clickable. - Include a “New chat” button or link.
- List both seed conversations in the sidebar. Each conversation links to its page:
- “Hello World” links to
/conversations/a1b2c3d4-e5f6-7890-abcd-ef1234567890/ - “Visiting Ann Arbor” links to
/conversations/c3d4e5f6-a7b8-9012-cdef-123456789012/ - The home page is not a conversation page, so neither link is marked with
aria-current="page".
- “Hello World” links to
- Show the logged-in user’s full name, “Andrew DeOrio”.
- Show the welcome message “Select a conversation or new chat” in the main area.
Your HTML must include the required text and links. It’s okay if some links lead to nowhere for this hand-coded portion. CSS is optional.
Pitfall: Always use absolute paths, including links, images, and stylesheets. Absolute paths start with /.
Pitfall: Always end paths to directories with a trailing /. For example: /conversations/a1b2c3d4-e5f6-7890-abcd-ef1234567890/ instead of /conversations/a1b2c3d4-e5f6-7890-abcd-ef1234567890.
Conversation page
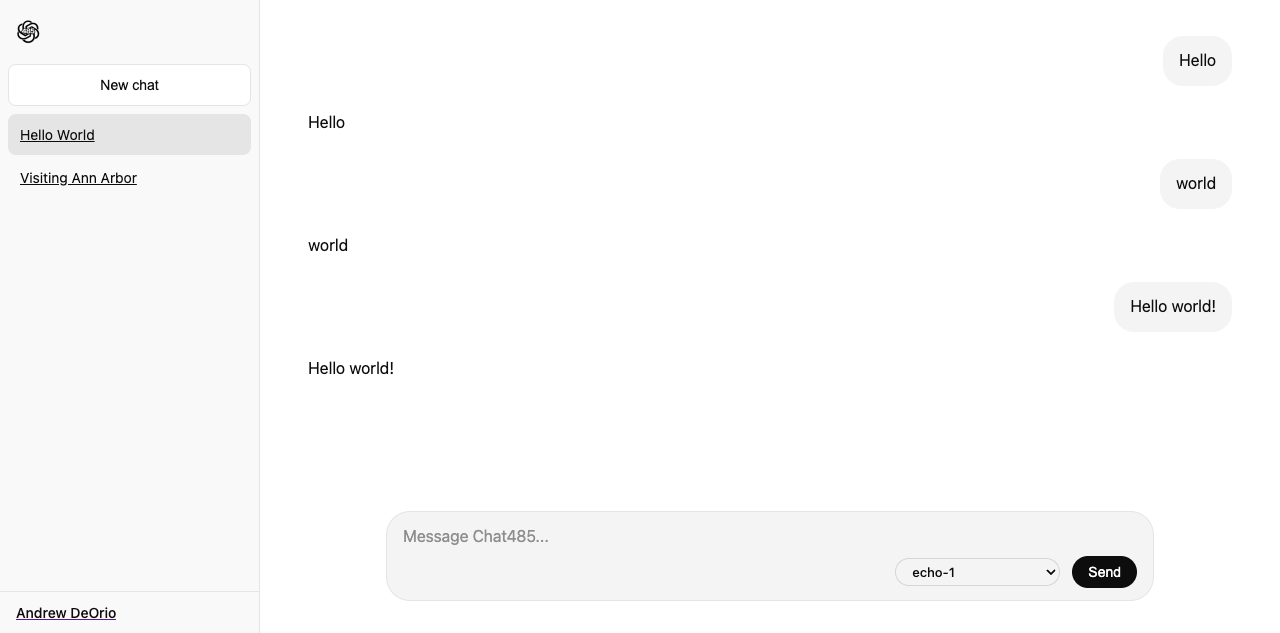
Next, code handcoded_html/conversations/a1b2c3d4-e5f6-7890-abcd-ef1234567890/index.html. This is the “Hello World” conversation, which has six messages. When you’re done, the page should have the following content, although yours might have different styling.
- Include
<title>Chat485</title>. Nothing else should be in the<title>section. - Include the same sidebar as the home page: a link to
/, a “New chat” button, both conversations linking to their pages, and the user’s full name “Andrew DeOrio”. - Mark the sidebar link for the current conversation with
aria-current="page". Styling the marked conversation is optional. - Show each message in the conversation, oldest first. The “Hello World” conversation has these six messages in order. (The assistant echoes each user message, so the content repeats.)
- Hello
- Hello
- world
- world
- Hello world!
- Hello world!
- Include a message input area with a “Send” button and a model picker, a dropdown (
<select>) listing the chat modelsecho-1,llama3.2:3b,claude-sonnet-4-6,gpt-5, andgemini-3.0-flash, withecho-1first and selected by default. Each model is an<option>whosevalueis the model id. The button submits nowhere and selecting a model does nothing; both are inert in the static site.
Testing
All HTML should be W3C HTML5 compliant. Here’s how to check yours at the command line.
$ html5validator --root handcoded_html/
In some environments the Java runtime prints a Picked up JAVA_TOOL_OPTIONS line that the validator counts as an error. You can silence it with --ignore JAVA_TOOL_OPTIONS.
Install libraries needed by the test suite. You only need to do this once. Make sure your virtual environment is activated first.
$ which pip
/Users/awdeorio/src/eecs485/p1-chat485-static/env/bin/pip
$ pip install -r requirements.txt
You should now pass the hand-coded HTML public test.
$ pytest -v tests/test_handcoded_html_public.py
Reach goals
Reach goals are optional. The autograder does not test them. A reach goal you complete stays in your submission and the autograder still passes, because it checks required behavior, not the absence of extras. Codegen is allowed here, but you are still responsible for every line you submit.
Style your hand-coded HTML with CSS
The validator and public test check your HTML, not its appearance, so styling is optional. As a reach goal, fill in handcoded_html/css/style.css and link it from your pages with an absolute path. This is your first taste of styling static pages, and the CSS reach goal carries forward to the templated site and on to Project 2 and Project 3.
Submit
You may want to submit to the autograder after completing just the hand-coded part to check your progress. The command below prepares a submission tarball containing everything you’ve worked on up to this point. Include the --disable-copyfile flag only on macOS.
$ tar \
  --disable-copyfile \
  -czvf submit.tar.gz \
  handcoded_html
Full submission instructions are in the Submitting and grading section of this spec.
Static site generator
In this section, you’ll implement a command line program, chat485generator, that creates web pages from templates. The inputs to chat485generator are templated HTML files and data in JSON format. The output is HTML files.
The generator works in three steps:
- Read the configuration file (e.g.,
hello/config.json). - Render each template to the output directory.
- Copy the static directory.
New to Python? The Python 3 Tutorial will help you get started.
Setup
Our program will be called chat485generator. The following steps will help you create a Python package in your project directory. (More info in the Python documentation on modules, especially the section on packages.)
$ mkdir chat485generator/
All packages must have an __init__.py file. Our starter package is simple, so it won’t do anything. Create the file chat485generator/__init__.py (be sure to include the two underscores before and after init) and add a comment like this to it:
"""A static site generator."""
Now, within the chat485generator directory, create a new file called __main__.py. Our main function will go in chat485generator/__main__.py. We have given you the skeleton code below.
"""Build static HTML site from directory of HTML templates and plain files."""


def main():
    """Top level command line interface."""
    print("Hello world!")


if __name__ == "__main__":
    main()
Now, try running it:
$ python3 chat485generator/__main__.py
Hello world!
The pyproject.toml file provided with the starter files describes how your package should be installed. It also includes linter configuration.
Install the chat485generator package using pip. We’ll install in editable mode so that we won’t have to reinstall when we make changes to our Python source code. Be sure that your virtual environment is active.
$ echo $VIRTUAL_ENV
/Users/awdeorio/src/eecs485/p1-chat485-static/env
$ pip install -r requirements.txt
$ pip install -e .
Because of the entry point in pyproject.toml (chat485generator = chat485generator.__main__:main), there’s now an executable that calls our chat485generator package’s main() function.
$ chat485generator
Hello world!
Now you can continue developing chat485generator by adding code to chat485generator/__main__.py. You’re welcome to add more files to the chat485generator package directory to organize your source code.
Lint early and often. As you write code, fix style problems automatically.
$ ruff check --fix chat485generator
$ ruff format chat485generator
Arguments and options
The chat485generator command line utility supports the following options.
$ chat485generator --help
Usage: chat485generator [OPTIONS] INPUT_DIR

  Templated static website generator.

Options:
  -o, --output PATH  Output directory.
  -v, --verbose      Print more output.
  --help             Show this message and exit.
The --help output is auto-generated by Click. You’ll define what --output and --verbose do later in the Output directory and Verbose sections; here you set up Click to parse them.
We’ll help get you started with this code snippet. Open __main__.py and add this to your main() function.
@click.command()
@click.argument("input_dir", nargs=1, type=click.Path(exists=True))
def main(input_dir):
    input_dir = pathlib.Path(input_dir)
    print(f"DEBUG input_dir={input_dir}")
GenAI pro-tip: Use GenAI to learn how the Click library handles arguments and options, then write the parsing code yourself. Use click.Path() for the input and output directories.
I am a student learning the Python Click library. My command already takes an
input_dirargument. How do I add an optional-o/--outputdirectory and a-v/--verboseflag, and how doesclick.Path()check that a path exists?
When your --help output exactly matches the example above, you’ve configured Click correctly.
Click automatically generates error messages.
$ chat485generator
Usage: chat485generator [OPTIONS] INPUT_DIR
Try 'chat485generator --help' for help.

Error: Missing argument 'INPUT_DIR'.
Render templates
This breaks down into a few steps, each covered below:
- Read the configuration file (e.g.,
hello/config.json). - For each entry, render its template with the entry’s context.
- Write each rendered template to the output directory (e.g.,
generated_html/index.html).
Read configuration file
Read the configuration file config.json in the input directory using the JSON library.
The input directory contains a configuration file config.json, a templates/ directory, and an optional static/ directory. We’ve provided a hello/ example input directory.
$ tree hello/
hello
├── config.json
└── templates
    └── index.html
A configuration file (e.g., hello/config.json) is a JSON string with a list of dictionaries. Each dictionary contains a url, the name of a template file, and a context dictionary. The template file is rendered using the context dictionary.
[
    {
        "url": "/",
        "template": "index.html",
        "context": {
            "words": [
                "hello",
                "world"
            ]
        }
    }
]
GenAI pro-tip: Reading config.json involves two new ideas: opening a file with a context manager (the with statement, which guarantees the file is closed), and json.load(), which turns the file into Python lists and dictionaries. Ask a chat about both before you write the parsing yourself.
I am a student learning Python. I want to read a JSON config file like this:
[
    {
        "url": "/",
        "template": "index.html",
        "context": {
            "words": [
                "hello",
                "world"
            ]
        }
    }
]
Two questions. First, why is it best practice to open the file with a
withstatement (a context manager) instead of callingopen()andclose()myself? Second, afterjson.load()parses it, what Python types do I get back, and how do I index into the result to reach the list of words inside the first entry’scontext? Please explain the concepts rather than write my code.
Render a template
For each configuration in the list read from config.json, render a template. Our hello example contains one configuration, whose context is:
{'words': ['hello', 'world']}
Read the template file, for example hello/templates/index.html.
<!DOCTYPE html>
<html lang="en">
<head><title>Hello world</title></head>
<body>
{% for word in words %}
{{word}}
{% endfor %}
</body>
</html>
Render the template with the context using the Jinja2 library.
We’d like to save you a bit of frustration getting the jinja2 library working the same way our instructor solution works. First, in order to make template inheritance work correctly, you’ll need to use the FileSystemLoader. Second, we’re going to enable auto escaping for security reasons.
Here’s how we configured our template environment in our instructor solution:
template_env = jinja2.Environment(
    loader=jinja2.FileSystemLoader(str(template_dir)),
    autoescape=jinja2.select_autoescape(['html', 'xml']),
)
Write output
Write the rendered template output to a file called index.html in the output directory, in a subdirectory matching the url. In our hello example, the default output directory is generated_html and the corresponding output file is generated_html/index.html.
The output of a rendered template no longer contains any template code, for example generated_html/index.html.
<!DOCTYPE html>
<html lang="en">
<head><title>Hello world</title></head>
<body>

hello

world

</body>
</html>
The default output directory is generated_html. Create the output directory, exiting with an error message if the output directory already exists.
Pro-tip: Avoid string concatenation while computing an output filename. Use the pathlib library instead.
url = url.lstrip("/")  # remove leading slash
output_dir = pathlib.Path(output_dir)
output_path = output_dir/url/"index.html"
Testing
Serve up the newly created site and browse to http://localhost:8000/.
$ rm -rf generated_html
$ chat485generator hello
$ python3 -m http.server 8000 -d generated_html/
Serving HTTP on 0.0.0.0 port 8000 (http://0.0.0.0:8000/) ...
You should now pass the test_hello autograder testcase.
$ pytest -v tests/test_chat485generator_public.py::test_hello
Copy static/ directory
If the input directory contains a static/ subdirectory, copy the contents of the static/ directory to the output directory. Copy what’s inside static/, not the static/ directory itself.
GenAI pro-tip: Ask GenAI to explain the difference between shutil.copytree() and copying files one at a time, then write the copy code yourself.
The hello_css/ example input directory is provided with the starter files. It contains a static/ directory.
$ tree hello_css
hello_css
├── config.json
├── static
│   └── css
│       └── style.css
└── templates
    └── index.html
Build and list output files. Notice that everything inside hello_css/static/ was copied to generated_html/.
$ rm -rf generated_html
$ chat485generator hello_css
$ tree generated_html
generated_html
├── css
│   └── style.css
└── index.html
You should now pass the test_hello_css autograder testcase.
$ pytest -v tests/test_chat485generator_public.py::test_hello_css
Output directory
By default, render templates to generated_html. For example:
$ rm -rf generated_html
$ chat485generator hello
$ tree generated_html
generated_html
└── index.html
If the --output option is supplied, render templates directly to OUTPUT_DIR. For example:
$ chat485generator hello --output myout
$ tree myout/
myout/
└── index.html
Verbose
Here’s an example of the --verbose (-v) option with the hello input.
$ rm -rf generated_html
$ chat485generator hello --verbose
Rendered index.html -> generated_html/index.html
This example uses the hello_css input.
$ rm -rf generated_html
$ chat485generator -v hello_css
Rendered index.html -> generated_html/index.html
Copied hello_css/static -> generated_html
The verbose output prints one Rendered ... -> ... line for each rendered template, then one Copied ... -> ... line if a static/ directory was copied.
Error messages
Catch all FileNotFoundError exceptions, as well as any exception raised by the jinja or json libraries. You should also produce an error when the output directory already exists.
Print a sensible error message to stderr beginning with chat485generator error: and exit with a non-zero value. This message is optional when the input directory does not exist because you may let Click handle that error.
The instructor solution has Click handle the input directory check. Note that echo $? prints the exit code (return value) of the previous command.
$ chat485generator input-does-not-exist
Usage: chat485generator [OPTIONS] INPUT_DIR
Try 'chat485generator --help' for help.

Error: Invalid value for 'INPUT_DIR': Path 'input-does-not-exist' does not exist.
$ echo $?
2
$ chat485generator hello --output myout
$ chat485generator hello --output myout
chat485generator error: 'myout' already exists
$ echo $?
1
$ chat485generator input-missing-config
chat485generator error: 'input-missing-config/config.json' not found
$ echo $?
1
$ chat485generator input-invalid-json
chat485generator error: 'input-invalid-json/config.json'
Expecting value: line 12 column 1 (char 186)
$ echo $?
1
$ chat485generator input-invalid-template
chat485generator error: 'test.html'
Unexpected end of template. Jinja was looking for the following tags: 'endfor' or 'else'. The innermost block that needs to be closed is 'for'.
$ echo $?
1
$ chat485generator input-missing-templates
chat485generator error: 'input-missing-templates/templates' not found
$ echo $?
1
GenAI pro-tip: Ask GenAI how to find the top-level exception class for a library so you can catch it. For example, the JSON library exceptions are documented in the standard library.
Testing
Run the public autograder testcases on your chat485generator.
$ pytest -v tests/test_chat485generator_public.py
Pro-tip: Learn how to use the Python pytest unit test utility using the pytest Tutorial. When a test fails, the Python debugger pdb helps you investigate; learn it with the Python Debugging Tutorial.
Lint with ruff, which checks conformance to the PEP 8 Style Guide and PEP 257 Docstring Conventions. Do not add inline suppressions like # noqa; refactor the code instead.
$ ruff check chat485generator              # Report style and correctness problems
$ ruff check --fix chat485generator        # Fix lint errors automatically where possible
$ ruff format --check chat485generator     # Check formatting
$ ruff format chat485generator             # Fix formatting
You should now pass the style public tests.
$ pytest -v tests/test_style_public.py
Write your own tests
Write your own tests in tests/test_student.py. Each def test_... function is one test.
Model your tests on test_hello, the first test in tests/test_chat485generator_public.py. Because chat485generator is a command line program, test_hello:
- Copies the input directory
tests/testdata/hello/into a temp directory (pytest’stmp_pathfixture, apathlib.Path). See the pytesttmp_pathdocs. - Runs
chat485generator helloin that temp directory withsubprocess.run. - Asserts on the generated files.
When your test needs input files, write them in a new subdirectory of tests/testdata/, similar to the hello input directory. The name is up to you.
$ tree tests/testdata/hello
tests/testdata/hello
├── config.json
└── templates
    └── index.html
Copy the test input directory from tests/testdata/ to tmp_path, like test_hello. TESTDATA_DIR comes from tests/utils.py and is the path to tests/testdata/. Do not modify tests/utils.py.
from utils import TESTDATA_DIR


def test_hello(tmp_path):
    shutil.copytree(TESTDATA_DIR / "hello", tmp_path / "hello")
    ...
Run your tests the same way as the instructor-written tests:
$ pytest -v tests/test_student.py
Your tests are graded by mutation testing. Target distinct spec-mandated behavior the public tests do not already cover.
GenAI pro-tip: Ask a chat to explain how one of the instructor-written tests works before you write your own.
$ cat tests/test_chat485generator_public.py | pbcopy  # macOS
$ cat tests/test_chat485generator_public.py | clip.exe  # WSL
Walk me through how the
test_hellotest works. I am a student learning testing with pytest’stmp_pathfixture and Python’ssubprocessmodule. Help me understand, do not write tests for me.[paste test]
Submit
You may want to submit to the autograder after completing the static site generator to check your progress. The command below prepares a submission tarball containing everything you’ve worked on up to this point. Include the --disable-copyfile flag only on macOS.
$ tar \
  --disable-copyfile \
  --exclude '*__pycache__*' \
  --exclude 'generated_html' \
  -czvf submit.tar.gz \
  handcoded_html \
  chat485generator \
  tests/test_student.py \
  tests/testdata
Full submission instructions are in the Submitting and grading section of this spec.
Exam skill: Explain static versus dynamic page generation, without AI assistance.
This project generates each HTML page once, at build time. Project 2 will render pages per request on a server. Explain the difference, why build-time generation makes pages fast to serve and easy to cache, and the limitation that forces some sites to render on a server instead.
Write your explanation first, then paste it into a chat for feedback.
You are an exam tutor. I’m studying for a closed-book EECS 485 exam where I can’t use AI, so do not answer the question for me, and do not reveal the answer even if I ask; give a hint instead. Tell me whether my explanation is correct and point me toward any mistake, then give me one follow-up question to try.
Question: [paste]
My explanation: [paste]
Static templated Chat485
In this part of the project, you will write HTML template files that you render using chat485generator to create a non-interactive Chat485 clone. First, this section helps you create skeleton files and helper scripts. Then, in the Pages section, we describe each page in detail.
Create the templates directory and blank template files.
$ mkdir -p chat485/templates/
$ touch chat485/templates/index.html
$ touch chat485/templates/conversation.html
Your chat485 directory should look like this. config.json is from the starter files. The static/ directory is optional, so you may not have a logo or CSS yet; styling is a reach goal. The example below includes a logo.png so you can see chat485generator copy it.
$ tree chat485
chat485
├── config.json
├── static
│   └── images
│       └── logo.png
└── templates
    ├── conversation.html
    └── index.html
Run chat485generator with chat485_html as the output directory, then start a development server. At this point the templates are blank, so the pages will be blank too.
$ rm -rf chat485_html  # remove output directory, if it exists
$ chat485generator chat485 -v -o chat485_html
Rendered index.html -> chat485_html/index.html
Rendered conversation.html -> chat485_html/conversations/a1b2c3d4-e5f6-7890-abcd-ef1234567890/index.html
Rendered conversation.html -> chat485_html/conversations/c3d4e5f6-a7b8-9012-cdef-123456789012/index.html
Copied chat485/static -> chat485_html
$ python3 -m http.server 8000 -d chat485_html/
Serving HTTP on 0.0.0.0 port 8000 (http://0.0.0.0:8000/) ...
Utility scripts
Web developers often use short shell scripts to make their lives easier. First, complete the Shell Scripting Tutorial.
chat485run script
Write a shell script bin/chat485run (no file extension) that:
- Stops on errors and prints commands.
- Cleans up the
chat485_htmloutput directory withrm -rf chat485_html. - Builds the static site with
chat485generator chat485 -o chat485_html. - Starts a development server with
python3 -m http.server 8000 -d chat485_html.
Check for shell script pitfalls.
chat485test script
Write another script called bin/chat485test that:
- Stops on errors and prints commands.
- Lints
chat485generatorwithruff check chat485generatorandruff format --check chat485generator. - Runs all unit tests using
pytest -v tests. - Cleans up a previous
chat485_htmldirectory. - Builds a new
chat485_htmldirectory usingchat485generator. - Validates hand-coded HTML in
handcoded_html/usinghtml5validator --ignore JAVA_TOOL_OPTIONS --root handcoded_html. - Validates generated HTML in
chat485_html/usinghtml5validator --ignore JAVA_TOOL_OPTIONS --root chat485_html.
You should now have a bin directory with two scripts.
$ tree bin/
bin/
├── chat485run
└── chat485test
Check your files
Here’s a list of project files up to this point, excluding automatically generated files like env and __pycache__.
$ tree -I 'env|__pycache__|*.egg-info'
.
├── bin
│   ├── chat485run
│   └── chat485test
├── chat485
│   ├── config.json
│   ├── static
│   │   └── images
│   │       └── logo.png
│   └── templates
│       ├── conversation.html
│       └── index.html
├── chat485generator
│   ├── __init__.py
│   └── __main__.py
├── handcoded_html
│   ├── conversations
│   │   └── a1b2c3d4-e5f6-7890-abcd-ef1234567890
│   │       └── index.html
│   ├── css
│   │   └── style.css
│   ├── images
│   │   └── logo.png
│   └── index.html
├── hello
│   ...
├── hello_css
│   ...
├── pyproject.toml
├── requirements.txt
└── tests
    ...
Pages
Now, write templates for each URL. You are welcome to add extra files and use template inheritance. Style the pages any way you like. Styling is optional and a reach goal.
GenAI pro-tip: Ask a chat about approaches to sharing a common layout across Jinja templates, then write the templates yourself.
I am a student learning Jinja. Both of my pages share the same sidebar. What are the common approaches to sharing a layout across templates, such as template inheritance with a base template, and which is most idiomatic? Please explain the approaches rather than write my templates.
The list of URLs and templates:
/->index.html/conversations/a1b2c3d4-e5f6-7890-abcd-ef1234567890/->conversation.html(“Hello World”, 6 messages)/conversations/c3d4e5f6-a7b8-9012-cdef-123456789012/->conversation.html(“Visiting Ann Arbor”, 60 messages)
Inspect chat485/config.json to see the context each page receives, the same way you read hello/config.json earlier. The output below is truncated.
$ python3 -m json.tool chat485/config.json
[
    {
        "url": "/",
        "template": "index.html",
        "context": {
            "user": {
                "fullname": "Andrew DeOrio"
            },
            "models": [
                "echo-1",
                ...
            ],
            "conversations": [
                {
                    "uuid": "a1b2c3d4-e5f6-7890-abcd-ef1234567890",
                    "title": "Hello World"
                },
                ...
            ]
        }
    },
    {
        "url": "/conversations/a1b2c3d4-e5f6-7890-abcd-ef1234567890/",
        "template": "conversation.html",
        "context": {
            "user": {...},
            "conversations": [...],
            "current_uuid": "a1b2c3d4-e5f6-7890-abcd-ef1234567890",
            "conversation": {
                "uuid": "a1b2c3d4-e5f6-7890-abcd-ef1234567890",
                "title": "Hello World"
            },
            "show_older": false,
            "messages": [
                {
                    "role": "user",
                    "content": "Hello"
                },
                ...
            ]
        }
    },
    ...
]
All pages
Every page shows the sidebar:
- Include
<title>Chat485</title>. Nothing else should be in the<title>section. - A link to
/. If you choose not to include a logo, include some text to make sure this link is clickable. - A “New chat” button. It submits nowhere in the static site.
- The list of conversations, each linking to
/conversations/<uuid>/and showing its title. On a conversation page, mark the conversation being viewed by addingaria-current="page"to its sidebar link. The home page marks no conversation. Styling the marked conversation is optional (see Reach goals). - The logged-in user’s full name.
Home page
/
The home page renders index.html. In the main area, show the welcome message “Select a conversation or new chat”.
Conversation detail
/conversations/<uuid>/
A conversation page renders conversation.html. In the main area:
- Show a “Load older messages” link at the top of the transcript for a conversation that has older messages to load. In Project 2 this link loads older messages; the static site has no older page to load, so the link is cosmetic. The “Visiting Ann Arbor” conversation shows this link; “Hello World” does not.
- Show every message, oldest first.
- Show a message input area with a “Send” button and a model picker, a dropdown (
<select>) listing the models. Each model is an<option>whosevalueis the model id.echo-1is always present, listed first, and selected by default. The button submits nowhere and selecting a model does nothing; both are inert in the static site. Project 2 wires them up.
Testing
Run the public autograder testcases on your chat485 templates.
$ pytest -v tests/test_template_html_public.py
Reach goals
Reach goals are optional. The autograder does not test them. A reach goal you complete stays in your submission and the autograder still passes, because it checks required behavior, not the absence of extras. Reach goals are the place to practice driving an agentic GenAI tool (Claude Code, Cursor, GitHub Copilot agent mode, etc.); codegen is allowed here, but you are still responsible for every line you submit. Reach goals carry forward across the Chat485 project sequence.
Style your pages with CSS
Create chat485/static/css/style.css and style the pages your own way. You can also add a logo at chat485/static/images/logo.png and link it from your templates. This reach goal originates here in Project 1, where you first style static pages, and carries forward to Project 2 and Project 3.
Add your own conversation
Add a new conversation to chat485/config.json with its own uuid, title, and messages, then re-run chat485generator and watch it appear in the sidebar and as its own page. Keep the seed conversations so the autograder still passes; extra conversations are welcome.
Exam skill: Write a Jinja2 template without AI assistance.
Given this context, write a template that renders the sidebar. Output a <ul> with one <li> holding each conversation’s title, or the single line <p>No conversations yet</p> when the list is empty.
{'conversations': [{'title': 'Hello World'}, {'title': 'Visiting Ann Arbor'}]}
Write your answer first, then paste it into a chat for feedback.
You are an exam tutor. I’m studying for a closed-book EECS 485 exam where I can’t use AI, so do not write or correct code for me, and do not reveal the answer even if I ask; give a hint instead. Tell me whether my answer is correct and point me toward any mistake, then give me one follow-up question to try.
Question: [paste]
My answer: [paste]
Submitting and grading
Run the published autograder test cases locally.
$ pytest -v
Submit a tarball to the autograder. Include the --disable-copyfile flag only on macOS.
$ tar \
  --disable-copyfile \
  --exclude '*__pycache__*' \
  --exclude 'chat485_html' \
  --exclude 'generated_html' \
  -czvf submit.tar.gz \
  bin \
  handcoded_html \
  chat485 \
  chat485generator \
  tests/test_student.py \
  tests/testdata
The autograder will run pip install -e YOUR_SOLUTION. The exact library versions in the requirements.txt provided with the starter files are cached on the autograder, so be sure not to add extra library dependencies to requirements.txt or pyproject.toml.
Avoid adding any large files to the tarball. The autograder may throw an error if the size of the tarball is greater than 5MB. Use the following command to verify the size of the tarball.
$ du -h submit.tar.gz
Direct link to the Fall 2026 Project 1 autograder: https://autograder.io/web/project/3969
Mutation testing
We autograde the tests you write in tests/test_student.py. See Write your own tests for the file and run command.
A suite must run within the autograder’s time limit and contain 10 or fewer test_ functions.
To grade your tests, we use a set of intentionally buggy instructor solutions called mutants. You earn points for catching the bugs.
- We rebuild the app with the correct solution and run your tests.
- Tests that pass are valid.
- Tests that fail are invalid; they falsely report a bug and earn no credit.
- We run your valid tests against each buggy solution (mutant).
- If any of your tests fails, you caught the bug.
- You earn points for each mutant you catch.
Acknowledgments
Original project written by Andrew DeOrio awdeorio@umich.edu, 2026. Based on Insta485 written by Andrew DeOrio, 2017.
This document is licensed under a Creative Commons Attribution-NonCommercial 4.0 License.